How to Install a Hot Water Circulating Pump: Step-by-Step Guide for Homeowners
To install a hot water circulating pump and achieve near-instant hot water, follow these key steps: First, identify the locations for your heater and return lines. Next, select the suitable pump type and ensure compatibility with your existing electrical and plumbing systems. After shutting off power and water, mount the pump in the correct orientation, install the necessary shutoff, check, and bypass valves. Then, connect the wiring and controls, refill the system, purge any air, and test for leaks and proper flow. Additional guidance will cover controls, troubleshooting tips, and important code considerations.
What a Hot Water Circulating Pump Does and Why You Might Need One
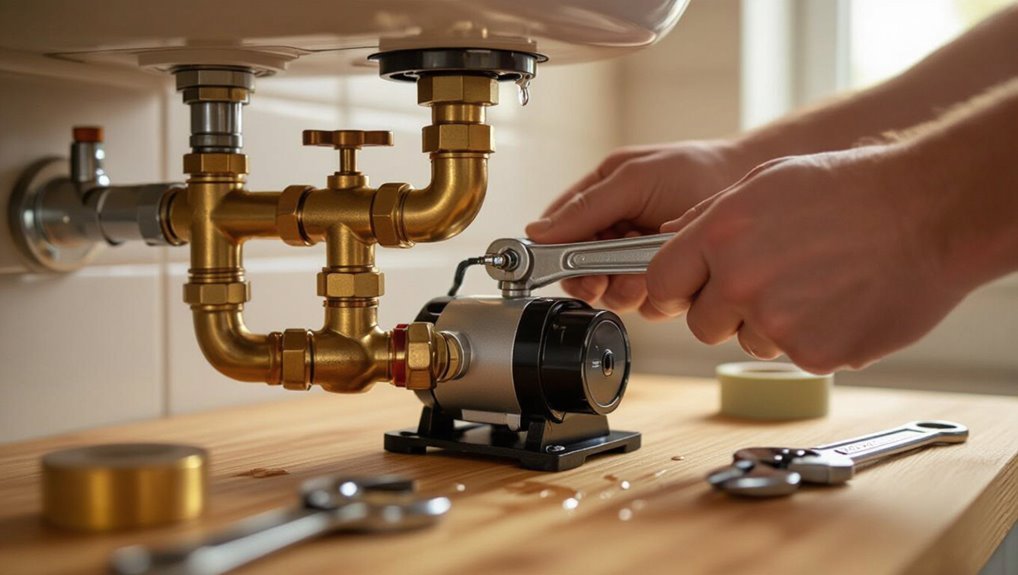
A hot water circulating pump continuously moves water through the domestic hot water loop so potable hot water is available at fixtures with minimal delay.
This reduces wait time at taps, cuts wasted water and can improve overall system efficiency when properly controlled.
It is most beneficial in larger homes, long-run plumbing layouts, or where convenience and water savings justify the added installation and operating cost, but may be unnecessary for compact systems with short pipe runs.
How a circulating pump works in a domestic hot water system
Circulating pumps move hot water through a home’s plumbing loop so heated water is readily available at fixtures without long waits.
The pump continuously or periodically pushes water from the water heater through return lines, maintaining temperature.
Controls like timers, thermostats, or demand buttons modulate operation.
Instructions on how to install circulating pump for hot water focus on placement, wiring, check valves, and safe connections.
Benefits for comfort, water savings, and energy efficiency
Because hot water is kept moving through the pipes, a circulating pump delivers near-instantaneous hot water at fixtures, improving comfort by eliminating long waits and the shock of cold taps.
It reduces water waste by avoiding prolonged faucet running, lowers household water heating demand, and can cut energy use when paired with timers, thermostats, or demand controls that minimize pump run time while preserving convenience.
Situations where a pump is recommended versus unnecessary
Those advantages lead to a practical question: when is installing a hot water circulating pump justified versus unnecessary.
Recommended for large or multi-story homes, long piping runs, distant bathrooms, or when wait times and wasted water are significant.
Unnecessary for compact layouts, instant-heating fixtures, or where water/energy costs and installation complexity outweigh benefits.
Consider plumbing layout, usage patterns, and cost-benefit analysis.
Types of Hot Water Circulating Pumps and Components
The discussion now turns to common pump types and the components that determine performance and compatibility.
It contrasts inline pumps with dedicated loop units, explains control methods such as timer, demand-activated, and thermostatic operation, and lists essential parts and sizing considerations.
Proper selection balances pump body, check and bypass valves, controls (timer/sensor), and matching flow rate to the system.
- Inline vs. dedicated loop pumps and where each is appropriate
- Timer-controlled, demand-activated, and thermostatic control options
- Key components: pump body, check valve, bypass valve, timer, and sensor
- Matching pump size and flow rate to the plumbing and boiler capacity
Inline pumps vs. dedicated loop pumps
When choosing a hot water circulator, homeowners and installers must weigh the differences between inline pumps and dedicated loop pumps, as each design suits distinct plumbing layouts and performance needs.
Inline pumps install directly in supply lines, simplifying retrofit work and reducing install cost.
Dedicated loop pumps require a return loop, provide faster consistent hot water and lower flow resistance, but need more plumbing.
Timer-controlled, demand-activated, and thermostatic pumps
Although differing in control strategy and complexity, timer-controlled, demand-activated, and thermostatic circulator pumps each aim to balance comfort with energy use by regulating when and how hot water is moved through a system.
Timer units run on schedules, demand models activate via button or motion, and thermostatic types respond to temperature thresholds, offering progressively finer control over circulation and reduced standby losses.
Key components: pump body, check valve, bypass valve, check valve, timer, sensor
A typical hot water circulating system comprises several essential components that work together to maintain steady flow and prevent unwanted heat loss.
The pump body circulates fluid; check valves prevent backflow; a bypass valve balances pressure and allows controlled return flow.
A timer or demand controller schedules operation, while a temperature sensor triggers or limits runs to maintain setpoint and efficiency.
Matching pump size and flow rate to your system
Select a pump that matches the system’s required flow rate and head pressure to guarantee efficient circulation and prevent premature wear.
The installer calculates required gallons per minute and total dynamic head, then selects pump curves meeting those values.
Oversized pumps waste energy and cause noise; undersized pumps starve fixtures.
Consider variable-speed models for fine tuning and seasonal demand adjustments.
Tools, Materials, and Safety Equipment Needed
The installation requires a concise set of plumbing and electrical tools, appropriate materials for the pump and piping, and proper safety equipment to control hazards.
Essential items include wrenches, pipe cutters, soldering or tubing tools, wiring and connectors, plus fittings, valves, insulation, and sealants.
Before work begins, verify shutoffs, lockout/tagout procedures, and personal protective equipment are in place.
- Plumbing tools: wrenches, pipe cutters, soldering/tubing tools
- Electrical tools & materials: wire, connectors, circuit protection
- Materials: pump, fittings, valves, insulation, Teflon/sealant
- Safety gear & precautions: shutoffs, lockout, PPE
Plumbing tools (wrenches, pipe cutters, soldering/tubing tools)
Gathering the right plumbing tools guarantees a smooth, safe installation of a hot water circulating pump. Essential items include adjustable and basin wrenches, pipe cutters for copper or PEX, tubing benders, deburring tools, and soldering or brazing kits with flux and torch for copper systems.
Thread sealant, pipe joint compound, and replacement fittings complete the plumbing toolkit for reliable connections and leak-free performance.
Electrical tools and materials (wire, connectors, circuit protection)
After completing the plumbing prep, attention turns to the electrical tools and materials needed to power and protect the circulating pump.
Required items include appropriately gauged THHN/romex wire, wire strippers, screwdrivers, cable clamps, waterproof connectors or wire nuts, a junction box, and a dedicated circuit breaker or fused switch per local code.
A multimeter and voltage tester verify safe installation and circuit protection.
Materials: pump, fittings, valves, insulation, Teflon/sealant
A compact circulating pump sized for the home’s flow rate and head loss forms the project’s core, accompanied by fittings, valves, insulation, and thread sealant selected for compatibility with the existing plumbing and local codes.
Necessary materials include compatible unions or sweat fittings, isolation and check valves, heat-resistant insulation, PTFE tape or pipe compound, and mounting hardware sized to the pump and pipework.
Safety gear and precautions (shutoffs, lockout, PPE)
Several essential safety measures must be taken before beginning pump installation: isolate the water supply, de-energize and lock out electrical circuits feeding the pump, and don appropriate personal protective equipment.
Confirm valve positions, drain lines, and relieve pressure. Use lockout/tagout devices, insulated tools, gloves, eye protection, and hearing protection if needed.
Verify absence of voltage and test for leaks after energizing.
Pre-Installation Checklist: Assessing Your Home System
Before beginning the installation, the installer should identify the water heater, return line, and ideal pump location to guarantee efficient flow and easy access.
They must confirm pipe material and diameter match pump fittings and that the home’s electrical supply and circuit capacity meet the pump’s requirements.
Finally, applicable permits and local code requirements should be verified to avoid compliance issues.
Locating the water heater, return line, and best pump placement
Locate the water heater, trace the return line, and identify accessible piping runs to determine the best pump placement.
The installer notes water heater outlet and return connections, follows the loop or dedicated return line to find a convenient junction, and seeks a flat, supported spot near electrical access.
Prioritize minimal plumbing changes, easy service access, and proximity to thermostat or timer controls.
Checking pipe material and size compatibility
When evaluating compatibility, the installer verifies pipe material and diameter to guarantee the circulating pump and fittings match the existing system.
Copper, PEX, CPVC and steel require specific adapters and clamping methods. Wall thickness and nominal size affect flow and pump selection.
Threaded versus soldered or press connections determine fitting types. Accurate measurement prevents leaks, flow restriction, and premature equipment failure.
Verifying electrical supply and circuit capacity
Any installer should confirm the home’s electrical supply and circuit capacity to assure the circulating pump can be powered safely and reliably.
Inspect voltage (120V/240V) and available breakers, verify circuit amperage matches pump nameplate, and ascertain wiring gauge and conduit meet load.
Check for spare dedicated circuit or capacity to add one without overloading panel.
Document findings before purchasing equipment.
Permits and code considerations to check before starting
After confirming electrical supply and circuit capacity, the installer should review local permitting and code requirements to assure the pump installation meets legal and safety standards.
Verify whether a plumbing or electrical permit is required, confirm setback and venting rules, ascertain compliance with backflow prevention and pressure regulations, and consult utility or municipal inspectors.
Retain documentation and obtain approvals before work begins.
Step-by-Step Installation Guide
The installation proceeds methodically through five essential actions: cut power and water and drain the circuit as needed, select pump orientation and prepare the pipe section, and fit any required valves and bypass loop.
Next, the pump is mounted and connected to the piping using the appropriate joint type—sweat, threaded, or push-fit.
Finally, check valves and a temperature sensor or switch are installed to guarantee correct flow direction and control.
Step 1 Turn off power and water; drain system as needed
Begin by cutting power to the boiler and any pump circuits at the breaker panel, and shutting off the main water supply to the heating system; this prevents electrical hazard and limits water loss during work.
Verify absence of voltage with a tester.
Close zone valves as needed, open a drain or bleed valves to relieve pressure, and collect discharged water into a bucket or hose.
Step 2 Choose mounting orientation and prepare the pipe section
When deciding pump orientation, consider flow direction, access for wiring and service, and clearance for mounting hardware; the pump’s arrow must align with system flow and the motor shaft should be horizontal unless the manufacturer specifies otherwise.
Mark and measure the pipe section to remove, allow enough straight run for connections, support the pump location, and deburr cut pipe ends.
Step 3 Install necessary valves and bypass loop (if required)
Install valves and any required bypass loop before cutting pipe to maintain system control and prevent draining more water than necessary.
The installer fits isolation valves on both pump connections and a check valve to prevent reverse flow.
If the system needs continuous circulation without overloading the boiler, a bypass loop with an adjustable balancing valve is added.
Tighten fittings and test for leaks.
Step 4 Mount and connect the pump to the piping (sweat, threaded, or push-fit)
With isolation and check valves in place and any bypass loop secured, the installer positions the circulating pump so its arrow of flow aligns with the system’s direction and the motor shaft is horizontal if the manufacturer specifies.
The pump is mounted to a bracket or wall, connections made using sweat, threaded, or push-fit fittings. Joints sealed, torqued to spec, and the assembly supported to prevent stress.
Step 5 Install check valve(s) and temperature sensor or switch
Begin by confirming the pump and bypass are isolated.
Then position and secure the check valve(s) in the return line(s) so they permit only designated circulation and prevent backflow.
Next, mount the temperature sensor or switch at the manufacturer-recommended location—typically on the hot water supply or return near the pump—ensuring good thermal contact, proper orientation, and cable routing for service access and code compliance.
Step 6 Make electrical connections: wiring the pump, timer, or controller
Next, power and control wiring are completed to connect the circulating pump, timer, and any controller to the building electrical and control circuits.
The installer isolates power, follows wiring diagrams, grounds equipment, and sizes conductors and breakers per pump nameplate and local code.
Timers or controllers are wired to the pump relay or contactor, and waterproof connectors and strain reliefs are used.
Step 7 Refill, purge air, and check for leaks
The installer fills the system slowly, opening the supply valve and admitting water until the boiler and all branch lines reach normal operating level.
Then, vents trapped air at high points, purge valves, and air separators until steady, bubble-free flow is observed.
Pressures are adjusted to specification, expansion tank charged, and all fittings, unions, and pump seals are inspected.
Any leaks are tightened and rechecked.
Step 8 Configure controls: timers, sensors, or demand switches
Set up the pump controls by choosing the appropriate timing and activation method—timer, temperature sensor, or demand switch—and wiring it according to manufacturer instructions and local code.
Program schedules or adjust sensor thresholds to match household hot-water patterns.
Install any required relays, mounting hardware, and weatherproofing.
Verify correct electrical connections and secure wiring; label controls for future reference.
Step 9 Final test run: flow, temperature, noise, and leak inspection
Begin the final test run by powering the circulating pump and opening the nearest hot-water faucet to create flow; observe system response for at least 10–15 minutes to stabilize temperatures and pressures.
Monitor flow rate and verify hot-water arrival times, check outlet temperature consistency, listen for unusual vibration or cavitation, and inspect all joints and valves for leaks.
Document findings and address issues promptly.
How to Size and Select the Right Pump
Selecting the correct circulating pump begins with calculating the required flow rate and total head pressure for the system.
The chosen pump must then be matched to the plumbing layout—pipe lengths, fittings, and fixtures—to guarantee adequate performance.
Finally, energy efficiency ratings and projected operating costs should be compared to balance upfront expense with long-term savings.
Calculating required flow rate and head pressure
Determining the correct pump starts with calculating the system’s required flow rate and total head pressure: the flow rate guarantees adequate heat delivery to fixtures and returns, while head pressure accounts for friction losses, vertical lifts, and fittings.
Calculate flow from fixture demand and desired temperature drop (GPM), then sum static lift plus friction loss to obtain total dynamic head (feet) for pump selection.
Matching pump specifications to pipe length, fittings, and fixtures
Once the required flow rate and total dynamic head are known, the next step is to match pump curves and specifications to the actual piping layout—length, diameter, number and type of fittings, and fixture locations—to guarantee the installed pump can deliver the calculated GPM against the real-world head losses.
Verify pump curve intersects required GPM at or above calculated head, account for future additions, and select compatible connection sizes and materials.
Energy efficiency ratings and expected operating costs
When evaluating pumps, attention to energy efficiency ratings and projected operating costs is essential because a modest increase in upfront price can be offset by substantially lower electricity use over the pump’s lifetime.
Homeowners should compare wattage, variable-speed capability, and ENERGY STAR or equivalent certifications.
Estimate annual kWh based on duty cycle and local rates to calculate payback period and total lifecycle cost before purchasing.
Installation Variations and Specific Scenarios
The following section outlines common variations and specific scenarios installers encounter when fitting a hot water circulating pump.
It covers gravity-fed and multi-zone systems, retrofit solutions for homes without a dedicated return line, and considerations for pairing pumps with tankless water heaters.
Material-specific installation notes for copper, PEX, and CPVC piping are also highlighted.
Installing on gravity-fed or multi-zone systems
Installers must account for the unique hydraulic characteristics of gravity-fed and multi-zone hot water systems, since these configurations influence pump placement, flow paths, and control strategies.
Gravity systems often require pump placement below the header and check valves to maintain natural circulation.
Multi-zone installations demand zone valves, bypasses, and pump sizing matched to combined head losses to prevent flow imbalance and short-cycling.
Retrofit installation for existing homes without a return line
Many existing homes lack a dedicated hot-water return line, requiring a retrofit approach that combines minimal plumbing changes with strategic pump placement to create an effective recirculation loop.
Typical solutions include installing a pump at the water heater with a thermostatic crossover valve at the furthest fixture, using existing cold pipes as temporary returns, and adding check valves and timer or sensor controls for efficiency and comfort.
Integration with tankless water heaters
When integrating a hot water recirculation system with a tankless water heater, special attention must be paid to flow activation, minimum return temperatures, and pump location to avoid unwanted cycling or cold-water bypasses.
Configure sensors or thermostatic controls to respect the unit’s minimum flow and inlet temperature.
Use check valves and dedicated return routing to prevent short cycling, and follow manufacturer recommendations for bypass valves and warranties.
Installing on copper, PEX, or CPVC piping
Different pipe materials require distinct fittings, strap methods, and heat-management practices that affect pump placement and connection.
For copper, use soldered or press adapters and secure with metal straps; allow thermal expansion.
For PEX, employ crimp or push-fit fittings and insulated clamps to prevent movement.
For CPVC, use solvent-weld joints and avoid excessive heat from pump motors; follow manufacturer torque and support spacing.
Common Problems After Installation and How to Troubleshoot
After installation, several recurring issues can affect a hot water circulating pump and require prompt troubleshooting.
Common faults include electrical failures or a pump that won’t run, airlocks, excessive noise or vibration, slow hot-water delivery from poor return flow, and leaks or failing seals.
The following section outlines diagnostic checks and targeted fixes for each problem.
Pump not running or electrical issues
Diagnose electrical faults methodically if the circulating pump fails to run, since most stoppages stem from power, wiring, or control issues.
Verify breaker, fuse, and switch positions, confirm voltage at the pump, and inspect wiring connections for loose or corroded terminals.
Test the pump motor with a multimeter, check relay/timer programming, and replace a faulty control or motor as indicated.
Airlocks, noisy pump, or vibration problems
Bleed the system and inspect pump mounting when airlocks, excessive noise, or vibration arise, because trapped air and poor installation are the most common culprits.
Release air at high points, use the pump’s bleed screw, and cycle power briefly.
Verify flexible mounts, tighten loose fasteners, and guarantee pipe supports prevent resonance.
Replace damaged bearings or misaligned couplings if noise persists.
Inadequate hot water return or slow hot-water delivery
Once air and mounting issues have been ruled out, attention shifts to inadequate hot-water return or slow delivery, which typically stems from flow restrictions, incorrect pump sizing or control settings, or piping layout problems.
Technicians should check valve positions, clear debris or clogged strainers, verify pump curve versus system head, confirm correct timer/thermostat settings, and inspect bypasses or long, undersized runs for excessive pressure loss.
Leaks, dripping fittings, or seal failures
Inspect leaks and dripping fittings promptly, as they are the most common post-installation issues and can indicate poor sealing, improper torque, or incompatible materials.
The installer should tighten fittings to specified torque, replace damaged seals or PTFE tape, and verify correct gasket materials for temperatures and chemicals.
Recheck after system pressurization and thermal cycling; persistent leaks require component replacement or professional assessment.
Maintenance Schedule and Long-Term Care
A concise maintenance schedule helps guarantee the circulating pump’s reliability and efficiency over time.
Monthly and annual inspection checklists should cover leaks, electrical connections, bearing play, and flow performance, with routine cleaning, lubrication, and replacement of worn seals or impellers as needed.
Clear criteria for professional servicing or full pump replacement—such as persistent noise, reduced flow despite maintenance, or frequent failures—should be established and followed.
Regular inspection checklist (monthly, yearly)
Routine vigilance preserves pump performance and prevents small issues from becoming costly failures.
Inspect mounting and vibration isolation monthly, verify electrical connections and timer settings, check for unusual noise or leaks, and confirm correct flow.
Annually, review system pressure, validate check valve and thermostat operation, examine insulation integrity, and schedule professional diagnostic testing.
Document findings and corrective actions for trend tracking.
Cleaning, lubrication, and replacing worn parts
Following the monthly and annual checks, attention shifts to cleaning, lubrication, and replacing worn parts to maintain pump reliability and extend service life.
Exterior debris and sediment should be removed, strainers cleared, and seals inspected.
Motor bearings require manufacturer-specified lubricant intervals.
Worn impellers, gaskets, or electrical connectors must be swapped promptly using compatible parts to prevent leaks and mechanical failure.
When to service or replace the pump
When service or replacement becomes necessary depends on usage patterns, system water quality, and manufacturer guidance; operators should track runtime hours, noise changes, reduced flow, and recurrent leaks as primary indicators.
Routine inspection every 6–12 months, prompt seal or impeller replacement when performance drops, and full pump replacement after persistent failures or exceeding expected service life (typically 5–15 years) guarantee reliability and efficiency.
Safety, Codes, and When to Call a Professional
Before beginning work, local electrical and plumbing code requirements should be verified to guarantee proper wiring, grounding, permits, and relief valve arrangements.
Improper installation can create electrical shock, leaks, water damage, or legal liability for noncompliance.
A licensed plumber or electrician should be called if wiring or pipe modifications are required, if there is any uncertainty about codes, or if persistent leaks or electrical faults appear.
Electrical and plumbing code requirements to verify
Although a circulating pump is a relatively small appliance, compliance with local electrical and plumbing codes is essential to guarantee safety and legal installation.
Installers must confirm circuit capacity, grounding, GFCI/AFCI protection, and conduit or wiring methods meet jurisdictional requirements, while plumbing checks should verify pressure ratings, backflow prevention, shutoff valves, and correct pipe materials and fittings.
Inspectors may require permits, labeling, and accessible disconnects.
Risks of improper installation and liability
Confirming code compliance is only part of the responsibility; improper installation of a hot water circulating pump can create immediate safety hazards, long-term system damage, and significant legal exposure for homeowners or contractors.
Faulty wiring, leaks, or poor mounting may cause fires, water damage, voided warranties, and code violations leading to fines or denied insurance claims.
Liability can include repair costs and litigation.
Signs you should hire a licensed plumber or electrician
When signs of electrical, plumbing, or structural complexity appear, a licensed professional should be engaged rather than attempting DIY fixes.
Hire a plumber or electrician if circuits must be modified, gas lines are nearby, leaks recur after initial repair, water damage or mold exists, local codes require permits, or insurance concerns arise.
Professionals guarantee safe wiring, code compliance, and reliable pressure and flow.
Estimated Costs, Energy Savings, and ROI
A brief cost-benefit overview helps homeowners weigh equipment and installation expenses against likely energy and water savings and expected payback periods. Below is a simple snapshot of typical ranges and example scenarios to frame that comparison. Further detail can be used to calculate ROI for specific usage patterns.
| Item | Example range / outcome |
|---|---|
| Pump cost | $100–$500 |
| Installation | $150–$800 |
| Energy/water savings | 10–30% of water heating costs; reduced cold-water waste |
| Payback examples | 1–7 years depending on usage and local energy prices |
Typical equipment and installation cost ranges
Cost considerations guide most decisions about installing a hot water circulating pump, with typical equipment prices ranging from modest pump-only units to higher-end models featuring timers, thermostats, or integrated sensors.
Typical retail pump costs: $50–$400.
Professional installation adds $150–$600 depending on complexity, location, and plumbing modifications.
Permit or electrical work may increase totals; warranty and brand also affect price.
Estimated energy and water savings scenarios
Typically, homeowners can expect quantifiable reductions in both water waste and energy use after installing a hot water circulating pump, though actual savings vary with household size, fixture layout, pump type, and usage patterns.
Estimated scenarios show water savings of tens to hundreds of gallons monthly and energy reductions of 5–25% on water heating bills.
ROI depends on local rates and installation cost.
Payback period examples based on usage patterns
How long will it take for a hot water circulating pump to pay for itself?
Typical payback varies: a family of four with high morning/evening demand may see 2–4 years; a couple with sporadic use might require 6–10 years.
Assumptions: pump cost $200–$600, modest electricity increase, water and heating fuel savings of 10–30%.
Local rates and usage patterns determine exact ROI.
Quick Reference: Checklist for DIY Homeowners
A concise checklist helps guarantee homeowners gather the right materials, take accurate measurements, and document the setup with photos before beginning.
The list also offers quick reminders for each installation stage to keep the work orderly and safe. Refer to the items below as a practical pre-install and on-the-job guide.
- Materials and tools: pump model, fittings, pipe cutter, wrench, Teflon tape, and sealant.
- Measurements and photos: pipe locations, clearances, and current plumbing layout for reference.
- Pre-start checks: shut-off valves, power isolation, and drain points confirmed.
- Step reminders: mount pump, make connections, purge air, test for leaks and proper flow.
Materials, measurements, and photos to prepare before starting
Before beginning work, gather a concise kit of materials, take key measurements, and document the installation area with photos to prevent delays and mistakes.
Include pump, fittings, shutoff valves, adapters, PTFE tape, pipe cutter, wrenches, electrical supplies, and mounting hardware.
Measure pipe diameter, distance to water heater, voltage at outlet, and clearance.
Photograph access points, labeling orientations and existing connections for reference.
Step-by-step quick reminders for each installation stage
Start by reviewing the prepared materials and photos, then follow each stage of the installation in order—shut off water and power, isolate the bypass or tee location, cut and fit piping, mount the pump and valves, make electrical connections, purge air and test for leaks, and verify operation and timer settings.
Inspect fittings, confirm flow direction, secure supports, torquing per specs, use thread sealant, restore power, run cycles, document outcomes.
Case Examples and Common Homeowner Configurations
Three concise examples illustrate typical homeowner situations: a small single-family retrofit using a single pump on an existing loop, a multi-bathroom house requiring higher-capacity circulation for long runs, and a new-construction project with an integrated recirculation loop specified during plumbing layout.
Each case highlights distinct routing, pump sizing, and control choices. These examples frame practical considerations for selecting components and installation approaches.
Example 1 Small single-family home retrofit
This example examines a typical retrofit of a small single-family home—usually a one- to two-story dwelling with a single branch hot-water distribution and one or two bathrooms—illustrating practical pump selection, line connection options, and control strategies that minimize disruptions while improving hot-water delivery.
The homeowner typically uses a compact inline pump, taps into the return or creates a retrofit jumper, and employs timer or temperature controls.
Example 2 Multi-bathroom house with long runs
Moving from a small single-family retrofit to a larger residence highlights different challenges: multi-bathroom homes with long hot-water runs often require higher-capacity pumps, more complex piping strategies, and layered controls to maintain acceptable wait times without wasting energy.
Solutions include zoned pumps or variable-speed units, dedicated return lines for distant wings, thermostatic sensors, and prioritized scheduling to balance comfort, circulation efficiency, and installation cost.
Example 3 New construction integrated loop design
In new construction, an integrated hot-water loop can be planned from the outset to deliver near-instantaneous hot water throughout the house while minimizing plumbing complexity and operating cost.
Designers route a continuous return loop connecting fixtures, size the pump for low head loss, and place balancing valves and insulated lines.
Controls include demand sensors or timers.
This approach reduces wait time, conserves water, and simplifies maintenance.
Conclusion
A hot water circulating pump can cut wait time for hot water dramatically; studies show homes with circulation systems reduce water waste by up to 30%. For homeowners, this means faster comfort, lower utility bills, and less wasted water—especially in larger or multi-story homes. While many installations suit confident DIYers, complex plumbing, electrical or code requirements may necessitate a licensed pro. Weigh upfront costs and energy savings to decide the best approach for each household.