How to Turn On Hot Water for Your Washing Machine: Step-by-Step Guide
To turn on hot water for your washing machine, fully open the hot supply valve and ensure the red-marked hose is securely connected to the hot inlet. Verify that your water heater is functioning properly by running a nearby faucet to check for hot water flow. Inspect the hoses for kinks, tighten any loose fittings, and ensure the inlet screens are clear. If you experience weak water flow, check the heater thermostat and inlet valve. For detailed step-by-step instructions, troubleshooting tips, and maintenance advice, continue reading.
How to Turn On Hot Water for Your Washing Machine Quick Summary
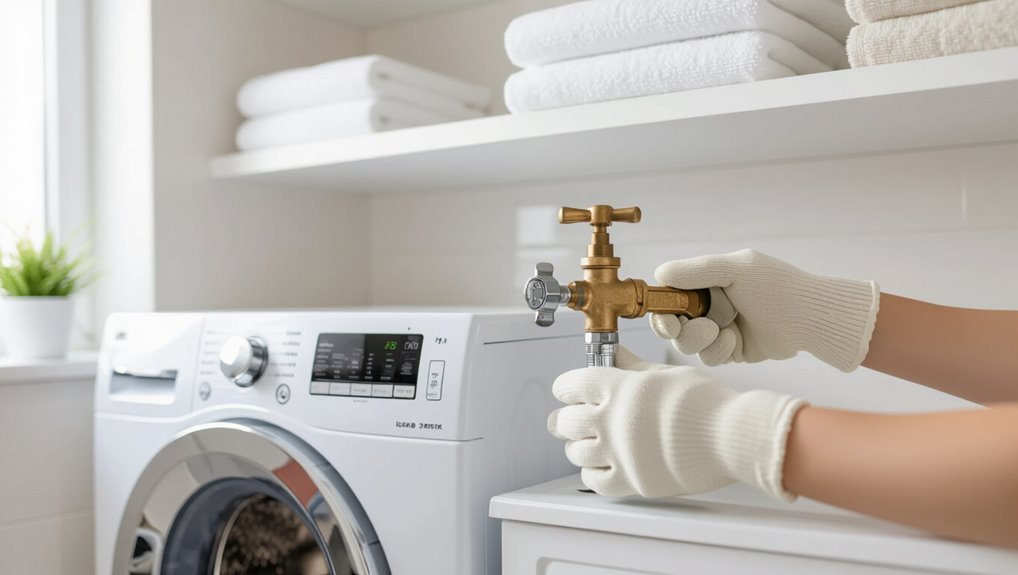
A simple way to enable hot water is to open the hot-water valve at the supply line and select the hot or warm wash cycle on the machine.
Hot water is recommended for heavily soiled items, whites, and sanitizing needs, while cold water suits delicate fabrics and most colors to prevent fading and shrinkage.
The summary clarifies when to use each setting and how to guarantee the hot supply is active.
One-sentence solution to enable hot water supply
Turn the hot water valve behind the washer (or at the wall supply box) fully counterclockwise to open it.
Then confirm hot flow by running a short cycle or briefly opening a nearby hot faucet.
A single clear action restores hot supply; verify hoses are connected to correct hot/cold inlets and that the water heater is on.
This answers how to turn on hot water for washing machine.
When to use hot water vs cold water for laundry
Once the hot supply is confirmed, the next decision is choosing hot or cold water based on fabric, stain type, and care labels.
Hot water suits whites, heavily soiled work clothes, and oily stains, aiding detergent performance and sanitization.
Cold water preserves colors, delicate fibers, and prevents shrinkage or set-in protein stains.
Follow garment labels and stain-specific guidance for best results.
Understand Your Washing Machine’s Water Connections
The reader should first identify the hot and cold inlet hoses and their corresponding shutoff valves to confirm which connection supplies hot water.
Different hookup layouts—stackable, top-load, and front-load—affect access and valve placement.
It is also important to note whether the machine uses a built-in hot water heater or relies on an external supply when preparing to enable hot water.
Identify hot and cold inlet hoses and valves
Several simple checks help distinguish hot and cold inlet hoses and their shutoff valves: the hot side is typically marked red, labeled “H” or “Hot,” and connects to the left inlet on the machine, while the cold side is marked blue, labeled “C” or “Cold,” and connects to the right.
Inspect hose coloring, valve handles, and labels; feel water temperature briefly after opening to confirm correct connection.
Types of washing machine hookups (stackable, top-load, front-load)
Different washer configurations—stackable units, top-loaders, and front-loaders—require distinct hookup layouts and space considerations that affect access to hot and cold connections, drain placement, and venting.
Stackable setups often use rear or recessed hookups to save space.
Top-loaders need easy top access and higher drain height.
Front-loaders require front access, low drains, and sometimes pedestal-mounted connections for convenience.
Built-in hot water heater models vs external supply
When comparing built-in hot water heater models to machines that rely on an external supply, homeowners should evaluate capacity, energy source, and plumbing complexity.
Integrated heaters simplify hookups but add weight, electrical or gas requirements, and limited hot-water capacity.
On the other hand, external supply systems depend on household plumbing but allow unlimited hot water and easier servicing.
Consider installation cost, maintenance, recovery rate, and space constraints when choosing.
Safety Precautions Before Working with Water Lines
Before opening any washing machine water lines, the main water supply and electrical power should be shut off to prevent flooding and shock.
Necessary tools and protective gear—such as wrenches, channel locks, gloves, and safety glasses—should be gathered and inspected.
If fittings are corroded, leaks are complex, or the user is unsure, a professional plumber should be contacted.
Turn off main water and power sources
Shut off the home’s main water supply and disconnect power to the washing machine to eliminate risks from pressurized leaks and electrical contact.
Verify valves are fully closed and drain residual water from supply lines by running a brief cycle or opening nearby faucets.
Tag the breaker or power plug to prevent accidental restoration.
Confirm absence of flow before proceeding with line work.
Tools and protective gear you’ll need
A basic kit of tools and protective gear is essential for safely working on washing machine water lines. Recommended items include adjustable wrenches, pliers, a basin or bucket, Teflon tape, and spare hose washers.
Protective gear should consist of safety glasses and waterproof gloves. A flashlight and towels help manage leaks.
Keep tools organized and within reach to minimize exposure to water and injury.
When to call a professional plumber
Recognize when a job exceeds basic maintenance and call a professional plumber to prevent damage or injury.
A licensed plumber should handle persistent leaks, corroded valves, complex pipe replacements, gas-line proximity, hidden water damage, or uncertainty about shutoff controls.
Professional diagnosis prevents appliance harm, code violations, and flooding.
Prioritize safety and warranty concerns; document conditions and obtain estimates before proceeding.
Step-by-Step: Turning On Hot Water at the Washing Machine
The following steps guide the user through restoring hot water to the washing machine: locate the hot water shutoff valve, inspect hoses and fittings for damage, and slowly open the valve while checking for leaks.
After confirming connections are sound, run a short test cycle to verify hot water flow.
Finally, adjust the machine settings to select a hot wash.
Step 1 Locate the hot water shutoff valve
Begin by tracing the hot water hose from the back of the washing machine to where it connects to the house plumbing. The shutoff valve is typically located on that inlet line, either behind the machine or on a nearby wall.
Identify a lever, knob, or round valve; note its orientation. Confirm whether it’s labeled HOT or has red marking before proceeding to operate it.
Step 2 Inspect hoses and fittings for damage
Inspect visually and by touch for cracks, bulges, corrosion, kinks, or loose fittings on both the hot water hose and its connectors.
Note any fraying, hardening, or mineral buildup at the ends.
Verify that clamps or threaded couplings are secure and not stripped.
Replace hoses showing deterioration or use braided stainless-steel lines for improved longevity and reduced rupture risk.
Step 3 Slowly open the hot water valve and check for leaks
Open the hot water valve slowly to pressurize the line while watching all hose connections and the valve body for signs of dripping, seepage, or spray.
Observe for any immediate pressure-related leaks, paying attention to hose ends, washers, and coupling nuts.
If moisture appears, tighten fittings slightly or isolate the supply and repair before proceeding.
Note any unusual sounds or visible damage.
Step 4 Run a short test cycle to confirm hot water flow
Start a brief wash cycle to verify that hot water is reaching the machine and that settings operate correctly; select a warm-to-hot temperature and a quick or rinse-only program.
Then let the machine fill and run for a few minutes while observing the inlet hose, valves, and drum for steady hot flow and any leaks.
Note water temperature at the drum, listen for unusual sounds, and stop if issues appear.
Step 5 Adjust machine settings to select hot water wash
Having confirmed hot water reaches the machine and no leaks are present, the user can now set the washer to a hot-water cycle.
Select the appropriate temperature setting (hot or sanitize), choose the cycle compatible with fabric care labels, and adjust soil level and detergent dispenser for hot wash.
Start the cycle, monitor initial fill for correct temperature, and pause if any issues appear.
Troubleshooting Common Hot Water Problems
The section outlines a concise checklist for diagnosing why hot water fails to reach the washing machine, including valve positions, supply interruptions, and inlet filters.
It also covers causes and fixes for weak hot water flow, repairing or replacing leaking inlet hoses and connections, and steps to address overly hot or inconsistent temperatures by adjusting the household water heater.
Practical, safety-minded tips and when to call a professional are included.
No hot water reaching the machine diagnostic checklist
Begin by confirming whether cold water flows into the machine; if both inlets are dry, the issue likely lies with the home’s supply rather than the appliance.
Check hot supply valve position, inspect inlet hose for kinks or blockage, and verify water meter and main shutoff are open.
Examine hot water shutoff under sinks and any external isolation valves.
Call a plumber if supply issues persist.
Weak hot water flow causes and fixes
Inspecting weak hot water flow requires a methodical approach that separates appliance issues from plumbing problems.
Check hot supply valve fully open, inspect in-line filters or screens on the machine’s inlet for debris, and test flow at a nearby hot faucet.
Evaluate water heater output, thermostat setting, and sediment buildup.
If pressure elsewhere is normal, the washer’s inlet valve or internal flow paths may need service.
Leaks at hose connections how to repair or replace hoses
Addressing leaks at washing machine hose connections requires isolating the source, evaluating hose condition, and deciding whether a simple tightening or full hose replacement is needed.
Turn off water, inspect fittings and washers, tighten loose nuts with pliers, and replace cracked or bulging hoses.
Use new reinforced hoses, new rubber washers, apply plumber’s tape if threads leak, then test for leaks before restoring normal use.
Water too hot or inconsistent temperature adjusting household water heater
If water from the washing machine is scalding hot one cycle and lukewarm the next, the household water heater is a likely culprit.
Inconsistent or excessive temperatures typically stem from faulty thermostats, sediment buildup, or incorrect temperature settings.
Inspect thermostat settings, flush the tank to remove sediment, test or replace thermostats and heating elements, and consult a licensed technician if problems persist or if safety devices (pressure relief valve) malfunction.
When the Washing Machine Has Internal Temperature Controls
Some washing machines include built-in heaters that allow the appliance to heat water independently of the household supply.
Technicians or owners should verify thermostat settings and test the heating element if water fails to reach the selected temperature.
Consult the machine’s error codes and manual for specific fault indicators related to hot water or the heater assembly.
Using built-in heater features (models with onboard heaters)
Consult the machine’s control panel and manual to identify whether it includes an onboard heater and how temperature settings are accessed.
If present, select the desired temperature or “hot” option, enable any dedicated heater or boost mode, and start the cycle.
Observe indicators for heater activation.
Follow manufacturer guidelines for load size and detergent compatibility to guarantee proper heating and avoid damage.
Verifying thermostat and heater element functionality
Begin by confirming that the machine’s internal temperature controls are designed to heat water rather than only mix hot and cold supplies.
Next, power off and unplug the washer, access the heater element and thermostat, and inspect for visible damage or corrosion.
Use a multimeter to test continuity and resistance against manufacturer specifications.
Replace faulty components and reassemble, restoring power to verify proper operation.
Error codes related to hot water or heating elements
After confirming thermostat and heater element condition and replacing any faulty parts, attention turns to the washer’s diagnostic system: many models register specific error codes when internal temperature controls or heating elements malfunction or when the machine fails to detect expected hot water flow.
Consult the manual for code definitions, clear codes after repairs, monitor recurrence, and record codes for technician reference if persistent faults indicate control board or sensor failure.
Replacing or Upgrading Components
When replacing parts, the author recommends selecting inlet hoses and shutoff valves rated for hot-water use and appropriate pressure.
They note that adding a mixer or tempering valve allows precise temperature control and prevents scalding.
If repeated issues persist, upgrading to a washer with an independent hot-water hookup can simplify connections and improve performance.
Choosing the right replacement inlet hoses and valves
Selecting the correct inlet hoses and shutoff valves requires matching dimensions, material compatibility, and flow capacity to the washing machine and household plumbing.
Recommendations include choosing braided stainless steel hoses, quarter-turn ball valves, correct thread size (usually 3/4″ GHT), pressure rating, and temperature tolerance.
Proper fittings and corrosion resistance extend service life and reduce leak risk.
- Braided stainless steel hoses
- Quarter-turn ball valves
- 3/4″ GHT thread verification
- High pressure rating
- Corrosion-resistant fittings
Installing a mixer valve or tempering valve to control temperature
Install a mixer or tempering valve to provide consistent, safe hot water temperature to the washing machine and protect fabrics and plumbing from scalding or thermal shock.
A thermostatic or manual mixer blends hot and cold lines at the supply, set to a safe outlet temperature.
Install per local code, include shutoffs and accessible mounting, test settings with a thermometer, and check for leaks.
Upgrading to machines with independent hot water hookup
Upgrading to a washing machine with an independent hot water hookup involves replacing or modifying existing plumbing and possibly electrical components to accommodate a separate hot inlet.
A licensed plumber should install dedicated hot and cold supply lines, shutoff valves, and proper fittings.
Electrical requirements or grounding may need review.
After installation, test for leaks, verify temperature control, and confirm manufacturer specifications are met.
Preventive Maintenance to Keep Hot Water Flowing
A routine inspection schedule for supply hoses, with replacement every 5–7 years or sooner if cracking appears, helps prevent sudden failures.
Periodic flushing of the water heater and valves removes sediment that can reduce hot water availability and strain plumbing.
Seasonal checks and clear vacation shutdown procedures guarantee controls and isolation valves function when demand or absence changes.
Regular hose inspection and replacement intervals
Regular inspection of washing machine hoses prevents sudden failures and protects hot water delivery and home fixtures from water damage.
Examine hoses every six months for bulges, cracks, corrosion, or soft spots.
Replace rubber hoses every three to five years and braided stainless-steel hoses every five to seven years or sooner if damage appears.
Always shut off water before replacing hoses.
Flushing sediment from water heater and valves
Flush sediment from the water heater and valves periodically to maintain efficient hot water flow and extend equipment life.
Sediment buildup reduces capacity and clogs valves; drain the tank according to manufacturer instructions, flush until clear water flows, and operate inlet/outlet valves to dislodge deposits.
Inspect and clean valve screens and strainers.
Repeat annually or more often in hard-water areas to prevent reduced hot-water delivery.
Seasonal checks and vacation shutdown tips
Seasonal checks and proper vacation shutdowns help prevent frozen pipes, scale buildup, and unexpected outages that interrupt hot-water availability.
Inspect insulation, test pressure relief and drain valves, and flush lines before cold snaps.
When away, lower thermostat, shut off and drain auxiliary lines, and pause appliance water supplies.
Notify a professional for persistent issues; document actions for future maintenance.
Cost, Time and Tools Overview
Typical DIY activation or minor repairs often take 30 minutes to 2 hours, while more complex issues can require a half-day or a service appointment.
Parts such as hoses, shutoff valves, and thermistors commonly cost $10–$100, and professional service ranges from $75–$200 depending on labor and diagnostics.
Essential tools include an adjustable wrench, pliers, Teflon tape, a flashlight, and a towel or bucket for spills.
Typical time required for DIY activation or repair
A straightforward activation or minor repair usually takes between 30 minutes and two hours for someone with basic DIY skills and the proper tools.
Tasks like reconnecting hoses, replacing a shutoff valve, or clearing a blockage commonly fall within that range.
More complex troubleshooting—electrical checks, replacing inlet assemblies—can extend time.
Preparation and correct parts reduce delays and repeat trips.
Estimated costs for common parts and professional service
While some repairs can be accomplished with commonly available parts, costs vary widely depending on whether a homeowner opts for DIY replacement or hires a professional. DIY parts are typically inexpensive; labor raises total cost. Below is a simple cost reference:
| Item | Typical DIY Cost | Typical Pro Service |
|---|---|---|
| Hoses | $10–30 | $50–80 |
| Valve | $15–60 | $80–150 |
| Thermostat | $20–70 | $90–200 |
Essential tools checklist
Necessary tools and a realistic time estimate help guarantee the job proceeds smoothly and safely. A basic kit, cost range, and allocated 30–60 minutes prevent delays.
Professional service may be quicker for complex issues. Confirm shutoff valves and fittings before starting.
- Adjustable wrench
- Slip-joint pliers
- Teflon tape
- Bucket and towels
- Hose replacement kit
Additional Tips for Effective Hot Water Laundry
The guide notes practical energy-saving habits for hot-water cycles, such as shorter wash times, full loads, and efficient temperature settings.
It also highlights detergents and stain treatments formulated for high temperatures and explains when hot water improves cleaning.
Finally, it outlines environmental and fabric-care trade-offs to help readers choose hot water only when benefits outweigh potential wear or extra energy use.
Energy-saving tips when using hot water cycles
Because heating water accounts for a large portion of a washing machine’s energy use, adopting targeted habits can cut consumption without sacrificing cleanliness.
Use hot cycles only for genuinely soiled loads, pre-treat stains to avoid repeat washes, run full loads, choose lower temperature settings when appropriate, maintain an efficient water heater, and combine similar fabrics to maximize wash efficiency and minimize energy per garment.
Best detergents and stain treatments for hot-water washes
After optimizing when and how hot water is used, attention turns to selecting detergents and stain treatments formulated for higher temperatures.
Choose heavy-duty detergents labeled for hot cycles; enzymes effective at elevated temperatures target protein, grease, and ground-in soils.
Use color-safe bleach for whites and oxygen-based pre-treaters for persistent stains.
Follow manufacturer dosing and garment care labels to guarantee cleaning without damage.
Environmental and fabric-care considerations when choosing hot water
Many households must balance cleaning power with environmental impact and fabric longevity when opting for hot-water cycles.
Hot water improves stain removal and sanitization but increases energy use and accelerates wear on delicates, elastic, and printed fabrics.
Use hot only for heavily soiled or sanitization-needed loads, pre-treat stains, separate fiber types, and prefer eco-friendly detergents to reduce environmental footprint while preserving garments.
Conclusion
Brightly mundane, the washing machine’s cold tap once stubbornly sealed now yields warm streams, illustrating how small actions transform routine into comfort. By checking valves, honoring safety, and testing connections, the appliance moves from silence to steady hot flow. Simple vigilance contrasts with potential floods; a single tightening averts chaos. With modest tools and timely upkeep, hot-water laundry becomes effortless—an ordinary chore redeemed by careful steps and quiet preparedness.