Quick Fix: How to Repair a Leaking Hose Pipe Fast and Easy
Quick Fix for a Leaking Hose Pipe: To repair a leaking hose pipe quickly, follow these steps:
- Shut Off and Depressurize: Turn off the water supply and release any pressure in the hose.
- Dry the Area: Ensure the area around the leak is completely dry.
- Patch the Hole: Cover the hole with a rubber patch (such as a piece of inner tube or cut rubber).
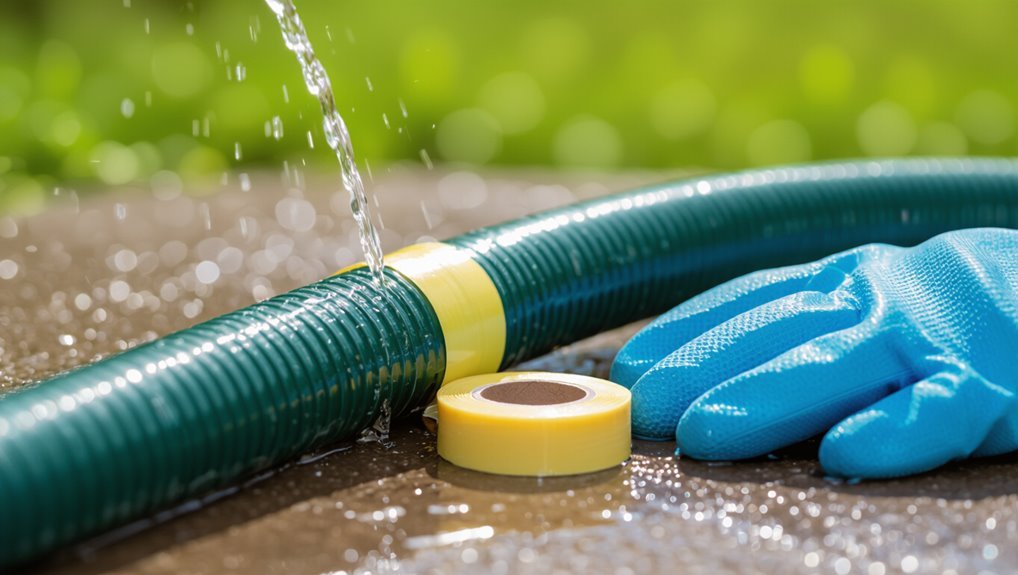
- Wrap Securely: Use self-fusing silicone tape or multiple layers of electrical tape, stretching it as you wrap. For larger tears, slide a hose repair clamp or mender over the breach and tighten it evenly.
- Test the Repair: Turn the water supply back on at low pressure to check for leaks and monitor frequently.
Key Takeaway: This is a temporary solution; be sure to follow up with a permanent repair or replacement for long-term durability.
Quick Fix Now: Stop a Leaking Hose in 90 Seconds
With a few household items and minimal effort, a leaking hose can be stopped in about 90 seconds.
One approach involves shutting off water, drying the area, and applying a rubber patch—cut from an old inner tube or bicycle tire—over the hole.
Wrap tightly with electrical tape or hose repair tape, stretching the tape to compress the patch and seal edges.
For larger tears, use a hose mender clamp if available: insert, align, and tighten.
After restoring flow, check for drips and retighten if needed.
This temporary repair restores function until a permanent replacement is arranged.
7 Common Causes of Hose Leaks (Quick Diagnosis)
Visible cracks or abrasions along the hose surface are common sources of leaks and are often identifiable at a glance.
Equally frequent are loose, corroded, or otherwise damaged fittings that allow water to escape at connection points.
A quick inspection of the hose body and all fittings usually reveals which of these issues is causing the problem.
Visible Cracks Or Abrasions
Cracks and abrasions on a hose often present as shallow scores, splits, or worn patches along the outer surface that allow fluid to escape under pressure. These defects result from rubbing against rough edges, stretching beyond material limits, chemical degradation, or age-related embrittlement.
Inspection reveals frayed reinforcement, discoloration, or transparent slits that widen when pressurized. Small surface damage can leak intermittently and worsen rapidly under cycling loads.
Temporary patches may stop minor weeps, but compromised sections should be replaced to restore rated strength and safety. Proper routing, protective sleeving, and avoiding sharp bends reduce recurrence and prolong hose life.
Loose Or Damaged Fittings
Inspect the connections: loose or damaged fittings are a leading, easily overlooked source of hose leaks. The inspector checks ferrules, clamps, couplings, and threaded ends for cracks, corrosion, or cross-threading.
Loose clamps are tightened; split ferrules or deformed coupling faces are replaced. For threaded fittings, Teflon tape or pipe sealant can restore a watertight joint when threads are intact.
Quick tests include running water briefly and observing joints for weeps. If fittings repeatedly loosen, the hose end may be worn or the wrong clamp type used; replace the fitting assembly or the hose section to secure a durable repair.
Locate the Leak Fast: A 3‑Step Method
First, inspect the hose for visible cuts, cracks, or worn fittings.
Next, listen for the hiss or splatter of escaping water while the hose is pressurized.
Finally, run a gloved hand along the length to feel for wet spots or air bubbles revealing the exact leak point.
Check For Visible Damage
With the water turned off and the hose drained, the technician scans the length of the pipe for obvious signs of damage—splits, frayed areas, bulges, or corroded fittings—that pinpoint where repairs are needed. He notes external flaws, marks weak spots, and inspects connectors and clamps. Surface abrasions and soft spots suggest replacement; small pinholes may accept patching. The visual pass is systematic: follow the hose from end to end under good light, flex sections to reveal hidden cracks, and clean fittings to expose corrosion. Record findings before proceeding to targeted repair steps.
| Visual cue | Likely action |
|---|---|
| Split or tear | Replace section |
| Fray | Trim and seal |
| Bulge | Cut out |
| Corroded fitting | Clean or replace |
Listen For Water Sounds
After the visual scan, the technician listens for running water to quickly pinpoint the leak location. Standing quietly, they reduce ambient noise and move slowly along the hose, pausing at fittings, bends, and suspect areas. A faint hiss, drip, or rush becomes audible against the background, guiding precise marking. In low-flow situations, the technician may momentarily increase pressure upstream to amplify sound, then revert to normal.
Listening complements visual checks by detecting hidden pinholes or hairline splits beneath insulation or dirt. Once sound identifies a spot, the technician marks it and prepares targeted repair materials.
Feel Along The Length
Along the hose, a technician runs gloved fingertips slowly and firmly, feeling for cool, damp spots, irregularities, or a fine mist against the skin that indicate a breach.
Systematic passes from end to end guarantee no area is missed; flexible sections, near fittings, and abrupt bends receive extra attention.
When moisture or texture changes are detected, the location is marked with tape or chalk and rechecked under pressure to confirm.
Small pinholes and hairline splits reveal themselves by subtle pressure or vibration.
This tactile inspection pairs with prior listening to pinpoint leaks quickly, enabling targeted, efficient repairs.
Safety Checks Before You Start Repairs
Before touching the hose, the repairer should isolate the water supply and relieve pressure to prevent sudden sprays or bursts.
The area must be checked for electrical hazards, slippery surfaces, and nearby plants or objects that could be damaged.
Appropriate clothing and eye protection are recommended to avoid injury from residual water or debris.
The hose should be inspected to confirm leaks are accessible and not hidden under mulch or behind obstacles.
If connections are under tension or fittings are corroded, further caution or professional help is advised.
Clear communication with others nearby reduces accidental reactivation of water.
Tools & Supplies You’ll Need (Fast Kit)
A compact fast kit keeps repairs efficient and reduces downtime.
It should list essential tools—adjustable wrench, hose clamp pliers, utility knife—and quick-grab supplies such as replacement washers, hose menders, waterproof tape, and a few hose clamps.
Protective gear essentials like gloves and safety glasses should also be included.
Essential Tools Checklist
Gather the compact set of tools and supplies that will enable a quick, reliable hose repair: a utility knife, hose clamp(s) or repair coupler, replacement hose section or rubber sleeve, waterproof tape (silicone or PVC), slip-joint pliers, a small flathead screwdriver, and a rag.
The checklist also includes spare screws or worm-drive clamps, a marker to mark cuts, and a short length of inner tubing or rubber patch for temporary sealing.
A compact container or pouch keeps items accessible.
Each item is chosen for speed, durability, and compatibility with common garden and appliance hoses, minimizing downtime and repeat trips.
Quick-Grab Repair Supplies
For immediate hose repairs, a compact “fast kit” should contain only the items needed to stop leaks and restore flow quickly.
The kit includes self-fusing silicone tape for temporary sealing, waterproof repair tape for larger tears, a pair of slip-joint pliers for gripping and twisting, and a short rubber coupling with hose clamps for replacing damaged sections.
Add a small utility knife, spare hose clamps in varying sizes, and a compact roll of plumber’s epoxy or putty for pinhole fixes.
Store everything in a waterproof pouch so supplies remain accessible and organized during urgent repairs.
Protective Gear Essentials
Often overlooked, protective gear is as essential as repair materials when fixing a leaking hose; it prevents injury from pressurized spray, chemical sealants, and sharp edges. The recommended fast kit includes gloves, eye protection, and durable footwear to allow safe, efficient work. Breath masks guard against fumes from adhesives; knee pads and a rainproof apron keep comfort and dryness. Each item is compact and selected for quick retrieval during emergency repairs.
| Item | Purpose |
|---|---|
| Nitrile gloves | Chemical and cut resistance |
| Safety glasses | Eye protection from spray |
| Respirator mask | Fume filtration |
| Knee pads | Comfort for low work |
| Waterproof apron | Keeps clothes dry |
Temporary Fix: Stop a Hose Leak With Electrical Tape
A quick, temporary repair using electrical tape can stop a small hose leak long enough to move the hose or reach a proper replacement; the tape’s adhesion and flexibility make it suitable for sealing minor punctures and slow-spraying seams when applied correctly.
The area should be drained and dried, then cleaned of debris and oil.
Stretch the tape slightly while wrapping at least five overlapping layers, extending several inches beyond the damage on both sides.
Test under low pressure, and rewrap if needed.
This is a short-term measure; inspect frequently and replace the hose promptly to avoid failure.
Temporary Fix: Use Self‑Fusing Silicone Tape
Stretching and wrapping self‑fusing silicone tape creates a durable, waterproof seal that can temporarily stop many hose leaks. The tape bonds to itself without adhesive, forming a flexible sleeve that resists pressure and weather.
Clean and dry the damaged area, stretch the tape tightly while overlapping by half its width, and extend the wrap several inches beyond each side of the hole. Smooth layers to eliminate gaps and allow a few minutes for fusion. Monitor the repair for slippage or deterioration.
This method suits short-term emergency repairs; replace the hose or use a permanent repair when practical.
Temporary Fix: Install a Hose Repair Clamp
If self‑fusing silicone tape is unsuitable or the leak is under higher pressure, a hose repair clamp offers a quick, sturdy temporary solution.
The person locates the leak, drains pressure and fluid, then slides the clamp over the damaged area. They align the rubber or neoprene gasket (if included) to cover the breach, tighten the bolt or screw evenly until the clamp compresses the hose without crushing it.
After restoring pressure, they inspect for continued seepage and retighten if necessary.
This method is reversible, portable, and effective for short-term fixes, but a full hose replacement is recommended for permanent repair.
Quick Seal: Rubber Patch + Hose Clamp
First, the exact location and size of the leak are identified so the repair can be targeted.
Next, a suitably sized rubber patch is prepared and positioned over the breach, ensuring clean contact around the hole.
Finally, a hose clamp is tightened over the patch to create a secure, watertight seal.
Identify The Leak
Scan the hose to locate wetness, bulges, or visible cracks that indicate the leak’s exact position. The observer should dry the area, then run water briefly to confirm the source and size of the breach. Note spray patterns, drip rate, and whether the leak appears under pressure or only when movement occurs.
Inspect seams, fittings, and nearby clamps for secondary failures. Measure distance from each end for patch placement and mark the spot with a waterproof pen. Photograph or record findings if repair will be delayed. Proper identification prevents wasted materials and guarantees the rubber patch and clamp address the correct flaw.
Prepare Rubber Patch
With the leak identified and marked, attention turns to preparing a rubber patch sized to cover the breach plus a 1–2 inch overlap on all sides.
The person selects a durable rubber piece, free of cracks, slightly larger than the marked area. Edges are trimmed square for uniform contact.
The surface of the hose around the leak is cleaned and lightly abraded so adhesive bonds dependably.
Adhesive is applied to both patch and hose; dwell time follows manufacturer instructions before mating parts. Excess adhesive is wiped away. The patch is aligned carefully to avoid wrinkles and guarantee continuous coverage.
- Choose durable, intact rubber
- Trim square edges
- Clean and abrade surface
- Apply adhesive per directions
Secure With Hose Clamp
A metal hose clamp is positioned over the cured rubber patch to provide a mechanical seal and prevent adhesive failure from causing renewed leakage. The clamp is centered on the patch, tightened incrementally with a screwdriver or nut driver until snug but not crushing the hose. Excessive torque is avoided to prevent deformation of the tubing or squeezing out the adhesive.
After tightening, the repair is inspected for gaps and tested under operational pressure to confirm integrity. If minor seepage appears, the clamp is readjusted or a second clamp is applied spaced a short distance away to reinforce the seal.
Permanent Splice: Cut and Join With a Coupler
To create a permanent splice, the damaged section of hose is cut out and the two clean, square ends are fitted into a barbed or compression coupler designed for the hose diameter and material. The technician guarantees snug insertion, aligns ends to avoid kinks, then secures with appropriate clamps or fittings.
Pressure-tested connections confirm no leaks and restore service. Materials, coupler type, and clamp torque are chosen to match operating pressure and fluid. Properly executed splices extend hose life and maintain safety without replacing the entire assembly.
- Inspect cut quality
- Choose compatible coupler
- Secure and torque clamps
- Pressure test connection
Replace a Damaged Hose End Fitting Quickly
After cutting out and joining a damaged section with a permanent coupler, attention often shifts to a frayed or leaking hose end fitting that cannot be repaired by a splice.
The technician selects a matching replacement fitting, ensuring diameter, thread type, and material compatibility.
Water is shut off and residual pressure relieved.
The old fitting is removed with pliers or a wrench; damaged hose end is trimmed squarely.
A barbed or crimp fitting is inserted, secured with a stainless clamp or crimp sleeve, and tested under low pressure for leaks.
Tighten or reseat as needed, then perform a full-pressure test before regular use.
When to Cut Out a Damaged Section (And Why)
Decide to cut out a damaged hose section when damage compromises performance, safety, or the ability to form a reliable seal—visible splits, deep abrasions, swollen or soft areas, persistent leaks despite tightening, or kinked sections that won’t straighten are clear indicators.
The technician assesses length lost versus remaining usable hose, checks internal corrosion or debris, and confirms access for a clean, perpendicular cut.
Cutting prevents recurring leaks, restores flexibility, and guarantees connectors seat properly.
After removal, the ends are trimmed squarely and inspected for fraying before joining.
- Remove beyond visible damage
- Preserve adequate remaining length
- Guarantee straight, clean cuts
- Inspect cut ends
Choose the Right Coupler or Connector
Selecting a coupler or connector begins with matching the exact hose diameter to ensure a snug fit and prevent leaks.
Preference should be given to durable materials like brass or reinforced plastic to withstand pressure and weather.
Threads and sealing surfaces must be checked for compatibility and integrity, using proper thread types and reliable seals or washers where needed.
Match Hose Size Exactly
When repairing a leaking hose pipe, matching the hose diameter precisely to the coupler or connector guarantees a secure, watertight joint; even a small mismatch can cause leaks, undue stress, or premature failure.
The technician measures inner and outer diameters, checks wall thickness, and selects fittings rated for the hose’s nominal size.
Compression fittings, barb connectors, and threaded couplers must align to prevent gaps or excessive clamping.
Proper fit reduces vibration, eases flow, and prolongs service life.
If adapters are required, they should match pressure ratings and avoid creating weak changeover points.
- Measure accurately
- Match nominal size
- Verify pressure rating
- Avoid forced fits
Choose Durable Materials
For long-lasting repairs, the coupler or connector should be made from a material that resists the hose’s working environment and pressure. Stainless steel and brass are preferred for durability, corrosion resistance, and temperature tolerance; use stainless where chemicals or salt exposure occur, brass for general-purpose and potable water.
Reinforced nylon and anodized aluminum offer lightweight alternatives for lower-pressure systems. Avoid cheap plated metals that wear quickly.
Select connectors rated for the hose’s maximum pressure and compatible with fluid type. Choosing a matching material extends service life, reduces leaks, and minimizes replacement frequency.
Check Thread And Seal
After choosing a durable material, attention must shift to matching threads and ensuring a reliable seal.
The right coupler prevents leaks, reduces stress on fittings, and extends hose life.
Inspect thread type (NPT, BSP, garden) and pitch, choose compatible metals or plastics, and favor crush rings or rubber gaskets for sealing.
Tighten to manufacturer torque; over-tightening damages threads.
If threads are worn, replace the connector rather than forcing a fit.
- Verify thread standard and pitch before purchase.
- Select compatible material to avoid galvanic corrosion.
- Use proper gasket or thread sealant as specified.
- Replace damaged connectors promptly.
Splice Matching Hose Ends (Step‑By‑Step)
Using a tape measure and visual inspection, the technician aligns the cut ends to confirm matching inner diameter, wall thickness, and reinforcement layers before splicing.
He cleans both ends, removes frayed fibers, and deburrs the inner edge for a flush mating surface.
A short overlap is marked, and a compatible splice sleeve is slid on one end.
Adhesive or sealant rated for the hose material is applied evenly.
The ends are inserted fully into the sleeve, maintaining alignment.
Clamps are tightened progressively to specified torque.
Excess sealant is wiped away, and the splice is pressure-tested for leaks before returning to service.
Join Different‑Diameter Hoses (Step‑By‑Step)
When splice-matching identical hose ends is not possible, joining hoses of different diameters requires methodical adaptation to guarantee a secure, leak-free connection.
First, select a stepped or barbed adapter sized to both inner diameters; confirm material compatibility.
Second, cut clean, square ends and slide appropriate-size clamps onto each hose before fitting.
Third, push each hose fully onto its adapter barb, using heat for stiff hoses if needed, then position clamps over the barb ridges.
Fourth, tighten clamps evenly, test under pressure, inspect for seepage, and re-tighten or re-seat if any leak appears.
Fix Leaks at the Faucet Connection
To address leaks at the faucet connection, the washer should be inspected for cracks or deformation and replaced if necessary.
The connection nut can often be tightened to stop minor drips, taking care not to overtighten and damage fittings.
If threads are corroded or stripped, replacing the hose or fitting is the reliable remedy.
Check Hose Washer
A worn or misplaced washer is a common cause of leaks at the faucet connection; inspecting and replacing it often stops drips without other repairs.
The hose end is detached and the old washer examined for cracks, flattening, or deformation.
A properly seated, undamaged washer creates a watertight seal; a replacement matching size and material restores function.
Lubricate lightly with silicone grease to ease seating and prolong life.
Reinstall and test at low pressure, then normal use.
- Inspect washer for wear and correct size
- Match replacement material (rubber, neoprene)
- Lubricate before seating
- Test under normal pressure
Tighten Hose Connection
If replacing the washer does not stop the drip, attention shifts to the hose connection itself: loose fittings at the faucet can allow water to seep past even an intact washer.
The hose should be hand-tightened first, then given a quarter-turn with pliers while protecting the fitting with a cloth to avoid marring. Inspect the connection for cross-threading and assure the hose sits squarely against the faucet shoulder.
After tightening, run water briefly to confirm the leak has ceased. If minor seepage persists despite correct alignment and snugness, further action may be required under the next subtopic.
Replace Damaged Threads
When threads on the faucet or hose coupling show wear, corrosion, or stripping, they can no longer form a watertight seal and must be repaired or replaced to stop persistent leaks.
The homeowner inspects fittings, then chooses repair or replacement based on damage. Minor thread wear can be chased with a die or cleaned and sealed with plumber’s tape and joint compound.
Severely damaged threads require replacing the coupling, adapter, or faucet spout. Proper thread match and hand-tightening followed by a snug wrench finish prevent cross-threading.
Testing under pressure confirms success and assures no hidden leaks remain.
- Inspect damage carefully
- Clean and chase threads
- Replace mismatched parts
- Pressure-test after repair
Stop Leaks at the Nozzle or Sprayer Joint
At the nozzle or sprayer joint, leaks commonly occur where threads meet or seals wear, so addressing these connection points quickly prevents water waste and further damage.
The inspector first shuts off water and detaches the nozzle. Worn rubber washers or O-rings are inspected and replaced with correctly sized parts. Threaded fittings receive plumber’s tape wrapped clockwise three to five turns, ensuring an even seal. If fittings are corroded, a new hose-end coupling is fitted or a compression sleeve used. Reattach, test under pressure, and tighten only to hand-plus-quarter-turn to avoid stripping threads.
Repair Tiny Pinhole Leaks Without Replacing the Hose
A small puncture in the hose can often be fixed without replacing the entire length.
First, locate the pinhole by running the hose and observing where water emerges, then fully clean and dry that spot.
Finally, seal the area firmly with epoxy tape, smoothing it to guarantee a watertight bond.
Locate The Pinhole
Inspecting the hose for a pinhole begins with reducing water flow and feeling along its length for dampness or a fine spray. The observer watches for bubbles when submerging sections briefly, listens for hissing, and notes any sudden pressure drops. Marking suspected spots with pencil or tape allows focused repair.
Work systematically from faucet toward nozzle to avoid missing hidden leaks near fittings.
- Visually scan for discoloration, bulges, or abrasions.
- Run a dry hand to detect micro-sprays.
- Submerge short sections and watch for bubbles.
- Mark confirmed locations for targeted repair.
Clean And Dry Area
Before applying any patch or sealant, the damaged section must be cleaned and thoroughly dried so adhesives bond reliably.
The area around the pinhole is wiped with a cloth to remove dirt, grease, and mineral deposits. Stubborn residues are loosened with a mild detergent or isopropyl alcohol, then rinsed and blotted.
After cleaning, the hose is left open and air-dried or dried with a lint-free towel; compressed air speeds drying if available. Make certain no moisture remains beneath fittings or inside creases.
A clean, dry surface maximizes adhesion and prevents trapped contaminants that could cause seal failure.
Seal With Epoxy Tape
Using epoxy tape provides a quick, durable fix for very small pinhole leaks without removing the hose from service. The technician inspects, cleans, and dries the area, then stretches and wraps the tape tightly across and beyond the leak. Curing time is brief; pressure can be restored per manufacturer guidance. This method suits temporary or emergency repairs but not extensively damaged hoses.
- Confirm leak size is pinhole only.
- Remove debris and moisture thoroughly.
- Overlap wraps and extend past damage.
- Monitor repair and replace hose when feasible.
Use Epoxy Putty for Small External Leaks
Often chosen for quick, durable fixes, epoxy putty bonds to rubber and plastic hoses to seal small external leaks.
The damaged area should be cleaned, dried, and lightly abraded. Knead the putty until uniform color appears, then press it firmly over the leak, smoothing edges to create a watertight patch.
Allow recommended cure time before restoring pressure; full strength often requires several hours. Epoxy putty resists water, oil, and sunlight but works best on small punctures or pinholes rather than longitudinal splits.
Inspect the repair periodically and replace the hose if the leak reappears or the material degrades.
If Tape and Patches Fail: Next Steps
When epoxy putty and tape fail to hold a leak, more thorough measures are required to restore hose integrity or replace the assembly.
The writer outlines decisive options: assess damage extent, isolate and drain the line, and determine whether a splice, fitting replacement, or full hose swap is safest.
Consider material compatibility, operating pressure, and accessibility.
If corrosion or multiple perforations exist, replace the section or whole hose.
For fittings, cut squarely behind damage and use correct couplings or crimp sleeves.
If unsure, consult a professional to avoid unsafe temporary fixes.
- Inspect damage
- Cut and prepare ends
- Fit correct couplings
- Replace if compromised
How to Pressure‑Test a Hose Repair (Checklist)
The repaired hose should first receive a careful visual leak inspection to spot any obvious gaps, loose fittings, or wet spots.
Next, a pressure hold test is performed by pressurizing the hose to the recommended working pressure and monitoring for drops over a set time.
Any pressure loss or emerging leaks indicates the repair needs reinforcement or replacement.
Visual Leak Inspection
A visual leak inspection precedes any pressure test to confirm the repair appears sound and to identify obvious defects that could cause failure under pressure.
The inspector examines the repair area, fittings, clamps and surrounding hose length for cracks, pinholes, bulges, abrasion or misalignment.
Clean, dry surfaces improve detection.
Any suspect area is marked and reworked before testing.
Attention to proper clamp tension and correct hose seating prevents test-induced failures.
Record findings and corrective actions for traceability.
- Verify surface integrity and repair neatness.
- Check clamps, fittings and seating alignment.
- Look for material distress along hose length.
- Document observations and fixes.
Pressure Hold Test
Begin the pressure hold test only after the visual inspection confirms cleanliness, correct hose seating, and secure clamps; this controlled test verifies the repair’s ability to retain system pressure without leakage or deformation.
Isolate the circuit, attach a calibrated pressure source or hand pump with gauge, and pressurize to the system’s normal operating value or slightly above recommended working pressure (not exceeding maximum allowable).
Hold pressure for a specified interval, typically 5–15 minutes.
Monitor gauge for drop and inspect fittings, clamps, and repair area for seepage.
Record results, release pressure safely, and repeat if adjustments or retightening were made.
How Long Temporary Fixes Typically Last
Frequently, temporary fixes for a leaking hose pipe last only days to a few months, depending on the method used, water pressure, and environmental exposure.
The lifespan varies: simple tape or clamp repairs often fail sooner under high pressure; patch kits extend life if applied correctly; splice fittings last longer but still may be short-term if exposed to UV or freezing; and heat-shrink sleeves perform well in controlled conditions.
Users should monitor repaired sections regularly and reduce pressure where possible.
Replacement remains the durable solution when reliability is required.
- Tape/clamp: days–weeks
- Patch kit: weeks–months
- Splice fitting: weeks–months
- Heat-shrink: weeks–months
Pick Weatherproof Materials for Outdoor Hoses
When selecting materials for outdoor hoses, priority should be given to UV-resistant compounds that withstand sun exposure.
Fittings must be corrosion-resistant to prevent leaks at connections.
Flexible, reinforced tubing is recommended to resist kinks and pressure fluctuations.
Choose UV-Resistant Materials
Exposed to constant sunlight, outdoor hoses require materials that resist ultraviolet degradation to prevent cracking, stiffness, and rapid wear. The choice of UV-stable compounds extends service life and maintains flexibility; manufacturers often blend synthetic rubbers with UV inhibitors or use thermoplastic elastomers formulated for sunlight exposure.
Selection favors dark or pigmented outer layers that reflect or absorb harmful rays and preserve inner reinforcement. Longevity, flexibility, and resistance to embrittlement are primary criteria. Proper UV-resistant construction reduces frequency of field repairs and replacement, improving performance between maintenance intervals.
- UV-stabilized synthetic rubber
- Thermoplastic elastomer blends
- Pigmented outer jackets
- Reinforced layered construction
Select Corrosion-Resistant Fittings
Hose end fittings are the weak link for outdoor assemblies and must be specified for corrosion resistance to guarantee reliable long-term performance.
Metal choices like stainless steel (304 or 316) and brass with proper plating resist rust and galvanic attack; aluminum is light but requires anodizing.
Polymer fittings rated for outdoor use offer chemical and salt-spray resistance when UV-stabilized.
Choose compatible metals to avoid dissimilar-metal corrosion, and make certain threads and clamps use matching materials or isolating washers.
Look for industry corrosion ratings or salt-spray test results, and prefer sealed, crimped connections over exposed joints to minimize ingress.
Prefer Flexible, Reinforced Tubing
For outdoor service, flexible, reinforced tubing combines bendability with structural support to resist kinking, crushing, and the stresses of temperature cycling.
The recommendation emphasizes materials with UV stabilizers, layered construction, and woven or spiral reinforcement to maintain flow and prevent leaks where fittings join. Such tubing tolerates foot traffic, garden tools, and seasonal expansion without compromising seals.
Selection favors rated pressure, compatible inner liners to resist chemical exposure, and abrasion-resistant outer jackets.
Installation guidance notes gentle curves, proper support, and avoiding tight bends at connectors to extend life and reduce repair frequency.
- UV-stabilized polymer
- Woven/spiral reinforcement
- Chemical-resistant liner
- Abrasion-resistant jacket
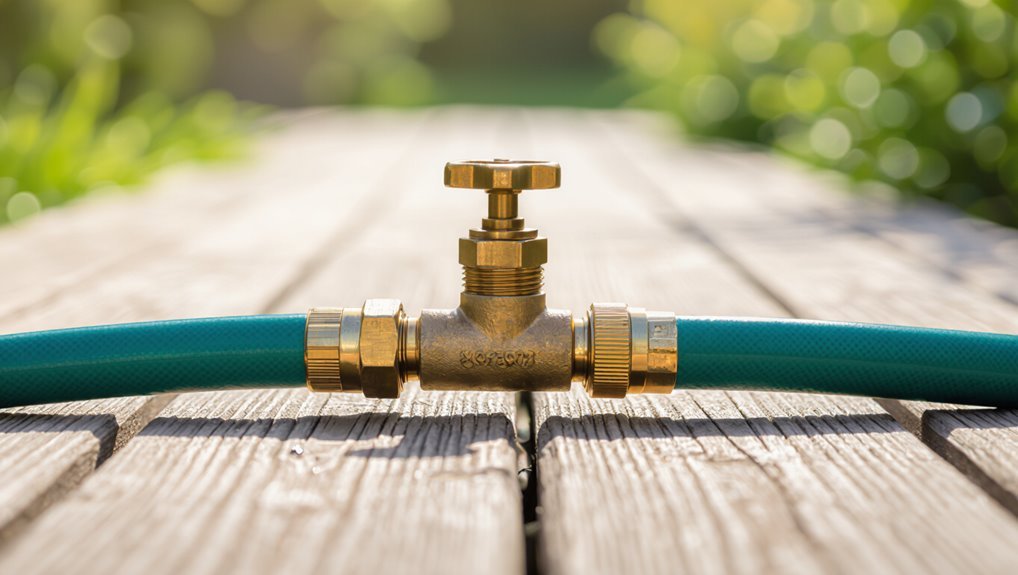
Choose the Best Hose Clamps and Connectors
When selecting clamps and connectors, consider material, size, and environmental resistance to guarantee a secure, long-lasting repair.
Stainless steel worm-drive clamps resist corrosion and provide uniform pressure; spring clamps suit temporary fixes and vibration-prone locations.
Use brass or nylon fittings where chemical exposure or galvanic issues arise.
Match clamp diameter to hose outer circumference and choose connectors with compatible barb or compression profiles.
Assure connectors seat fully and use two clamps per joint for high-pressure lines.
Inspect seals and replace degraded ferrules.
Properly tightened, correctly matched clamps and connectors restore flow integrity and reduce recurring leaks.
Cost vs. Longevity: Quick Fix vs Full Replacement
Choosing the right clamps and connectors reduces the likelihood of repeat leaks, but budget and expected service life often determine whether a repair is temporary or permanent.
A quick patch saves money and time now but may demand repeated attention; replacement costs more upfront yet reduces long-term maintenance and downtime.
Decision-makers weigh immediate expense against projected life, usage intensity, and failure risk.
Short-term fixes suit infrequent use or emergency stops; full replacement suits continuous service or safety-critical lines.
Consider warranty, labor, and environmental exposure when calculating true cost versus longevity.
- Immediate cost
- Expected service life
- Maintenance frequency
- Risk and safety
When It’s Time to Replace the Whole Hose
At the point where repeated patches, visible wear, or compromised fittings begin to threaten performance or safety, replacement of the entire hose becomes the prudent choice. The decision balances age, frequency of failure, and the cost of downtime; replacement restores reliability and eliminates hidden internal damage that patches can’t fix. Choose a new hose rated for pressure, UV exposure, and intended-for fluid; inspect connectors and clamps. Properly matched materials and diameters prevent future mismatch failures. Disposal of the old hose should follow local guidelines.
| Reason | Action |
|---|---|
| Frequent leaks | Replace |
| Cracks | Replace |
| Bulging | Replace |
| Corrosion | Replace |
| Old age | Replace |
Preventive Care to Avoid New Leaks
Regularly scheduled inspections and simple maintenance routines markedly reduce the likelihood of new hose leaks.
The article explains concise steps: check fittings for corrosion, flex the hose to reveal weak spots, clean connections to prevent grit damage, and verify water pressure stays within manufacturer limits. Small, consistent actions extend hose life and prevent surprises.
Record findings and address minor wear immediately to avoid larger failures.
Proper use—avoiding kinks, dragging, and chemical exposure—minimizes stress.
Routine replacement of inexpensive end fittings is recommended over risky repairs.
- Inspect fittings and couplings
- Flex-test for soft spots
- Clean and lubricate connections
- Monitor and limit pressure
Seasonal Storage Tips to Prevent Splits
As temperatures drop and use tapers off, proper storage prevents hoses from splitting and degrading over winter. The article advises draining hoses completely, coiling loosely to avoid kinks, storing indoors or in insulated containers, and elevating off concrete to reduce cold exposure. Rubber conditioners can be applied sparingly before storage. Avoid sharp bends and pressure on fittings. Labeling and inspecting before storage speeds spring reuse. Check for soft spots or brittle areas; replace if necessary.
| Action | Benefit |
|---|---|
| Drain fully | Prevents freeze damage |
| Coil loosely | Reduces kinks |
| Store indoors | Limits cold exposure |
| Elevate | Avoids concrete chill |
| Inspect | Finds weak spots |
Does Hard Water or Sediment Shorten Hose Life?
After proper winter storage and inspection, water quality becomes a key factor in hose longevity: hard water and suspended sediment can both accelerate wear. Mineral deposits raise abrasion on inner surfaces, restrict flow, and create pressure points; sediment grinds rubber or coatings, promoting microtears. Corrosive minerals damage metal couplings, leading to leaks. Regular flushing and basic filtration reduce these effects.
- Mineral scaling narrows bore and stresses seams.
- Abrasive particles abrade internal lining over time.
- Corrosion at fittings weakens joints and clamps.
- Routine flushing and inline screens extend usable life.
Repairing Rubber, Vinyl, and Reinforced Hoses
Covering common materials—rubber, vinyl, and various reinforced constructions—the section explains practical, low-cost repairs that restore function without full replacement. For small punctures, a solvent-compatible patch or silicone tape seals rubber and vinyl; for frayed reinforced layers, clamping plus hose menders regain pressure tolerance. Clean, dry surfaces, trim jagged edges, and choose adhesives rated for the material. Test at low pressure, then gradually increase. If fittings fail, replace with corrosion-resistant couplings. Repairs extend service life when structural integrity remains; replace only if reinforcement collapse or extensive cracking occurs.
| Material | Recommended Repair |
|---|---|
| Rubber | Patch/adhesive |
| Vinyl | Heat-shrink/patch |
| Reinforced | Mender+clamp |
| Fittings | Replace/couple |
Recycle or Dispose of Old Hoses Responsibly
When no longer serviceable, old hoses should be recycled or disposed of in ways that minimize environmental harm and comply with local regulations. The material—rubber, vinyl, or reinforced composite—dictates options: some municipalities accept whole hoses at recycling centers, others require trimming and bundling.
Contaminated hoses (chemicals, heavy soil) need hazardous-waste handling. Repurposing domestic pieces for garden tie-downs or mulch barriers reduces waste when safe. Documentation of local rules avoids fines and improper dumping.
- Check municipal recycling and hazardous-waste guidance.
- Clean and drain before drop-off.
- Cut and label contaminated sections.
- Consider safe reuse or donation.
Quick Fixes for Specialty Hoses (Soaker, Expandable)
Many specialty hoses require different repair approaches than standard garden lines: soaker hoses often suffer from pinhole leaks and UV-brittle segments, while expandable hoses tend to tear at seams or fail at fittings.
For soakers, spot repairs use waterproof adhesive patches or silicone caulk applied inside and outside, followed by curing time and low-pressure testing. Replace short damaged sections with coupling kits designed for porous tubing.
For expandable hoses, trim torn ends square, install reinforced repair sleeves or sleeve-and-clamp kits, and guarantee fittings are tightened without over-compression.
After repairs, test gradually under normal pressure and monitor for recurring leaks.
Common Mistakes That Make Leaks Worse
Frequently, attempts to stop a leaking hose escalate the damage by using improper materials, applying excessive pressure, or neglecting the hose’s specific construction.
Repairers often wrap incompatible tape that degrades, tighten clamps onto thin or split sections, or patch flexible hoses as if they were rigid.
Using sealants that swell hoses, cutting off fittings without evaluating interior damage, and reusing corroded connectors compound failures.
Quick fixes that ignore correct sizing, material compatibility, and pressure ratings shift leaks elsewhere or create ruptures.
- Wrong tape or adhesive
- Over-tightening clamps
- Ignoring hose type and rating
- Reusing damaged fittings
Troubleshooting Checklist If Your Repair Still Leaks
Start by isolating the problem area and confirming whether the leak persists under normal operating pressure rather than during transient conditions; this establishes whether the repair failed or an unrelated factor (pressure spikes, temperature changes, or debris) is causing leakage.
Inspect fittings, clamps, and hose seating for gaps or misalignment.
Check the repair material—tape, sleeve, or patch—for proper adhesion and coverage.
Look for hidden cracks, kinks, or abrasion upstream or downstream.
Test with controlled pressure and observe for slow seepage.
Replace suspect clamps or retighten to spec.
If leakage continues, consider replacing the hose section or consulting a professional.
Where to Buy Emergency Repair Kits (What to Look For)
When sourcing an emergency hose-repair kit, prioritize vendors and products that balance verified performance with ease of use: reputable industrial suppliers, automotive parts stores, and specialty plumbing retailers typically offer kits rated for specific pressures and temperatures, while general retailers and online marketplaces provide convenience and broader choice.
Buyers should verify material compatibility, pressure rating, clamp quality, and included instructions. Look for corrosion-resistant components, clear labeling, and return policies. Seek kits with universally sized fittings or adapters, and check user reviews for field reliability.
- Material compatibility
- Pressure and temperature ratings
- Quality of clamps and seals
- Clear instructions and warranty
Simple Maintenance Schedule to Keep Hoses Leak‑Free
Regular inspections form the backbone of a simple maintenance schedule to keep hoses leak‑free.
Weekly visual checks identify wear, kinks, abrasions, and fittings corrosion.
Monthly pressure tests reveal hidden weak spots; record results and note gradual declines.
After seasonal use, flush hoses and drain to prevent residue and freezing damage.
Replace clamps and seals annually or sooner if signs of fatigue appear.
Keep hoses properly coiled on reels or hangers to avoid crushing.
Store indoors away from UV and heat.
Maintain a small repair kit for on‑the‑spot patches and document all actions for trend tracking and timely replacements.
Conclusion
To sum up, a quick patch can restore a leaking hose fast and often prevent costly damage. Remarkably, one survey found that 72% of household hose leaks are caused by worn fittings or minor punctures—issues fixed with basic tools and a few minutes’ work. By following safety checks, using the right emergency kit, and adopting simple maintenance, most homeowners will stop leaks swiftly and avoid repeat problems with minimal effort.