What Size Is a Kitchen Sink Drain Pipe? Quick Guide & Measurements
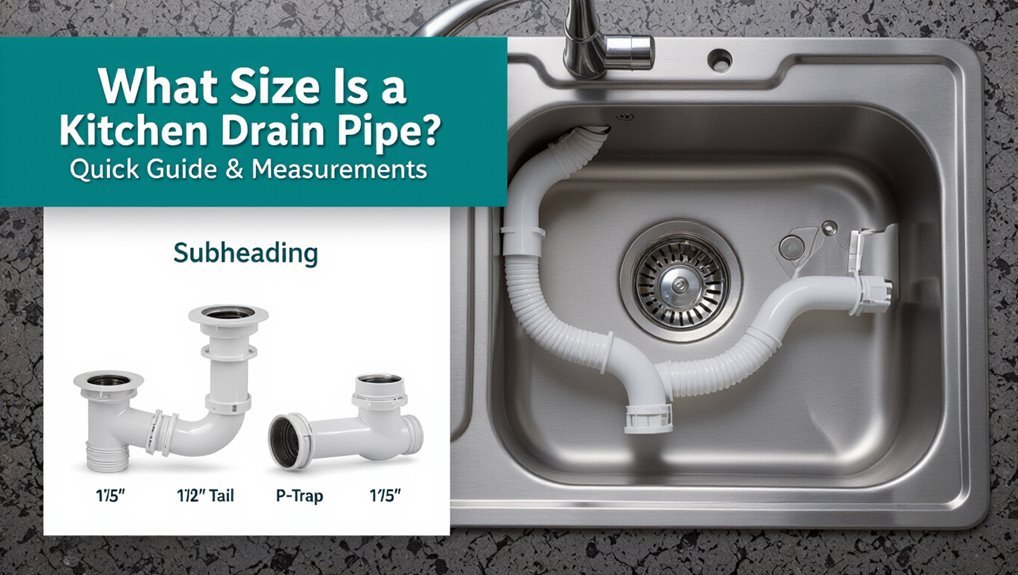
A kitchen sink drain pipe typically uses a 3.5-inch strainer opening paired with a 1½-inch nominal tailpiece and P-trap. Some older or utility sinks may have 2.25-inch or nonstandard openings, while garbage disposals generally fit a 3.5-inch flange. When connecting tailpieces and traps, slip nuts and washers are utilized, and outer diameters may differ from nominal sizes. To address any mismatches, adapters are available, but it’s crucial to confirm measurements before purchasing to avoid issues. Further details regarding fittings, adapters, and code considerations are also available.
Quick Answer: Which Kitchen Sink Drain Size to Use
Most kitchen sinks use a 1½‑inch drain tailpiece and trap to match common household plumbing, while some commercial or older installations may require a 1¼‑inch or 2‑inch size.
The typical recommendation favors 1½ inches for single-basin residential sinks and dishwashers draining into the same trap. Smaller 1¼‑inch drains appear on compact or bar sinks but can clog more easily and are less compatible with garbage disposals.
Larger 2‑inch drains suit commercial sinks or heavy-duty disposals to improve flow and reduce blockage risk. Installers should confirm local codes, fixture specifications, and connection compatibility before selecting a size.
Why Kitchen Sink Drain Size Matters
Every inch of drain diameter affects flow rate, clog likelihood, and compatibility with disposals or appliances. Proper sizing balances wastewater capacity, venting performance, and ease of maintenance. Undersized drains increase backups and require frequent clearing; oversized runs can reduce trap seal efficacy and complicate fitting connections. Selection also influences water hammer potential and noise transmission. Plumbing codes aim to standardize sizes for predictable performance and appliance matching. Consider long-term serviceability: access to trap and cleanouts matters as much as nominal diameter.
| Concern | Effect |
|---|---|
| Flow | Capacity and speed |
| Clogs | Frequency and severity |
| Appliance fit | Compatibility |
| Maintenance | Accessibility and cost |
Standard 1½‑Inch vs 2‑Inch Sink Tailpieces
Choose between a 1½‑inch and a 2‑inch sink tailpiece by weighing common plumbing practice against specific performance needs.
The 1½‑inch tailpiece is standard for most residential kitchen sinks, fitting typical strainer outlets and offering adequate flow for everyday use.
The 2‑inch option increases capacity, reducing clogging risk for heavy debris or commercial-style use and matching larger strainers.
Compatibility with existing fittings, local code preferences, and disposal connections guides selection; adapters can bridge sizes but may affect flow and assembly simplicity.
Selection prioritizes correct fit and intended purpose rather than assumed superiority of the larger diameter.
How the P‑Trap Size Relates to Your Sink Drain
Typically, the P‑trap diameter should match the sink tailpiece and drain outlet to guarantee proper flow and trap seal. Match prevents constrictions that cause slow drainage, backups, or siphoning.
Materials—plastic, brass, or stainless—offer compatible fittings but require correct slip‑joint sizes. Vertical drop, trap arm length, and slope further influence performance; adapters can bridge mismatches but may introduce extra joints and potential leaks.
Local codes dictate minimum diameters and trap configuration for fixture types. When replacing or installing, confirming thread type and measurement secures a snug fit and preserves water seal integrity without resorting to inappropriate downsizing or oversized piping.
When a 1½‑Inch Trap Is Adequate
A 1½‑inch P‑trap often meets the residential sink standard because it accommodates typical household flow rates and fittings.
It is generally compatible with low‑flow fixtures, including modern aerators and water‑saving faucets, without risk of frequent clogs.
Short horizontal runs to the trap outlet further guarantee adequate drainage capacity and reduce the chance of siphoning or slow flow.
Residential Sink Standard
For most residential bathroom and kitchen sinks, a 1½‑inch trap provides sufficient capacity to handle normal household drainage while maintaining proper trap seal and venting.
Building codes and plumbing practice typically designate 1½ inches as the standard for lavatories and kitchen sinks with single drain lines. This size balances flow rate with clog resistance and fits common fixture tailpieces and P-trap assemblies.
Installers select 1½‑inch traps for compatibility, ease of maintenance, and availability of replacement parts.
Exceptions occur when multiple fixtures share a trap arm or appliances require larger drains, which call for different sizing and layout considerations.
Low-Flow Fixture Compatibility
Many low-flow bathroom fixtures and standard kitchen sinks operate effectively with a 1½‑inch trap because the reduced water volume still produces enough velocity to clear solids and prevent siphonage. It suits single fixtures or paired lavatories where discharge rates remain low. Properly graded piping and minimal obstruction preserve trap seal integrity. Local codes or unusual fixtures may require upsizing, so verification is advisable. Maintenance access and occasional cleaning compensate for smaller diameters. Consider the drain’s fixture unit rating and manufacturer guidance when confirming adequacy.
- Typical installations: single lavatory, bar sink, secondary bathroom
- Benefits: cost, space, simpler connections
- Limits: higher flow appliances, long shared runs
Short Horizontal Runs
When limited to short horizontal runs, a 1½‑inch trap can reliably handle kitchen sink drainage provided the run from trap weir to vertical drop remains brief and unobstructed.
Code allowances and manufacturer specifications often permit this arrangement where fixture demand is moderate.
Proper slope (¼ inch per foot), minimal fittings, and avoidance of long flat sections preserve self‑scouring velocity and reduce clog risk.
Garbage disposals or high‑flow appliances may still require larger piping.
Inspectors focus on total developed length and number of bends; if either exceeds recommended limits, upsizing to 2 inches or adding a vented vertical drop restores performance and code compliance.
When You Need a 2‑Inch Trap for a Sink
A 2‑inch trap is required when a sink’s waste outlet or connected fixture produces higher flow rates or larger solids than standard kitchen or bathroom sinks, such as commercial prep sinks, mop sinks, or certain laundry setups. It guarantees proper drainage capacity, reduces clogging risk, and meets many commercial plumbing codes.
Selection depends on fixture unit load, anticipated peak discharge, and local regulations. Installation may require corresponding 2‑inch tailpiece, trap arm, and correct pitch to the horizontal drain. Inspection accessibility and materials compatible with the system (metal or ABS/PVC) are also considerations.
- Commercial prep sinks
- Mop or janitorial sinks
- High-capacity laundry trays
Measure Your Existing Sink Drain Quickly
Measure the drain opening and visible trap components before ordering parts or scheduling repairs. The observer notes flange diameter, tailpiece visible length, and trap shape. Use a tape measure and calipers for accuracy, recording inside and outside diameters. Photograph connections and any compression nuts. Label measurements and compare to common sizes (1½”, 1⅜”, 2″). Avoid probing beyond visible fittings to prevent disassembly. If corrosion or nonstandard fittings appear, consult a plumber with documented measurements. The following table summarizes measurements to capture and their purpose.
| Item | What to measure | Why it matters |
|---|---|---|
| Flange | Inside dia. | Fit replacement strainer |
| Tailpiece | Visible length | Compatibility check |
| Trap | Outer dia. | Determine trap size |
| Nut | Width | Match fittings |
How to Measure Tailpiece, Trap Inlet, and Wall Pipe
The section explains how to measure the tailpiece diameter and length to guarantee a proper fit with the trap.
It also outlines how to check the wall pipe size and alignment before selecting replacement parts.
Clear measurements prevent leaks and mismatched connections.
Measuring The Tailpiece
When preparing to fit or replace sink drain components, identify and record three key lengths: the tailpiece from the sink outlet to the trap inlet, the trap inlet diameter where the tailpiece connects, and the wall pipe distance from the trap outlet to the wall stub-out; these measurements determine compatibility and coupling choices.
Measuring the tailpiece involves using a tape or caliper from the sink’s threaded outlet to the top of the trap inlet, noting any flare or nut. Record pipe diameters by measuring outside diameter and checking label sizes (1-1/4″, 1-1/2″). Note any offset or extension required for proper trap alignment.
- Measure straight length
- Check diameters
- Inspect offsets
Checking Wall Pipe Size
A quick visual and dimensional check of the wall pipe guarantees the trap and tailpiece will align and seal correctly.
Measure the wall stub-out diameter with calipers or a tape at the outer lip; record internal diameter if accessible. Compare that to the trap inlet and tailpiece outer diameters to confirm compatibility—common sizes are 1-1/2″ and 1-1/4″.
Note wall pipe material (PVC, ABS, copper, cast iron) and any reducer or adapter present.
Check wall depth from finished surface to pipe face; make certain tailpiece length and trap arm reach accommodate that depth.
Document measurements before purchasing fittings.
Nominal Size vs Actual Pipe Diameter (What to Expect)
One common source of confusion is that a pipe labeled by a nominal size—such as 1¼ inch or 1½ inch—does not always match its actual outside or inside diameter; manufacturers and standards use nominal dimensions as identifiers tied to fitting systems and wall thicknesses rather than literal measurements. A reader should expect nominal sizes to indicate compatibility with traps and fittings, not precise measurements.
Materials (PVC, ABS, metal) and schedule or SDR affect actual bore and OD. When replacing or matching parts, measure the existing pipe’s outside diameter and wall thickness, or bring the part to guarantee fit.
- Measure OD for mating parts
- Check material and schedule
- Bring part for shop matching
Compression Fittings vs Slip‑Joint Fittings: What Fits
Distinguish compression fittings and slip‑joint fittings by how they seal and connect: compression fittings use a nut and ferrule (or ring) tightened onto a straight pipe end for a mechanical, more permanent seal, while slip‑joint fittings rely on a loose nut and tapered washer that compresses against the trap arm for easier removal and adjustment.
Compression fittings suit rigid metal or plastic pipes where a firmer, leak‑resistant joint is desired; they require precise pipe end preparation and occasional retightening.
Slip‑joint fittings favor traps and short connections under sinks for fast disassembly and minor alignment tolerance, but they are less robust for high‑stress runs.
Common Drain Materials and Their Standard Sizes
Common drain materials for kitchen sinks typically include PVC, ABS, cast iron, copper, and brass, each chosen for cost, durability, or code requirements.
Standard pipe diameters most often encountered are 1-1/4 inch and 1-1/2 inch for tailpieces and traps, with 2-inch and larger sizes used in some waste stacks and commercial installations.
The following section compares these materials and their common diameters to guide selection and compatibility.
Common Pipe Materials
Across residential and commercial plumbing systems, several drain pipe materials dominate the market, each offered in standard diameters suited to specific fixtures and flow needs. Common choices balance durability, cost, corrosion resistance, and ease of installation.
Brass and copper resist corrosion and are used where longevity and soldered joints are preferred. PVC offers lightweight, low-cost, chemical resistance and simple solvent-weld connections for most residential drains. Cast iron provides sound-deadening and high strength for commercial stacks and older buildings, often favored in multi-story applications for longevity.
- Brass/copper: durable, corrosion-resistant, soldered or compression fittings
- PVC: inexpensive, easy to install, solvent-welded
- Cast iron: strong, quiet, long-lasting
Standard Pipe Diameters
Having outlined typical materials, attention turns to the standard diameters these products are manufactured in and how those sizes align with fixture demands.
Residential kitchen sink drains most commonly use 1-1/2 inch (38 mm) trap and tailpiece fittings; 2-inch (50 mm) lines appear where larger flow or disposals require it.
PVC and ABS are produced in these nominal sizes plus 3-inch and 4-inch options for main soil stacks.
Cast iron and copper match similar nominal diameters but are often referenced by inside diameter.
Adapters and reducers bridge mismatched systems, ensuring code-compliant flow and trap seal performance.
PVC and ABS Kitchen Drain Size Guidelines
How large should PVC or ABS drain lines be to handle a kitchen sink without clogging or violating code? PVC and ABS commonly use 1-1/2 inch traps paired to 1-1/2 inch branch lines; local codes sometimes require 2-inch mains for heavy disposals.
Materials differ in stiffness and solvent-weld vs. glue fittings, affecting install practice but not nominal sizing. Proper slope, trap seal, and venting prevent backups more than material choice. Use fittings rated for residential drainage and follow manufacturer and code specifications.
- Typical sizes: 1-1/2″ trap to 1-1/2″ branch
- Garbage disposal may need 2″ branch
- Slope: 1/4″ per foot
Brass and Chrome Tailpiece Sizing Quirks
Often overlooked, brass and chrome tailpieces present sizing quirks that differ from PVC/ABS because their nominal diameters, internal clearances, and threaded connections vary by manufacturer and finish.
Metal tailpieces often list nominal sizes like 1-1/4″ or 1-1/2″ but actual internal bore can be smaller due to wall thickness and decorative sleeves.
Thread standards (MIP, slip nut dimensions) may not match plastic fittings without adapters.
Compression ferrules and decorative collars alter effective length and sealing surface.
Installers should measure outside diameter, thread pitch, and bore, and keep a few adapter types on hand for reliable connections.
Copper Sink Drain Sizes in Older Homes
Older homes often use copper drain lines in nominal diameters such as 1/2 inch, 3/4 inch, and 1 inch that can differ from modern sizing conventions.
These installations frequently feature soldered or threaded joints that affect repair and adapter choices.
Over time corrosion, pinholing, and mineral buildup can reduce flow and necessitate replacement or reconditioning.
Common Copper Pipe Diameters
Many older homes use copper piping for sink drains, and these pipes typically come in a few standard diameters—commonly 1 1/4 inch, 1 1/2 inch, and occasionally 2 inch—measured by nominal pipe size or outside diameter depending on the era and local practice.
The choice reflected flow needs and available fittings; smaller kitchens often used 1 1/4″, typical sinks used 1 1/2″, while utility setups could employ 2″. Identification relies on measuring outside diameter or consulting period plumbing charts.
Wall thickness (type L, M) affects internal flow and strength, so size alone doesn’t tell the full story.
- 1 1/4″ common for compact sinks
- 1 1/2″ standard for kitchen drains
- 2″ used in heavy-duty or older utility installations
Older Installation Joints
Featuring a variety of connection methods, older copper sink drain installations commonly used sweat (soldered), threaded, and slip-joint fittings that reflect the practices and materials available when the house was built. These joints often correspond to nominal copper sizes (1/2″, 3/4″, 1″) but adapt to traps, tailpieces, and adapters. Repair or replacement may require matching the joint type rather than only pipe diameter; threaded unions and slip nuts differ from modern compression fittings. Awareness of historic joint styles helps assure proper adapters and tools for service without altering downstream plumbing.
| Joint Type | Typical Size | Common Use |
|---|---|---|
| Sweat | 1/2″–1″ | Permanent connections |
| Threaded | 3/4″ | Fixtures, adapters |
| Slip-joint | 1″ | Trap connections |
Corrosion And Wear Effects
Following a review of historic joint types, attention shifts to how corrosion and mechanical wear alter copper sink drain sizes and fit over time. Copper pipes develop pitting, thinning, and scale that reduce internal diameter and change thread or slip-fit tolerance. Mechanical abrasion from tools or moving parts enlarges or distorts openings, causing leaks or misfits with modern fittings. Mineral deposits and corrosion products complicate measurement, yielding unreliable nominal sizes. Assessment requires visual inspection, caliper measurement at multiple points, and possible replacement of short sections to restore proper dimension and seal integrity.
- Pitting and thinning narrow internal bore
- Abrasion distorts mating surfaces
- Scale masks true diameter
Garbage Disposals and Drain Sizing
When integrating a garbage disposal into a kitchen sink system, proper drain sizing and alignment are essential to guarantee efficient waste removal and prevent backups. The disposal outlet typically connects to 1¼-inch or 1½-inch tailpieces; matching the home’s drain pipe diameter avoids constrictions. Many disposals perform best with a 1½-inch trap arm and a gradual slope to the drain line to carry solids and water.
Adequate clearance for the disposal flange, trap, and dishwasher knockout prevents kinks or low spots. Also, use smooth-walled fittings and avoid abrupt reducers. Correct venting and cleanouts support reliable operation and easier maintenance.
Sizing for Dishwasher Drain Connections
Dishwasher drain connections typically attach to a 7/8-inch to 1¼-inch tailpiece or use a dedicated knockout on the disposal, and sizing must match hose and fitting dimensions.
An air gap or high loop is required by local code to prevent backflow and must be considered when routing the drain.
Common connection methods include clamp-on hose fittings, inlet knockouts on disposals, and branch tailpiece adapters, each dictating different pipe size and configuration needs.
Typical Drain Tailpiece Size
A common drain tailpiece size for kitchen sink dishwasher connections is 1½ inches in diameter, matching the sink drain to make certain a proper fit and adequate flow; some older or compact setups use 1¼ inches, while code and appliance manufacturers typically recommend 1½ inches with a properly sized branch tailpiece or air gap to prevent backflow.
The tailpiece length and fitting type influence installation: straight, adjustable, or branch tailpieces accommodate trap and dishwasher hose connections.
Proper sizing reduces clogging and makes certain efficient drainage. Installers should verify existing fittings and replace mismatched parts to maintain consistent slope and seal integrity.
- Typical diameters: 1¼” or 1½”
- Common materials: brass, PVC, chrome-plated
- Replace mismatches to avoid leaks
Air Gap Requirements
Many installations require an air gap or equivalent high-loop to safeguard the potable water supply by preventing backflow from the dishwasher into the household plumbing.
Codes often mandate a dedicated air gap device mounted above the sink or an approved high-loop under the counter when local rules permit.
The dishwasher drain hose typically connects to the air gap inlet; the outlet then feeds the sink drain or disposer.
Proper sizing follows manufacturer instructions and local plumbing codes, generally using 3/8–1/2 inch nominal hose to maintain flow while preventing siphon.
Inspect, test, and replace faulty air gaps to guarantee backflow protection.
Connection Methods Explained
After making certain an air gap or properly routed high-loop is in place, the focus shifts to how the dishwasher drain actually connects to the sink or disposer and what pipe or hose sizes are appropriate.
The dishwasher typically uses a 5/8″ to 7/8″ flexible corrugated hose that mates to a 7/8″ tailpiece inlet or disposer branch.
Installations require a secure clamp or compression fitting and a check valve only where local codes permit.
Adapters convert between hose and 1½” or 1¼” tailpieces.
Proper slope and no-sag loops prevent backups and make certain code compliance.
- Flexible dishwasher hose to 7/8″ inlet
- Clamp or compression fitting
- Adapter to 1¼”/1½” tailpiece
Air Gap, High‑Loop, and Layout Impacts on Sizing
When determining sink drain sizing, the presence and placement of an air gap or high‑loop and the overall fixture layout can change flow behavior and backflow risk, so these features must be treated as part of the hydraulic calculation rather than afterthoughts.
An air gap introduces an open‑air break requiring trap arm and tailpiece alignment; a high‑loop provides elevation to prevent siphonage but affects effective vertical drop and head loss.
Long runs, multiple fixtures, and offsets increase friction and may demand larger diameter or steeper slope to maintain self‑scouring velocity.
Designers must account for these elements when selecting pipe size and routing.
Local Plumbing Code Minimums to Check First
Before selecting pipe sizes, the local plumbing code should be consulted for baseline requirements.
Typical checks include minimum trap diameter and any permit or inspection mandates that could affect acceptable materials or configurations. Adhering to these minimums prevents costly rework and guarantees compliance with jurisdictional standards.
Minimum Trap Size
Check local plumbing codes to determine the minimum trap size required for a kitchen sink, since jurisdictions commonly set specific diameters to guarantee proper drainage and trap seal performance.
The minimum trap diameter often aligns with the drainpipe size (commonly 1 1/2″ or 1 1/4″ in older homes), but some codes mandate 1 1/2″ for kitchens to prevent clogging and preserve water seal depth. Installers should confirm local tabled requirements, allowable reductions, and materials.
Incorrect trap sizing can cause siphoning, slow drainage, or code violations, so verification before replacement or remodeling is essential.
- Confirm required diameter for kitchen fixtures
- Check allowable trap arm lengths
- Verify trap materials and fittings
Local Permit Requirements
In many jurisdictions, local plumbing codes and permit requirements dictate minimum sizes, materials, and installation practices for kitchen sink drains to guarantee safety, sanitation, and consistent performance. Inspectors often require 1¼–2 inch trap sizes, approved materials (PVC, ABS, or metal), slope standards, venting, and accessible cleanouts. Permit applications may demand plans showing pipe diameters, trap configuration, and connection details. Homeowners and contractors should verify local amendments, schedule inspections, and retain receipts. Noncompliance can force costly rework. Consult the authority having jurisdiction before starting work to confirm exact minimums and avoid delays.
| Item | Example |
|---|---|
| Trap size | 1¼–2″ |
| Material | PVC/ABS/metal |
| Slope | 1/4″ per ft |
| Venting | Required |
| Permit | Plan submittal |
When to Increase Drain Diameter During a Remodel
Determine whether a remodel warrants a larger kitchen sink drain by evaluating changes in fixture count, appliance connections, and expected flow rates. The decision hinges on plumbing code, available slope, and peak discharge from disposers, dishwashers, or additional sinks. Increasing diameter reduces clog risk and improves drainage when combined flows exceed original design.
Inspect existing trap arm length and venting; larger pipe may require reconfiguration. Consult local code for trap and vent sizing limits before upsizing. Balance benefits against added fitting costs and space constraints to guarantee functional, code-compliant results.
- Multiple appliances added
- Higher peak flow expected
- Existing frequent backups
Choosing the Right Size for Double‑Bowl Sinks
For double-bowl sinks, selecting the appropriate drain pipe size requires balancing flow capacity between two fixtures and the main waste line.
Common options include 1-1/2 inch and 2 inch trap arms, with larger diameters easing simultaneous use and reducing clog risk.
Proper installation and venting layout guarantee both bowls drain efficiently and meet local plumbing codes.
Drain Pipe Size Options
Several common drain sizes suit double‑bowl sinks, with 1½‑inch and 1¼‑inch trap arms being the typical options depending on flow needs and local code. Selection hinges on combined fixture discharge, disposal presence, and expected water load. Larger diameters reduce clog risk and accommodate disposals; smaller sizes suffice for light use and conserve space. Material and adapter compatibility also influence choice. Consider local regulations and whether a single or dual tailpiece configuration will join at a common trap.
- 1½-inch: standard, handles higher flow and disposals
- 1¼-inch: compact, for light dual‑bowl use
- 2‑inch: rare, for specialized high‑flow setups
Installation And Venting
Having chosen a drain diameter based on flow and disposal needs, attention turns to how those pipes are installed and vented to maintain proper drainage and prevent traps from siphoning. For double‑bowl sinks, each bowl requires a trap; traps may join into a single branch that leads to a vented sanitary tee. Adequate slope (1/4″ per foot) and correct traparm length prevent clogs and siphoning. Local codes determine vent size and placement; island sinks need island vents. Professional installation guarantees compliant connections and minimizes odors or slow drains.
| Component | Requirement |
|---|---|
| Slope | 1/4″ per ft |
| Vent | Code‑sized, correctly placed |
How Basket Strainer Size Affects Your Tailpiece
When a sink’s basket strainer diameter changes, it directly determines the tailpiece size and connection type required; larger strainers typically need wider tailpieces or adapters, while smaller strainers pair with narrower tailpieces and may use threaded or slip-fit couplings. The tailpiece must align with the strainer outlet to guarantee a watertight seal and proper flow. Material, finish, and outlet height also influence compatibility. Incorrect matching can cause leaks, misalignment with traps, or reduced drainage.
- Verify outlet diameter and thread style before purchasing.
- Match tailpiece length to trap inlet position.
- Choose corrosion-resistant materials for longevity.
Using Adapters and Reducers for Mismatched Sizes
When a sink’s tailpiece and drainpipe differ in diameter, selecting the correct reducer guarantees a secure, watertight changeover and maintains proper flow.
The chosen adapter should match pipe materials and include the appropriate gasket or compression fitting for the application.
Careful installation—seating seals fully and tightening to manufacturer torque—prevents leaks and makes future disassembly easier.
Choosing The Right Reducer
In selecting a reducer, attention should focus on matching pipe diameters, material compatibility, and joint type to guarantee a watertight, code-compliant connection. The right reducer minimizes turbulence, prevents leaks, and preserves trap function.
Inspect dimensions carefully: nominal vs. actual OD/ID, and confirm materials (PVC, ABS, copper, stainless) for solvent welds, compression fittings, or threaded joins. Avoid mixing incompatible solvents or adhesives.
Consider flow direction and available space; eccentric fittings are preferred when maintaining trap seal levels. Verify local code for required fittings and allowable conversions before purchase.
- Confirm exact diameters and fitting style
- Match materials and joining method
- Use eccentric fittings where elevation matters
Proper Adapter Installation
How should adapters and reducers be installed to guarantee a secure, code-compliant connection between mismatched sink drain sizes? Installers should select components rated for the materials and pipe schedule specified by local code.
Clean and deburr pipe ends, then dry-fit parts to confirm alignment and slope.
Use appropriate gaskets, slip nuts, and thread sealant or plumber’s tape where required; avoid excessive sealant that can obstruct flow. Tighten fittings evenly to manufacturer torque recommendations.
Support joined sections with hangers to prevent stress.
After assembly, perform a water and air test to verify there are no leaks and that traps and vents function correctly.
Quick Checklist for Replacing a Sink Drain Assembly
Before starting work, confirm the correct replacement parts, gather basic tools (adjustable wrench, plumber’s putty or silicone, plumber’s tape, bucket, rags), and shut off the water supply or isolate the fixture to prevent spills.
The homeowner should inspect the sink flange, tailpiece, gasket, and trap for compatibility and wear. Measure diameters and note thread types to avoid returns. Prepare a clean workspace and have a mild cleaner for sealing surfaces.
During reassembly, hand-tighten fittings first, then secure to manufacturer torque recommendations to prevent leaks without cracking components.
- Verify parts fit and are rated for sink type
- Clear workspace and protect cabinet
- Test for leaks before restoring normal use
Confirming a Disposal Outlet Diameter Before Buying
After verifying drain parts and workspace readiness, the next step is confirming the disposal outlet diameter to guarantee a proper fit.
The installer measures the disposal flange opening and the disposal’s outlet spud with calipers or a tape measure, noting common sizes (typically 1-1/2 inch or 2 inches). They compare measurements to the sink tailpiece and mounting assembly, ensuring compatible slip-joint or threaded connections.
If an adapter is required, its dimensions and material durability are checked. Accurate measurement prevents mismatches, unnecessary returns, and installation delays, and supports selection of a disposal unit that mates cleanly with existing plumbing.
Troubleshooting Slow Drains Caused by Wrong Sizing
When slow draining persists, the first step is to inspect the pipe diameter for undersized sections that restrict flow.
Next, check P-trap alignment and fittings for sags or offsets that create low points where debris accumulates.
Finally, confirm venting is clear, since blocked or improperly sized vents can cause slow drainage despite correct pipe diameters.
Inspect Pipe Diameter
How will the pipe diameter affect flow? The inspector notes that diameter governs velocity and resistance: smaller pipes increase friction and clog risk, larger pipes may reduce self‑scouring and slow drainage if slopes are inadequate.
Measuring internal diameter with calipers or a tape guarantees compatibility with fixtures and fittings. Compare measurements to common sizes (1-1/2″, 1-1/4″, 2″) to identify mismatches. Replace or adapt connectors when sizes differ to restore proper flow. Consider material thickness and buildup when evaluating effective diameter.
- Measure internal bore at several points for accuracy.
- Record size and compare to fixture specs.
- Note obstructions reducing true diameter.
Check P-Trap Alignment
In evaluating slow drains attributed to incorrect sizing, the inspector verifies P‑trap alignment to confirm the trap inlet, outlet and tailpiece sit on a single plane without undue bends or offsets.
Visual assessment determines whether misalignment forces the trap into angled fittings, creating low spots that collect debris and reduce flow.
Measurements check centerline heights and horizontal distances against standard trap arm lengths and outlet positions.
If mismatched, replacement of the tailpiece or use of properly sized straight connectors restores alignment.
Properly aligned traps maintain smooth water velocity, minimize standing water and help reveal remaining causes of slow drainage.
Clear Venting Obstructions
After confirming proper P‑trap alignment, the inspector examines venting for obstructions that can mimic or worsen slow drainage caused by undersized piping. The vent stack and branch vents are checked for nests, debris, or ice that restrict airflow. Restricted venting reduces trap siphonage and flow, so clearing blockages often restores proper drainage without resizing pipes. Techniques include mechanical rodding, water flushing, or using a plumber’s auger; severe obstructions may require roof access.
The inspector documents findings and recommends corrective action, noting when pipe diameter is actually the root cause.
- Inspect roof openings for visible blockages
- Use auger or rod to clear vents
- Recommend professional roof access for stubborn clogs
Preventing Siphon and Trap Seal Loss With Proper Sizing
Maintaining an appropriate trap and waste-arm diameter prevents siphoning and preserves the trap seal that blocks sewer gases. Proper sizing matches fixture drainage rates, avoids excessive velocity that can pull water from the trap, and prevents slow flow that allows evaporation or solids buildup. Codes typically specify 1½-inch or 2-inch traps for sinks; selecting the correct size for combined loads reduces risk. Regular inspection confirms trap integrity. The table below summarizes key considerations and outcomes.
| Consideration | Outcome |
|---|---|
| Trap diameter match | Stable trap seal |
| Waste-arm sizing | Prevents siphon |
| Combined loads | Avoids seal loss |
How Slope and Pipe Run Length Affect Required Diameter
Slope and run length directly influence the minimum drain diameter needed to guarantee self-cleansing velocity and prevent standing water. Longer runs increase friction loss, requiring larger diameters or steeper slopes to maintain flow; conversely, short runs tolerate smaller pipes. Codes prescribe minimum slope (e.g., 1/4″ per foot for 1½–2″ drains) and limit run length before upsizing.
Material, fittings, and flow rate also modify effective head loss, so planners calculate required diameter from total equivalent length and desired velocity. Conservative design errs toward larger pipes when run or fittings are numerous to avoid clogging.
- Longer runs raise friction loss.
- Steeper slope restores velocity.
- Fittings increase required diameter.
Typical Cost Differences by Drain Pipe Size
Cost differences between drain pipe sizes reflect more than just the raw price of materials, with larger-diameter pipes typically costing more in PVC, metal, or specialty materials.
Labor prices also vary, since wider pipes can require different fittings, more complex routing, or additional support that increases installation time.
Over the long term, maintenance costs—such as clog removal, replacement frequency, and access needs—further influence the total ownership cost of each pipe size.
Material Cost Differences
Across common kitchen sink drain sizes—typically 1 1/4″, 1 1/2″, and 2″—material costs vary predictably based on diameter and material type.
Different materials carry distinct price points: PVC is lowest, ABS slightly higher, brass and stainless steel cost more, and specialty finishes or thicker gauges raise prices further.
Cost scales with diameter due to increased material volume and larger fittings.
Corrosion resistance, code requirements, and longevity influence selection and price.
Budget planning should account for parts like traps, slip joints, and connectors that match the chosen material and size.
- PVC: economical, common
- ABS/CPVC: mid-range
- Brass/stainless: premium
Labor Price Variations
Labor rates and time requirements shift with drain pipe size, influenced by access, fitting complexity, and material handling.
Smaller 1¼–1½-inch kitchen sink drains generally require less labor: straightforward fittings and easy replacements lead to shorter service calls and lower hourly charges.
Larger or atypical drains, such as 2-inch runs or those tied into bulkhead systems, increase labor due to heavier fittings, additional sealing, and potential rerouting.
Tight under-sink access, wall or floor penetrations, and changes between materials (PVC, ABS, metal) further raise time and skilled-labor premiums.
Estimates typically reflect pipe diameter, accessibility, and needed specialty tools or connectors.
Long-Term Maintenance Costs
Longer-term maintenance expenses for kitchen sink drains scale with pipe diameter and material: smaller 1¼–1½-inch runs typically incur lower routine costs due to simpler clog clearing and fewer specialized parts, while 2-inch or nonstandard systems often require pricier seals, adapters, and occasional rerouting that raise service visits and parts replacement frequency.
Annual maintenance, frequency of clogs, and replacement part availability drive lifetime expenses.
Corrosion-prone metals and flexible plastic fittings can change cost trajectories.
Homeowners with simpler standard drains usually see lower cumulative costs; those with custom or commercial-sized drains should budget higher ongoing maintenance and occasional professional intervention.
- Standard 1¼–1½” : lower parts and labor costs
- 2″ or nonstandard: higher seal, adapter, reroute costs
- Material impacts: PVC vs metal long-term expense
DIY vs Pro Install: When Size Makes the Difference
Deciding whether to tackle a kitchen sink drain resize as a DIY project or hire a professional hinges on the pipe diameter, existing plumbing layout, and local code requirements.
For simple swaps between common 1¼-inch and 1½-inch tailpieces or replacing a trap, a competent DIYer can proceed if fittings match and venting is adequate.
Larger changes—transitioning to 2-inch drains, rerouting to meet code, or modifying concealed waste lines—typically require a licensed plumber to make certain proper slope, joint type, and permit compliance.
Safety, inspection access, and potential water damage risks justify professional work when scope or size complexity increases.
Tools You Need to Work on Sink Drain Assemblies
For working on sink drain assemblies, a concise set of hand tools and a few specialty items cover most jobs: adjustable wrenches, channel-lock pliers, slip-joint pliers, a basin wrench for hard-to-reach nuts, plumber’s putty or silicone, pipe joint compound or Teflon tape, and a set of screwdrivers.
Additional useful items include a compact flashlight, a bucket for catching water, and a rag. Protective gloves and safety glasses are recommended. Small replacement parts—washers, slip nuts, and tailpiece sections—save time. Properly sized tools prevent damage to fittings and finishes and make routine maintenance or minor repairs straightforward.
- Flashlight
- Bucket
- Replacement washers
How to Swap a 1½‑Inch Trap for a 2‑Inch Trap
After gathering the hand tools and a bucket from the previous step, the technician begins by confirming measurements and clearances: a 2‑inch trap is larger in diameter and may conflict with cabinet space, drain stub-out height, or existing tailpiece and wall elbow fittings.
The procedure proceeds: shut off water, place bucket, loosen and remove the 1½‑inch trap and slip nuts, inspect tailpiece and wall elbow for compatibility.
If needed, replace or adapt the tailpiece to a 2‑inch size and install matching P‑trap, aligning trap arm and trap seal.
Tighten slip nuts, test for leaks and proper flow; adjust as required.
Best Practices for Sealing Different Sized Connections
The discussion shifts to matching pipe and fitting dimensions precisely to guarantee a proper mechanical fit before sealing.
It then surveys appropriate sealant types—thread tape, pipe dope, and RTV silicone—and notes which perform best on different materials and joint types.
Practical application tips stress correct amount, cure time, and avoiding over-application that can obstruct flow.
Match Pipe And Fitting
When connecting pipes and fittings of different nominal sizes, ensuring a proper match of diameters, materials, and joint types prevents leaks and long-term failures.
The installer selects compatible reducers, adapters, or couplings rated for the pipe materials (PVC, ABS, metal) and verifies inner diameters and wall thicknesses to maintain flow and mechanical integrity.
Alignment, support, and correct insertion depth reduce stress on joints.
Compression or mechanical adapter fittings are preferred where solvent or welded joints are inappropriate.
Pressure ratings and local code requirements guide choices to avoid mismatches that cause corrosion or failure.
- Verify material compatibility and pressure rating
- Use listed adapter fittings
- Check insertion depth and support
Sealant Types And Application
Although sealant choice and application vary with pipe size and material, proper sealing principles remain consistent: select a compatible product, prepare mating surfaces, apply the correct quantity, and allow adequate cure time.
For PVC or ABS, use solvent cement or manufacturer-recommended primer; for metal threads, use thread sealant tape (PTFE) or pipe dope rated for potable water.
Rubber gaskets and silicone sealants suit compression fittings and flange joints. Avoid overapplication that squeezes into flow paths.
Clean, dry surfaces and follow temperature and cure-time guidelines. Test joints under pressure after cure.
Replace degraded sealants during maintenance to prevent leaks.
Inspecting and Replacing Worn Tailpieces and Traps
In inspecting and replacing worn tailpieces and traps, attention focuses on leaks, corrosion, and loose connections that compromise drainage and create odors. The process begins with a visual and tactile check: look for rust, hairline cracks, and softened plastic.
Shut off water, place a bucket, and loosen slip nuts; remove and inspect washers and gaskets. Replace components that show wear, matching pipe diameters and materials to existing plumbing. Reassemble carefully, hand-tightening then testing for drips. Properly fitted tailpieces and traps restore flow, prevent sewer gases, and extend fixture life.
- Check seals and washers
- Match pipe size and material
- Test under load
Common Measuring Mistakes to Avoid
Measure carefully to avoid misfits that lead to leaks, slow drainage, or repeated repairs. One should verify pipe diameter, thread type, and wall thickness; rushing or using visual guesses causes mismatches. Measure inside and outside diameters with calipers, confirm slip vs. threaded connections, and note any offsets or compression fittings. Allow for existing sealants and washers when sizing. Double-check units (inches vs. millimeters) and compare to replacement part specs. Avoid substituting similar-looking parts. The checklist below underscores consequences and emotions tied to mistakes.
| Mistake | Result | Feeling |
|---|---|---|
| Wrong diameter | Leak | Frustration |
| Incorrect thread | Jam | Anxiety |
| Misread units | Fail | Regret |
How Drain Size Affects Clog Frequency and Maintenance
Accurate sizing reduces installation errors, but the pipe diameter itself directly influences how often a kitchen sink will clog and what maintenance it requires. Smaller diameters slow flow, trapping grease and food solids more readily, increasing manual clearing or chemical treatments. Larger drains pass debris more easily, reducing blockages but complicating connections and waste trap fitting. Regular maintenance frequency correlates with usage, waste type, and diameter.
- 1½-inch drains: common, manageable clogs; frequent trap cleaning recommended.
- 1¼-inch drains: higher clog risk with heavy use; consider strainers and routine flushing.
- 2-inch drains: best for heavy loads; less frequent maintenance.
Matching Vent Size and Its Effect on Performance
How does vent size influence a kitchen sink’s drainage performance? Proper vent sizing controls air flow into the drain, preventing negative pressure that slows drainage or siphons traps.
An undersized vent restricts air admission, causing gurgling, slow emptying, and potential trap seal loss; an oversized vent rarely harms function but may be impractical or violate code.
Vent size requirements depend on fixture units and horizontal distances per local plumbing codes; longer or more obstructed runs often require larger vents or additional vents.
Correctly matched venting maintains consistent flow, protects against sewer gas infiltration, and reduces strain on the trap and waste line.
Retrofit Tips for Nonstandard Drain Sizes
When venting constraints are resolved, attention turns to adapting fixtures and piping when a kitchen sink has nonstandard drain dimensions. Retrofit focuses on sealing, alignment, and flow. Adapters or reducer couplings bridge unusual diameters; choose materials compatible with existing plumbing.
Measure stub-out depth and offset to verify trap and tailpiece alignment. Maintain trap seal depth and slope to prevent siphoning and backups. Test under load and inspect joints for leaks.
If corrosion or brittle plastics are present, replace segments rather than patching. When in doubt, consult local code or a licensed plumber to confirm compatibility and durability.
- Use purpose-made adapters for size mismatch.
- Check alignment before finalizing joints.
- Prefer replacing degraded parts over temporary fixes.
Reading Product Specs for Traps and Fittings
For a reliable retrofit, reading product specifications for traps and fittings is essential: manufacturers list critical dimensions, materials, flow capacities, and connection types that determine fit and performance.
Inspect trap arm length, inlet/outlet diameters, thread sizes, and compression or slip-joint details.
Note seal materials (rubber, silicone) and body materials (PVC, ABS, brass) for chemical and temperature compatibility.
Review maximum flow rate and trap seal depth to assure code compliance and prevent siphoning.
Confirm included adapters or required mating parts to avoid surprises.
Accurate spec matching reduces leaks, rework, and incompatibility during installation.
Recommended Sizes for Island and Bar Sinks
In kitchen islands and wet bars, selecting the correct drain and trap sizes guarantees proper drainage while fitting limited cabinet space and maintaining aesthetics. Island and bar sinks typically use 1-1/4″ or 1-1/2″ traps; choice depends on sink outlet and expected flow. Space constraints favor low-profile or drum traps when codes permit; longer tailpieces and properly pitched runs prevent clogs.
Venting requirements and disposal connections influence pipe diameter. Installers should confirm local code and fixture specifications before choosing fittings to ascertain compatibility and avoid retrofits.
- Common choices: 1-1/4″ for bar, 1-1/2″ for small kitchen sinks
- Use low-profile traps for cabinetry clearance
- Verify venting and disposal needs with codes
Quick Reference: Common Sizes, Fittings, and OD/ID
Moving from sizing choices for islands and bars to a compact reference, this section lists the typical drain diameters, common fittings, and their outer and inner dimensions so installers can match parts quickly.
Typical sink tailpieces: 1-1/2 inch nominal (OD ~1.66″, ID ~1.50″).
Common trap arms and P-traps: 1-1/2″ and 1-1/4″ options (1-1/2″ OD ~1.66″, ID ~1.50″; 1-1/4″ OD ~1.38″, ID ~1.25″).
Tubing and slip-joint nuts vary by manufacturer; compression washers fit OD ranges.
Adapters reduce from 1-1/2″ to 1-1/4″.
Waste fittings and strainer threads follow standard nominal sizes.
When to Consult Local Code or a Licensed Plumber
When local regulations or complex site conditions affect installation, consultation with the applicable plumbing code and a licensed plumber becomes necessary. Code interpretations, permit requirements, and variance procedures differ by jurisdiction; a plumber guarantees compliance and avoids costly rework. Complexities such as multi-fixture drains, shared stacks, older homes with unknown piping, or remodels that change drainage loads warrant professional assessment. Safety, health, and insurance considerations also favor licensed involvement when uncertainty exists.
- Confirm permit needs and local venting/trap requirements.
- Assess compatibility with existing materials and slopes.
- Identify required inspections, testing, or licensed sign-offs.
Decision Flow: Pick the Right Kitchen Sink Drain Size
After confirming code requirements and whether a licensed plumber is needed, the decision flow for selecting a kitchen sink drain size guides users through a few clear checkpoints: fixture type (single or double bowl, disposer), total downstream load, existing pipe diameters, and required trap and vent configurations.
Next, assess flow capacity: disposers and double sinks often require 1½-inch minimum traps with 2-inch building drains in high-demand setups.
Check existing piping; upsizing may be necessary if branch lines restrict flow.
Verify trap arm length and venting to prevent siphonage.
Conclude by matching components to code-approved sizes and documenting any alterations for inspectors.
Conclusion
In the end, the sink’s plumbing quietly judges kitchen ambitions: a 1½‑inch tailpiece pats modest countertops on the head, while a 2‑inch throat smirks at double-basin bravado. Municipal codes and plumbers hover like stern chaperones, insisting practicality over culinary drama. The homeowner, armed with tape measure and misplaced confidence, discovers that drain size is less romance than arithmetic — a small, soggy reminder that pipes govern dreams more reliably than Pinterest.