Why Did My Pipe Burst? Top Causes & Prevention Tips for Homeowners
A burst pipe typically occurs due to a few key factors: freezing temperatures, corrosion, excessive pressure, blockages, or poor installation practices. When water freezes, it expands and can crack pipes. Corrosion can weaken metal pipes over time, leading to failure. High pressure from the plumbing system or water hammer can stress joints, while clogs can increase pressure upstream, causing ruptures. Additionally, using improper materials or poor soldering can create weak points in the plumbing. To limit damage from a burst pipe, temporary fixes and turning off the main water supply are essential. For a more in-depth understanding of diagnosing causes and preventing future breaks, further guidance is available.
If a Pipe Is Bursting Now : Stop Water and Stay Safe
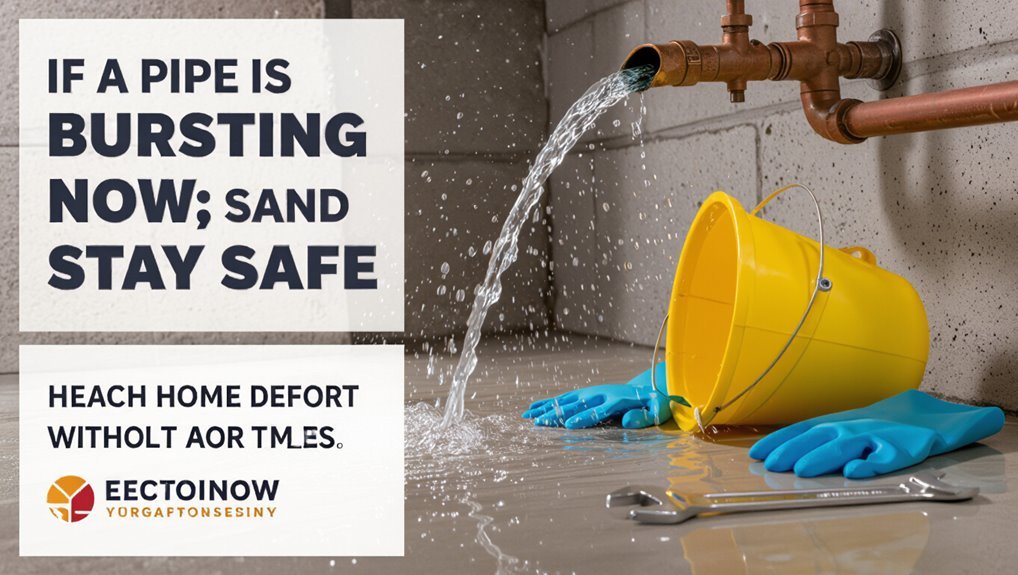
Shut off the main water supply immediately and move people and pets away from the affected area to reduce injury and property damage.
The homeowner should locate the main shutoff, turn it off, and open nearby faucets to relieve pressure.
Electrical sources near pooled water must be deactivated by a qualified person or utility.
After stopping flow, document damage for insurance with photographs and notes.
Contain spreading water with towels, buckets, and temporary barriers.
Call a licensed plumber promptly for repair and a water-mitigation professional to dry and sanitize affected areas to prevent mold and structural deterioration.
Top Causes of Residential Pipe Bursts (Quick Summary)
Frequently, residential pipe bursts stem from a handful of predictable issues that compromise pipes’ integrity: freezing temperatures and resultant ice expansion, prolonged corrosion and deterioration, excessive water pressure or sudden pressure changes, physical impact or ground movement, and poor installation or substandard materials.
These causes often act alone or together, producing leaks, weak joints, or abrupt failures. Homeowners and inspectors should note common contributors and prioritize targeted prevention.
Typical categories include:
- Corrosion and age-related weakening
- Pressure spikes, water hammer, or sustained overpressure
- Mechanical damage from excavation, accidental strikes, or shifting soil
- Faulty fittings, improper soldering, or low-grade pipe materials
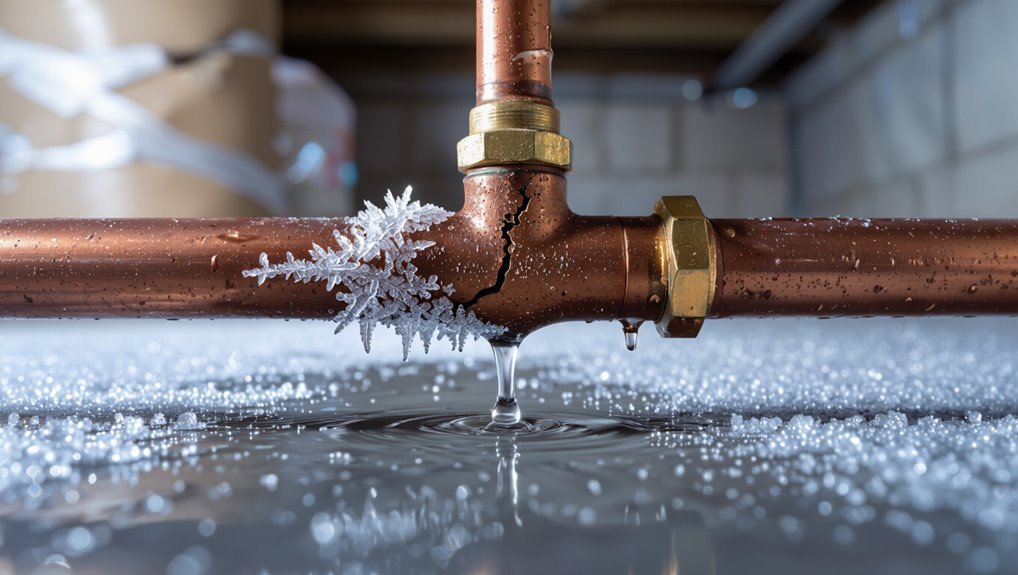
How Freezing Temperatures Split Pipes and How to Recognize It
Freezing water expands and can crack or split pipe walls as internal ice forms and pressure rises.
Visible signs often appear before a full rupture, including frost on exposed pipes, reduced water flow, or bulging sections.
Recognizing these early warning signs allows prompt action to prevent catastrophic failure.
Ice Expansion Damage
Expanding water that turns to ice exerts enormous pressure inside a pipe, enough to crack metal, PVC, or copper even when the pipe wall itself appears intact.
Ice expansion damage fractures joints, splits fittings, and forces seams apart; failures often occur at bends, clamps, and threaded connections.
Repair needs depend on location and material; sometimes sections must be replaced rather than patched.
Prevention focuses on insulating vulnerable runs and maintaining interior heat.
Consequences include hidden leaks, structural water intrusion, and costly repairs if unnoticed.
- Causes: freezing, trapped water, poor insulation
- Typical failure points: bends, fittings, joints
- Repair: replace damaged segments
- Prevention: insulation, heat maintenance
Early Warning Signs
Having covered how ice exerts destructive pressure on pipes and where damage typically appears, attention turns to the signs that freezing conditions are beginning to compromise a plumbing run.
Early indicators include reduced water flow or sputtering faucets as partial blockages form from ice. Unusual noises—clanking, banging, or ticking—can signal thermal stress or shifting ice. Frost on exposed pipes, especially in basements, crawlspaces, or exterior walls, warns of dangerously low temperatures. Musty or damp odors and tiny wet spots near fittings may reflect micro-leaks. Prompt recognition of these signs allows homeowners to thaw, insulate, or shut off lines before rupture.
Aging and Corrosion: Signs Old Pipes Will Fail
As pipes age, protective coatings thin and metal deteriorates, making corrosion a primary cause of eventual failure. Homeowners may observe visual and functional clues long before a rupture. Regular inspection identifies thinning walls, pitting, and greenish or rust-colored deposits. Sediment buildup accelerates internal decay and reduces flow, while joint weakness signals seal breakdown. Hidden corrosion under insulation or behind walls often produces unexplained stains or odors.
- Flaking or rust-colored deposits on fixtures.
- Reduced water flow and frequent sediment in taps.
- Visible pitting or thinning where accessible.
- Stains or damp spots with no surface leak.
High Water Pressure and Water Hammer : How to Spot Stress on Pipes
High water pressure often reveals itself through rattling pipes, unusually fast filling fixtures, or frequent pressure relief valve discharge.
Sudden loud bangs or shocks in the plumbing indicate water hammer, which subjects joints and fittings to repeated stress.
Together, these signs—repeated vibration, visible pipe movement, and weakened or leaking connections—signal increased risk of pipe failure.
High Pressure Signs
In many homes and buildings, excessive water pressure and sudden pressure spikes known as water hammer are common causes of pipe stress and eventual failure.
Signs of high pressure include visible leaks, frequently burst fittings, and premature appliance wear.
Homeowners should watch for rapid faucet vibration and persistent dripping after shutoff.
Routine pressure checks help catch issues early.
- Gauges reading above 60 psi indicate elevated system pressure.
- Repeated small leaks at joints suggest sustained stress.
- Shortened appliance lifespan (water heaters, dishwashers) signals overpressure.
- Stiff, noisy pipes under flow point to damaging force.
Water Hammer Symptoms
Many homeowners notice a sudden, loud banging or knocking in their plumbing when faucets or appliances shut off—classic signs of water hammer. This phenomenon occurs when moving water is forced to stop or change direction rapidly, creating pressure waves that rattle pipes and fittings. Symptoms include intermittent knocking, vibrating pipes, loose fixtures, and occasional sputtering at outlets. Repeated events can loosen joints and stress supports. Early recognition helps prevent progressive damage and costly repairs. The table below summarizes common signs, typical locations, and immediate actions to contemplate.
| Sign | Location | Immediate Action |
|---|---|---|
| Loud bangs | Walls/attic | Close main valve |
| Knocking | Basement | Secure pipes |
| Vibrations | Under sinks | Check fixtures |
| Sputtering | Faucets | Inspect air chambers |
| Recurrent | Whole house | Call plumber |
Pipe Stress Indicators
Detectable signs of pipe stress reveal whether excessive water pressure or repeated water hammer is compromising a plumbing system’s integrity. Observable indicators include vibrating pipes, frequent joint leaks, and sudden tap shocks; these point to pressure surges or sustained overpressure. Visual and audible cues guide diagnosis and urgency.
- Loud bangs when valves close indicate water hammer.
- Continuous vibration along runs suggests high static pressure.
- Persistent dripping at fittings signals weakened seals.
- New hairline cracks or bulges reveal metal fatigue from cyclic stress.
Prompt assessment and pressure testing reduce burst risk and prioritize targeted repairs.
Clogs and Blockages That Raise Pressure and Lead to Bursts
A clogged pipe creates a pressure imbalance that can quickly escalate into a rupture if the obstruction prevents normal flow. Debris, mineral buildup, grease, or foreign objects narrow passages, raising upstream pressure and stressing joints and walls.
Repeated or partial blockages produce cyclical pressure spikes during use, weakening material over time. Symptoms include slow drains, gurgling, unusual noises, and localized swelling in exposed piping.
Routine maintenance—flushing, mechanical clearing, and water-softening where hard water exists—reduces buildup. Promptly addressing slow flow and avoiding flushing solids or grease prevents excessive internal pressure and lowers the chance of a burst.
Bad Installation and Wrong Materials That Increase Rupture Risk
Poor fittings and sloppy joints undermine a system’s integrity, creating weak points where leaks and ruptures can start.
Using incompatible materials—such as mismatched metals or plastics not rated for the pressure or temperature—accelerates corrosion and stress.
Examining common connection errors and material mismatches clarifies how installation choices raise rupture risk.
Improper Pipe Connections
Misaligned joints, incompatible fittings, and weak seals create stress points that dramatically raise the chance of a pipe bursting. Improper connections concentrate pressure and encourage fatigue, corrosion, or leaks. Inspection and correct assembly reduce risk.
- Use proper coupling techniques to make sure aligned, secure joints.
- Tighten fittings to manufacturer torque; avoid overtightening that fractures threads or compresses seals.
- Employ compatible sealants and gaskets rated for the fluid, temperature, and pressure.
- Verify soldering, brazing, or solvent-welds meet code and show consistent penetration without gaps.
Regular professional inspection catches installation faults before catastrophic failure.
Incompatible Material Choices
Several common material mismatches markedly raise the likelihood of pipe failure by creating chemical reactions, galvanic corrosion, or mechanical incompatibility at joints and shifts.
Mixing copper and steel without proper dielectric fittings accelerates corrosion; aluminum components paired with copper or brass can pit rapidly.
Using incompatible plastics with solvent-welded fittings causes weak bonds and leaks under pressure.
Incorrect adhesive, sealant, or gasket choices degrade seals and invite rupture.
Thermal expansion differences between dissimilar materials stress connections during temperature swings.
Proper selection, isolation fittings, manufacturer recommendations, and adherence to codes reduce risk; inspections catch risky combinations before catastrophic failure.
Quick Temporary Fixes for a Burst Pipe Before the Plumber Arrives
When a pipe bursts, immediate temporary measures can limit water damage and buy time until a professional arrives; shutting off the main water supply, containing escaping water with buckets or towels, and applying a quick seal—such as pipe repair tape, a rubber patch secured with hose clamps, or an emergency pipe clamp—are effective short-term steps that minimize flooding and protect surrounding structures.
- Cut power to nearby outlets before approaching to reduce shock risk.
- Elevate and protect valuables; use towels, plastic, and buckets to channel flow.
- Apply wrap tape or a rubber patch with clamps; tighten gradually to avoid further cracking.
- Document damage and call a licensed plumber promptly.
Preventive Maintenance Checklist : Seasonal and Yearly Tasks
As seasons change, a concise preventive maintenance checklist helps homeowners spot vulnerabilities before they lead to bursts.
Inspect exposed pipes quarterly for leaks, corrosion, and insulation gaps.
Winterize by insulating exterior and basement plumbing, draining outdoor lines, and maintaining consistent indoor temperature.
Spring and fall, clear gutters and downspouts to prevent ice dams and foundation moisture that stress pipes.
Annually, test pressure relief valves, check water pressure, and exercise shutoff valves.
Schedule a professional plumbing inspection yearly to detect hidden issues.
Keep records of inspections, repairs, and replacements to track trends and prioritize timely interventions.
Affordable Home Upgrades and Repairs That Cut Burst Risk
For homeowners seeking cost-effective ways to reduce the risk of pipe bursts, targeted upgrades and small repairs often deliver the best return: add pipe insulation to exposed runs, install heat tape for vulnerable outdoor faucets and short interior stretches, replace worn shutoff valves, and swap out old galvanized or polybutylene lines with modern PEX or copper where budget allows.
Practical, low-cost measures include sealing gaps where cold air enters, insulating crawlspaces, and installing pressure-reducing valves to limit stress. Prioritize visible corrosion, slow leaks, and areas that freeze most often.
- Insulation and heat tape
- Replace aged valves
- Seal drafts
- Pressure control
Conclusion
When a pipe bursts, swift action and preventive care matter. One in 50 U.S. households experiences a significant water leak or damage each year, underscoring how common and costly failures can be. Homeowners who understand freezing risks, aging materials, pressure issues, and poor installation—and who perform seasonal checks and timely upgrades—dramatically reduce their odds of a costly rupture. Small, consistent steps often prevent the most damaging surprises.