How to Use Freon Gauges Safely: Step-by-Step Guide for HVAC Beginners
To safely use Freon gauges as an HVAC beginner, always wear personal protective equipment (PPE), ensure proper ventilation, and use the correct gauge sets for your specific refrigerant. Start by verifying the ports, purging hoses, and securely attaching the low and high side lines. Measure static and running pressures while accounting for temperature and elevation. Keep an eye out for leaks, avoid cross-threading, and adhere to lockout and recovery regulations. Document superheat and subcooling for precise charging. Familiarize yourself with emergency response protocols and maintain thorough documentation for compliance. For more advanced techniques, additional guidance is available.
How to Use Freon Gauges Safely: Quick Overview and Key Takeaways
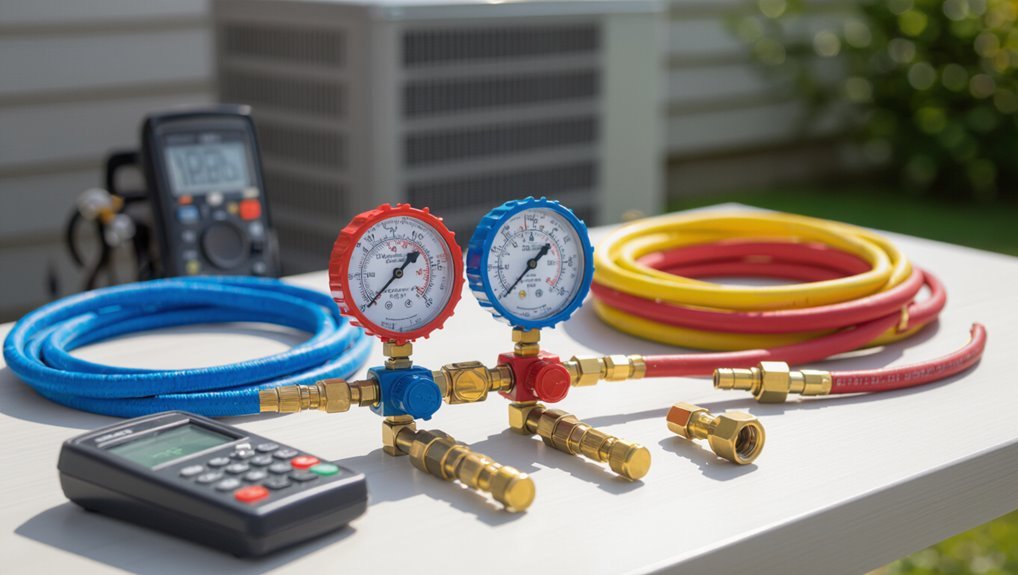
A refrigerant gauge measures system pressures to diagnose and service cooling equipment, and using it safely prevents injury and environmental harm.
Before connecting gauges, users must wear protective gear, verify equipment compatibility, work in a ventilated area, and follow proper procedures to avoid leaks or overpressurization.
If the system shows unexpected readings, contains unknown refrigerants, or requires recovery or major repairs, a licensed HVAC technician should be called.
What a Freon (Refrigerant) Gauge Is and Why Safe Use Matters
Freon (refrigerant) gauges are precision instruments that measure the pressure of refrigerant within HVAC and refrigeration systems, providing critical data for diagnosis and charging.
They translate system pressures into actionable information, helping technicians determine charge status, leaks, and performance.
Proper understanding of how to use freon gauges reduces equipment damage, environmental release, regulatory violations, and personal injury risk, underscoring safe, informed operation.
Immediate safety summary must-do precautions before starting
Given the role of refrigerant gauges in diagnosing and charging systems, technicians should follow a short checklist of safety actions before connecting any hoses or opening service valves.
Verify PPE (gloves, goggles), confirm proper refrigerant type and gauge compatibility, guarantee valves and hoses are intact, work in ventilated space, isolate electrical power, and have emergency contact and first-aid access available.
When to call a licensed HVAC technician instead of DIY
Contact a licensed HVAC technician when diagnostic complexity, safety risks, or legal restrictions exceed routine gauge checks and simple low/high side pressure readings.
Professional help is required for refrigerant leaks, noncondensable gases, compressor or valve failures, electrical or control issues, system retrofits, or EPA-certified refrigerant handling.
Technicians provide proper tools, leak detection, recovery, accurate charging, and regulatory compliance to prevent damage, injury, or fines.
Required Tools, Equipment, and Personal Protective Gear
A technician preparing to work with refrigerant gauges should assemble the correct gauge set—choosing between analog and digital models—and verify all manifold components, hoses, and fittings are in good condition.
Essential adjunct tools include a calibrated thermometer, leak detector, and properly rated manifold and hoses, while PPE such as safety goggles, gloves, and adequate ventilation are required to prevent exposure.
Before beginning, the technician must confirm refrigerant type and guarantee gauge oil and fittings are compatible to avoid contamination or equipment damage.
Refrigerant gauge set components and types (analog vs digital)
Refrigerant gauge sets consist of hoses, valves, manifolds, and pressure gauges—either analog dials or digital displays—designed to monitor system pressures and control refrigerant flow during service.
The technician evaluates accuracy, durability, and ease of reading; digital units offer data logging, analog units provide robust simplicity.
Selection depends on task, environment, and calibration needs.
- Hoses
- Valves
- Manifold
- Gauge type
Essential tools beyond the gauge (manifold, hoses, thermometer, leak detector)
Essential tools beyond the gauge guarantee accurate diagnosis, safe handling, and efficient service of refrigeration and air-conditioning systems.
A compact manifold, durable color-coded hoses, an accurate thermometer for superheat/subcooling, and a sensitive leak detector are indispensable.
Proper selection and maintenance of these items prevent misdiagnosis, equipment damage, and refrigerant loss.
- Manifold
- Hoses
- Thermometer
- Leak detector
Personal protective equipment and ventilation requirements
Wear appropriate personal protective equipment (PPE) and guarantee adequate ventilation whenever servicing refrigeration or air-conditioning systems to prevent chemical exposure, frostbite, and asphyxiation.
Technicians should assess work area airflow, evacuate confined spaces, and use monitoring as needed.
- Safety goggles and face shield
- Chemical-resistant gloves and insulated gloves
- Protective clothing and boot covers
- Portable exhaust or blower fans
Compatibility: identifying refrigerant type and gauge oil compatibility
Confirm the refrigerant type and gauge oil compatibility before connecting any service gauges to a system.
Technicians must verify refrigerant labels, system documentation, or perform identification tests.
Use gauges, hoses, and oil approved for that refrigerant class; miscible oils differ between mineral, alkylbenzene, and PAG types.
Incompatible oil or seals risk contamination, component damage, and inaccurate readings—replace or adapt equipment as required.
Preparing the System and Workspace
Before connecting gauges, the technician verifies that the system is powered down and properly locked out to prevent accidental startup.
They inspect hoses, valves, and gauges for leaks, cracks, or signs of wear and guarantee the workspace is well ventilated and clear of bystanders.
They also confirm compliance with applicable refrigerant handling laws and environmental reporting or recovery requirements.
Confirm system is powered down and locked out
Shut down the HVAC or refrigeration unit at its main disconnect and verify all power sources are isolated before any service begins.
The technician applies lockout/tagout devices, posts warnings, and confirms zero voltage at control panels with a meter.
Capacitors are discharged and starter controls secured.
Only after verified isolation should gauges be connected or further preparatory checks continue.
Inspect hoses, valves, and gauge condition for leaks or damage
Inspect hoses, valves, and gauges visually and by touch for cuts, bulges, corrosion, cracked fittings, or loose connections that could leak under pressure.
Verify hose O-rings and fittings seat properly. Check valve stems for smooth operation and absence of debris.
Ascertain gauge faces are intact and readings zero when isolated.
Replace any compromised component before proceeding to connect or pressurize the system.
Establish safe workspace and ventilation; avoid enclosed spaces
Clear the immediate area and position work at least several feet from doors or vents so any released refrigerant disperses outdoors; never perform charging or recovery in basements, enclosed garages, or small rooms with limited airflow.
Establish cross-ventilation, use portable fans to direct airflow away from occupants, keep ignition sources distant, cordon the zone, post warning signs, and guarantee easy egress for technicians and bystanders.
Legal and environmental considerations: refrigerant handling regulations
Alongside proper workspace setup and ventilation, technicians must follow federal, state, and local refrigerant handling laws to avoid fines, environmental harm, and liability.
Compliance includes EPA certification, accurate leak detection and repair, proper recovery and recycling procedures, and correct documentation.
Disposal and purchases must match allowed refrigerant types.
Staying current with regulations prevents penalties and protects the ozone and climate.
Step-by-Step Procedure to Connect and Read Freon Gauges Safely
The technician first verifies the system’s high‑side and low‑side service ports, then purges hoses to expel air and moisture before connection.
Low‑side and high‑side hoses are attached to their respective ports and secured, after which valves are opened in the prescribed sequence to control refrigerant flow.
Static and running pressures are recorded carefully, ensuring readings are stable and taken with the system in the correct operating state.
Identifying service ports (high-side vs low-side)
Before attaching gauges, technicians must locate and distinguish the system’s service ports: the low-side (suction) port and the high-side (discharge) port.
The low-side typically has a larger diameter, lower pressure, and is near the evaporator or compressor suction. The high-side is smaller, higher pressure, and near the condenser or compressor discharge.
Confirm via service port caps, labeling, and system schematic.
Purging hoses and preventing air contamination
With the service ports identified, attention shifts to purging hoses to prevent air and moisture from entering the refrigeration circuit.
The technician vents a brief refrigerant puff from the gauge manifold to displace air, then quickly clamps and connects hoses.
Use dry, clean hoses; inspect for oil or debris.
Confirm valves remain closed until system pressures stabilize and contamination risk is minimized.
Properly attaching low-side and high-side hoses to service ports
Begin by matching each gauge hose to its corresponding service port: the low-side (usually blue) hose to the larger-diameter, low-pressure port near the compressor or evaporator, and the high-side (usually red) hose to the smaller, high-pressure port near the condenser.
Inspect fittings for damage, confirm valve cores are seated, align and push hose couplers firmly, then tighten hand-tight and verify secure, leak-free connections before proceeding.
Opening valves in the correct sequence and controlling flow
After confirming secure, leak-free hose connections, the technician proceeds to open valves in a controlled sequence to prevent pressure surges and guarantee accurate readings.
The low-side valve is cracked first, allowing slow pressure equalization. Then the high-side valve is opened gradually.
Flow adjustments are made using gauge knobs and manifold valves, monitoring hand feel and needle movement to avoid sudden spikes.
Taking accurate static and running pressure readings
To take reliable static and running pressure readings, the technician follows a precise, step-by-step routine that isolates system conditions and minimizes measurement error.
They first record static pressures with compressors off and service valves closed. Then, they restart equipment and note running pressures after stabilization.
Connections are leak-checked, hoses supported, and manifold valves operated slowly to prevent pressure spikes and guarantee repeatable, safe measurements.
Interpreting gauge readings for common refrigerant types
With static and running pressures documented, the technician compares those readings to expected pressure-temperature relationships for the system’s refrigerant to determine charge condition and component performance. Reference common refrigerants, typical low/high side ranges, and temperature equivalents; note deviations indicating overcharge, undercharge, or restrictions.
| Refrigerant | Low Side psi | High Side psi |
|---|---|---|
| R-22 | 60–80 | 200–300 |
| R-410A | 120–140 | 350–450 |
| R-134a | 30–50 | 150–220 |
Safely disconnecting and capping service ports
Disconnecting and capping service ports requires steady hands and the correct sequence to prevent refrigerant release, contamination, or damage to valves.
Close manifold valves, purge hoses by briefly opening low‑side to manifold, then shut.
Unscrew hose from service port slowly; catch residual with short burst into recovery.
Immediately install and tighten protective caps, inspect for leaks, and record actions.
Interpreting Readings and Diagnosing Common Issues
The technician compares measured high- and low-side pressures to expected ranges for the specific refrigerant, ambient temperature, and whether the system is idle, starting, or running under load.
Characteristic gauge patterns—such as low suction with high discharge, equalized pressures, or fluctuating readings—help distinguish undercharge, overcharge, restrictions, or component failures.
Readings that show extreme high discharge pressure, no suction pressure, or rapid loss of charge prompt immediate shutdown to prevent compressor or system damage.
Normal pressure ranges by refrigerant, ambient conditions, and system state
Because pressure readings reflect refrigerant type, outdoor temperature, and whether the system is running, accurate interpretation requires comparing measured gauge values to expected ranges for the specific refrigerant and operating condition. Typical low/high pressures vary by refrigerant and ambient load; consult manufacturer charts. Example reference:
| Refrigerant | Ambient Temp | Typical Low/High (psi) |
|---|---|---|
| R-22 | 75°F | 68 / 225 |
| R-410A | 95°F | 135 / 400 |
| R-134a | 60°F | 24 / 140 |
Signs of undercharge, overcharge, and blockages from gauge patterns
When pressures on the low and high sides deviate from expected ranges for a given refrigerant and load, distinct gauge patterns point to undercharge, overcharge, or flow restrictions.
Low suction with low head suggests undercharge; low suction with high head can indicate restriction or noncondensible gas.
High suction and high head often reflect overcharge or high ambient load.
Sudden pressure drops suggest partial blockages.
Diagnosing compressor, expansion device, and leak-related problems
Having identified pressure patterns indicative of undercharge, overcharge, or flow restrictions, attention shifts to pinpointing whether readings originate from compressor faults, expansion device malfunctions, or leaks.
Technicians compare superheat/subcooling, observe cycling and vibration, and note temperature differentials.
High head pressure with low suction suggests compressor or condenser issues; erratic superheat points to expansion device faults; equalized low pressures indicate leaks.
When readings indicate immediate shutdown to prevent damage
Shut down the system immediately if gauge readings fall into ranges that predict imminent component damage or unsafe operating conditions.
High discharge pressure, low suction pressure with overheating, rapid pressure spikes, or vacuum on the liquid line require immediate stop.
Record readings, isolate power, ventilate area for leaks, and tag equipment.
Arrange qualified technician intervention for diagnosis, repair, and safe restart procedures.
Common Mistakes and How to Avoid Them
Common mistakes with Freon gauges often stem from unsafe connection and purging practices, incorrect interpretation of readings influenced by temperature and altitude, and use of the wrong refrigerant tables or mixed refrigerants.
Failures to wear appropriate PPE, to use regulators properly, or to follow environmental disposal rules further increase risk. Addressing these specific errors reduces hazards and improves diagnostic accuracy.
Dangerous connection and purging errors
Mistakes during connection and purging—such as cross-threaded fittings, loose hoses, or failing to purge air and moisture—create immediate hazards including refrigerant leaks, gauge damage, and risk of compressor contamination.
Technicians must verify thread engagement, use correct adapters, tighten to torque specs, and purge lines with dry nitrogen until bubbles cease.
Inspect hoses and valves for wear; replace damaged components before charging.
Misreading gauges due to temperature and altitude effects
After addressing connection and purging errors, attention turns to reading gauges accurately under varying environmental conditions.
Technicians must compensate for ambient temperature and elevation when interpreting pressure readings; failing to adjust leads to wrong charge decisions.
Use temperature-corrected pressure charts, measure static temperatures at lines, and apply altitude corrections per manufacturer guidance to guarantee accurate diagnostics and safe refrigerant handling.
Using incorrect refrigerant tables or mixing refrigerants
When technicians rely on wrong pressure-temperature tables or mix refrigerants, system performance and safety are compromised: incorrect tables lead to erroneous charge and diagnosis, while blending refrigerants can create incompatible oils, chemical reactions, and unknown pressure behaviors.
Technicians should verify refrigerant type, use manufacturer or AHRI tables, avoid retrofit blends, label systems, and purge lines properly to prevent contamination and misdiagnosis.
Neglecting PPE, regulator use, or environmental disposal rules
Safety begins with proper gear and procedures: technicians must consistently use appropriate PPE, set and monitor regulators correctly, and follow environmental disposal rules to prevent injury, equipment damage, and regulatory penalties.
Failure to wear gloves, goggles, or respirators, misadjust regulators, or ignore recovery and recycling protocols risks exposure, valve failure, fines, and contamination.
Follow manufacturer and legal guidelines without exception.
Advanced Tips for Accurate Measurement and System Care
For more precise charge assessment, the technician should apply superheat and subcooling methods alongside gauge readings.
Pressure readings must be interpreted with corresponding temperature charts and supplemented by digital tools or data logging for effective troubleshooting.
Regular calibration and proper long-term maintenance of gauges guarantee continued accuracy and system reliability.
Using superheat and subcooling methods for precise charge assessment
Although often overlooked by novices, using superheat and subcooling measurements provides the most reliable way to determine an accurate refrigerant charge. This is because these methods assess the system’s thermal performance rather than rely solely on pressure readings.
Technicians calculate superheat at the evaporator outlet and subcooling at the condenser outlet, compare to manufacturer specs, and adjust refrigerant to optimize efficiency and prevent compressor damage.
Combining gauge readings with temperature and pressure charts
Having established superheat and subcooling as reliable indicators of charge and system health, technicians can further refine assessments by correlating gauge pressures with temperature-pressure (P-T) charts.
This combination converts raw pressure readings into refrigerant saturation temperatures, verifies component performance under actual load, and helps identify issues such as non-condensables, restriction, or incorrect refrigerant.
Cross-reference measured suction and discharge temps, adjust for ambient, and note deviations.
Best practices for long-term gauge maintenance and calibration
When gauges are treated as precision instruments rather than disposable tools, reliable long-term performance depends on routine inspection, periodic calibration, and proper storage.
Technicians should establish a documented maintenance schedule that includes leak checks, diaphragm and needle movement tests, and verification against a certified master gauge or deadweight tester.
Replace worn hoses and seals, keep caps on ports, record calibration dates, and retire gauges showing hysteresis or inconsistent readings.
Using digital tools and data logging for troubleshooting
Because modern refrigeration diagnostics generate complex, time-stamped data, technicians increasingly rely on digital tools and data logging to pinpoint intermittent faults and validate system behavior over time.
Portable manifold interfaces, clamp meters with logging, and HVAC apps capture pressures, temperatures, and currents.
Logged trends reveal cycling anomalies, leaks, and efficiency losses.
Secure data export and consistent sampling rates guarantee reliable analysis and repeatable diagnostics.
Safety Response and Emergency Procedures
In the event of a refrigerant leak or exposure, personnel should immediately evacuate the area, ventilate the space if safe to do so, and isolate the source while awaiting trained responders.
First aid measures for inhalation, frostbite, and eye contact must be enacted promptly—move the affected person to fresh air, warm any frostbitten tissue gradually without rubbing, and irrigate eyes with clean water for at least 15 minutes—seeking medical attention as needed.
Any significant release must be reported according to applicable environmental regulations and employer protocols, including timely notification to authorities when required.
What to do in case of refrigerant leak or exposure
Immediately isolate the area and evacuate nonessential personnel, as rapid removal of people from the vicinity reduces risk of inhalation and frostbite from escaping refrigerant.
Technicians should shut off equipment, ventilate the space using fans or open windows, and wear appropriate PPE.
Notify supervisors and follow company spill and reporting procedures.
Call certified recovery services for containment and repair; do not attempt major recovery alone.
First aid steps for inhalation, frostbite, and eye exposure
Treat exposed individuals promptly and methodically: for suspected inhalation, move the person to fresh air, monitor breathing and consciousness, and administer oxygen if trained personnel and equipment are available; if breathing stops, begin CPR and call emergency services.
For frostbite, remove wet clothing, warm affected areas gradually with body heat or lukewarm water, avoid rubbing.
For eye exposure, flush with water for at least 15 minutes and seek medical care.
When and how to report releases per environmental regulations
After providing first aid for inhalation, frostbite, or eye exposure, attention must turn to legal obligations for reporting refrigerant releases.
Technicians should document quantity, substance, time, and location, notify the employer and designated environmental officer, and file required reports with local and national authorities within mandated timeframes.
Preserve evidence, cooperate with investigations, and follow spill containment and cleanup protocols to guarantee compliance.
Checklist Before Finishing the Job
Before leaving the site, the technician completes final system checks to confirm pressures, temperatures, and leak-free operation after charging or servicing.
Refrigerant must be properly recovered or disposed according to regulations and equipment requirements.
Documentation, clear labeling, and a concise customer handoff guarantee service records and safety information are transferred.
Final system checks after charging or servicing
Complete a systematic checklist to verify the refrigeration or air-conditioning system is operating safely and efficiently following charging or service.
Inspect for leaks, proper pressures, and stable superheat/subcooling.
Validate electrical loads and fan operation.
Ascertain filters are clean and airflow is correct.
Restore panels and document readings.
- Confirm pressure and temperature stability
- Check for audible/olfactory leaks
- Verify electrical integrity
- Record final readings and actions
Proper disposal and recovery of refrigerant
With final system checks confirmed, attention shifts to the proper recovery and disposal of refrigerant to comply with regulations and protect the environment.
Technicians must use certified recovery equipment, follow EPA or local protocols, avoid venting, and transfer refrigerant to approved containers.
Contaminated or mixed refrigerants require special handling.
Arrange transport to licensed reclamation or disposal facilities and retain recovery records as required.
Documentation, labeling, and customer handoff
Document all work, label components and refrigerant containers, and prepare a concise handoff package for the customer to close the job properly.
Provide a clear service report: refrigerant type and charge, pressures, temperatures, and any repairs.
Affix durable labels to access points and recovered cylinders.
Include warranty details, safety advisories, and contact information.
Review findings with the customer and obtain signature confirmation.
Recommended Resources and Next Steps for Beginners
Beginners are advised to consult recognized training courses and certification paths and to review applicable local regulations before attempting refrigerant work.
Manufacturer manuals, up-to-date refrigerant tables, and reputable tool suppliers should be used as primary technical references.
If troubleshooting becomes uncertain or the job exceeds certified limits, a qualified HVAC professional should be engaged rather than proceeding solo.
Training courses, certification paths, and local regulations
Seek out accredited refrigeration and HVAC courses that cover safe gauge use, refrigerant handling, leak detection, and relevant safety protocols.
Pursue EPA Section 608 certification (or local equivalent) and specialized refrigerant-specific credentials.
Verify state and municipal licensing requirements, workplace safety rules, and permitted refrigerants.
Attend hands-on labs, maintain continuing education, and document certifications to guarantee compliance and professional competency.
Manufacturer manuals, refrigerant tables, and tool suppliers
When consulting manufacturer manuals, refrigerant tables, and reputable tool suppliers, a technician gains the specific pressures, temperature conversions, torque settings, and service procedures required for safe and accurate gauge use.
Reference official specs, verify refrigerant charts for ambient conditions, and purchase calibrated gauges and hoses. Consult supplier warranties and calibration services.
- Manufacturer installation and service guides
- Refrigerant pressure–temperature tables
- Certified gauge and hose suppliers
- Calibration and repair services
When to seek professional HVAC service versus continuing DIY practice
Although some routine tasks—such as checking pressures with properly calibrated gauges, replacing filters, or topping off refrigerant under clear manufacturer guidance—can be handled safely by a competent DIYer, more complex diagnostics, sealed-system repairs, electrical work, or any procedure involving refrigerant recovery should be deferred to licensed HVAC professionals.
DIYers should limit work to inspection, basic maintenance, and learning; call pros for uncertain symptoms, leaks, or warranty-covered systems.
Conclusion
In the noble pursuit of coaxing refrigerant to behave, the novice HVAC tech now possesses enough know-how to avoid heroic leaks and unexpected frostbite. Armed with gauges, goggles, and a suspiciously confident checklist, they may proceed to read pressures without causing an international cooling incident. If the system protests, consult manuals—not YouTube bravado—and remember: refrigerant obeys physics, not optimism. Safety first; showmanship optional.