How to Shut the Water Off at the Street: Step-by-Step Guide for Homeowners
To shut off the water at the street, locate the curb stop or meter box at your property line. Clear the cover, then use a curb key or meter wrench to turn the valve stem clockwise until the water flow stops. Check indoor fixtures to confirm the water is off, and document the time and valve position. Remember to wear personal protective equipment (PPE), avoid forcing any stuck valves, and contact your utility company if you’re unsure or if permits are needed. For more details, refer to the guidance on tools, safety, permits, and troubleshooting steps.
Why You Might Need to Shut the Water Off at the Street

Situations such as a burst pipe, a major leak, or replacement of a water-using appliance often require shutting off the supply at the street to stop damage and allow repairs.
The valve accessed at the curb or meter can be the curb stop, meter stop, or, in larger emergencies, the municipal main, each with different locations and operational considerations.
Before turning any street valve, legal permissions, utility notifications, and safety precautions should be confirmed to avoid service interruptions or liability.
Common situations requiring a shutoff (burst pipe, major leak, appliance replacement)
Many homeowners will face at least one emergency that requires shutting off water at the street: a burst pipe flooding a basement, a major leak that undermines walls or foundations, or planned work such as replacing a sewer-fed appliance.
In such cases, knowing how to shut water off at the street prevents damage, allows repairs, and isolates systems during appliance replacement, minimizing risk and repair scope.
Differences between curb stop, meter stop, and main municipal shutoff
Because responsibility and access differ by location, homeowners should understand the distinct roles of the curb stop, the meter stop, and the municipal main shutoff.
The curb stop isolates service at the property line, the meter stop controls flow at the meter, and the municipal main shutoff cuts water for entire streets or neighborhoods.
Ownership, access, and who must operate each valve vary.
Legal and safety considerations before shutting off the street valve
Before attempting to shut off a street valve, a homeowner should confirm legal authority, required permits, and municipal procedures, and assess safety risks such as traffic, underground utilities, and pressurized lines.
Contacting the water utility clarifies liability, scheduling, and required crews.
Proper personal protective equipment, traffic control, utility locates, and adherence to local codes prevent damage, fines, and injury.
Quick Answer: How to Shut the Water Off at the Street
The fastest way to shut off water at the street is to locate the curb stop or meter box, remove the cover, and turn the valve clockwise with a curb key or adjustable wrench until it stops.
If the curb stop is corroded, inaccessible, or the leak is large, the water utility or a licensed plumber should be contacted to avoid damage or injury.
Emergency situations, such as major flooding or a broken main, always warrant calling the utility immediately.
One-line summary of the fastest method
Locate the street-side curb box, insert a water key or socket wrench, and turn clockwise until resistance indicates the main valve is fully closed.
This quickly isolates the property’s supply; confirm closure by checking interior fixtures for stopped flow.
Use caution with tight fittings and guarantee proper tools fit the operating nut to avoid stripping.
Record the valve position for future reference.
When to call your water utility or a licensed plumber instead
If the curb box is inaccessible, the operating nut is stripped, excessive force is required, or water keeps flowing after multiple turns, contacting the water utility or a licensed plumber is recommended. Professionals handle frozen pipes, damaged mains, buried or missing curb boxes, and permits. Choose utility for service-line issues; choose a plumber for internal or lateral repairs.
| Reason | Who to call | Action |
|---|---|---|
| Stripped nut | Plumber | Repair/replace |
| Inaccessible box | Utility | Locate/excavate |
| Continuous flow | Utility | Shutoff at main |
| Frozen/broken line | Plumber | Repair/replace |
Tools and Safety Gear You’ll Need
The next section lists the tools and safety gear required to access and operate a street shutoff.
It identifies essential items like a curb key, adjustable wrench, and water meter key, plus optional tools for frozen or stuck valves such as penetrating oil, a socket set, and a valve-turning tool.
It also covers personal protective equipment and basic traffic-safety items for working near the roadway.
Essential tools (curb key, adjustable wrench, water meter key)
A few basic tools make shutting off a property’s water at the street practical and safe: a curb key for turning the underground shutoff, an adjustable wrench for stubborn nuts, and a water meter key for accessing and operating exposed meter valves.
Each tool should fit local fittings, be in good condition, and be kept with emergency supplies. Proper use reduces damage and speeds restoration.
Optional tools for frozen or stuck valves (penetrating oil, socket set, valve turning tool)
When valves are frozen or seized, a few additional tools can make the difference between a quick shutoff and a lengthy repair: penetrating oil to free corroded threads, a socket set for stubborn fasteners, and a dedicated valve-turning tool to apply torque without damaging fittings.
These items speed operation, reduce risk of rounding nuts, and minimize pipe damage; use sparingly and follow product instructions.
Personal protective equipment and traffic safety items
After freeing a seized valve with penetrating oil or applying extra torque, attention must turn to safety gear and traffic control before opening the street box. The homeowner should use gloves, eye protection, reflective vest, cone placement, and a flashlight. Items protect against debris, traffic, and low light while signaling motorists.
| Item | Purpose | Notes |
|---|---|---|
| Gloves | Hand protection | Cut-resistant |
| Vest | Visibility | ANSI-approved |
| Cones | Traffic control | Bright color |
| Goggles | Eye safety | Impact-rated |
| Flashlight | Illumination | Waterproof |
How to Locate the Street Shutoff and Water Meter
The location of the curb stop and meter box is often near the property line, in a grass strip, sidewalk cutout, or driveway edge, but variations occur by neighborhood and age of installation.
Property maps, utility records, and meter labels provide exact placement and identification details for the service line and valve.
If the meter box is obscured by soil, snow, or landscaping, proceed carefully with hand tools to uncover the cover and contact the water utility if obstruction or damage is suspected.
Typical locations of the curb stop and meter box
Curb stops and meter boxes are typically positioned near the property line where the service line meets the main, often along the sidewalk, in the grass strip between the sidewalk and street, or just inside the edge of the driveway; awareness of these common placements helps narrow the search quickly.
They may also be adjacent to utility poles, near driveways, or beside walkways, usually recessed or covered.
How to read property maps, utility records, and meter labels
Maps, utility records, and meter labels together form a practical roadmap for locating the street shutoff and water meter.
Property maps show lot lines, easements, and meter placements; utility records list service line sizes, installation dates, and curb stop identifiers.
Meter labels and tags display serial numbers and customer account references, allowing cross-reference with municipal records to pinpoint the curb stop location.
What to do if the meter box is covered by soil, snow, or landscaping
After cross-referencing records and meter labels to narrow the likely location, attention should turn to situations where the meter box is obscured by soil, snow, or landscaping.
Carefully clear surface cover with hand tools to avoid damaging the box or lid. Remove snow incrementally. Trim plants and rake soil away.
If uncertain, contact the utility for guidance or request a technician to expose the meter safely.
Step-by-Step: Shutting Off the Water at the Street
Before attempting any work, the homeowner should confirm ownership and obtain any required permissions to access the street shutoff.
Next, the meter or curb box must be located and exposed safely so the correct valve—curb stop or main—can be identified.
Finally, the proper curb key or wrench is used to turn the valve (noting direction and required force), and the house is checked for dryness by testing faucets and appliances.
Step 1 Confirm ownership and legal permissions
Because shutting off a street water main affects public supply and neighboring properties, the homeowner or contractor must first verify legal authority and ownership before taking action.
They should check property records, utility account status, and municipal permits; contact the water utility to confirm who controls the curb stop; obtain required written permissions or scheduled shutoff approval to avoid liability and service disruption.
Step 2 Locate and expose the meter or curb box safely
Once ownership and permissions are confirmed, attention turns to finding and uncovering the curb box or water meter that controls the service.
Inspect property records, utility maps, and visible markers. Wear gloves and eye protection.
Clear vegetation, soil, or frost carefully with a hand trowel or small shovel. Expose the lid without forcing it; use a curb key or pry bar if accessible.
Step 3 Identify the correct valve (curb stop vs. main)
Locate the valve assembly and confirm whether it is the curb stop (the individual service shutoff) or the main street valve (the utility’s primary control).
Examine markings, pipe size, and proximity to the service line; curb stops are smaller and adjacent to the meter, mains are larger and set farther into the street.
When in doubt, document location and contact the water utility before proceeding.
Step 4 Use the curb key or wrench to turn the valve (direction, force)
Fit the curb key or appropriate wrench onto the valve stem square or slot, ensuring a secure seating to prevent slipping.
Turn clockwise slowly and steadily to close the valve; count revolutions if resistance is light.
Do not force a stuck stem—apply steady pressure, try small back-and-forth motions, or use penetrating lubricant.
Stop if excessive resistance or damage occurs and consult a professional.
Step 5 Verify the house is dry (check faucets, appliances)
Confirm that the shutoff succeeded by checking multiple indoor fixtures and appliances for water flow or leaks.
The homeowner inspects faucets, showers, toilets, washing machine, water heater, and dishwasher.
They open taps briefly to verify no pressure, look for dripping, examine under sinks and around appliances for puddles, and listen for running sounds.
Any residual moisture indicates a partial shutoff or leak needing attention.
Step 6 Document the shutoff and notify occupants or neighbors
Record the shutoff by noting the time, valve position, and any irregularities.
Then promptly inform household members and nearby neighbors so they know water service has been interrupted.
Log these details in a notebook or photo, include contact information for the person responsible, and mark the meter box.
Communicate expected duration and safety precautions; confirm recipients understand and can access alternative water sources if needed.
Step 7 Restoring service safely after repairs
Reopen the street valve gradually after verifying repairs are complete and all fittings and downstream fixtures are secured; this minimizes pressure surges and reveals leaks early.
Observe pressure increase, check all visible joints and meters, and bleed air from high fixtures.
Monitor for several minutes, then confirm normal pressure and flow.
Record completion time, notify occupants, and advise post-repair vigilance for hidden leaks.
Troubleshooting Common Problems When Turning the Street Valve
When the street valve resists movement, the guide outlines safe techniques for freeing stuck, corroded, or frozen mechanisms without causing damage.
It also covers temporary measures and the associated risks for broken valve stems or cracked valve boxes.
Finally, the discussion explains how to determine whether continued flow after turning the valve stems from internal valve failure or an external supply issue.
Stuck, corroded, or frozen valves safe techniques to free them
Stubborn street valves can resist operation due to corrosion, mineral buildup, or freezing; addressing them requires careful assessment before applying force.
Use penetrating lubricant on exposed stems, allow soak time, then try gentle, incremental turns with proper tools.
For frozen stems, apply warm water or a heat pack cautiously.
If resistance persists or damage appears, stop and consult a utility professional to avoid breakage.
Broken valve stem or cracked box temporary measures and risks
If attempts to free a seized stem reveal a broken valve stem or a cracked wrench box, temporary measures can limit water flow and damage while awaiting professional repair.
Apply an adjustable clamp or hose clamp to reduce flow from exposed pipe, place a heavy tarp or sandbags around the box to prevent erosion, and mark the site clearly.
Risks include leaks, sudden failure, and contamination; call a pro.
Water continues to flow after turning diagnosing internal vs. external issues
Start by confirming the street valve stem actually rotated through its full travel and felt resistance at the closed position; continued flow after a shutoff attempt can stem from either internal valve failure or an upstream bypass/external source.
Inspect nearby meters, service saddles, and visible pipe joints for alternate feed paths.
If internal failure is suspected, note wetness at the valve, then contact the utility for repair or isolation.
When to Contact Professionals or the Water Utility
If the valve cannot be operated, there is uncontrolled flooding, or sewage is backing up, the water utility should be contacted immediately for emergency shutoff and response.
For damaged service lines, complex fittings, or repairs beyond basic tools, a licensed plumber is the appropriate professional to hire.
When contacting the utility, provide the exact address, nature and timing of the problem, any visible damage, and whether water must be shut off for safety.
Emergencies requiring immediate utility intervention
When should the water utility be called rather than relying on a homeowner’s shutoff?
Immediate utility intervention is required for main-line breaks at or beyond the curb, visible street sinkholes, contaminated or discolored water from the street connection, multiple homes affected, or suspected meter damage.
The utility must isolate, repair, and guarantee system safety; homeowners should avoid tampering with street apparatus.
Situations needing a licensed plumber (service line issues, complicated repairs)
Call a licensed plumber for any service-line failures, complex repairs, or work that crosses the property boundary, because these situations often require specialized tools, permits, and liability coverage beyond a homeowner’s scope. A professional assesses risks, secures permits, coordinates with utilities, and guarantees code-compliant repairs to prevent contamination, collapse, or costly rework.
| Issue | Reason to hire |
|---|---|
| Service-line break | Liability, excavation |
| Cross-boundary work | Permits, coordination |
| Complex repairs | Specialized tools |
| Contamination risk | Safety, testing |
How to communicate with your utility (what info to provide)
Several key pieces of information should be ready before contacting the water utility so the exchange is efficient and actionable.
Provide name, address, account number, and nearest cross-street.
Describe the problem: leak location, visible damage, meter readings, and when it began.
Note any safety hazards or basement flooding.
Ask expected response time, required permits, and whether shutting at the curb is authorized.
Preventive Maintenance and Seasonal Considerations
Routine care of the curb stop and meter access keeps shutoff points operable throughout the year.
Before cold weather, outdoor shutoffs should be insulated or drained to prevent freezing, and in-season inspections help spot leaks or corrosion.
Schedule regular checks and replace valves or components that show wear to avoid emergency failures.
How to maintain curb stop and meter access year-round
Maintaining year-round access to the curb stop and meter requires regular inspection, timely repairs, and seasonal adjustments to prevent freezes, blockages, and damage.
Homeowners should keep the area clear of vegetation, debris, and snow; guarantee lids close and seals remain intact; lubricate moving parts annually; report leaks or corrosion promptly; and mark locations with visible, removable stakes for emergency responders and maintenance crews.
Winterizing your outdoor shutoff and preventing freezing
Prepare the outdoor shutoff for winter by insulating exposed pipes, securing lids, and draining any remaining water to prevent freezing and damage.
Apply foam pipe covers, heat tape when recommended, and seal gaps around access boxes.
Elevate or wrap vulnerable valves, label shutoff location, and check snow clearance.
Prompt action reduces burst pipes, costly repairs, and emergency service calls during cold spells.
Regular checks and when to replace aging components
At least twice a year, the outdoor shutoff and its components should be inspected for leaks, corrosion, and wear to catch deterioration before it leads to failure.
Valve stems, packing nuts, and exposed pipe fittings must be checked; replace rubber seals, corroded valves, or brittle insulation promptly.
Retire components showing pitting, persistent leaks, or stiff operation to prevent sudden failure and costly repairs.
Cost, Permits, and Liability Considerations
Typical costs for curb stop repairs or utility service vary by region and complexity, ranging from minor parts and labor to several hundred dollars for excavation and replacement.
Permit requirements for main or service line work in residential areas often mandate prior approval from the municipality or water utility and may include inspection fees.
Liability concerns arise if damage occurs while turning or repairing the street valve, potentially exposing the person performing the work to repair costs, fines, or claims unless work is authorized and insured.
Typical costs for curb stop repairs or utility service
Curb stop repairs and related utility service work can vary widely in cost depending on factors such as valve accessibility, depth, pipe material, and whether pavement restoration or traffic control is required.
Typical residential curb stop replacement ranges from modest patch-and-locate jobs costing a few hundred dollars to deeper excavations and pipe replacement reaching several thousand dollars.
Emergency callouts, specialty parts, and site restoration increase total expense.
Permit requirements for main/service line work in residential areas
While repair costs depend on excavation depth and restoration needs, many municipal rules require permits for any work that affects a public main or service line, especially where street excavation or right-of-way use is involved. Permit processes vary by jurisdiction; required documentation, inspection schedules, and fees differ. Contact local public works before starting work.
| Permit Type | Typical Fee | Inspection |
|---|---|---|
| Excavation | $100–$500 | Site |
| Service tie | $50–$300 | Final |
| ROW use | $75–$600 | Pre/post |
Liability concerns if damage occurs while turning or repairing the street valve
Liability hinges on who authorized the work and whether proper procedures were followed: unauthorized turning or improper handling of a street valve can expose a homeowner, contractor, or utility to claims for property damage, service interruption, or bodily injury.
Insurance coverage, written authorization, permits, and adherence to utility protocols limit exposure.
Negligence findings can trigger repair costs, fines, and civil liability; documentation is essential.
Quick Reference Checklist
A concise checklist helps guarantee a street water shutoff proceeds safely and efficiently by covering tasks before, during, and after the operation.
The following quick-reference items summarize essential pre-shutoff checks, shutdown execution steps, and reopening procedures for on-site crews and inspectors.
Refer to the detailed sections for specific tools, permits, and safety actions.
- Confirm permits, locate valves, and notify affected parties.
- Secure the work area, isolate the valve, and verify pressure relief.
- Record valve position, test downstream fixtures, and monitor for leaks.
- Restore service, re-pressurize slowly, and complete documentation.
Pre-shutoff checklist
Before shutting off the street water, perform a concise checklist to confirm safety, access, and authorization: Verify permit or utility approval, locate shutoff box, gather tools, inform occupants. Confirm clear access, stable footing, and traffic safety. Record contact numbers.
| Item | Status |
|---|---|
| Permit/Authorization | |
| Location of Box | |
| Tools Ready | |
| Safety Measures |
Shutdown execution checklist
One concise checklist guides the technician through the shutdown: confirm identity and permit at the site, verify box alignment and valve condition, position traffic control and personal protective equipment, secure tools and communication, and announce the action to occupants and crew before turning the valve.
Execute valve turn slowly, monitor for leaks, confirm zero downstream pressure, tag valve position, document time and personnel, and stow equipment.
Reopening checklist
Several clear steps guarantee a safe, controlled reopening of the street water supply: verify permits and identity at the site, confirm valve and box condition, reestablish traffic control and PPE, position crew and tools, and communicate intent to occupants.
Then inspect for leaks, slowly open valve in stages, monitor pressure and downstream fixtures, flush lines, document readings, notify residents of completion, and restore site cleanliness.
Visual Aids and Diagrams
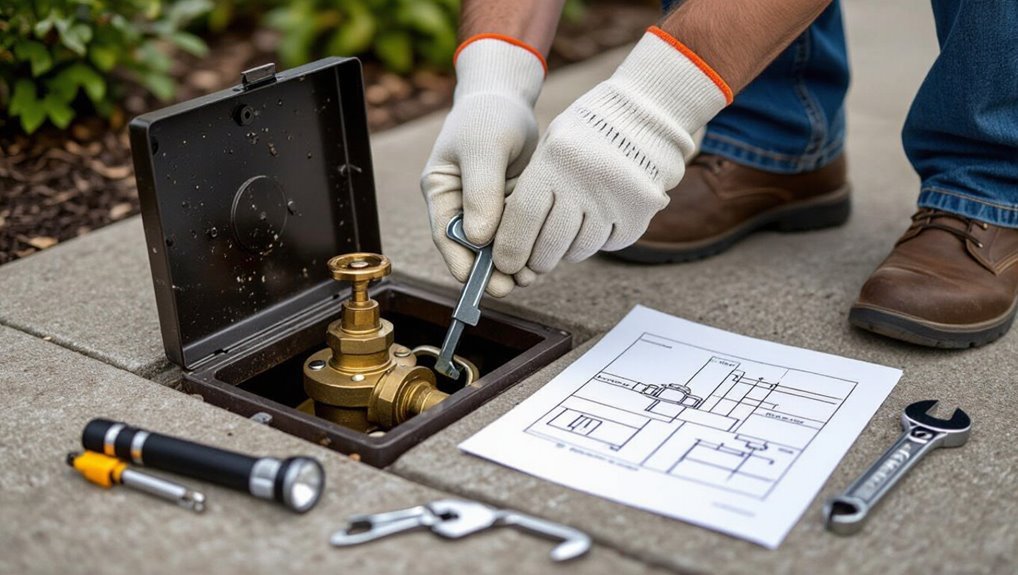
The section presents clear diagrams showing the curb stop, meter box, and service line layout to help users locate key components.
Step-by-step illustrations demonstrate proper use of a curb key and the sequence for verifying a successful shutoff.
Captions and labels clarify orientation and common variations encountered in the field.
Diagram of curb stop, meter box, and service line layout
A simple diagram clarifies the relative positions and connections among the curb stop, meter box, and service line, showing how surface features align with buried components.
The illustration labels curb stop location near the property line, the meter box on the easement, and the service line path to the house.
Scale, depth markers, and a north arrow aid orientation and trench identification.
Step illustrations for using a curb key and verifying shutoff
With the curb stop, meter box, and service line locations established in the diagram, clear step-by-step illustrations guide users through operating a curb key and confirming water is shut off.
Sequential visuals show key placement, turning direction, required force, and safety posture.
Follow-up panels depict faucet checks, pressure gauges, and meter readings, plus troubleshooting visuals for stuck valves and when to call a professional.
Common Mistakes to Avoid
Common errors during a street shutoff include forcing a stuck valve, which can lead to breakage and costly repairs.
Turning the wrong valve can unintentionally cut off neighboring properties.
Neglecting to relieve pressure or drain lines before working increases the risk of flooding and injury.
Forcing a stuck valve and causing breakage
Forcing a stuck street valve with excessive torque often leads to broken stems, split housings, or sheared fittings that can turn a simple shutoff into a costly emergency repair.
Homeowners should stop when resistance feels abnormal, avoid using cheater bars, and call the water utility or a licensed plumber.
Temporary fixes can worsen damage; documented service protects against liability and unexpected expenses.
Turning the wrong valve or shutting off neighbors’ water
After attempting to work a stubborn valve, attention must shift to ensuring the correct control is operated.
Homeowners should verify property markers, consult utility maps, and confirm meter or curb box labels before turning any wheel. Misidentification can interrupt neighbors’ service and prompt repairs or fines.
When uncertain, contact the water utility to locate the right shutoff and avoid mistaken closures.
Failing to relieve pressure or drain lines before repairs
Neglecting to relieve pressure or drain pipes before beginning street-side or meter repairs can lead to sudden water bursts, equipment damage, and safety hazards for workers and bystanders.
The homeowner should release downstream pressure, open faucets and drain valves, and verify zero flow at the shutoff.
Failure to do so risks injury, costly repairs, and contaminated lines; always follow utility and safety protocols.
Conclusion
Knowing how to shut the water off at the street equips a homeowner for leaks, bursts, or repairs—so why wait until an emergency? With proper tools, safety gear, and awareness of local rules, the procedure is straightforward: locate the meter or valve, use the correct key or wrench, and turn steadily clockwise. Remember permit and liability considerations, and avoid common mistakes like forcing a stuck valve; preparedness saves time and prevents costly damage.