How to Remove Limescale From Toilet Below the Waterline: 7 Proven Methods That Work
To effectively remove limescale from below the toilet waterline, consider these seven proven methods: vinegar soak, baking soda and vinegar paste, citric acid soak, toilet-safe descaling gels or tablets, pumice stone scrubbing, mechanical brushing, and cautious use of phosphoric or diluted muriatic acid for severe buildup. Always wear gloves and eye protection, ensure proper ventilation, protect seals, and avoid mixing different cleaners. Select your method based on the severity of the limescale and the toilet’s material. For detailed step-by-step instructions and safety tips, continue reading.
How to Tell If Limescale Is Present Below the Toilet Waterline
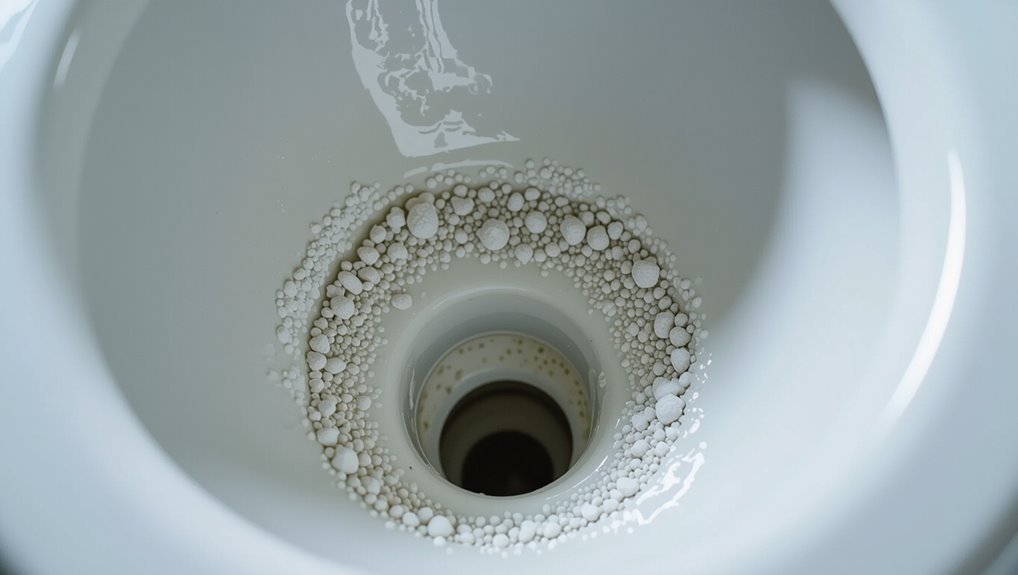
The presence of limescale below the waterline is often revealed by discolored rings, chalky deposits, or rough patches on the bowl surface.
A metallic or stale odor and reduced flush efficiency can also indicate mineral buildup affecting water flow.
For hard-to-see areas, use a flashlight, mirror, or long-handled brush to inspect and confirm deposits.
Visual signs to look for inside the bowl
One clear indicator of limescale below the waterline is a chalky, off-white or pale gray buildup clinging to the porcelain surface.
Other visual signs include rough, crusty rings, faint white streaks around trap curves, and mineral speckling on bowl sides.
These marks help determine severity and guide choices for how to remove limescale from toilet below waterline using targeted cleaners and tools.
Smell and water flow indicators
Visual signs often accompany other sensory clues that point to limescale below the waterline; smell and water flow give additional confirmation.
A musty or metallic odor lingering after flushing can indicate mineral buildup. Reduced or uneven bowl refill, sluggish flush performance, and sputtering water suggest constricted passages.
These functional changes, combined with visual deposits, help distinguish limescale from organic stains or other issues.
Tools for inspecting hard-to-see buildup
Inspectors rely on a handful of simple tools to reveal mineral deposits hidden beneath the waterline. A bright waterproof flashlight illuminates inner bowl contours.
A telescoping mirror or inspection camera shows under-rim and siphon jet areas. Flexible plumber’s brush contacts suspect surfaces. Vinegar-soaked swabs collect samples for visual confirmation.
A small magnet helps distinguish iron stains from calcium buildup.
Fast, Safe Methods to Remove Limescale Below the Waterline
Practical, safe options exist for removing limescale below the toilet waterline, each suited to different severity levels and user preferences.
The following concise methods cover household acids, abrasives, and commercial descalers with clear step-by-step approaches and safety notes. Selection depends on material compatibility, contact time needed, and whether mechanical assistance is required.
- Vinegar soak method: step-by-step
- Baking soda + vinegar paste technique: step-by-step
- Citric acid soak: step-by-step
- Toilet-safe descaling tablets or gels: step-by-step
- Pumice stone method (safe use instructions): step-by-step
Vinegar soak method step-by-step
Soak stubborn deposits with plain white vinegar to dissolve limescale below the waterline without harsh chemicals.
Drain the bowl partially, pour enough vinegar to cover stains, and let sit 6–12 hours.
Agitate with a toilet brush or pumice stone, then flush and repeat if residue remains.
Rinse thoroughly and ventilate the bathroom during soaking.
Baking soda + vinegar paste technique step-by-step
Combine baking soda and vinegar into a paste to create a fizzy, mildly abrasive cleaner that loosens limescale below the waterline without harsh chemicals.
Apply paste to stained areas, let react for 10–15 minutes, scrub with a toilet brush or non-scratch pad, then flush to rinse.
Repeat for stubborn deposits.
Rinse tools and ventilate the bathroom during use.
Citric acid soak step-by-step
A straightforward citric acid soak dissolves limescale efficiently and safely below the waterline.
Pour a measured citric acid solution into the bowl, ensuring contact with stained areas. Let it sit several hours or overnight for stubborn deposits.
Scrub gently with a toilet brush, then flush and repeat if needed. Rinse surfaces to remove residue and restore water clarity.
Toilet-safe descaling tablets or gels step-by-step
Several commercially available toilet-safe descaling tablets and gels provide a fast, low-effort way to dissolve limescale below the waterline.
Follow product instructions: flush, place tablet or apply gel under the rim and over deposits, let sit for recommended time (usually 15–60 minutes), agitate with a toilet brush if needed, then flush to rinse.
Repeat for stubborn buildup; ventilate and wear gloves.
Pumice stone method (safe use instructions) step-by-step
If chemical descalers are ineffective or the deposits are particularly hard, a pumice stone offers a mechanical option for scrubbing limescale below the waterline.
Drain some water so the stone contacts deposits. Wet the pumice and the surface to prevent scratching.
Gently rub in short strokes, rinse frequently, and stop if glazing or pitting appears.
Dry area and flush when finished.
Commercial limescale removers (acid-based) step-by-step and precautions
When stronger action is required, acid-based commercial limescale removers offer a fast, chemical approach for dissolving deposits below the waterline. They contain acids such as hydrochloric, sulfamic, or lactic acid formulated to break down mineral buildup quickly.
Follow label directions: ventilate, wear gloves and eye protection, pour or apply to stained area, wait recommended time, scrub gently with a nonabrasive brush, rinse thoroughly.
Mechanical scraping with specialized tools step-by-step and safety tips
Employing mechanical scraping with specialized tools provides a fast, controlled method to remove stubborn limescale below the waterline without relying on strong acids.
Begin by draining water, wear goggles and gloves, then use a plastic scraper, nylon brush, or rotary pumice stone to loosen deposits.
Work gently to avoid glazing porcelain. Rinse, inspect, and dispose of debris.
Ventilate and sanitize tools afterward.
Choosing the Right Method Based on Severity and Toilet Type
When selecting a limescale treatment, the reader should weigh the severity of buildup against the toilet’s material to avoid damage and guarantee effectiveness. Below is a quick emotional cue to guide choices.
| Severity | Recommended approach |
|---|---|
| Light — cosmetic rings | Mild acid or citric cleaners, soft brush |
| Heavy — thick deposits | Stronger descalers, repeated applications |
Severity levels and recommended approaches
Limescale buildup varies from light mineral film to thick, crusted deposits, and selecting an appropriate removal method depends on that severity and the toilet’s material and finish. For light scale, use mild acids or daily cleaners; moderate requires soaked acidic treatments; severe needs mechanical removal plus professional products. Match effort to severity to protect finishes.
| Severity | Approach | Time |
|---|---|---|
| Light | Mild cleaners | Short |
| Moderate | Soak treatments | Medium |
| Severe | Mechanical + strong agents | Long |
Material compatibility: porcelain, enamel, and coated bowls
Because different toilet finishes react differently to cleaners and tools, choice of method should be guided by the bowl material—porcelain, enamel, or factory-applied coatings—along with severity of buildup. Porcelain tolerates mild acids and scrubbing; enamel requires gentler agents to avoid chipping; coated bowls need manufacturer-safe cleaners and nonabrasive tools. Test first in an inconspicuous area.
| Material | Recommended approach |
|---|---|
| Porcelain | Mild acid, brush |
| Enamel | Gentle cleaner, soft pad |
| Coated | Manufacturer-safe, soft cloth |
| Severe | Professional advice |
Step-by-Step Preparation and Safety Precautions
Before starting, the writer recommends equipping gloves, eye protection, and ensuring adequate ventilation to limit exposure to fumes.
They advise shielding exposed seals and fittings and closing water supply valves to protect plumbing components.
They warn explicitly against mixing acidic limescale removers with bleach or ammonia-based cleaners.
Personal protective equipment and ventilation
A cleaner’s safety begins with proper personal protective equipment and adequate ventilation to prevent chemical exposure and respiratory irritation; gloves resistant to acids, eye protection, and a mask or respirator rated for fumes are essential.
Windows or exhaust fans should be used to keep air moving while working. Protective clothing should cover skin, footwear be non-slip, and eyewash access be planned.
How to protect plumbing components and seals
Protect plumbing components and seals by isolating sensitive parts and minimizing chemical contact: shut off the water supply, flush and siphon excess water from the bowl and tank, and remove or cover tank hardware, rubber flappers, and exposed seals with plastic sheeting or waterproof tape.
Inspect visible rubber and gaskets for wear, loosen removable fittings, and place absorbent towels beneath joints to catch drips during cleaning.
What to avoid mixing with household cleaners
When household cleaners are combined improperly, they can produce toxic gases, violent reactions, or corrosive mixtures that endanger occupants and damage plumbing. Consequently, clear rules about which substances must never be mixed are essential.
Never combine bleach with ammonia, acids (vinegar, toilet cleaners), or alcohols. Avoid mixing different drain cleaners. Never mix hydrogen peroxide with vinegar.
If unsure, use one product at a time and ventilate thoroughly.
Deep-Cleaning Protocol for Stubborn Limescale
The section outlines a deep-cleaning protocol that pairs targeted chemical agents with controlled mechanical action to remove entrenched limescale while minimizing surface damage.
It describes timed treatments and when to repeat cycles for safe, progressive results.
Guidance is provided on signs that indicate a professional plumber should be contacted.
Combining chemical and mechanical methods safely
Begin by evaluating the bowl to determine limescale severity and any porcelain damage.
Then plan a sequence that alternates appropriate chemical treatments with targeted mechanical action to maximize scale removal while minimizing surface abrasion and chemical exposure.
Select compatible cleaners and tools, use personal protective equipment, ventilate the area, test a small spot, work gradually from soft to firmer methods, and rinse thoroughly between steps.
Timed treatments and repeat cycles
Although stubborn limescale often resists a single pass, a timed, repeat-cycle protocol increases chemical dwell time and mechanical leverage without overexposing porcelain or the cleaner; treatments should be scheduled in short, controlled intervals (for example 15–30 minutes of chemical action followed by targeted scrubbing and thorough rinsing), repeated as needed until deposits visibly loosen, with progressive escalation only after evaluating surface condition between cycles.
Subsequent cycles use the gentlest effective reagent and measured agitation, documenting results and avoiding concurrent aggressive agents.
When to call a professional plumber
If repeated short treatments and measured agitation fail to reduce deposits, or if porcelain, seals, or flushing mechanisms show signs of damage or persistent staining, a professional plumber should be engaged.
A plumber assesses mineral buildup, tests components, and recommends descaling, gasket replacement, or part repair. They guarantee safe chemical use, prevent further damage, and provide warranty-backed repairs when DIY efforts prove insufficient.
Long-Term Prevention Strategies
Long-term prevention focuses on reducing mineral content and interrupting buildup before it hardens. Options such as water softeners or point-of-use filters, combined with a simple maintenance schedule, greatly lower recurrence.
Small daily habits—wiping bowl surfaces, flushing after use, and checking for leaks—further limit scale formation.
Water softening and filtration options
Because hard water is the primary cause of persistent limescale buildup, investing in water softening or filtration systems offers the most reliable long-term prevention.
Whole-house ion-exchange softeners reduce calcium and magnesium, while salt-free conditioners and magnetic descalers alter mineral behavior without removal.
Point-of-use filters protect fixtures.
Selection should consider water hardness, household size, maintenance needs, and budget for effective, lasting limescale control.
Regular maintenance routine and frequency
After selecting an appropriate softening or filtration system, establishing a consistent maintenance routine keeps limescale at bay and preserves plumbing performance.
Inspections, targeted cleaning, and component care prevent deposits below the waterline and extend fixture life.
- Inspect toilet and tank monthly
- Clean bowl and jets every 2–4 weeks
- Descale with appropriate product quarterly
- Replace filters per manufacturer schedule
- Record maintenance dates and observations
Everyday habits to reduce limescale buildup
Many small daily practices considerably reduce limescale accumulation in toilets: flushing after each use, wiping visible water lines, avoiding hard deposits from cleaning products, and running a quick brush through the rim jets once or twice a week.
Additionally, using a mild weekly descaler, keeping bathroom humidity low, installing a water softener or showerhead filters where feasible, and inspecting seals prevents mineral buildup over time.
Troubleshooting Common Problems After Treatment
After treatment, common issues such as residual staining or etching are addressed with targeted cleaning techniques and, where necessary, gentle resurfacing.
Persistent odors are examined for hidden deposits or seal failures and corrected through deodorizers, disinfection, or component replacement.
Finally, any visible damage is assessed and repair options—from minor repairs to professional refinishing—are outlined.
Residual staining or etching how to fix
When mineral deposits are removed too aggressively or left too long, porcelain or enamel can develop faint stains or dull etching that soap and routine cleaners won’t fix.
For light staining, apply a nonabrasive cleaner with a soft pad and rinse.
For etching, consider professional polishing or reglazing; small areas may improve with a porcelain-safe polishing compound applied sparingly and buffed gently.
Persistent odors after cleaning
Even if visible stains and etching have been addressed, lingering odors can indicate trapped residue or bacterial growth in hard-to-reach areas.
Address odors by scrubbing under the rim, inside trapways, and around the flush holes with a brush and enzymatic cleaner.
Flush repeatedly, use a pumice or targeted descaler for deposits, and ventilate.
Repeat treatments and inspect seals and vents for persistent sources.
Damage assessment and repair options
A systematic damage assessment helps determine whether cleaning has restored functionality or if repairs are needed; inspect the bowl, tank, seals, and flush mechanisms for cracks, weakened glaze, mineral pits, or corroded components.
Document findings, prioritize safety, and decide between patching enamel, replacing seals and valves, re-glazing, or swapping fixtures.
Seek professional help for structural cracks or persistent leaks beyond simple parts replacement.
Cost, Time, and Effectiveness Comparison of Methods
A concise comparison helps readers weigh estimated cost and time against expected results and durability for each limescale removal method. The table below summarizes typical costs, time required, and durability expectations to guide selection. Clear trade-offs between investment and longevity are highlighted to inform practical choices.
| Method | Notes |
|---|---|
| Vinegar | Low cost, short time, temporary results |
| Baking soda + vinegar | Very low cost, moderate time, moderate results |
| Commercial descaler | Moderate cost, short time, longer-lasting |
| Mechanical scrubbing | Low cost, longer time, immediate but variable durability |
| Professional service | High cost, short time on-site, longest durability |
Estimated cost and time per method
Cost, time, and effectiveness vary noticeably between limescale removal methods, so choosing the right approach depends on budget, available time, and how stubborn the deposits are. Estimated costs and durations:
| Method | Cost & Time |
|---|---|
| Vinegar soak | Low cost; 4–12 hours |
| Baking soda paste | Very low; 1–3 hours |
| Commercial descaler | Moderate; 30–90 minutes |
| Mechanical scraping | Low–moderate; 10–60 minutes |
Expected results and durability of each method
Having compared cost and time, the next concern is how well each method actually removes limescale and how long results last. Results vary: acid cleans fastest but may require protection; enzymatic cleaners are gentler with moderate durability; mechanical scraping is effective long-term but laborious.
| Method | Expected durability |
|---|---|
| Acid | Short–medium |
| Enzymatic | Medium–long |
| Mechanical | Long |
Quick Reference: Best Method for Common Scenarios
A concise guide matches stain severity to the most effective removal method, helping readers choose quickly.
It outlines preferred treatments for light deposits, moderate buildup with discolored waterlines, and heavy scaling below the waterline.
Practical tips and safety notes accompany each recommendation for straightforward action.
- Use vinegar or a pumice stone for quick, light deposits.
- Apply commercial descaler or baking soda plus vinegar for moderate buildup.
- Employ prolonged soak, pumice, or a specialist product for heavy scaling below the waterline.
- Wear gloves and ventilate the bathroom when using strong cleaners.
- Test any method on a small area before full application.
Light deposits and quick fixes
For light limescale rings and minor spotting, a brief targeted treatment usually restores the bowl without scrubbing or harsh chemicals.
A few simple steps deliver fast results.
- Pour white vinegar, let sit 15–30 minutes
- Use baking soda for fizzing lift
- Apply diluted citric acid spray
- Scrub gently with a soft brush
- Flush to rinse and inspect
Moderate buildup with discolored waterline
Address moderate limescale buildup and a discolored waterline by combining chemical softening with targeted mechanical removal: apply a citric-acid or vinegar soak to dissolve mineral deposits, let it sit long enough to penetrate the ring (typically 30–60 minutes), then loosen remaining residue with a nylon-bristled brush or pumice stone designed for porcelain before flushing and repeating spot treatments as needed.
- Use citric acid for faster results
- Protect finishes and wear gloves
- Agitate gently with a brush
- Rinse thoroughly after treatment
- Repeat weekly until resolved
Heavy scaling below the waterline
Tackle heavy scaling below the waterline by combining strong acidic soaking with careful mechanical abrasion to reach deep mineral deposits without damaging the bowl.
Professionals recommend patience, protective gear, and spot testing. Success requires repeated cycles of soak, scrub, and flush until deposits loosen.
- Use diluted muriatic or phosphoric acid cautiously
- Apply long‑duration soak with plastic wrap
- Scrub with nylon brush
- Rinse thoroughly
- Repeat as needed
Conclusion
Limescale below the toilet waterline can be effectively resolved with methodical care. Studies show hard-water regions spend up to 16% more on plumbing maintenance, highlighting prevention’s value. After evaluating severity and choosing an appropriate approach, technicians should follow safety steps, deep-clean stubborn deposits, and implement long-term measures to prevent recurrence. Routine inspections and simple soft-water or descaling strategies typically keep fixtures clean and reduce costly repairs over time.