How to Remove Corrosion From Water Pipes: Step-By-Step Fixes and Prevention Tips
To effectively remove corrosion from water pipes, begin by shutting off the water supply and wearing appropriate personal protective equipment (PPE). Assess the situation to determine if cleaning, targeted repairs, or complete replacement is necessary. Start by removing surface rust with brushes or sanding, then treat any remaining deposits with mild acids. For damaged sections, use epoxy or clamps, or consider replacing the affected pipes. To prevent future corrosion, manage your water’s chemistry and conduct regular inspections. Follow these detailed steps for a thorough fix.
What causes corrosion in household water pipes
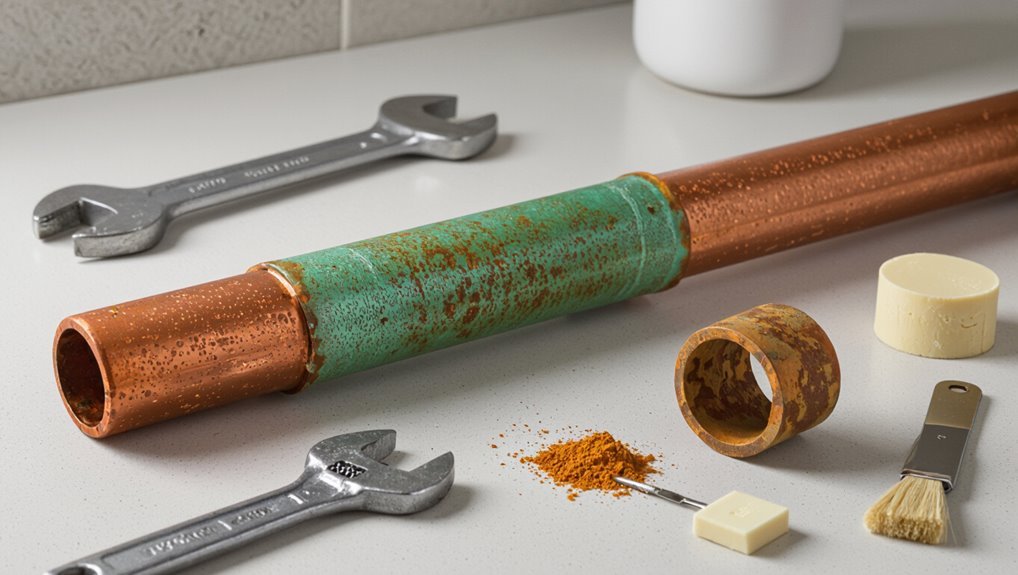
Household pipe corrosion occurs in several forms—rust on iron and steel, pitting in copper, galvanic corrosion between dissimilar metals, and tuberculation that narrows flow.
Different materials show varying vulnerability: copper and iron corrode under certain water chemistries while PVC and other plastics are chemically inert.
Early signs include discolored or metallic-tasting water, reduced flow, and leaks, all of which can pose health risks and damage the plumbing system.
Common types of pipe corrosion (rust, pitting, galvanic, tuberculation)
Corrosion in domestic water pipes arises from several distinct mechanisms—rust, pitting, galvanic action, and tuberculation—each driven by specific chemical or electrochemical conditions.
Rust forms uniformly from oxygen and moisture.
Pitting creates deep localized holes from aggressive ions.
Galvanic action occurs at metal dissimilarities with an electrolyte.
Tuberculation builds mineral and corrosion deposits that restrict flow.
Readers seeking how to remove corrosion from water pipes should match treatment to type.
Materials affected (copper, galvanized steel, iron, PVC and why some don’t corrode)
After outlining the common corrosion types, attention turns to which materials are vulnerable and why some resist damage.
Copper resists uniform corrosion but suffers pitting from aggressive water.
Galvanized steel and iron corrode to rust and scale, thinning walls.
PVC and other plastics are inert to electrochemical corrosion, so they remain stable unless mechanically damaged or degraded by UV or chemicals.
Signs and early indicators of corrosion inside pipes
Several common early indicators signal that water pipes are beginning to corrode: discolored or metallic-tasting water, reduced flow or intermittent pressure, unusual noises like banging or hissing, and visible rust or flaking at accessible joints and fixtures.
Additional signs include staining on sinks or laundry, frequent valve or faucet leaks, accelerated scaling inside fixtures, and increased sediment in aerators or showerheads indicating internal degradation.
Health and system risks from corroded pipes
Household water pipe deterioration poses both public-health and system risks: compromised pipes can leach metals (lead, copper, iron) and harbor bacteria, degrading water quality and increasing illness risk, while also causing leaks, pressure loss, and premature system failure that raise repair costs and property damage.
Corrosion arises from oxygen, pH imbalance, dissolved minerals, stray electrical currents, and aggressive water chemistry, accelerating degradation and contamination.
Quick assessment: How to determine if pipes need cleaning, repair, or replacement
A brief assessment begins with a visual checklist of accessible pipes and fixtures, noting flaking, green or white deposits, pitting, and leaks.
Simple water-quality tests for discoloration, metallic taste, elevated iron or copper, and low pH can indicate active corrosion or corrosion byproducts.
If signs are widespread, tests confirm contamination, or the homeowner lacks tools or confidence, a professional plumber should be called rather than attempting extended DIY fixes.
Visual inspection checklist for accessible pipes and fixtures
When should a visible patch of green, white, or rust-colored buildup prompt further action?
Inspect accessible pipes for discoloration, flaking, pitting, dampness, and mineral crusts.
Check joints, valves, faucets, and exposed fittings for leaks or active corrosion.
Tap suspect areas for thinness or hollow sound.
Note staining on surrounding surfaces and persistent odors.
Photograph and record locations for follow-up.
Testing water quality to detect corrosion byproducts
If discoloration or metallic taste is noticed, testing the water for corrosion byproducts gives a clear, objective basis for deciding whether pipes need cleaning, repair, or replacement.
Collect samples for lead, copper, iron, pH, and hardness. Use certified laboratory analysis or EPA-approved test kits.
Compare results to health and plumbing standards; elevated metals or low pH indicate active corrosion requiring intervention.
When to call a professional plumber versus DIY
How should one decide between a quick DIY cleaning and calling a professional plumber?
Assess visible corrosion, leak presence, water discoloration, and flow reduction.
DIY suits surface rust, minor scale, and simple aerator or soft-bristle cleaning.
Call a plumber for persistent leaks, structural pipe damage, widespread corrosion, lead concerns, low water pressure after cleaning, or when replacement, soldering, or permit-required work is likely.
Tools, materials, and safety precautions for removing corrosion
Before beginning corrosion removal, the author recommends outlining required personal protective equipment and ensuring adequate ventilation to prevent inhalation and skin exposure.
A concise inventory of hand tools, suitable chemical agents, and mechanical cleaners should be assembled to match pipe material and corrosion severity.
Finally, proper containment and disposal procedures for removed corrosion and spent chemicals must be planned to protect the environment and comply with local regulations.
Personal protective equipment and ventilation
Wearing appropriate personal protective equipment and ensuring adequate ventilation are essential when removing corrosion from water pipes to protect against chemical exposure, dust, and airborne particles.
Eye protection, chemical-resistant gloves, and a respirator rated for particulates and vapors minimize risk. Use long sleeves and impermeable footwear.
Work in cross-ventilated areas or with exhaust fans; consider local exhaust near treatment sites to reduce fume buildup.
Hand tools, chemical agents, and mechanical cleaners to have on hand
After establishing protective gear and ventilation, attention turns to the tools and agents needed to remove pipe corrosion safely and effectively.
Essential hand tools include wire brushes, scrapers, emery cloth, and adjustable wrenches.
Recommended chemical agents are diluted vinegar, citric acid, and commercial descalers used per instructions.
Mechanical options: rotary brush attachments and small grinders with guards.
Keep neutralizers and spill kits nearby.
Environmental and disposal considerations for removed corrosion
Consider containment and proper disposal of removed corrosion as integral to the job: collect flakes, sludge, and spent chemical solutions in labeled, sealed containers to prevent runoff and airborne spread.
Follow local hazardous-waste regulations; separate acids, bases, and heavy-metal residues.
Use absorbents, neutralizers, and corrosion-resistant tools.
Transport only to authorized disposal facilities.
Document handling, maintain spill kits, and guarantee personnel use PPE during all stages.
Step-by-step: Removing surface corrosion from exposed metal pipes
The procedure begins with preparing the work area and shutting off the water supply to prevent contamination and accidental flow.
Mechanical removal with a wire brush, sandpaper, or rotary tools is followed by careful application of mild chemical cleaners or rust removers, then neutralizing and thoroughly rinsing the treated surfaces.
Once dry, appropriate protective coatings are applied to inhibit future corrosion.
Preparing the work area and shutting off water
Prepare a clear, dry workspace and locate the main shutoff valve before any corrosion removal begins.
The technician isolates affected lines, drains residual water via nearby taps, and relieves system pressure.
Protective coverings shield surrounding surfaces and floor. Adequate lighting and ventilation are arranged.
Personal protective equipment—gloves, eye protection, and a dust mask—are donned.
Tools and disposal containers are staged for safe, efficient work.
Mechanical removal techniques (wire brush, sandpaper, rotary tools)
Begin by selecting the appropriate mechanical method—wire brush, medium-grit sandpaper, or a rotary tool with a brush or flap-wheel—based on corrosion severity and pipe material.
Secure the pipe, wear eye and hand protection, and work longitudinally to avoid gouging.
Remove loose rust, inspect progress frequently, and switch to finer abrasives for smoothing.
Clean debris before protective treatment or reassembly.
Using mild chemical cleaners and rust removers safely
When surface corrosion remains after mechanical cleaning, a mild chemical cleaner can be applied to dissolve residual rust without damaging the pipe or surrounding materials.
The technician selects a compatible, low-acid product, follows manufacturer dilution and contact-time instructions, wears gloves and eye protection, ventilates the area, shields nearby finishes, and tests on a small patch.
Dispose of residues per local regulations.
Neutralizing and rinsing treated areas
After chemical cleaners have been allowed to work and any loose residue wiped away, the treated area must be neutralized and thoroughly rinsed to stop the chemical activity and remove dissolved corrosion.
A dilute baking soda solution neutralizes acids; follow with copious clean water rinses.
Dry the surface completely with clean cloths or air to prevent flash corrosion.
Dispose of rinse water per local regulations.
How to apply protective coatings after cleaning
Apply a corrosion-inhibiting coating promptly once the metal is fully dry and neutralized to prevent re-oxidation and extend service life.
Inspect surface for residue, sand or scuff as needed, then remove dust.
Choose compatible primer and topcoat (epoxy, polyurethane, or zinc-rich systems).
Apply thin, even coats per manufacturer instructions, allowing proper cure between layers.
Restore insulation and monitor periodically.
Step-by-step: De-scaling and clearing internal corrosion and deposits
The section outlines practical options for clearing internal scale and corrosion, from chemical flushes using vinegar, citric acid, or commercial descalers to mechanical methods like pipe snakes, water jetting, and rotary descalers.
It also summarizes electrochemical and electrolysis techniques for removing internal rust and indicates the circumstances that justify professional hydro-jetting or pipe relining.
Clear criteria for choosing each approach are provided, focusing on severity, pipe material, and access constraints.
Methods for flushing and descaling pipes (vinegar, citric acid, commercial descalers)
Begin by isolating the affected section of pipe and shutting off the water supply to prevent flow during treatment.
Apply diluted white vinegar or a citric acid solution, circulate and soak per manufacturer guidance, then flush thoroughly.
For stubborn scale, use a commercial descaler rated for the pipe material, following safety and disposal instructions.
Rinse and restore water, checking for improved flow and leaks.
Using pipe snakes, water jetting, and mechanical descalers
For internal corrosion and mineral deposits that resist chemical treatment, technicians employ mechanical methods—pipe snakes, high-pressure water jetting, and rotary descalers—to physically break up and remove buildup.
Each tool is selected based on pipe diameter, material, configuration, and the nature of the obstruction, and is used with appropriate safety measures to avoid pipe damage or injury.
- Inspect and choose tool.
- Isolate and depressurize line.
- Mechanically remove deposits.
- Flush and reinspect.
Electrochemical and electrolysis approaches for internal rust removal
Where mechanical tools reach their limits—tight bends, fragile materials, or tenacious rust—electrochemical and electrolytic methods offer a controlled alternative for removing internal corrosion.
Controlled current, sacrificial anodes, or reverse-polarity electrolysis dissolve oxides and loosen scale without abrasive contact. Proper electrode placement, current density, and electrolyte selection are essential.
Monitor pH, flow, and metal loss; stop when debris clears.
When to use professional hydro-jetting or pipe relining
Assess the severity and location of deposits before deciding between professional hydro-jetting and pipe relining:
Hydro-jetting is most effective for heavy, continuous scale, roots, and sludge in long runs where mechanical removal is feasible, while relining is preferable when pipes are structurally compromised, fragile, or difficult to access and a non-invasive, long-term restoration is needed.
A qualified plumber should inspect, camera the line, recommend cost-effective, code-compliant treatment.
Repair and replacement options for severely corroded pipes
When corrosion is too advanced for cleaning alone, the homeowner must consider targeted repairs or replacement options.
Temporary fixes such as epoxy, clamp, or wrap systems can seal leaks, while rerouting or replacing sections — or opting for full pipe replacement — offers longer-term solutions.
Choices of replacement materials (copper, PEX, PVC, CPVC) carry trade-offs in cost, durability, and suitability for different applications.
Patching and local repairs (epoxy, clamps, wrap systems)
Repairing localized corrosion can often be achieved without replacing entire pipe sections by using targeted solutions such as epoxy compounds, mechanical clamps, and wrap systems.
These methods stop leaks, restore structural integrity, and extend service life while minimizing water shutoffs and excavation.
Epoxy patches bond to cleaned metal, clamps provide immediate compression sealing, and polymer wraps conform to irregular damage, offering durable, cost-effective temporary or long-term repairs.
Rerouting, replacing sections, and full pipe replacement choices
If localized fixes such as epoxy patches, clamps, or wraps cannot restore adequate strength or reliability, more extensive options must be considered: rerouting flow around damaged sections, replacing individual pipe segments, or performing full pipe replacement.
Professionals assess extent, accessibility, cost, and disruption. Rerouting minimizes demolition; segment replacement targets isolated failures; full replacement addresses systemic corrosion and long-term reliability, though it is the most invasive.
Pros and cons of common replacement materials (copper, PEX, PVC, CPVC)
Several common replacement materials—copper, PEX, PVC, and CPVC—offer distinct trade-offs in durability, cost, installability, and suitability for potable or heated water systems. Each material suits different budgets, climates, and codes: copper is durable but costly; PEX is flexible and fast to install; PVC is cheap for cold water; CPVC handles hot water with moderate cost.
| Material | Key trait |
|---|---|
| Copper | Durable, costly |
| PEX | Flexible, easy |
| PVC | Inexpensive, cold-only |
| CPVC | Hot-water rated |
Preventing future corrosion: maintenance and long-term strategies
Preventing future corrosion requires addressing water chemistry through pH, hardness and chloride control and, where appropriate, installing treatment systems.
Physical protections such as sacrificial anodes, dielectric unions and choosing corrosion-resistant materials suited to the local water conditions reduce electrochemical attack.
A routine maintenance and inspection schedule catches early signs of deterioration and guarantees protective measures remain effective.
Water chemistry adjustments (pH, hardness, chlorides) and treatment systems
Adjusting water chemistry and using targeted treatment systems reduces ongoing pipe corrosion by stabilizing pH, controlling hardness, and limiting chloride and other aggressive ions.
Regular testing guides precise adjustments: pH correction, softening to prevent scale-related under-deposit corrosion, and chloride reduction via filtration or blending.
Corrosion inhibitors and sequestrants applied appropriately protect metal surfaces; routine monitoring guarantees effectiveness and avoids over-treatment or adverse reactions.
Installing sacrificial anodes and dielectric unions
Install sacrificial anodes and dielectric unions as targeted physical protections to slow or stop electrochemical attack at vulnerable points in a plumbing system.
Sacrificial anodes, typically magnesium or zinc, corrode preferentially, protecting metal pipes.
Dielectric unions electrically isolate dissimilar metals to prevent galvanic currents.
Proper sizing, correct placement near fittings or tanks, and secure installation guarantee effective, long‑term corrosion control without altering water chemistry.
Routine maintenance schedule and inspection tips
Vigilance is essential: a concise, scheduled inspection program guarantees early detection of corrosion and extends pipe service life.
Technicians should log visual checks, measure wall thickness, test water chemistry, and verify protective coatings. Frequency depends on age, material, and water quality; adjust after each finding.
Prioritize prompt repairs and record trends to inform proactive replacements.
- Monthly visual inspections
- Quarterly chemistry tests
- Annual thickness surveys
- Immediate follow-up on anomalies
Best material choices for longevity in different water conditions
Selecting the right pipe material for a given water system is a primary defense against corrosion and greatly influences maintenance needs and service life.
In soft, acidic or high-chloride water, PVC, CPVC or FRP resist corrosion.
For neutral, low-oxygen water, copper or stainless steel (304/316) perform well.
Galvanized steel is discouraged; consider linings or cathodic protection where metal remains necessary.
Costs, timelines, and decision-making factors
Typical cost ranges span modest expenses for DIY cleaning, higher fees for professional remediation, and substantial costs for full pipe replacement.
Timeframes vary from a few hours for simple cleaning to days for professional repairs or replacements.
Decisions should balance severity, immediate risk, and available budget to prioritize short-term fixes or long-term solutions.
Typical cost ranges for DIY cleaning, professional services, and replacements
Cost estimates for addressing pipe corrosion vary widely depending on whether a homeowner opts for DIY cleaning, hires a professional for remediation, or replaces sections of piping; understanding these ranges helps weigh upfront expense against long-term reliability.
DIY kits and materials commonly cost $20–$200.
Professional cleaning or spot repairs typically run $200–$1,200.
Partial or full pipe replacement may range $500–$6,000 or more.
Time required for common remediation methods
When evaluating remediation options for corroded water pipes, homeowners should consider both the duration of each method and how that timeline interacts with cost, disruption, and long‑term reliability.
DIY cleaning typically requires hours to a day.
Professional descaling or lining often takes one to three days.
Partial or full replacement ranges from a day for minor jobs to several days for extensive work, including inspection and curing times.
How to prioritize actions based on severity and budget
Evaluating severity and budget together guides the choice of response: minor surface corrosion with no leaks and a limited budget may justify DIY cleaning or targeted patching, whereas extensive pitting, recurring leaks, or lead contamination typically require professional descaling, lining, or full replacement despite higher cost and longer timelines.
Prioritize safety, regulatory limits, and long-term cost per year; document condition, get quotes, then act.
Real-life examples and common mistakes to avoid
The article presents brief case scenarios showing a homeowner’s successful DIY cleanup, an attempted repair that failed, and outcomes after professional intervention.
Each example highlights practical signs, tools used, and resulting costs.
Common mistakes that can worsen corrosion or cause leaks—such as using the wrong cleaners, overaggressive scraping, or improper sealing—are identified for avoidance.
Short case scenarios: successful DIY cleanup, when DIY failed, and professional fixes
Illustrative case snapshots show how homeowners handled pipe corrosion: a renter successfully removed surface rust from exposed copper using vinegar and a soft brush.
Another attempted a DIY repair that worsened leaks after using an incompatible chemical cleaner.
A plumber restored service by replacing a failing galvanized segment and installing dielectric fittings.
Follow-up notes highlight timely detection, proper tools, documenting damage, and calling a pro when integrity is compromised.
Mistakes that worsen corrosion or cause leaks
Those case snapshots also reveal how well-intentioned actions can accelerate corrosion or trigger leaks.
Homeowners tightened fittings over corroded threads, cracking pipes; applied bleach directly, accelerating metal pitting; mixed incompatible metals without dielectric unions, creating galvanic corrosion; ignored hairline fractures until they widened; used tape instead of proper seals; and painted over corrosion, hiding ongoing deterioration.
These mistakes compounded damage and increased repair costs.
How to monitor pipes after treatment
After treatment, the article outlines clear signs of recurrence — discolored water, metallic taste, or increased sediment — and recommends retesting water at regular intervals.
It describes simple home tests readers can perform, such as pH strips and visual checks, and specifies when professional water analysis is warranted.
Guidance is provided on scheduling follow-up inspections based on test results and the severity of initial corrosion.
Signs of recurrence and how often to retest water
How can homeowners tell if corrosion is returning and when to retest water after treatment?
Watch for discolored water, metallic taste, reduced flow, new stains, or recurring leaks.
Inspect visible pipes for fresh flaking or greenish buildup.
Retest water quality within 1–3 months post-repair, then every 6–12 months or after plumbing work, water source changes, or persistent symptoms suggest recurrence.
Simple home tests and when to schedule professional follow-up
Several straightforward checks let a homeowner track pipe condition between professional visits: inspect visible joints for fresh rust, monitor water color and odor, and note pressure changes or new leaks.
Perform simple pH and hardness tests monthly. If staining returns, pH drops below neutral, pressure fluctuates, or leaks appear, schedule a professional inspection and possible remediation within days to weeks depending on severity.
Conclusion
To sum up, the homeowner restored pipe function through targeted cleaning, replacement where necessary, and ongoing maintenance—much like a Victorian plumber consulting a pocket watch to time each task. Simple surface scrubbing, chemical descaling, and occasional section replacement prevented leaks and improved water quality. Regular inspections, water treatment, and prompt repairs kept corrosion at bay. With reasonable costs and predictable timelines, proactive care proved far more economical than emergency overhaul, preserving plumbing longevity.