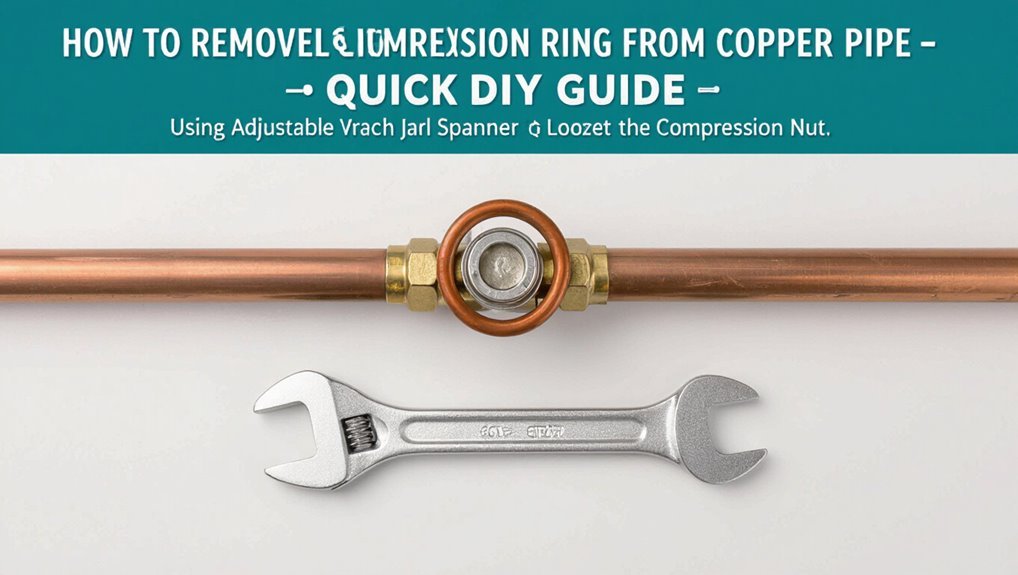
How to Remove a Compression Ring From Copper Pipe €” Quick DIY Guide
To remove a stuck compression ring from a copper pipe, first shut off the water supply and open a downstream tap to relieve pressure. Protect your work area, then back off the nut and slide the nut and ferrule back. If it binds, apply penetrating oil briefly and score the ferrule lengthwise with a small cutter. You can then pry it open or use a low-profile extractor to pull the ring while supporting the pipe. Finally, clean and deburr the tube before fitting a new compression joint, following the careful prep and reassembly steps.
Quick: Remove a Compression Ring (3‑Step)
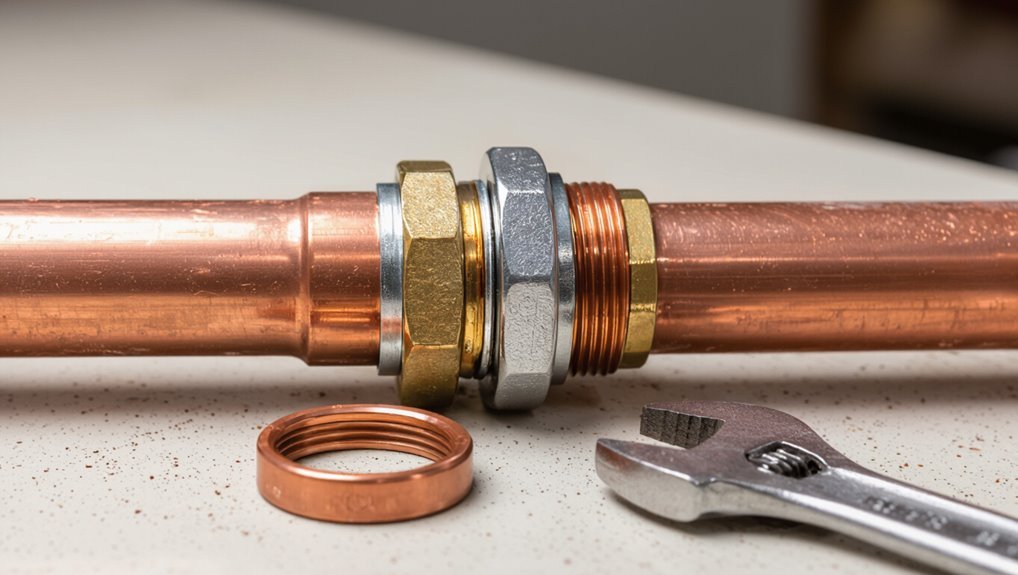
Begin by turning off the water and opening a nearby faucet to relieve pressure; then place a bucket under the joint to catch any remaining water.
The person loosens the compression nut with an adjustable wrench, holding the fitting steady with a second wrench.
After backing the nut off, they slide it and the ferrule away from the pipe.
If the ferrule resists, a small cutting wheel scores it lengthwise, allowing gentle prying with needle-nose pliers.
Finally, the pipe end is cleaned with emery cloth to remove burrs and corrosion before preparing for a new fitting or reassembly.
What a Stuck Compression Ring Does to Your Pipe
A stuck compression ring can deform the copper pipe wall, leaving a permanent indentation that weakens the tubing at that point.
That deformation narrows the internal passage and creates a localized flow restriction that may reduce system performance.
Over time, the altered profile can accelerate wear and increase the risk of leaks or blockages.
Pipe Wall Deformation
Pressing inward over time, a stuck compression ring can permanently deform a copper pipe’s wall, narrowing the bore and creating an uneven inner surface that disrupts flow and weakens the pipe structurally.
Localized indentation reduces wall thickness, concentrating stress and raising susceptibility to cracks or pinholes under pressure or thermal cycling.
Work hardened copper around the ring loses ductility, making future repairs or flaring difficult and increasing the chance of brittle failure during disassembly.
Corrosion can accelerate at deformed edges where protective oxide is disturbed.
Detecting deformation early allows targeted replacement of the damaged section to restore integrity and safety.
Flow Restriction Risks
Stuck compression rings constrict the internal diameter of a copper pipe, creating a physical bottleneck that reduces flow rate and increases pressure drop across the affected section. Reduced velocity downstream, turbulence at the ring, and localized stagnation elevate corrosion risk and hinder appliance performance. Over time, mineral buildup and debris accumulate at the restriction, worsening blockage. Pressure fluctuations may stress joints, raising leak probability. Prompt detection and removal restore hydraulic capacity, prevent premature wear, and maintain system efficiency.
| Effect | Consequence |
|---|---|
| Reduced flow | Poor appliance function |
| Increased pressure drop | Higher pump strain |
| Turbulence | Accelerated corrosion |
| Debris buildup | Progressive blockage |
When to Remove a Compression Ring From Copper Pipe
When metal fittings are being replaced or a joint is leaking, the compression ring should be removed to allow proper reassembly or repair; leaving the ring in place during maintenance can prevent a new ferrule from seating correctly and cause persistent leaks.
Removal is also warranted when corrosion, deformation, or scoring on the pipe or ferrule compromises the seal.
If tubing is being rerouted, shortened, or upgraded, the old ring must be taken off to guarantee a fresh connection.
Conversely, undisturbed, sound fittings need not be touched.
Removal should occur before testing or final tightening to confirm a reliable, leak-free joint.
Tools You Need to Remove a Compression Ring
The task requires a handful of basic hand tools and some cutting and cleaning implements to remove a compression ring from copper pipe.
Common essentials include adjustable wrenches, pliers, a tubing cutter or hacksaw, and a deburring tool or emery cloth.
Proper selection of these items streamlines removal and protects the pipe from damage.
Essential Hand Tools
Removing a compression ring from a copper pipe requires a small set of reliable hand tools chosen for precision and control.
Essential items include an adjustable wrench to loosen the nut, a pair of slip-joint pliers for gripping ferrules, and a basin wrench for tight spaces.
A compact pocket-sized screwdriver assists with accessing clips or retaining screws.
Needle-nose pliers permit careful manipulation of small parts.
A thin-tip deburring tool or pick helps pry the ferrule without cutting the pipe.
A soft-faced hammer allows gentle persuasion.
Quality tools with comfortable grips reduce slippage and prevent damage during removal.
Cutting And Cleaning
Following grip and loosening tools, attention shifts to cutting and cleaning where accuracy prevents leaks and damage.
The practitioner selects compact, sharp tools to cut seized fittings and remove burrs without deforming the pipe.
Cleaning readies the surface for reinstallation or soldering, removing corrosion and contaminants.
Protective measures limit metal debris entering the system.
- Tubing cutter for straight, controlled cuts
- Fine file or deburring tool to smooth edges
- Emery cloth or sandpaper for polishing
- Brass brush to remove buildup without scoring
- Clean cloth and solvent to degrease before assembly
Shut Off Water and Prepare the Pipe
Before any work begins, shut off the water supply to the affected line at the nearest valve or the main shutoff to prevent flooding and relieve pressure. The person checks downstream taps to confirm drain, opens a nearby faucet to bleed remaining water, and places a bucket under the joint. They dry the pipe with a cloth and inspect the compression nut and ferrule for corrosion or deformation. Marking the pipe edge helps alignment during reassembly. Small hand tools and safety glasses are laid out within reach. The process minimizes surprises and readies the joint for safe disassembly.
| Item | Action | Note |
|---|---|---|
| Valve | Close | Verify |
| Faucet | Open | Drain |
| Bucket | Place | Catch water |
Protect Surrounding Fittings and Surfaces
To protect adjacent fittings and finished surfaces, the person should cover nearby valves, trim, and flooring with clean rags or painter’s tape and lay down a drop cloth or cardboard to catch drips and debris. They should remove loose items, shut cabinet doors, and isolate the work area. Edges of tape must be sealed to prevent small particles reaching crevices. Tools and removed parts go on a small tray to avoid scratches. Lighting should be positioned outside the protected zone. Consider ventilation if soldering later.
- Cover valves and trim with rags or painter’s tape
- Protect floor with drop cloth/cardboard
- Seal tape edges
- Use a parts tray
- Keep lighting external
Method A : Loosen the Nut and Slide the Ferrule Off
Before beginning, the water supply is shut off to prevent leaks and pressure buildup.
The pipe is held steady with one hand or a clamp while the nut is loosened with a wrench.
Once the nut is backed off, the ferrule is slid backward along the pipe away from the fitting.
Turn Off Water Supply
Typically, the water supply should be shut off at the nearest shutoff valve or main before any work on a compression fitting begins. The operator confirms zero pressure by opening a downstream faucet briefly. Draining residual water prevents spills when loosening the nut and sliding the ferrule off. Safety and mess control are prioritized.
- Locate the closest shutoff valve
- Turn valve clockwise until fully closed
- Open a downstream fixture to relieve pressure
- Place a bucket or towels to catch residual water
- Verify no dripping before loosening the compression nut
Hold Pipe Steady
With the water off and the line drained, the technician secures the copper pipe to prevent rotation or axial movement while working on the compression nut. A pipe vise or adjustable wrench on a nearby fitting holds the tubing steady without marring it; padding or cloth protects the finish. The assistant wrench applies counter-torque to the nut while the holding tool stabilizes the pipe, ensuring forces concentrate on the nut and not the tubing.
Steady hands and proper support reduce the risk of loosening joints elsewhere. Once secure, the technician proceeds to loosen the compression nut, confident the pipe remains immobile.
Slide Ferrule Backward
Once the compression nut is loosened several turns, the technician slides the nut and ferrule assembly back along the copper tubing away from the fitting body.
The ferrule should move smoothly; if it binds, rotate gently while applying steady axial force.
Inspect the ferrule for deformation and note its orientation before removal.
If it resists, apply light penetrating oil and wait briefly, then try again.
After displacement, clean the tubing and fitting surfaces to prepare for reuse or replacement.
- Maintain steady, controlled pressure
- Rotate slightly to free stuck ferrules
- Avoid marring the tubing
- Inspect for dents or cracks
- Clean contact surfaces before reassembly
Method B : Cut the Compression Nut and Extract the Ferrule
As an alternative when the ferrule is seized or the nut cannot be unscrewed, Method B involves cutting the compression nut and removing the ferrule from the copper pipe; this approach sacrifices the nut but preserves the tubing and fitting body when done carefully.
First, mark the nut and protect nearby surfaces with tape.
Use a hacksaw or rotary cutter to slice the nut longitudinally, avoiding the pipe and fitting.
Pry the split nut open and remove it.
Slide the ferrule off with pliers; if it sticks, score gently and peel or split the ferrule.
Clean the pipe and inspect for damage before reassembling.
Method C : Use a Backup Ring Puller or Extractor
Method C recommends using a backup ring puller or dedicated extractor to remove stubborn ferrules without scoring the copper.
The technician selects an extractor sized to the pipe and ferrule type to guarantee a secure grip and correct fit.
Extraction is performed slowly and evenly to avoid deforming the pipe or pushing the ferrule deeper.
Choose The Right Extractor
Select an extractor that matches the pipe size, ring material, and available access before beginning work. The correct tool reduces damage risk and speeds removal. Consider extractor tip shape, jaw opening, length, and material compatibility. Inspect fit on a test piece if possible. When selecting, prioritize secure engagement and reachable leverage over cheapest option.
- Match extractor diameter to pipe outer dimension
- Choose hardened steel for crimped copper rings
- Prefer adjustable jaws for variable ring sizes
- Select low-profile designs for tight spaces
- verify handle or drive method fits available clearance
Safe Removal Technique
With the proper extractor chosen, proceed to a controlled removal using a backup ring puller or extractor designed for copper fittings. The tool should seat evenly against the compression ring while protecting the pipe and nut.
Secure the pipe to prevent rotation or bending. Apply steady, even force to draw the ring away from the ferrule and joint; avoid sudden jerks that might deform the pipe.
Inspect progress frequently and reposition the extractor if slippage occurs. Once removed, clean the pipe end and inspect for nicks or compression marks. Replace damaged sections or file minor imperfections smooth before reassembly.
Method D : Split the Ferrule With a Tubing Cutter
Using a tubing cutter to split the ferrule provides a controlled, non-destructive way to free the compression ring from the copper pipe.
The technician tightens the cutter lightly against the ferrule edge, scores once while rotating, then deepens the cut gradually until the ferrule cracks.
This method limits force on fittings and preserves pipe integrity when done carefully.
- Position cutter on ferrule, not on pipe
- Apply light, incremental pressure while rotating
- Check progress frequently to avoid overcutting
- Pry split ferrule open with pliers or a small screwdriver
- Clean burrs and inspect pipe for damage
Remove a Seized Ring Safely (Avoid Scoring Copper)
Before any effort begins, the condition of the ferrule and the adjacent copper should be inspected to determine how firmly it is seized and where corrosion or deformation exists.
Gentle methods are then applied to loosen the ring—using penetrating lubricant, controlled twisting, or backing tools that minimize contact pressure to avoid scratches.
Once freed, any burrs or residue are removed with a soft cloth and non-abrasive cleaner to preserve the pipe surface.
Assess Ring And Pipe
Inspect the compression ring and adjoining copper pipe carefully to determine how tightly the ring is seized and whether the pipe surface is damaged. The observer notes corrosion, deformation, and any visible tool marks; pictures or measurements can document extent.
Consider nearby fittings and access constraints before attempting removal. Safety gear is prepared and work area cleared.
- Check for corrosion or verdigris at the ring-pipe interface
- Note ring alignment and any crimping or mushrooming
- Inspect pipe for scratches, gouges, or thinning
- Verify surrounding fittings won’t obstruct removal
- Record dimensions and photograph damage for reference
Loosen Without Scratching
Having noted corrosion, deformation, and clearance around the fitting, the technician proceeds to free the seized compression ring without scoring the copper.
The method employs penetrating oil applied sparingly to the joint, allowed time to seep between ring and nut.
A strap wrench or nylon-jaw pliers provides grip without metal-on-metal contact; gentle, steady torque breaks adhesion.
If vibration helps, light taps with a plastic-headed mallet transmit shock without indenting the pipe.
Heat is used cautiously and briefly, directed to the nut only, never the pipe.
Progress is checked frequently to avoid overforce; work stops at any sign of surface damage.
Remove Residue Carefully
With the nut loosened and the ring loosened from its bite, attention shifts to removing any remaining residue clinging to the copper without marring the surface.
One person inspects the pipe for burrs, corrosion, or compressed metal. Soft tools and gentle methods preserve finish and fit. Abrasive action is avoided; chemical cleaners are used sparingly and rinsed thoroughly.
After cleaning, the seating surface must be smooth and true to accept a new ring.
- Use a plastic scraper or wooden dowel for gentle prying
- Apply mild vinegar or dedicated copper cleaner briefly
- Brush with a soft nylon brush
- Rinse and dry completely
- Inspect with light for scratches
Handling Corroded or Crimped Compression Rings
When a compression ring is corroded or crimped, removal requires more care and different tools than a standard disassembly; stubborn rings can seize to the copper tubing or deform beyond reuse, risking damage to the pipe or fitting. The technician inspects corrosion, scores, and deformation, then chooses penetrating oil, fine hacksaw, or rotary tool with a cutoff wheel. Heat is avoided unless fittings permit. Small incremental cuts and gentle prying free the ferrule without scoring the pipe. Cleaned surfaces are inspected for gouges before reassembly or replacement.
| Tool | Purpose | Caution |
|---|---|---|
| Penetrant | Loosen corrosion | Allow dwell time |
| Cut wheel | Section ferrule | Avoid pipe contact |
| Pliers | Pry open | Use gentle force |
Replace or Reuse a Compression Ferrule?
Decide whether to replace or reuse a compression ferrule based on its visible condition and the integrity of the copper pipe beneath it.
The ferrule must seat evenly and show no deep gouges, cracks, or severe deformation.
Reuse only when it compresses uniformly and the pipe’s outer surface is undamaged.
Replace when corrosion, flattening, or splitting is present, or if leaks occurred previously.
Consider ferrule material compatibility with the fitting and local codes.
When in doubt, replace to guarantee a reliable seal and avoid repeat disassembly.
- Inspect ferrule for cracks or splits
- Check for uniform compression marks
- Assess pipe surface condition
- Confirm material compatibility
- Replace if any doubt
Clean and Prepare the Pipe After Ring Removal
After the compression ring or ferrule is removed, the exposed section of copper must be cleaned and prepared before reassembly or fitting replacement.
Surface contamination, oxidation, and burrs compromise seals. Use a clean cloth to wipe away residue, then a fine abrasive pad or emery cloth to remove tarnish and create a bright, smooth surface.
Deburr the pipe end with a reamer or round file, maintaining roundness and avoiding material removal that shortens the pipe unnecessarily.
Finish with a final wipe of solvent or alcohol to remove oils. Inspect visually and by touch; the pipe should be smooth, clean, and correctly sized for the fitting.
Install a New Compression Fitting Correctly
With the pipe cleaned and deburred, the installer fits the new compression nut and ferrule onto the tubing, ensuring the ferrule seats squarely against the pipe and the nut threads engage the fitting body without cross-threading.
The fitting is hand-tightened, then given a measured quarter to half turn with a wrench while holding the fitting body steady.
Over-tightening is avoided; leaks are checked under low pressure first. If a leak appears, the nut is tightened incrementally. Proper alignment prevents stress on the joint and ensures longevity.
- Seat ferrule squarely
- Hand-tighten first
- Wrench turn: 1/4–1/2 turn
- Check under low pressure
- Tighten incrementally
Safety Tips to Avoid Cutting or Puncturing Copper Pipe (Compression Fittings)
Often overlooked, careful handling and the right tools are essential to prevent accidental cuts or punctures when working with copper pipe and compression fittings. Wear cut-resistant gloves and eye protection.
Use a properly sized tubing cutter, reamer, and deburring tool to avoid irregular edges that cause stress points. Support pipe near the work area to prevent bending or kinking.
Avoid excessive torque on fittings; tighten to manufacturer specifications. Inspect pipe for corrosion or thinning before cutting.
Keep work area clear of sharp debris and secure loose clothing or jewelry. When uncertain, consult a professional to prevent damage and guarantee safety.
Common Mistakes That Ruin Fittings and How to Avoid Them
In working with compression fittings, several common mistakes—overtightening, improper tube preparation, misaligned components, and reusing worn olives or nuts—are responsible for most leaks and failures. Awareness prevents damage: avoid excessive torque, deburr and clean tubing, check alignment, and replace crushed or corroded parts.
Training and simple inspection reduce wasted time and materials.
- Overtightening: crushes olives, deforms nuts.
- Dirty or rounded tubing: prevents proper seal.
- Misalignment: stresses joints, causes leaks.
- Reusing damaged olives/nuts: compromises integrity.
- Ignoring manufacturer torque/specs: invites failure.
Quick Checklist: Remove, Clean, and Refit a Compression Ring
Typically, a quick checklist for removing, cleaning, and refitting a compression ring breaks the task into a few clear steps: isolate and depressurize the line, loosen and remove the nut and ferrule, inspect and clean the tube and fitting bore, replace any damaged components, then refit and torque to specification while checking for leaks.
Next, document materials and sizes before disassembly.
Use penetrating oil if seized, protect pipe with appropriate wrenches, and remove burrs or corrosion with a file or emery cloth.
Fit a new ring when necessary, hand-start the nut to avoid cross-threading, tighten to manufacturer torque, restore pressure, and test for leaks.
Conclusion
Like a well‑timed chorus ending, removing a stubborn compression ring restores the pipe’s quiet purpose. The simple three-step ritual—shut off, cut or pry, clean—recalls careful hands that tended household systems long before modern convenience. When fittings are refitted correctly, flow resumes and small repairs echo larger lessons about patience, precision, and respect for craft. Done right, a minor plumbing task becomes a modest act of stewardship, keeping water moving and homes whole.