How to Plumb a Recirculating Hot Water System: Step-by-Step Guide for Faster Hot Water
A recirculating hot water system ensures that hot water is readily available at your fixtures by using a pump and return piping to keep water moving. This installation involves planning the layout, sizing the return pipe, adding a pump with isolation valves, and potentially incorporating a timer or sensor. While the upfront costs may be higher, you’ll benefit from reduced water waste and faster access to hot water. Follow local codes, insulate your piping, and test for leaks and air. Continue reading for comprehensive step-by-step instructions and troubleshooting tips.
What a Recirculating Hot Water System Is and How It Works
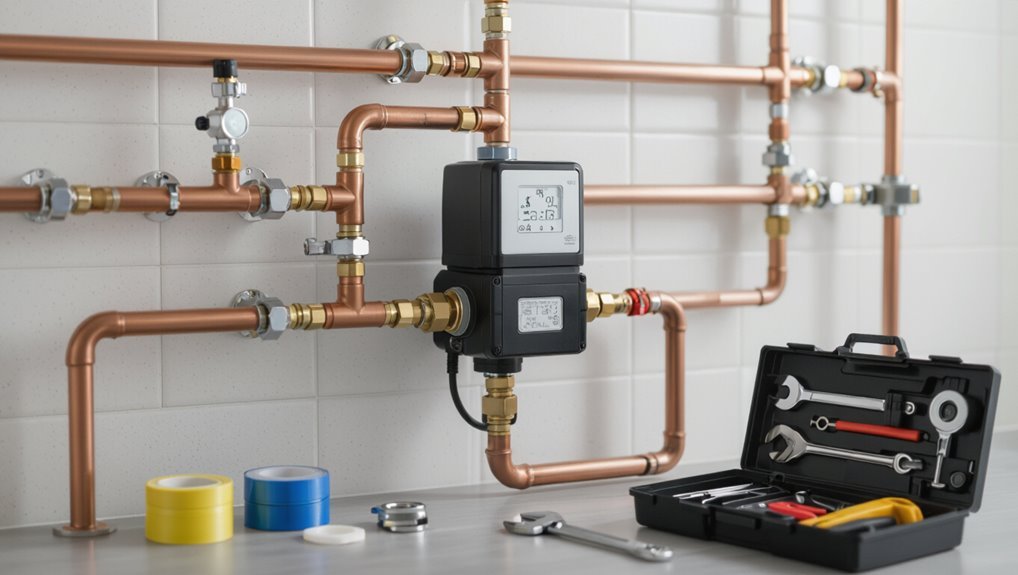
A recirculating hot water system returns unused hot water to the heater through a pump and piping network, with core components including the pump, crossover or dedicated return line, and a control such as a timer or thermostat.
It operates by keeping water moving so hot water is available at fixtures quickly, either continuously via a dedicated loop or intermittently with demand-activated or integrated-loop controls.
Common configurations include dedicated return systems, demand-activated systems that use sensors or push-button valves, and integrated-loop setups that use the cold water line or a crossover valve.
Definition and core components
Recirculating hot water systems circulate heated water through a loop of pipes so hot water is available immediately at fixtures instead of waiting for cold water to clear the lines.
Definition and core components outline the loop piping, dedicated pump, return connection or crossover, check valves, balancing valves, and control device.
Guidance for how to plumb a recirculating hot water system focuses on component placement and reliable connections.
Basic operating principles (pump, crossover, timer/thermostat)
When water in the distribution loop cools below a set point, a small pump energizes to push hot water from the heater through supply pipes and back to the return, maintaining temperature and minimizing wait time at fixtures.
A crossover valve permits controlled flow at fixtures; timers and thermostats limit pump runtime and prevent overheating.
Controls reduce energy use while preserving immediate hot-water availability.
Types of recirculating systems (dedicated return, demand-activated, integrated loop)
Although systems share the goal of delivering hot water quickly, they differ in piping layout, control method, and installation impact.
Dedicated return systems use a separate cold-return pipe for continuous circulation.
Demand-activated systems run the pump only when needed via button, motion sensor, or app.
Integrated loop systems reuse existing cold lines with a crossover valve, minimizing plumbing work but increasing wait times between uses.
Benefits and Trade-offs of Installing a Recirculating System
A recirculating hot water system offers clear benefits—significantly reduced wait time for hot water, measurable water savings, and increased convenience for occupants.
These gains must be weighed against higher energy use in some configurations, upfront installation costs, and ongoing maintenance needs.
Typical payback varies widely depending on water and energy prices, household usage patterns, and system type, so a simple cost–benefit estimate is essential before proceeding.
Primary advantages (reduced wait time, water savings, convenience)
Many homeowners notice immediate benefits after installing a recirculating hot water system: markedly reduced wait times for hot water at fixtures, measurable water savings from less wasted cold runs, and increased daily convenience for tasks like showering or dishwashing.
Fixtures deliver hot water almost instantly, lowering household water use and improving comfort.
Time savings add convenience and can enhance property appeal without altering daily routines.
Potential downsides (energy use, installation cost, maintenance)
Trade-offs accompany the convenience of a recirculating hot water system: increased energy use, upfront installation costs, and ongoing maintenance obligations can offset some benefits.
Higher standby heat loss raises utility bills unless insulated or timed. Professional installation and possible pump replacements add expense.
Periodic checks, valve servicing, and occasional leak repairs require time and budget, making long-term commitment and proper system management essential.
Typical payback timeline and factors that affect savings
Several factors determine how quickly a recirculating hot water system pays for itself, typically ranging from 2 to 10 years depending on installation complexity, energy prices, and household hot-water usage patterns.
Savings depend on fuel cost, system type (timer, demand, continuous), pump efficiency, pipe layout, water waste reduction, and maintenance.
Higher hot-water demand and expensive energy shorten payback; low use and cheap energy lengthen it.
Pre-Installation Planning and Requirements
Before beginning work, the homeowner should evaluate the existing plumbing layout for compatibility with a recirculating loop and identify any necessary reroutes or access points.
They must verify permit requirements, applicable local codes, and inspection timelines, and assemble a concise checklist of required tools, materials, and parts.
Finally, a clear decision between DIY and hiring a licensed professional should be made based on skill level, code compliance, and warranty considerations.
Assessing your home plumbing layout and compatibility
A clear inventory of existing pipes, fixtures, valves, and the water heater location is the starting point for determining whether a recirculating hot water system can be integrated without extensive modifications.
Evaluate pipe materials, diameters, and routing; identify return paths or potential dedicated lines; note pump access and electrical availability; check for one-way valves, balancing valves, and proximity of remote fixtures to minimize trenching or rerouting.
Required permits, local codes, and inspection considerations
Municipal permits, plumbing codes, and inspection requirements establish the legal framework for installing a recirculating hot water system and must be reviewed early in project planning.
Contractors or homeowners should verify local code sections for backflow prevention, circulation loop methods, thermostat/electrical connections, and energy-efficiency rules.
Obtain required permits, schedule inspections at mandated stages, and retain documentation to guarantee compliance and avoid costly corrections or fines.
Tools, materials, and parts checklist
With permits secured and inspection milestones identified, planning the tools, materials, and parts list guarantees the installation proceeds efficiently and complies with code.
The checklist should match the system type and local requirements, itemizing fittings, valves, and safety devices, plus tools and consumables for soldering or press connections. Confirm spare parts and manufacturer-recommended components are included.
- Circulator pump, check valve, and timer/controller
- Copper, PEX, or CPVC tubing and fittings
- Isolation, balancing, and pressure-relief valves
- Soldering/press tools, pipe cutter, flux, and sealant
Choosing between DIY vs. professional installation
Although homeowners may be comfortable tackling many plumbing projects, deciding between DIY and professional installation for a recirculating hot water system requires weighing skill level, local code and permit requirements, and the complexity of the chosen system.
Improper installation can cause leaks, poor performance, or code violations. Evaluate experience with soldering, electrical work, and system layout, time availability, warranty needs, and liability.
Hire licensed pros for complex or regulated installs.
Step-by-Step Guide to Installing a Dedicated Return Loop System
The process begins by locating the hot water source and planning the most direct, accessible routing for the dedicated return loop.
After shutting off water and draining the affected lines, the installer fits return piping to complete the loop, then mounts the circulation pump and isolation valves.
Finally, the pump is wired to its electrical control and programmed with the timer or thermostat to regulate operation.
Step 1 Locate hot water source and plan loop routing
Begin by identifying the primary hot water source—typically the water heater or boiler—and tracing the most direct, practical route for the dedicated return loop from that source through the service areas to the furthest fixtures.
Map fixture locations, note existing supply and cold lines, avoid long detours, prioritize accessible paths and minimal fittings, and plan return pipe size and pump placement for ideal flow and balanced temperatures.
Step 2 Shut off water and drain affected lines safely
With the route and pump location finalized, attention moves to isolating and emptying the sections of plumbing that will be worked on.
Main shutoff and local isolation valves are closed, then downstream faucets opened to relieve pressure.
Drain valves or hose bibs are used to evacuate water from targeted runs.
A bucket and rags catch residual drips; a pressure gauge verifies zero pressure before proceeding.
Step 3 Install return piping and create the loop
Install the dedicated return loop by running appropriately sized return piping from the farthest fixture back to the pump location, ensuring continuous slope and minimal fittings to reduce heat loss and friction.
Route piping to follow shortest practical path, secure supports at proper intervals, and use matching materials and connectors to prevent leaks.
Pressure-test the loop and correct any joints before restoring service.
Step 4 Install circulation pump and isolation valves
Position the circulation pump at the designated pump location on the return loop, ensuring accessibility for service and alignment with the piping; mount it on a solid, vibration-dampening base and orient the pump so the arrow on its body matches flow direction toward the water heater.
Install isolation valves on both pump flanges or unions, include unions for removal, and slope nearby piping for drainage and air removal.
Step 5 Connect pump to electrical control and timer/thermostat
Begin by turning off power at the circuit breaker and verifying the pump is de-energized before making any electrical connections.
Mount the timer/thermostat per manufacturer instructions.
Run appropriately sized control wiring to the pump, observe polarity and grounding, and install conduit or connectors.
Program timer/thermostat schedules and set temperature or activation parameters.
Securely fasten all terminals and restore power for functional testing.
Step 6 Pressure test, purge air, and restart system
Before restoring full service, the installer must pressure test the new return loop, purge trapped air from the lines and components, and then restart the system methodically to verify leak-free operation and proper flow.
Isolate sections, apply test pressure per code, inspect fittings for leaks, then slowly vent air at high points and purge via pump circulation.
Confirm stable pressure and audible silence before finalizing.
Step 7 Adjust controls and verify hot water delivery
With the system pressurized and circulating, the installer adjusts controller settings, flow rates, and temperature setpoints to match the home’s needs and the manufacturer’s specifications.
Then they verify sensor calibration, programming timers or occupancy sensors, and set pump speed or duty cycles.
Finally, fixtures are checked for prompt hot delivery, leak-free connections confirmed, and documentation of final settings provided to the homeowner.
Step-by-Step Guide to Installing a Demand-Activated (On-Demand) Recirculation System
The procedure for installing an on-demand recirculation system begins with selecting a compatible pump and sensor type matched to the plumbing layout and fixtures.
The installer mounts the flow or temperature sensor at the designated fixture or branch, positions the pump at the water heater or under a sink per manufacturer instructions, and wires the control module while programming activation settings.
Finally, activation cycles are tested and the sensor placement is fine-tuned to guarantee prompt, reliable operation.
Step 1 Select compatible on-demand pump and sensor type
Choose an on-demand pump and sensor that match the plumbing layout, flow requirements, and control strategy of the house.
Select a pump sized for line length, head loss, and desired recirculation rate; prefer quiet, energy-efficient models with compatible voltage and control interfaces.
Choose a sensor type (flow, temperature, or motion) compatible with chosen controls and installation environment.
Verify manufacturer compatibility and warranties.
Step 2 Mount flow/temperature sensor at fixture or branch
Install the flow or temperature sensor at the fixture branch where it will most accurately detect use—typically on the hot-water line near the fixture or at the tee feeding a group of fixtures.
Secure sensor to accessible straight pipe section, orient per manufacturer, seal connections, and route wiring or transmitter away from heat sources.
Verify sensor sensitivity and signal to the controller before concealing.
Step 3 Install pump at water heater or under sink as specified
Mount the pump at the location specified in the system plan—either at the water heater or beneath the sink—making certain the unit is oriented for correct flow and accessible for maintenance.
Secure mounting, vibration isolation, and proper support prevent strain.
Connect inlet and outlet with appropriate fittings, using thread sealant or tape.
Check for leaks, verify correct flow direction, and confirm clearance for future service.
Step 4 Wire control module and program activation settings
With the pump secured, the technician proceeds to wire the control module and configure activation settings, ensuring safe, reliable operation of the on-demand recirculation system.
He verifies proper voltage, grounds, and relay connections, programs run duration, temperature thresholds, and sensor inputs per manufacturer specs, and locks enclosures.
Documentation of settings and a clear wiring diagram are left for future reference.
Step 5 Test activation cycles and fine-tune sensor placement
Begin testing activation cycles to confirm the system responds as programmed and to identify ideal sensor locations for reliable performance.
Observe pump starts, flow, and valve actions through multiple triggers. Move sensors incrementally toward hot and cold lines to reduce false activations.
Record temperature thresholds, cycle durations, and response lag. Adjust sensitivity and mounting until consistent hot-water delivery occurs with minimal cycling.
Retrofit Options for Homes Without a Return Pipe
For homes lacking a dedicated return pipe, several retrofit approaches provide practical recirculation without major repiping.
Options include under-sink push-button or motion-activated valves that temporarily route hot water back through the cold line, and thermostatic crossover valves that automatically open at set temperatures to conserve water and energy.
A clear comparison of expected performance, installation complexity, and potential cold-water contamination risk helps homeowners choose the best solution.
Under-sink push-button or motion-activated recirculation valves
Homeowners seeking a recirculating hot water solution without tearing into walls can install under-sink push-button or motion-activated valves that temporarily create a return path at the fixture.
These retrofit devices open a sensor or manual valve, sending warm water back to the water heater via cold piping or a dedicated small-bore line.
Installation is minimally invasive, requires basic plumbing skills, and reduces wait time and water waste.
Thermostatic crossover valves and their installation
Where under-sink push-button or motion-activated valves create a temporary return by sending warm water back through cold piping, thermostatic crossover valves offer a passive, automatic alternative for homes lacking a dedicated return line.
A thermostatic valve senses temperature differential and opens when hot supply reaches setpoint, diverting flow into cold line until cooled.
Installation involves locating under-sink, cutting both lines, and threading valve with fittings; minimal tools required.
Comparing retrofit performance and installation complexity
Evaluate retrofit options by weighing installation complexity against expected performance and ongoing efficiency. Different approaches—on-demand pumps, dedicated return lines, and thermostatic crossover valves—offer trade-offs in cost, disruption, speed, and energy use. Selection depends on budget, plumbing access, and desired response time. Use the table to compare core attributes and guide decision-making.
| Option | Complexity | Performance |
|---|---|---|
| On-demand pump | Low | Moderate |
| Dedicated return | High | High |
| Thermostatic valve | Medium | Variable |
Electrical and Control Considerations
Electrical and control aspects determine safe operation and efficient performance of a recirculating system, starting with proper power sizing and compliant wiring.
Selection and placement of timers, thermostats, or smart controllers influence responsiveness and user convenience.
Configuring energy-saving schedules and setback strategies can minimize runtime and utility costs without sacrificing comfort.
Power requirements and safe wiring practices
Although the pump and controller may be compact, their power needs and wiring demands require careful planning to guarantee safe, code-compliant operation.
Installers must verify voltage, current, grounding, and circuit protection before connecting any equipment.
Installers should size conductors and breakers per nameplate load, use GFCI or AFCI where required, secure connections in rated boxes, follow local code, and label circuits for maintenance.
Timer, thermostat, and smart-control integration
Several control options—timers, thermostats, and smart controllers—must be selected and wired to coordinate pump operation, conserve energy, and maintain desired water temperature.
Choose compatible voltage and relay capacities, place temperature sensors near return lines, and wire controls to a dedicated circuit with proper grounding.
Include manual override and fail-safe settings.
Verify interoperability between devices and document wiring for maintenance and troubleshooting.
Energy-saving settings and scheduling strategies
When programmed around actual household demand patterns and heat-loss characteristics, recirculation controls can substantially reduce energy use without compromising comfort.
Schedule pumps for peak-use windows, apply setback temperatures during inactivity, and use adaptive or learning controls to refine cycles.
Prioritize minimum run-times, enable vacation modes, and integrate occupancy or hot-water sensors.
Periodically review and adjust settings to match lifestyle changes and seasonal heat-loss variations.
Common Problems, Troubleshooting, and How to Fix Them
A concise troubleshooting checklist guides diagnosis of no circulation or weak flow, including valve positions, pump power, and clogged strainers.
Guidance covers pump noise, vibration, cavitation remedies, and fixes for leaks, airlocks, and incorrect temperature control.
Criteria for when to call a professional plumber are provided for issues beyond basic homeowner repairs.
No circulation or weak flow diagnosis checklist
Why is the recirculating system failing to move hot water effectively?
Inspect pump power and switch settings, check for closed valves, clogged lines, or blocked check valves.
Verify system piping slope and air trapped in lines; bleed if present.
Confirm thermostat and timer operation, evaluate return line size and meter flow.
Document findings, prioritize fixes, and retest circulation after each correction.
Pump noise, vibration, and cavitation solutions
Address pump noise, vibration, and cavitation by first isolating symptoms and measuring operating conditions: audible rattles or humming, excessive vibration felt at fittings, and high-pitched squealing or intermittent knocking each indicate different causes that require distinct remedies.
Check mounting, tighten or replace soft mounts, balance and align shaft, inspect impeller for damage, verify correct pump speed and flow, guarantee proper suction head and eliminate inlet restrictions.
Leaks, airlocks, and improper temperature control fixes
Leaks, airlocks, and improper temperature control are common failures that quickly reduce comfort and efficiency in recirculating hot water systems and consequently demand systematic diagnosis.
Inspect joints and valves for drips; tighten or replace seals. Purge air via high points and bleed valves.
Verify thermostat setpoints, mixing valve calibration, and sensor wiring; replace faulty thermostats or recalibrate mixing valves to restore stable, safe temperatures.
When to call a professional plumber
When should a homeowner escalate a recirculating hot water issue to a professional plumber?
Persistent leaks, recurring airlocks, pump failure, electrical or control wiring concerns, unexplained temperature swings, or inadequate flow after basic troubleshooting warrant professional attention.
Also call a plumber for code compliance, system modifications, or when diagnostic steps exceed homeowner skills.
Prompt professional intervention prevents damage and guarantees safe, efficient operation.
Maintenance and Long-Term Care
Regular maintenance preserves system efficiency and prevents failures, so a concise inspection checklist with recommended frequencies should be followed.
Routine pump servicing—including bearing checks, timely replacements, and proper lubrication—ensures reliable circulation.
Water quality management and treatments that limit scale and corrosion will extend component life and reduce service needs.
Routine inspection checklist and frequency
A concise inspection checklist, paired with a clear frequency schedule, helps guarantee a recirculating hot water system remains efficient and reliable.
It should define specific items to check, acceptable condition thresholds, and who is responsible for each task.
Routine entries list visual, functional, and safety checks with periodic calibration and recordkeeping.
- Inspect valves and fittings for leaks (monthly)
- Check thermostats and setpoints (quarterly)
- Verify return-line temperature consistency (monthly)
- Review system pressure and expansion tank status (annually)
Pump servicing, bearing replacement, and lubrication
Moving from routine inspections to mechanical upkeep, attention turns to pump servicing, bearing replacement, and lubrication as the primary determinants of a recirculating system’s operational lifespan.
Service intervals, torque checks, and vibration analysis identify wear. Replace bearings at signs of noise or play, using manufacturer-specified parts.
Apply proper grease type and quantity; avoid over-lubrication. Document service dates and parts for predictable maintenance.
Preventing scale buildup and corrosion (water quality tips)
Because minerals and dissolved oxygen directly affect system longevity, maintaining proper water chemistry is essential to preventing scale buildup and corrosion in a recirculating hot water system.
Regular testing for hardness, pH, and oxygen levels is recommended. Implement softening, corrosion inhibitors, and sacrificial anodes as needed.
Flush lines periodically and use filtered makeup water to minimize deposits and extend component life.
Cost Breakdown and Return on Investment
Typical material and labor costs for a recirculating hot water system can range widely depending on pipe type, pump quality, and installation complexity.
Operating expenses should consider added electricity use for the pump against potential water and energy savings from reduced standby losses.
Return on investment improves with measures such as pipe insulation, a high-efficiency pump, and smart controls that minimize run time.
Typical material and labor cost ranges
A basic recirculating hot water system generally costs between $400 and $2,500 in materials, plus labor ranging from a few hundred to over $1,500 depending on system complexity and local rates.
Typical components include pump, timer or sensor, check valves, fittings and piping.
DIY installations reduce labor expense but require plumbing skill; contractor quotes vary by access, system type and permit requirements.
Operating cost estimates (electricity and possible water savings)
Many homeowners see recirculating hot water systems as modest ongoing expenses: electrical use for the pump typically ranges from a few watts for demand-controlled units to 50–100 watts for continuously running models, translating to roughly $5–$60 per year for intermittent pumps and $40–$120 per year for continuous operation (depending on local electricity rates).
Annual water savings vary by household, often cutting wasted cold-water discharge and lowering water-heating energy, yielding modest payback when combined with reduced water bills.
Factors that improve ROI (insulation, efficient pump, smart controls)
Cost-effectiveness hinges on reducing heat loss, minimizing pump energy, and matching control strategy to household patterns.
Proper pipe insulation lowers standby losses, boosting payback. Selecting a high-efficiency, variable-speed pump cuts electricity use.
Smart timers or occupancy sensors run the loop only when needed, further reducing runtime.
Combined, these measures shrink operating costs, shorten simple payback periods, and increase long-term savings.
Safety, Codes, and Environmental Considerations
Proper installation requires attention to backflow prevention and cross-connection control to protect potable water supplies.
Installers must follow applicable plumbing codes and manufacturer instructions to guarantee safe, code-compliant operation.
Consideration of environmental impacts and water-conservation best practices can reduce waste and improve system efficiency.
Backflow prevention and cross-connection control
Because potable water systems face real risk from pressure changes and contaminants, backflow prevention and cross-connection control are essential components of any recirculating hot water installation.
Install appropriate backflow preventers, such as reduced-pressure assemblies or double-check valves, and maintain air gaps where fixtures mix with nonpotable sources.
Regular testing, inspection, and proper labeling minimize contamination risk and protect public health.
Compliance with plumbing codes and manufacturer instructions
When installing a recirculating hot water system, adherence to applicable plumbing codes and the manufacturer’s instructions guarantees safety, legality, and system performance.
Installers must verify local code requirements, obtain permits, and follow approved connection, venting, and electrical specifications.
Compliance with rated components, installation clearances, and testing protocols prevents failures, preserves warranties, and facilitates inspections by authorities having jurisdiction.
Environmental impacts and water-conservation best practices
Meeting code and manufacturer requirements also supports broader environmental goals by ensuring systems operate efficiently and without unintended water waste or energy loss.
Properly sized pumps, insulated piping, and timed or demand-controlled recirculation minimize energy use.
Leak prevention, regular maintenance, and temperature optimization reduce water and heat loss.
Selecting efficient components and monitoring performance promotes conservation and lowers greenhouse gas emissions over the system’s lifetime.
Quick Comparison of Popular Brands and Models
A concise comparison highlights leading recirculation pumps and control systems by feature set, typical pros and cons, and notable warranty and support differences. The following schematic table helps visualize side-by-side distinctions that inform selection decisions. Readers are encouraged to consult specific model specs and warranty terms before purchasing.
| Feature/Aspect | Example Notes |
|---|---|
| Pump Performance | Flow rate, head, and energy use vary by model |
| Control Options | Timer, sensor, smart app connectivity |
| Warranty & Support | Length, coverage, and manufacturer responsiveness |
| Pros/Cons Snapshot | Typical strengths and common trade-offs |
Summary of top-rated pumps and control systems (features, pros, cons)
Although selection depends on home size and plumbing layout, a narrow set of pump and control features consistently distinguishes top-rated recirculating systems.
High-efficiency pumps offer variable speed, low noise, and compact form; pros include energy savings and quiet operation, cons are higher cost and installation complexity.
Controls with timers, motion or temperature sensors improve convenience; trade-offs include learning curve and occasional sensor false-positives.
Warranty and support differences
Most homeowners weigh warranty length and support responsiveness as primary decision factors when comparing recirculating pump brands and models.
Manufacturers vary: some offer five- to ten-year motor and part warranties with 24/7 technical lines; others limit coverage to one to two years and business-hour support.
Extended warranties, local dealer networks, and documented service procedures reduce downtime and long-term ownership cost differences.
Installation Scenarios and Example Walkthroughs
The section presents three practical installation scenarios to illustrate common approaches and trade-offs.
First, a single-family home with a basement water heater is shown using a full-loop layout for consistent circulation.
Next, a condo retrofit without a return line demonstrates an under-sink solution.
Finally, a multi-bath residence with a remote master bathroom explores optimized loop routing.
Single-family home with basement water heater full loop example
A full-loop recirculating system for a single-family home with a basement water heater demonstrates a straightforward configuration in which heated water is continuously circulated from the heater through the hot-water branch lines and returned via a dedicated return line to maintain temperature at fixtures.
The example outlines pump placement at the basement, check valves, balance valves, insulated piping, thermostat control, and recommended pipe sizing to minimize lag and energy waste.
Condo retrofit with no return line under-sink solution example
Homes with existing full-loop systems serve as a useful baseline for understanding recirculation. However, condominiums often lack the plumbing layout needed for a dedicated return line.
A common retrofit uses a compact under-sink pump and thermal bypass valve at the furthest fixture, operating on demand or timer.
Installation requires minimal drywall work, local code compliance, and consideration of noise, drainage, and electrical access.
Multi-bath home with remote master bathroom optimizing loop layout
Often overlooked, a multi-bath residence with a remote master bathroom presents distinct challenges for hot-water recirculation that require strategic loop layout and pump placement.
Separate branch loops serving clustered baths reduce return distance.
Priority zoning places a dedicated loop and insulated supply to the master suite.
Balance valves, thermostatic controls, and a variable-speed pump optimize flow, minimize standby losses, and guarantee rapid, even delivery.
Final Checklist Before You Finish the Project
Before closing out the job, a concise final checklist guarantees the recirculating hot water system is safe, compliant, and ready for use.
It should confirm all safety and code items, verify system performance with tests and user orientation, and assemble documentation, warranties, and a maintenance plan. Completing these steps minimizes callbacks and protects both installer and owner.
- Verify safety devices, pressure settings, leak-free joints, and local code compliance
- Run performance tests (flow, temperature, cycle timing) and demonstrate operation to the user
- Collect and label as-built diagrams, parts lists, warranty papers, and installation notes
- Establish a maintenance schedule with service intervals and contact information for support
Safety verifications and code compliance items
A concise final inspection should confirm that all valves, pumps, sensors, and electrical connections function correctly, pressure relief devices are properly installed and oriented, and materials comply with local plumbing and electrical codes.
Additionally, verify proper grounding, GFCI protection where required, correct pipe supports and labeling, accessible shutoffs, leak-free joints, and that permits, inspections, and manufacturer installation requirements are documented for code enforcement and future maintenance.
Performance tests and user training
With system integrity and code compliance confirmed, attention turns to verifying operational performance and instructing the end user.
Technicians perform flow, temperature, leak, timer, and pump cycling tests, document measured values, and adjust settings to meet design targets.
A concise user briefing covers control operation, troubleshooting basics, and safety precautions.
Final acceptance requires signed confirmation of satisfactory performance and user understanding.
Documentation, warranties, and maintenance schedule
Several concise documents should accompany the completed recirculating hot water system: as-built drawings, wiring and control schematics, component specifications, test reports, and a simple user guide noting normal settings and common faults.
Include warranty certificates, supplier contacts, and service logs.
Provide a maintenance schedule specifying tasks, frequencies, responsible parties, and replacement intervals.
Archive digital copies and hand a concise binder to the owner.
Conclusion
A recirculating hot water system can cut wait time for hot water by up to 30–50%, reducing wasted water and improving daily convenience. Homeowners weighing cost, complexity, and energy use should consider site-specific plumbing, local codes, and whether a dedicated return or demand-activated system best fits their needs. Proper planning, correct pump sizing, and adherence to safety and environmental guidelines guarantee reliable performance, long-term savings, and measurable reductions in water waste.