How to Paint a Metal Pipe: Step-by-Step Guide for Durable, Rust-Free Results
To achieve durable, rust-free results when painting a metal pipe, start by removing any rust and old coatings using wire brushes, sandpaper, or abrasive blasting. Next, degrease and thoroughly dry the surface. Lightly abrade the metal to enhance paint adhesion, and mask off surrounding areas to protect them. Apply a rust-inhibiting primer that is compatible with the metal, followed by a high-performance topcoat. After painting, inspect the work and touch up any areas as needed. Remember to adhere to safety and VOC regulations, and keep a record of your work. For detailed steps, tool recommendations, and safety tips, refer to the full guide.
How to Paint a Metal Pipe for Durable, Rust-Free Results
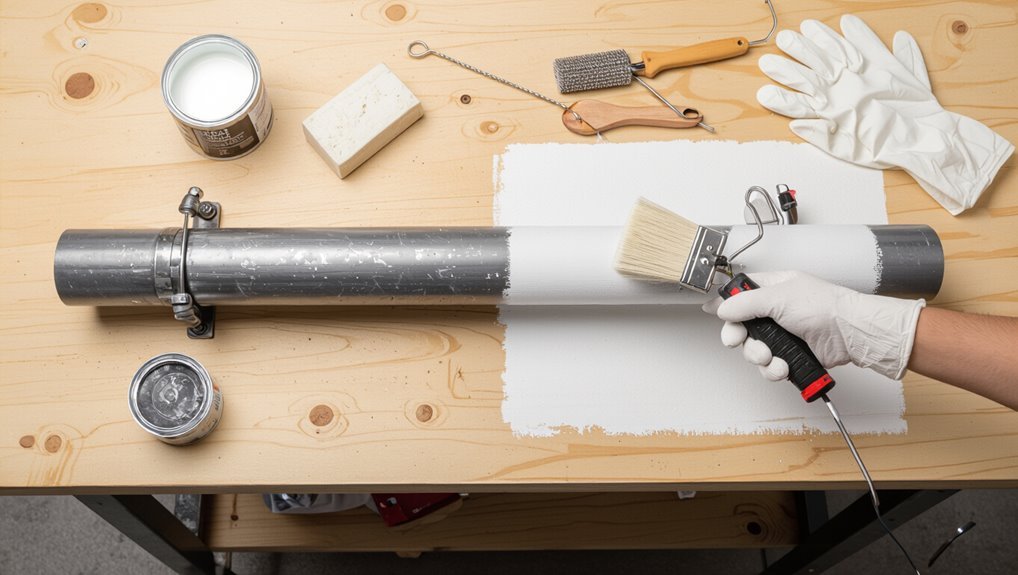
The process begins with thorough surface preparation—cleaning, rust removal, and light abrasion—followed by a rust-inhibiting primer and a durable topcoat.
When performed correctly, the coating bonds well and provides long-term protection against corrosion and wear.
The expected outcome is a uniform, adherent finish that preserves the pipe’s integrity and appearance.
Quick overview of the process and expected outcome
Begin by removing rust and old coatings, then prepare the surface, prime, and apply a protective topcoat to guarantee long-lasting, rust-free results.
The guide explains how to paint a metal pipe in clear steps: cleaning, sanding, priming, and topcoating.
Proper technique and suitable products yield durable corrosion protection, even finish, and extended service life, minimizing maintenance and repainting frequency.
Why painting metal pipes prevents rust and extends lifespan
Corrosion on metal pipes begins when moisture and oxygen break down the protective oxide layer, allowing rust to form and weaken the metal.
Proper surface preparation removes existing rust and contaminants, ensuring the coating bonds effectively.
Choosing the right primer and topcoat creates a durable barrier that blocks moisture and chemical attack, greatly extending pipe life.
How corrosion occurs on metal pipes
Metal pipes exposed to moisture and oxygen undergo electrochemical reactions that convert iron into iron oxide, commonly known as rust.
Electrochemical cells form where anodic areas lose electrons and cathodic areas gain them; salts, acids, and dissolved oxygen accelerate this process.
Pitting, flaking, and structural weakening follow as protective layers break down, increasing permeability to corrosive agents and propagating damage.
Benefits of proper surface preparation and coating selection
Proper surface preparation and correct coating selection create a durable barrier that interrupts the electrochemical reactions responsible for rust, sealing out moisture, salts, and oxygen while accommodating thermal and mechanical stresses.
Clean, profiled metal, appropriate primers, and topcoats guarantee adhesion and chemical resistance. This minimizes maintenance, slows corrosion progression, preserves structural integrity, and extends service life, delivering predictable performance and cost savings.
Materials and tools you need
A concise list of required materials and tools helps guarantee a durable, professional finish on a metal pipe.
Essential items include metal-compatible primers and paints, surface preparation supplies such as sandpaper and rust remover, and application tools like brushes, rollers, or sprayers plus safety equipment (gloves, respirator, and eye protection).
Each category will be outlined with recommendations and usage tips.
Paints and primers suitable for metal pipes
Selecting appropriate paints and primers is essential for durable, corrosion-resistant finishes on metal pipes. Recommended options include rust-inhibiting primers and high-adhesion metal paints formulated for ferrous or nonferrous substrates.
Use oil-based or epoxy primers under enamel, acrylic, or polyurethane topcoats rated for exterior exposure.
Visualize choices:
- Zinc-rich primer, matte gray
- Epoxy primer, smooth satin
- Alkyd enamel, glossy color
- Polyurethane topcoat, clear protective sheen
Surface preparation tools and supplies
After choosing primers and topcoats suited to the pipe material and environment, attention turns to the tools and supplies needed to prepare the surface for coating.
Essential items include abrasives and cleaners to remove rust, and tack cloths to capture dust.
- Wire brush and sanding pads
- Rust remover or phosphoric acid
- Degreasing solvent and rags
- Tack cloths and clean water
Application tools and safety equipment
Several essential tools and safety items enable consistent, durable coatings on metal pipe: quality brushes and rollers sized to the pipe diameter, adjustable-spray equipment for larger runs, mixing sticks and strainers, drop cloths and masking tape, plus respirators, chemical-resistant gloves, eye protection, and disposable coveralls.
- A narrow angled brush for seams
- A foam roller hugging curves
- A spray gun with adjustable tip
- Heavy-duty respirator and gloves
Assessing the pipe: material, location, and conditions
Before painting, the pipe should be assessed for material—steel, iron, galvanized, copper, or PVC—as each requires different preparation and coatings.
Location matters: indoor versus outdoor placement affects exposure to moisture, UV, and temperature changes.
Special cases such as buried, insulated, or high-temperature pipes demand specific treatments or may be unsuitable for standard paint.
Identifying pipe material (steel, iron, galvanized, copper, PVC)
How can a painter tell what a pipe is made of? Visual cues, weight, magnetic response and fittings reveal material:
- Steel and iron are heavy and magnetic with threaded joints;
- Galvanized shows dull, spangled zinc coating;
- Copper is reddish, nonmagnetic, softer with soldered seams;
- PVC is lightweight, plastic, often labeled with size and pressure rating.
Surface testing confirms composition before preparation.
Indoor vs outdoor pipes and exposure considerations
Knowing the pipe material is only part of the assessment; exposure and location greatly influence surface preparation and coating choice.
Indoor pipes face lower UV, moisture, and abrasion, allowing lighter primers and decorative topcoats.
Outdoor pipes require rust inhibitors, UV-stable paints, thicker coatings, and attention to drainage and ventilation during curing.
Consider seasonal weather, salt exposure, and proximity to chemicals when selecting products and prep methods.
Special cases: buried, buried-insulated, or high-temperature pipes
Evaluating special-case pipes requires attention to factors that standard indoor/outdoor guidance doesn’t cover: buried pipes face soil chemistry, moisture, and mechanical abrasion; buried-insulated pipes add concerns about coating compatibility with insulation and potential trapped moisture; and high-temperature pipes demand heat-resistant primers and topcoats plus consideration of thermal expansion.
Specify coatings rated for burial, use vapor-permeable or compatible insulation wraps, and allow expansion gaps.
Step-by-step surface preparation
The preparatory phase begins with a thorough inspection and documentation of any damage, corrosion, or existing coatings to determine required repairs and methods.
Next, rust, loose paint, and contaminants are removed, the surface is cleaned and degreased, and all areas are fully dried before proceeding.
Finally, the metal is roughened or chemically etched for adhesion and surrounding surfaces are masked and protected prior to priming and painting.
Inspecting and documenting damage
Begin by systematically scanning the pipe for visible defects—rust, pitting, flaking paint, dents, and weld irregularities—then record each finding with location, size, and severity.
Note substrate exposure, moisture signs, and any coating delamination. Photograph defects with scale markers, timestamp entries, and assign priority for repair.
Compile a concise log to guide remediation, materials, and safety considerations.
Removing rust, old paint, and contaminants
Prepare the surface by removing all rust, loose paint, oil, and other contaminants until a clean, sound metal substrate is revealed.
Use mechanical methods—wire brushing, sanding, grinding, or media blasting—matching technique to corrosion severity.
Remove flaky coatings to feathered edges. For tight spots, employ manual scraping and rotary tools.
Collect debris and contain dust to prevent recontamination before subsequent cleaning steps.
Cleaning degreasing and drying procedures
After mechanical cleaning, surface contaminants must be removed with a controlled cleaning and degreasing sequence to confirm paint adhesion and corrosion protection.
Solvent wiping, alkaline wash, or commercial degreaser removes oils and residues.
Rinse thoroughly with clean water, then air-blow or wipe dry with lint-free cloths.
Ascertain complete drying and no film remains before proceeding to primers or coating application.
Surface roughening and etching for better adhesion
Several controlled methods are used to roughen and etch a metal pipe surface to promote mechanical and chemical adhesion of coatings.
Abrasive blasting, sanding with graded grit, and chemical etchants remove mill scale and micro-contaminants. Profile depth should match coating specifications.
Rinse and neutralize after etching, then inspect for uniform texture and absence of residues before proceeding to priming.
Masking and protecting surrounding areas
Before any coating is applied, the areas adjacent to the pipe must be masked and protected to prevent overspray, drips, and mechanical damage during handling.
Use low-residue painter’s tape on joints and fittings, cover nearby surfaces with plastic sheeting or drop cloths, and secure edges.
Protect valves, sensors, and insulation.
Inspect coverings before painting and replace damaged protection immediately.
Choosing the right primer and paint
Selection of primer and topcoat depends on metal type, corrosion risk, and service conditions; common primers include zinc-rich, epoxy, and rust-inhibiting formulations.
Topcoat choices—alkyd, acrylic, epoxy, polyurethane, or high-temperature paints—offer differing durability, chemical resistance, and heat tolerance.
The primer and paint system should be matched to the pipe’s use-case and environment to guarantee adhesion and long-term protection.
Types of primers for metal (zinc-rich, epoxy, rust-inhibiting)
Primer choice determines longevity and corrosion resistance when painting metal pipes.
Zinc-rich primers offer galvanic protection for bare steel; epoxy primers bond to cleaned metal and resist chemicals; rust-inhibiting primers convert and seal existing corrosion; selection depends on substrate, exposure, and prep.
- granular zinc flakes on raw steel
- glossy epoxy film sealing joints
- porous rust sealed into a solid layer
- clean, scuffed metal ready for prime
Topcoat options (alkyd, acrylic, epoxy, polyurethane, high-temp)
Choose a topcoat based on the pipe’s service conditions—alkyd, acrylic, epoxy, polyurethane, and high-temperature paints each offer distinct balances of durability, flexibility, chemical resistance, and heat tolerance.
The inspector weighs longevity, adhesion, cure time, and finish.
Visualize performance:
- Weathering-resistant glossy alkyd sheen
- Fast-drying matte acrylic film
- Chemical-hard epoxy barrier
- Heat-stable metallic high-temp coat
Matching paint system to pipe use-case and environment
After weighing topcoat options for durability and heat tolerance, the next consideration is aligning the entire paint system—primer and finish—with the pipe’s service conditions. Select a primer for adhesion, corrosion resistance, and compatibility with the topcoat. Consider moisture, chemicals, temperature cycles, and UV exposure. Match cure times and thickness. Consult data sheets for system compatibility.
| Environment | Primer | Topcoat |
|---|---|---|
| Interior dry | Zinc-rich | Acrylic |
| Marine | Epoxy | Polyurethane |
Application methods and best practices
The next section outlines practical application methods and key best practices for painting metal pipes, comparing brushing and rolling techniques with spray application and appropriate equipment settings.
It will specify recommended coating thickness, wet-film and dry-film targets, typical drying times and recoat windows, and steps to prevent runs, drips, and uneven coverage.
Clear, concise guidance will help guarantee an even, durable finish regardless of access or pipe geometry.
Brushing and rolling technique for pipes
Begin by selecting a firm-bristled brush and a small-diameter roller compatible with the chosen paint and pipe curvature; these tools enable controlled application and consistent coverage on cylindrical surfaces.
Work in sections, brush into seams and welds, then roll along the pipe’s length with light, overlapping passes.
Maintain wet edges, avoid excess buildup, and allow recommended flash times between coats for an even, durable finish.
Spray application: equipment and settings
Use a quality HVLP or airless sprayer matched to the paint type and pipe diameter to achieve even atomization and avoid runs; HVLP offers finer control and less overspray for small pipes, while airless systems deliver faster coverage on long runs or thicker coatings.
Adjust nozzle size, pressure, and tip distance; maintain steady transverse passes, overlap 30–50%, mask adjacent areas, and follow manufacturer spray recommendations.
Recommended coating thickness and wet-film/dry-film guidance
Specify target film thicknesses in both wet-film (WFT) and dry-film (DFT) terms to guarantee adequate protection and proper curing without runs or excessive buildup.
Recommend system-based DFT per coat (typically 50–100 µm) and corresponding WFT considering solids volume.
Advise measuring WFT with a comb gauge during application and verifying DFT with a magnetic or ultrasonic gauge after cure.
Note multi-coat totals and avoid exceeding manufacturer limits.
Drying times and recoat windows
Drying times and recoat windows depend on coating chemistry, film thickness, ambient temperature, humidity, and ventilation. Manufacturers’ stated tack-free, touch-dry, and full-cure intervals should be used as the baseline while on-site conditions are monitored and recorded.
Recoat windows define the minimum and maximum intervals for subsequent coats; exceeding them risks adhesion failure or solvent entrapment. Adjust schedules for cold or humid conditions.
Preventing runs, drips, and uneven coverage
Apply steady, controlled strokes and maintain consistent film thickness to prevent runs, drips, and uneven coverage when painting a metal pipe.
Work in thin, overlapping passes, keeping the brush or roller moist but not overloaded.
Orient the pipe so excess paint travels away from visible areas.
Inspect under good light, smooth minor imperfections with a light second coat, and allow proper drying between coats.
Special treatments for problem situations
When standard preparation and coating methods are inadequate, specialized treatments are required to address issues such as heavy corrosion, pitting, and white rust on galvanized steel.
Recommendations include mechanical repair and fill for deep pitting, specific cleaners and primers for galvanized surfaces, high-temperature coatings for steam or hot pipes, and techniques or tools suited to confined or hard-to-reach areas.
The following section outlines practical options and precautions for each of these problem situations.
Repairing heavy corrosion or pitting
Severe corrosion or deep pitting requires more than standard cleaning and priming: the damaged metal must be assessed, stabilized, and rebuilt before painting.
Sections with structural loss need cutting out or reinforcement.
Remove loose rust, neutralize remaining corrosion, then fill pits with metal epoxy or weld patches as appropriate.
Grind smooth, clean thoroughly, apply suitable primer, and verify repairs bond before topcoating for lasting protection.
Painting galvanized steel and removing white rust
Galvanized steel requires specific surface preparation and coatings because its zinc-rich finish can develop white rust (zinc oxide/hydroxide) and resists standard paints.
Proper treatment involves removing soluble corrosion, guaranteeing a clean, profiled surface, and selecting primers compatible with zinc to facilitate adhesion and long-term protection.
Remove white rust with a mild acid or commercial zinc cleaner, rinse thoroughly, etch or scuff, apply zinc‑compatible primer, then topcoat.
Coating high-temperature or steam pipes
Because high-temperature and steam-service piping expose coatings to elevated thermal cycling, oxidation, and moisture under pressure, surface preparation and coating selection must prioritize heat resistance, adhesion at temperature, and resistance to steam-driven blistering.
Use high-temperature inorganic or silicone-based primers and topcoats, guarantee bare-metal cleaning and oxidation removal, apply thin, flexible layers, and follow manufacturer cure schedules to prevent delamination and corrosion.
Painting pipes in confined or hard-to-reach areas
When access is limited, painting pipes in confined or hard-to-reach areas requires modified preparation, application, and safety strategies to secure coating performance and worker protection.
Inspect and clean surfaces using compact tools or solvent wipes; abrade with mini grinders or abrasive pads.
Use low-VOC primers, brushable or aerosol paints, and extension tools.
Guarantee ventilation, respiratory protection, confined-space permits, and fall prevention measures.
Inspection and maintenance after painting
Following completion, the painted pipe should be inspected periodically for coating integrity, noting blistering, cracking, or adhesion loss.
Procedures for touch-up and full recoating should be outlined, including surface preparation, compatible products, and drying times.
Seasonal maintenance and systematic corrosion monitoring schedules help detect and address deterioration before it compromises the pipe.
How to inspect coating integrity over time
Establishing a regular inspection schedule is essential to guarantee the painted coating on a metal pipe continues to protect against corrosion and mechanical damage.
Inspectors should record coating appearance, adhesion, blistering, cracking, rust spots, and impact damage.
Use visual checks, simple adhesion tests, and magnification for fine defects.
Document findings, compare to prior records, and prioritize areas exposed to moisture or abrasion for more frequent monitoring.
Touch-up and recoating procedures
Begin touch-up and recoating by evaluating the extent and cause of coating failure to determine whether spot repair, partial recoat, or full recoating is required.
Clean and abrade affected areas to bare metal if corrosion exists, apply compatible primer, feather edges of old paint, and use specified topcoat in recommended thickness.
Allow proper cure times and verify adhesion before returning pipe to service.
Seasonal maintenance and corrosion monitoring
Although painting substantially slows deterioration, routine seasonal inspections and targeted maintenance are essential to detect coating degradation and early corrosion before structural damage occurs.
Technicians should schedule checks each season, examining seams, joints, supports, and high-exposure areas. Document findings, measure rust progression, and perform immediate spot repairs: clean, prime, and reseal compromised zones.
Maintain records to track trends and plan recoating cycles.
Common mistakes and how to avoid them
Many painters repeat the same avoidable errors—skipping proper surface preparation, using the wrong primer or paint, and neglecting adequate curing time—which compromise adhesion and durability.
To avoid failures, follow clear steps, choose compatible materials, and allow full drying between coats.
Visualize common pitfalls:
- Flaky rust under thin primer
- Sags from overloading a brush
- Peeling at unmasked joints
- Incompatible topcoat reactions
Estimated time, cost, and ROI of repainting pipes
An overview of estimated time, cost, and return on investment frames the practical decision to repaint metal pipes.
Typical timelines are broken down by project size and method—spot repairs may take a few hours, small runs a day, and large systems several days to a week—while material and labor costs commonly range from modest DIY expenses to several hundred dollars per linear foot for professional work.
Factoring in long-term savings from corrosion prevention and extended service life clarifies the potential ROI.
Time breakdown by project size and method
Estimating time, cost, and return on investment for repainting metal pipes depends primarily on project scale and chosen method—touch-up, partial strip-and-repaint, or full restoration.
Small touch-ups: hours to a day, minimal disruption, quick ROI through corrosion prevention.
Partial jobs: one to three days, moderate ROI.
Full restoration: several days to a week, higher upfront cost but longest-term protection and best ROI.
Typical material and labor cost ranges
Costs for repainting metal pipes vary with scope, surface condition, and coating system selected.
Typical materials — primers, rust converters, topcoats, abrasives, brushes, masking — range from $20 to $150 per pipe segment.
Labor rates depend on access and preparation: DIY costs minimal; professional crews charge $40–$120 per hour.
Small jobs may total $50–$300; complex industrial work can exceed $1,000.
Long-term savings from corrosion prevention
When properly applied and maintained, repainting metal pipes markedly extends service life by slowing corrosion, reducing the frequency of replacements and emergency repairs.
Upfront painting costs—materials plus labor—are recouped via fewer replacements, lower downtime, and reduced leak remediation.
Typical ROI appears within several years; projected savings depend on environment, pipe value, and inspection intervals, often exceeding initial investment over a 5–10 year horizon.
Safety, environmental, and regulatory considerations
Before work begins, the writer notes that proper personal protective equipment and adequate ventilation are essential to reduce inhalation and contact risks.
Special handling and disposal procedures apply if old coatings contain lead, while VOC limits and local waste rules affect product choice and cleanup.
Applicators should also confirm coatings’ certifications and comply with applicable local regulations to guarantee safety and legal compliance.
Personal protective equipment and ventilation
Appropriate personal protective equipment (PPE) and adequate ventilation are essential to minimize exposure to metal dust, solvent vapors, and paint particulates during pipe preparation and painting.
Workers should wear NIOSH-approved respirators, chemical-resistant gloves, eye protection, and coveralls.
Use local exhaust or cross-ventilation and fans to disperse fumes. Guarantee fresh air supply, monitor for vapor buildup, and follow manufacturer safety data sheet recommendations.
Handling lead-based paint and disposal rules
Address lead-based paint with strict controls and regulatory awareness due to its serious health hazards and specific disposal requirements.
Professionals must test surfaces, use certified abatement methods, and contain dust.
Waste, including contaminated rags and removals, follows hazardous-material signage, sealed containers, and designated disposal facilities per local law.
Records of testing, transport manifests, and worker training should be maintained for compliance and public safety.
VOCs, local regulations, and protective coatings certifications
While preparing metal pipe coatings, awareness of volatile organic compounds (VOCs), applicable local regulations, and required protective-coating certifications is essential to guarantee worker safety and legal compliance.
VOC limits dictate material selection and ventilation needs, local authorities set permit and disposal rules, and certification verifies that coatings meet performance and environmental standards.
Contractors must document compliance, use low-VOC products when possible, and retain certification records.
Professional vs DIY: when to hire a contractor
When deciding between DIY and hiring a contractor, the key criteria include scope and complexity of the job, required permits or certifications, and the homeowner’s experience with surface preparation and corrosion control.
Prospective contractors should be asked for proof of licensing and insurance, references for similar metal pipe work, a clear timeline, and a written warranty.
Bids should be evaluated for scope alignment, material specifications, and transparent labor and contingency costs.
Criteria for hiring professionals
If the pipe project involves complex conditions—extensive rust, pressurized lines, confined spaces, or specialized coatings—hiring a professional is advisable; otherwise, a competent DIYer can handle routine surface preparation and painting.
Criteria for hiring include proven experience with similar systems, proper licensing and insurance, access to appropriate equipment, familiarity with applicable safety standards, and clear guarantees on workmanship and materials.
What to ask a contractor and how to evaluate bids
After deciding whether the job warrants a professional, the next step is to vet potential contractors and compare their bids.
Ask about licensing, insurance, detailed scope, timeline, materials and warranty.
Evaluate bids for clarity, exclusions, labor versus materials, and surface‑prep methods.
- clipboard with itemized estimates
- sealed pipe being sanded
- primer and paint cans labeled
- stamped warranty and license
Quick-reference checklist for painting a metal pipe
A concise checklist organizes the essential steps and materials for painting a metal pipe, enabling quick reference before and during the job.
It summarizes surface prep, safety, coating choices, and inspection. Use this quick checklist for efficient execution and consistent results:
- Wire-brush rust, sand smooth, clean with solvent
- Apply rust converter where needed
- Use primer suitable for metal
- Topcoat with corrosion-resistant paint
Conclusion
Properly painting metal pipes greatly reduces corrosion and extends service life; studies show coated steel can last up to 25 years versus about 10–15 years uncoated, a 40–60% lifespan improvement. Following thorough surface preparation, appropriate primers and paints, and safe application practices yields durable, rust-free results that save money over time. When conditions or scale exceed DIY capability, hiring a qualified contractor guarantees compliance with environmental and regulatory requirements.