How to Flush a Gas Hot Water Heater: Step-by-Step Guide to Improve Efficiency and Lifespan
Flushing a gas hot water heater is essential for removing mineral and sediment buildup, enhancing efficiency, and extending its lifespan. To complete the process, you’ll need to turn off the gas and water supply, cool the tank, attach a hose to the drain valve, and drain the tank fully. After that, backflush to dislodge any deposits and apply a descaler for heavy scale if necessary. Finally, refill the tank, purge air, and relight the pilot. Follow up with safety checks and leak tests to ensure everything is in order. Continue reading for detailed steps, safety tips, and troubleshooting advice to ensure a successful flush.
What Flushing a Gas Water Heater Means and Why It Matters
Sediment accumulates in gas hot water heaters as minerals and debris settle out of the water and collect on the tank bottom.
This buildup reduces heating efficiency, increases fuel consumption, and can shorten the unit’s lifespan by promoting corrosion and burner issues.
Before flushing, manufacturers’ warranty terms and basic safety precautions—such as shutting off gas and water supply and relieving pressure—should be reviewed.
How sediment builds up in gas hot water heaters
Over time minerals and particles carried by incoming water accumulate at the bottom of a gas hot water heater, forming layers of grit and scale that reduce efficiency and can damage the tank.
Sediment originates from hard water, pipe corrosion, and suspended solids. It settles as temperature gradients form, compacting into sludge.
Regular maintenance, including how to flush a gas hot water heater, removes deposits and prevents buildup.
Effects of sediment on efficiency, fuel use, and lifespan
Accrued mineral and particulate deposits at the bottom of a gas hot water heater act as an insulating barrier and abrasive layer, forcing the burner to work longer and harder to reach set temperatures.
This reduces thermal efficiency, increases fuel consumption, raises operating costs, accelerates corrosion and tank wear, and shortens service life.
Regular flushing restores heat transfer, lowers fuel use, and prolongs equipment longevity.
Safety and warranty considerations before flushing
Before flushing a gas hot water heater, the owner should confirm both safety protocols and warranty terms because improper procedures can create hazards or void coverage.
The individual should check manufacturer instructions, verify the pilot light and gas supply procedures, guarantee power and gas are shut off as directed, inspect for warranty seals, and document actions.
When uncertain, contact a qualified technician to avoid liability.
Tools, Materials, and Safety Precautions Needed
A concise list of required tools and materials, from hoses and a garden valve adapter to a bucket and replacement anode, sets the foundation for a safe flush.
Proper personal protective equipment, attention to ventilation, and steps to shut off gas and water minimize risk during the procedure.
Clear criteria for when to call a licensed professional—such as suspected gas leaks, corroded tanks, or unfamiliarity with gas appliances—should be established before attempting a DIY flush.
Required tools and materials
Essential tools and materials for flushing a gas hot water heater include a garden hose, a wrench or pliers to operate the drain valve, a bucket for initial flushing or sediment checks, a wet/dry vacuum (optional for heavy buildup), replacement washers or a new drain valve if leaks are present, Teflon tape, and basic safety gear such as gloves and eye protection.
Additionally, a flashlight and adjustable wrench can help with tight fittings and inspections.
- Garden hose
- Bucket and wet/dry vacuum
- Replacement washers/valve and Teflon tape
- Wrench/pliers, flashlight, adjustable wrench
Personal protective equipment and ventilation
Having gathered the listed tools and materials, attention must turn to personal protective equipment and proper ventilation to minimize risk when flushing a gas hot water heater.
Wear heat-resistant gloves, safety goggles, long sleeves, and non-slip footwear.
Guarantee adequate airflow by opening windows and doors and using a fan to exhaust fumes.
Verify pilot light procedures and avoid confined-space operation without ventilation.
When to call a professional instead of DIY
When should a homeowner defer flushing a gas hot water heater to a licensed technician?
A professional is warranted for leaking tanks, damaged anode rods, corroded fittings, malfunctioning gas controls, or unclear sediment issues.
Also call for complex gas line work, failed pressure relief valves, or lack of confidence with isolation and depressurization.
Prioritize safety and code compliance; technicians diagnose and repair reliably.
Pre-Flush Preparation Steps
Before beginning the flush, the operator confirms the gas supply and pilot light are turned off and the cold-water inlet valve is closed while locating the heater’s drain valve.
Power to any ignition systems and electronic controls is then disconnected to prevent accidental activation.
Finally, hoses are attached, a suitable bucket or drain path is positioned, and the discharge area is prepared for hot, sediment-laden water.
Turning off the gas and pilot light safely
Shut off the gas supply at the appliance valve and extinguish the pilot light to eliminate ignition sources before any drain or maintenance work begins.
Confirm the control knob is in “off” position, then wait for combustion components to cool. If unsure, consult the heater’s manual or contact a qualified technician.
Verify no gas odor; if detected, evacuate and call the gas utility immediately.
Shutting off the cold water supply and locating drain valve
Close the cold-water inlet at the house shutoff or the heater’s dedicated valve to stop incoming water before draining.
Confirm no flow at a nearby faucet.
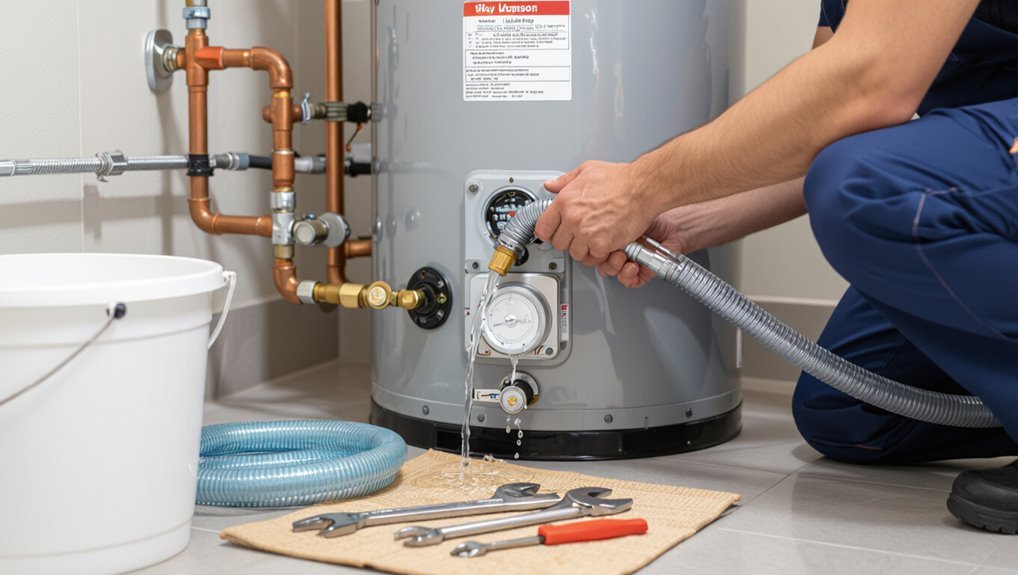
Locate the heater’s brass drain valve near the bottom; clear surrounding debris and position a garden hose to a safe drainage point.
Prepare a bucket for initial discharge and keep tools handy for valve operation.
Turning off power to ignition systems and electronic controls
Cut power to all ignition systems and electronic controls to prevent accidental firing or electrical shock while the tank is drained.
The technician should turn the gas control to OFF and disconnect any pilot or ignition power per manufacturer instructions.
Switch off circuit breakers for electronic components and remove batteries from control modules if accessible.
Verify power is off before proceeding with drain connections.
Preparing hoses, bucket, and discharge area
Gather appropriate hoses, a sturdy bucket, and plan the discharge area before opening the drain valve.
The technician selects a hose rated for hot water, checks for kinks and secure fittings, positions the bucket to catch initial flow, and routes the hose to a safe drain or outdoors.
Make sure the discharge won’t damage surfaces, freeze, or create slippery conditions.
Wear gloves and eye protection.
Step-by-Step Flushing Procedure
The procedure begins by cooling the water to a safe temperature to prevent scalding before any valves are opened.
The tank is then drained fully, followed by backflushing with a hose to dislodge and remove sediment, and treated with vinegar or a descaling solution if heavy buildup is present.
Finally, the tank is refilled and air pockets are bled out to restore normal operation.
Cooling the water to avoid scalding
Begin by turning off the water heater’s power source—electric breakers or gas pilot—to prevent reheating.
Then open a nearby hot water tap to relieve pressure.
Allow at least 30–60 minutes for temperature to drop before handling drains or hoses.
Verify water temperature with caution at the open tap; wear heat-resistant gloves and eye protection.
Never bypass safety valves or rush the cooling period.
Draining the tank completely
Once the water has cooled and pressure is relieved, proceed to draining the tank completely.
Open the drain valve and allow water to flow into a suitable container or drain. Monitor flow until it stops; this indicates the tank is empty.
Close the valve when finished.
Inspect the drained water for heavy sediment, noting color and particles for maintenance records.
Backflushing and using a hose to clear sediment
Attach a garden hose to the water heater’s drain valve and open the cold-water supply briefly to create a backflush that loosens and carries out remaining sediment.
Repeat short bursts until discharge runs clear. Flush gently to avoid valve damage.
Close the cold supply, reopen the drain to allow full drainage, then remove the hose and securely reseal the drain valve before refilling the tank.
Using vinegar or descaling solutions for heavy buildup
For heavy mineral buildup that resists flushing, use white vinegar or a commercial descaling solution to dissolve deposits inside the tank and on heating elements.
This requires isolating the heater, draining it to a low level, and circulating the chosen solution according to the product’s instructions and recommended contact time.
After soaking, flush thoroughly until discharge runs clear, inspect elements, and repeat treatment if persistent residues remain.
Refilling the tank and removing air pockets
After completing any vinegar or descaling soak and flushing until the discharge runs clear, the technician proceeds to refill the tank and purge trapped air.
They close the drain, reopen the cold-water supply slowly, and leave a nearby hot faucet open to vent air. Filling continues until a steady water flow replaces sputtering.
Once air is expelled, the faucet is closed and fittings checked for leaks.
Relighting the pilot and restoring gas safely
Proceed to relight the pilot and restore the gas only once the tank is full, all valves are secured, and the area is free of odors.
The technician confirms the gas supply valve is in the off position, opens a nearby window for ventilation, and verifies no lingering water is present near the burner assembly.
Follow the manufacturer’s pilot relight sequence, use a long lighter if required, and turn the gas on slowly.
Checking for leaks and confirming normal operation
Once the pilot is lit and the gas supply is reestablished, the technician inspects all fittings, valves, and connections for signs of leakage and proper operation before leaving the site.
They apply a soap solution to joints, monitor the pressure relief valve, verify no drips from drains, confirm thermostat responsiveness, and run hot water to guarantee steady flow and correct temperature.
Finally, they document observations and corrective actions.
Post-Flush Checks and Performance Verification
After flushing, observers should monitor hot water temperature and heater cycling to confirm stable operation.
They should time recovery intervals and note any changes in gas usage to assess efficiency improvements.
A quick inspection of the anode rod and drain valve for corrosion or damage completes the verification.
Monitoring water temperature and heater cycling
Verification of temperature and cycling behavior confirms that the flush succeeded and that the heater operates safely and efficiently.
The technician monitors outlet temperature at multiple draws, checking thermostat accuracy and stability. Observing burner run times and off cycles guarantees short cycling is absent and recovery periods are normal.
Any irregular temperature swings or rapid cycling prompt further inspection of thermostat, gas supply, and dip tube components.
Measuring recovery time and fuel consumption changes
With temperature stability and cycling confirmed, attention turns to measuring recovery time and tracking fuel consumption to quantify the flush’s impact on performance.
Record time to reheat a known volume from cold to setpoint before and after flushing.
Monitor gas meter or billing data for short-term usage differences.
Compare results to baseline, noting reduced recovery time or lower fuel use as efficiency indicators.
Inspecting anode rod and drain valve condition
A brief visual and functional inspection of the anode rod and drain valve completes the post-flush checklist, ensuring corrosion protection and proper drainage remain intact.
The anode rod should show substantial metal remaining; severe pitting or depletion warrants replacement.
Operate the drain valve to confirm smooth flow and tight shutoff; replace any leaking or stiff valves to prevent future sediment buildup and leaks.
Maintenance Schedule and Long-Term Tips
Frequency of tank flushing should be matched to water hardness and household usage, with softer water and low demand requiring annual attention and hard water or heavy use needing quarterly maintenance.
Routine tasks such as checking the anode rod, testing the temperature-pressure relief valve, and inspecting vents and burners help prevent problems between flushes.
If sediment returns quickly, heating efficiency drops, or leaks and corrosion appear, flushing alone may no longer suffice and tank replacement should be considered.
Recommended flushing frequency by water hardness and usage
Several factors determine how often a gas hot water heater should be flushed: water hardness, household size, and appliance usage patterns.
For very hard water or heavy use (large households, frequent appliances), flush every 3–6 months.
For moderately hard water or average use, flush every 6–12 months.
For soft water and low use, an annual flush is typically sufficient.
Additional preventive maintenance tasks
While regular flushing addresses sediment buildup, a simple, seasonal maintenance schedule and a few long-term checks will extend the heater’s life and maintain efficiency.
Routine tasks include:
- Inspect and test the T&P valve annually.
- Check and tighten gas and water connections.
- Replace sacrificial anode every 3–5 years.
- Schedule professional combustion and venting inspection biennially.
Signs that flushing is no longer sufficient and replacement is needed
If flushing and routine checks fail to restore performance or problems recur quickly, it may indicate that the tank or key components have reached the end of their serviceable life and replacement should be considered.
Persistent leaks, extensive corrosion, repeated burner or thermocouple failures, rusty or discolored water despite flushing, and frequent cold-water incidents signal irreversible deterioration.
Costly, recurring repairs justify replacement.
Common Problems and How to Troubleshoot Them
Common issues encountered during a flush include stubborn sediment buildup that can clog the drain valve, pilot light or ignition failures that occur afterward, and leaks or corrosion revealed while draining the tank.
For each problem, straightforward troubleshooting steps—such as clearing or replacing a clogged valve, checking thermocouple and ignition components, and inspecting or isolating corroded areas—can often restore safe operation.
If basic repairs do not resolve the issue or corrosion appears extensive, professional service is recommended.
Stubborn sediment and clogged drain valve solutions
Tackle stubborn sediment and a clogged drain valve by diagnosing the specific obstruction before attempting forceful fixes.
Inspect with a flashlight, run water briefly to check flow, then try gentle agitation with a garden hose or flexible snake.
If blockage persists, replace the valve or use a short sediment blowout through an auxiliary port.
Always shut off gas and water before interventions.
Pilot light or ignition failures after flushing
After addressing sediment and drain-valve issues, attention should turn to pilot light and ignition problems that can arise following a flush.
Debris can block pilot orifices, and moisture may short electronic igniters. Recommend checking pilot assembly, drying components, clearing soot or scale, and testing thermocouple continuity.
If ignition remains unreliable, suggest professional inspection to avoid gas leaks or unsafe operation.
Leaks or corrosion discovered during flushing
Several signs—visible rust, weeping joints, or puddling around the tank—indicate leaks or corrosion discovered during a flush and require immediate attention.
The technician should stop, isolate water and gas, document locations, and assess severity.
Minor weeps may tighten fittings or replace valves; significant corrosion or tank breaches necessitate replacement and licensed professional service to guarantee safety and code compliance.
Comparison of Flushing Methods and Tools
The article compares manual drain-and-rinse procedures with the faster, equipment-driven power-flush approach, highlighting time, cost, and effectiveness differences.
It also contrasts chemical descalers—which can dissolve mineral buildup—with mechanical removal methods that physically scrape or agitate deposits, noting safety and residue concerns.
The discussion frames which options suit routine maintenance versus heavy scaling or professional intervention.
Manual drain-and-rinse vs. power-flush equipment
Compare manual drain-and-rinse and power-flush methods by focusing on effectiveness, time, equipment, and cost. Manual uses simple tools, low cost, slower and less thorough; power-flush uses pump equipment, higher cost, faster and more complete. Choose based on sediment level, budget, and access.
| Manual drain-and-rinse | Power-flush equipment |
|---|---|
| Low cost | Higher cost |
| Simple tools | Specialized pump |
Pros and cons of chemical descalers vs. mechanical removal
Effectiveness hinges on whether scale is dissolved chemically or broken apart mechanically: chemical descalers use acids or chelating agents to dissolve mineral deposits, reaching narrow passages and crevices, while mechanical methods—scrubbing, agitation, or pressurized flushing—physically dislodge and remove bulk sediment.
Chemicals penetrate stubborn scale but risk corrosion, fumes, and disposal issues; mechanical removal avoids harsh chemicals but may miss tight spaces and requires more labor and equipment.
Cost Estimates and When Professional Service Is Worthwhile
Typical DIY flushing requires only basic supplies—a hose, wrench, and possibly a wet/dry vacuum—usually totaling under $50.
In contrast, hiring a technician commonly ranges from $100 to $300 depending on travel and labor.
Professional service is often justified for suspected gas or venting issues, persistent sediment problems, or when the owner prefers a certified safety check.
Clear cost comparisons and examples of risk-based scenarios help readers decide between self-service and hiring a pro.
Typical costs for DIY materials vs. hiring a technician
A basic flush performed by a homeowner generally requires only a few inexpensive items—a garden hose, a wrench to open the drain valve, and optionally a wet/dry vacuum or replacement anode if addressing sediment or corrosion—adding up to roughly $15–$60 depending on tool already owned and parts needed.
Hiring a technician for a flush plus inspection typically ranges $120–$300, reflecting labor, travel, and warranty.
Scenarios that justify professional inspection or service
Recognize that certain signs and circumstances make professional inspection or service for a gas hot water heater a prudent investment rather than a DIY task.
Professionals are warranted for persistent leaks, unusual noises, pilot or ignition issues, suspected gas odors, significant sediment buildup reducing output, corroded tanks or connections, and when warranties or local codes require certified work.
Costly repairs may outweigh continuing DIY attempts.
Quick Checklist for Flushing a Gas Water Heater
Several essential steps guarantee a safe, efficient flush of a gas water heater: shut off the gas and power, turn off the cold-water supply, attach a hose to the drain valve, open a hot-water tap to vent the system, then open the drain valve and flush until the water runs clear.
Recommended checklist:
- Confirm gas and pilot are off
- Secure hose and drainage
- Open hot tap and drain until clear
- Refill, purge air, restore gas and pilot
Conclusion
Sediment steadily smothers serviceable systems, so a simple, systematic flush sustains strong, smooth performance. Carefully closing cold connections, coaxing cloudy water clear, and cautiously checking valves cleanses clogs and curtails corrosion. Regular routine removal revives roaring recovery, restores reliable, responsive heat, and reduces ruinous repairs. With sensible safety steps and smart tools, homeowners secure savings, stretch service life, and savor softer strain on components—proof that periodic polishing preserves peak performance and peace of mind.