How to Control a Water Heater That Is Already Installed: Simple Steps to Adjust Temperature and Settings
To control an already installed water heater, first identify whether it’s a tank or tankless model and whether it operates on electricity or gas. Turn off the power or gas supply before making any adjustments. For electric heaters, access the thermostat behind the panel; for gas heaters, adjust the valve knob; and for tankless units, modify the digital control. Set the temperature to around 120°F for optimal performance. After making changes, allow the unit to stabilize before verifying the new settings. If issues persist, consult a technician for further assistance. For more detailed troubleshooting and maintenance tips, refer to specific guidelines.
How to Quickly Check and Adjust Your Water Heater Settings
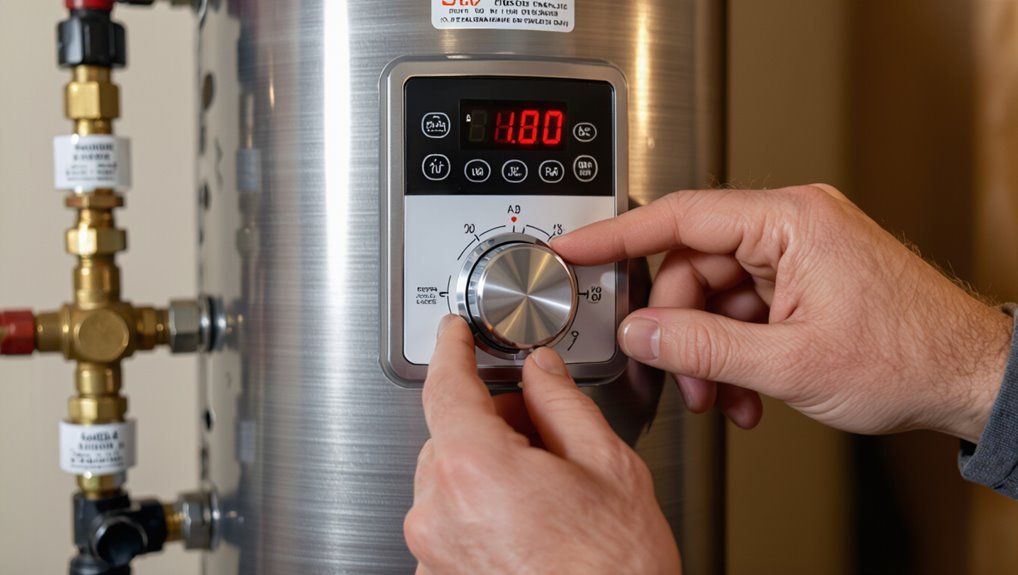
First, identify the water heater type—tank or tankless, electric or gas—as controls and procedures differ.
Next, observe basic safety precautions such as turning off power or gas and allowing hot components to cool before touching anything.
Finally, locate the temperature control and any other accessible settings to confirm current levels and make needed adjustments.
Confirm the type of water heater (tank, tankless, electric, gas)
Before adjusting any settings, identify whether the unit is a tank or tankless model and whether it runs on electricity or gas, since each type has distinct controls, safety features, and diagnostic indicators.
The inspector notes visible storage tanks, vents, burners, electrical panels, and labels. Knowing these details guides approaches in how to control a water heater that is already installed and determines accessible control locations.
Safety precautions before touching controls
Although adjusting a water heater’s controls can be straightforward, safety checks are essential: verify power/gas is off per manufacturer instructions, guarantee the area is dry and well-ventilated, wear protective gloves and eye protection, and confirm no recent leaks or corrosion.
Check for warning labels, carbon monoxide detectors (for gas units), and keep children and pets away before proceeding to adjust settings.
Locate the temperature control and other accessible settings
When locating the temperature control and other accessible settings, the user should identify the heater type—tank electric, tank gas, or tankless—since controls differ by model and placement.
Electric tanks typically have a thermostat behind an access panel near the top or middle. Gas tanks often have a dial on the gas valve at the bottom. Tankless units use a digital control on the unit’s front or a remote controller.
Check labels, service manuals, and nearby switches.
Step-by-step Guide to Changing Temperature on Different Heater Types
The article outlines clear procedures for changing temperature settings on common heater types: electric tank, gas tank, tankless on-demand units, and models with digital or smart controls.
For each type, it describes required tools, safety checks, and step-by-step adjustments. Readers are guided to confirm successful changes and troubleshoot basic issues.
Adjusting an electric tank water heater
Begin by shutting off power to the electric tank water heater at the circuit breaker to guarantee safety before making any adjustments.
Remove the access panel and insulation to expose the thermostat.
Use a flathead screwdriver to turn the dial to the desired temperature (typically 120°F).
Replace insulation and panel, then restore power.
Verify temperature after a few hours and check for unusual noises.
Adjusting a gas tank water heater
Adjust a gas tank water heater’s temperature by locating the temperature control knob on the gas control valve, usually near the bottom of the tank, and following safety steps before making changes.
Turn the knob slowly toward desired setting, wait 30–60 minutes for stabilization, check water temperature at a tap, and readjust if necessary.
Consult the manual or a professional for persistent issues.
Adjusting a tankless (on-demand) water heater
Changing the temperature on a tankless (on-demand) water heater requires different steps than a tank model because it controls output electronically and often through a digital interface or remote control.
Users should first consult the unit’s manual, power it down if instructed, then access the thermostat settings via the display, buttons, or app to incrementally raise or lower the setpoint and confirm changes with a hot-water tap after the system stabilizes.
After adjustment, verify error codes and restart per instructions, ensuring flow rates meet minimums and contacting a qualified technician for persistent issues or gas/electrical concerns.
Digital control panels and smart water heaters
After covering basic steps for tankless units, attention shifts to models with digital control panels and smart connectivity, where temperature settings are managed through buttons, touchscreens, or mobile apps rather than manual dials.
Users navigate menus to adjust setpoints, enable vacation or eco modes, and apply firmware updates.
Security, Wi‑Fi setup, and manufacturer instructions guarantee correct operation and safe temperature limits.
Recommended Temperature Settings and Why They Matter
Recommended temperature settings balance safety, comfort, and efficiency, with lower ranges advised where children or elderly are present to reduce scald risk.
Slightly higher settings can improve energy efficiency and reduce Legionella risk, but require safeguards such as thermostatic mixing valves.
Clear guidance on specific ranges and trade-offs helps homeowners choose appropriate settings for their household.
Safe temperature ranges for households with children or elderly
Because young children and older adults have thinner skin and slower reaction times, household water temperatures should be set lower than the standard 120°F to reduce scald risk.
Many experts advise 110–115°F for homes with vulnerable occupants to balance safety and practical hot-water needs.
Guardians should verify thermostat settings, install thermostatic mixing valves or anti-scald devices, and test taps periodically for consistent, safe output.
Energy-saving temperature recommendations
While maintaining safety, lowering a water heater thermostat to about 120°F—or to 115°F in homes with vulnerable occupants—also yields measurable energy savings by reducing standby heat loss and the energy required to raise water temperature for everyday use.
Modest reductions translate to lower utility bills and reduced fuel consumption. Consistent settings, insulation, and periodic maintenance optimize savings without compromising performance.
Preventing scalding versus preventing bacterial growth
Lowering a water heater to 120°F can save energy, but temperature choices also affect safety and microbiological risk.
At 120°F scalding risk rises for children and elderly; devices like thermostatic mixing valves can mitigate scalding at outlets.
Higher settings (≥140°F) reduce Legionella growth but increase burn hazard and energy use.
Balance by evaluating household vulnerability and using point-of-use controls.
Fine-tuning Performance and Efficiency
To maximize comfort and lower energy use, attention turns to fine-tuning controls and insulation.
Practical measures include installing a timer or setback thermostat, adding insulation to the tank and hot water pipes, and reducing standby heat loss for storage systems.
For tankless units, optimizing flow rate and delivery temperature improves responsiveness and efficiency.
Using a water heater timer or setback thermostat
A water heater timer or setback thermostat allows scheduled reductions in heating when hot water demand is predictably low, cutting fuel use without sacrificing comfort.
Install or program devices to lower temperature during work hours or overnight, then restore before peak use.
Confirm compatibility with the heater model, follow safety guidelines, and monitor savings and comfort to refine schedules for maximum efficiency.
Insulating the tank and hot water pipes
After scheduling reduced heating periods with a timer or setback thermostat, next steps focus on limiting heat loss through the tank and supply lines to preserve those savings.
Install an appropriate tank blanket rated for the heater type, avoiding covering controls or vents.
Add foam pipe insulation to exposed hot and cold runs, seal gaps at fittings, and verify insulation materials meet local fire and building codes.
Reducing standby heat loss for tanks
Several targeted measures can further cut standby heat loss from a water heater, focusing on sealing leaks, optimizing insulation, and refining control settings.
Inspect and seal pipe fittings, drafty vents, and access panels.
Add or upgrade jacket insulation and insulating blankets where safe.
Install a programmable or setback thermostat and enable vacation or lower-temperature modes.
Monitor performance and adjust to balance recovery and energy use.
Optimizing flow rate and temperature on tankless systems
Optimize flow rate and temperature on a tankless water heater by matching demand to the unit’s capacity and setting the outlet temperature just high enough for designated uses.
Adjust flow restrictors or faucets to maintain activation thresholds, balance simultaneous fixtures to prevent cold shock, and program temperature locks for safety.
Regularly descale heat exchangers and verify sensor calibration to sustain efficiency and consistent delivery.
Troubleshooting Common Issues After Adjusting Settings
After making control adjustments, the article outlines step-by-step diagnostics for when water temperature does not change, including basic checks and reset procedures.
It then lists specific items to inspect if water is too hot or too cold and explains how to read error codes and indicator lights on digital units.
Finally, it notes when persistent lack of hot water points to other components such as the thermostat, heating element, or gas valve and recommends targeted checks.
No change in water temperature diagnostic steps
Start by confirming whether the thermostat adjustments were actually registered by the unit: check the display or indicator lights, note any error codes, and verify that power remains connected.
Next, inspect wiring and connections for looseness or corrosion.
Test the thermostat and heating element continuity with a multimeter.
Review recent maintenance history, and consider sediment buildup restricting heat transfer before contacting a qualified technician.
Water too hot or too cold after adjustment what to check
If thermostat settings appear correct but water temperature remains too hot or too cold, the next step is to isolate common causes that can override adjustments.
Check for cross-connections with boilers or recirculation loops, malfunctioning mixing valves or tempering valves, sediment buildup on heating elements, faulty thermostats or sensors, and incorrect dip switch or limit settings.
Inspect supply pressure and recent plumbing changes.
Error codes and indicator lights on digital units
Consult the unit’s display and service manual when digital controls behave unexpectedly, because error codes and indicator lights are designed to pinpoint faults quickly.
Interpret codes per the manual, note color or blinking patterns, and record code numbers.
Reset per manufacturer guidance only. If persistent errors appear, contact qualified service.
Do not attempt internal electrical repairs without proper training and isolation.
When lack of hot water is due to other components (thermostat, heating element, gas valve)
When digital controls and error codes give no clear cause, the problem may lie in other components such as the thermostat, heating element, or gas valve.
Inspect thermostat continuity and calibration, test heating elements for resistance and shorts, and verify gas valve operation and pilot ignition.
Replace faulty parts only after confirming diagnosis, and follow safety protocols or hire a licensed technician for repairs.
Safety and Maintenance Tasks Related to Temperature Control
Routine safety and maintenance tasks help guarantee temperature settings remain effective and safe.
These include testing and resetting the temperature-pressure relief valve, flushing sediment from tank water heaters, and inspecting the anode rod for corrosion.
Regular checks for gas leaks or electrical faults should also be performed to prevent hazards.
Testing and resetting temperature-pressure relief valve
Inspecting and operating the temperature-pressure (T&P) relief valve is a critical safety step that verifies the tank will vent excess pressure or temperature before conditions become hazardous.
Visually check for corrosion or leaks, lift the test lever briefly to confirm flow and reseat smoothly, guarantee discharge pipe directs water safely, and replace the valve immediately if it sticks, leaks, or fails to reseat.
Flushing sediment from tank water heaters
Flush sediment from a tank water heater at least once a year to preserve heating efficiency and prevent overheating or premature element failure.
Turn off power or gas, attach a hose to the drain valve, open a hot water faucet, and drain until clear.
Flush cold water briefly to stir remaining debris, close valves, restore supply, and relight or restore power per manufacturer instructions.
Checking anode rod condition and corrosion signs
Check the anode rod annually to detect corrosion that compromises the tank’s sacrificial protection and accelerates rusting.
Technicians remove and inspect the rod for heavy pitting, thinning, or replacement of magnesium/zinc cores. Excessive wear or coating indicates replacement to prevent internal tank corrosion.
Document condition, install appropriate replacement, and tighten fittings to preserve heater lifespan and maintain safe, efficient operation.
Regular inspections for gas leaks or electrical faults
Periodically examine the water heater and surrounding connections for signs of gas leaks or electrical faults, as these hazards directly affect temperature control and occupant safety.
Inspect flex lines, fittings, valves, vents, and electrical junctions for corrosion, odor, hissing, scorch marks, or loose wiring.
If any issues appear, shut off gas or power and contact a qualified technician immediately to prevent malfunctions or dangerous failures.
When to Call a Professional
If temperature issues persist after basic checks or adjustments pose a burn, leak, electrical, or gas risk, a professional should be contacted.
Local codes, permits, and certain repairs—such as gas valve replacement or pressure relief valve work—often require licensed technicians.
When arranging service, provide model and serial numbers, a clear description of the problem, recent maintenance performed, and any error codes or symptoms observed.
Signs that adjustments are unsafe or ineffective
Recognize when adjustments exceed safe limits or fail to resolve the problem, because continuing to tinker can cause scalding, leaks, electrical hazards, or further damage.
Call a professional if temperature settings don’t stabilize, unusual noises persist, visible corrosion or leaks appear, pressure relief valve discharges frequently, pilot or ignition problems continue, or electrical components show burning odors or tripped breakers.
Stop attempts and seek service promptly.
Permits, local codes, and required professional services
A homeowner should be aware that many water heater tasks require permits, must follow local codes, and often legally or practically demand a licensed plumber or electrician.
Permits, inspections, and code compliance vary by jurisdiction; improper work can void warranties, trigger fines, or create hazards.
Hire licensed professionals for gas, electrical, major plumbing changes, venting, or tank replacement to guarantee safety and legality.
What to expect and what information to provide the technician
When calling a technician, homeowners should be prepared to describe the problem clearly, provide basic system details, and note any recent changes or events that may be relevant.
The technician will ask about heater type, age, model, serial number, symptoms, error codes, water temperature, unusual noises or leaks, maintenance history, and when issues began to diagnose, estimate costs, and schedule service.
Comparison of Control Options and Costs
A brief comparison of control options helps homeowners weigh upfront costs against long‑term energy savings and convenience. Below is a concise summary of common choices and typical cost considerations:
| Control Option | Cost / Benefit |
|---|---|
| Manual dial thermostat | Low cost, limited precision, minimal energy savings |
| Digital controls | Moderate cost, improved temperature accuracy, some savings |
| Smart controllers & remote monitoring | Higher initial cost, greater control and potential for significant savings |
| Cost vs. energy savings overview | Higher upfront costs often recoverable over time through reduced energy use |
Manual dial thermostats vs. digital controls
Several common control options exist for residential water heaters, chiefly manual dial thermostats and digital controls, each with distinct cost, accuracy, and usability trade-offs.
Manual dials are inexpensive, simple to readjust, but less precise and prone to temperature drift.
Digital controls cost more upfront, offer finer temperature settings, clearer displays, and built‑in safety features, improving efficiency and user confidence.
Smart controllers and remote monitoring
Beyond basic manual and digital thermostats, smart controllers add networked control, scheduling, and usage insights that can materially affect operating costs and convenience.
These devices enable remote temperature changes, leak and fault alerts, and integration with home automation or utility demand-response programs.
Installation complexity and subscription fees vary; compatibility with tank types and safety features should guide selection when comparing control options and costs.
Cost vs. energy savings overview
Cost-benefit analysis of water heater controls hinges on upfront expenses, ongoing fees, and realistic estimates of energy savings given household usage patterns and local energy rates. A concise comparison helps prioritize investments: simple thermostats have low cost and modest savings; smart controllers cost more but enable peak shifting and greater reduction. Choose based on payback period and behavioral fit.
| Option | Upfront | Typical Savings |
|---|---|---|
| Basic thermostat | $ | Low |
| Timer | $$ | Moderate |
| Smart controller | $$$ | High |
| Hybrid/Heat pump | $$$$ | Very high |
Practical Tips and Common Mistakes to Avoid
Practical tips and common mistakes can prevent accidents, extend equipment life, and protect warranties when adjusting a water heater.
The following emotional prompts summarize the key points to remember before making any changes:
- Fear of scalding: set safe temperatures and test carefully
- Frustration over voided warranty: avoid unauthorized modifications
- Relief from seasonal prep: follow a simple adjustment checklist
- Regret from damage: inspect valves and anode rods regularly
Quick tips for safe adjustments
When adjusting a water heater, follow a few concise safety steps to prevent burns, scalding, or equipment damage:
turn off power or gas before accessing controls, allow the tank to cool if it has been running, use insulated gloves when handling hot components, and make small incremental temperature changes (no more than 5°F/3°C at a time).
Also verify venting and pressure relief valve condition, keep area dry, and document settings.
Mistakes that can damage the heater or void warranty
Ignore common shortcuts that can shorten a heater’s lifespan or void its warranty; improper installations, DIY gas or electrical work without permits, bypassing safety devices (like the temperature-pressure relief valve), and using incompatible replacement parts are frequent culprits.
Technicians recommend avoiding shortcuts and documenting service.
Emotional reminders:
- Fear of costly failures
- Frustration from needless repairs
- Anxiety over safety risks
- Regret for lost warranty
Seasonal adjustment checklist
A concise seasonal adjustment checklist helps guarantee a water heater runs efficiently and safely through changing temperatures; it covers temperature settings, insulation, drain and vent inspections, pressure-relief testing, and fuel-supply checks.
Regularly verify thermostat, flush tank, test relief valve, and inspect vents.
Emotional reminders:
- Comfort preserved, bills lowered.
- Safety prioritized, risks reduced.
- Peace of mind earned.
- Neglect avoided, longevity secured.
Conclusion
Like a neighbor who tightened a faucet and cut a 20% energy bill, homeowners can thoughtfully adjust water heater controls to balance comfort and savings. Small, measured changes—checking thermostats, following safety steps, and noting performance—keep systems efficient and safe. If problems persist or settings confuse, calling a professional prevents mishaps. Ultimately, careful tuning of temperature and maintenance turns a temperamental appliance into a reliable, economical household ally.