How a Bathtub Drain Works: Inside the Parts, Flow Mechanics, and Common Problems
A bathtub drain effectively removes used water through a series of components: the stopper, tailpiece, P-trap, and waste line, relying on gravity while preventing sewer gases through a water seal. Key parts include the flange, stopper, overflow assembly, and venting for pressure balance. Flow rates are influenced by pipe size and potential blockages, with common issues such as hair and soap buildup, leaks at seals, and malfunctioning stoppers. This guide provides in-depth details on each component, their mechanics, and solutions to common problems.
How a Bathtub Drain Functions: Quick Overview
A bathtub drain channels used water away from the tub and prevents sewer gases from entering the bathroom via a trap.
Under normal operation it clears water within seconds to a minute, holds water when closed, and maintains a steady, quiet flow when open.
Persistent slow drainage, gurgling, or foul smells indicate performance problems.
What a bathtub drain does in plain terms
Drains water from the tub and prevents sewer gases from entering the bathroom by channeling used water into the household plumbing while maintaining a water seal.
In plain terms, a bathtub drain collects and directs wastewater, uses a trap to stop odors, and interfaces with overflow and stopper mechanisms.
This explains how a bathtub drain works without detailing performance metrics or troubleshooting.
Typical performance expectations and signs of normal operation
When functioning normally, the bathtub drain allows water to flow freely from the tub into the household plumbing, maintains the trap’s water seal to block sewer gases, and responds promptly when the stopper is opened or closed.
Normal operation includes steady drainage without gurgling, absence of odors, no slow pooling, consistent stopper sealing, and minimal visible leakage around fittings or overflow.
Key Parts Inside a Bathtub Drain
The section identifies the main components found in a bathtub drain and explains how each contributes to water control and sealing.
It covers the overflow assembly, drain flange, strainer, and common stopper types—including trip lever, lift-and-turn, pop-up, and push-button mechanisms—as well as the drain body, tailpiece, and slip nut that connect the assembly to the plumbing.
Understanding these parts helps diagnose leaks, clogs, and malfunctioning stoppers.
Overflow assembly and its purpose
An overflow assembly sits just below the tub rim and prevents overfilling by channeling excess water safely into the drain system.
It comprises a faceplate with an internal passage and a connector to the waste pipe, maintaining water level limits and protecting against spills.
It also provides an access point for clearing clogs or servicing internal linkage without removing the tub.
Drain flange, strainer, and stopper types
Following the overflow assembly’s role in preventing spills, attention turns to the drain’s visible components: the flange, strainer, and various stopper mechanisms.
The flange secures the drain to the tub and seals against leaks. Strainers capture hair and debris.
Stoppers—such as push-pull, flip, and toe-touch types—control water retention and release, differing in operation, maintenance needs, and suitability for retrofit or replacement.
Trip lever and lift-and-turn mechanisms
Operate by cable or direct rotation. Trip lever and lift-and-turn mechanisms convert user input at the overflow or stopper into motion that opens or seals the drain.
Trip levers use a linkage and plunger assembly behind the overflow plate; lift-and-turn stoppers rotate and lift on a threaded post.
Both require alignment, occasional lubrication, and periodic seal replacement to maintain watertight closure.
Pop-up and push-button stoppers
Pop-up and push-button stoppers control water flow by altering a single internal seal assembly rather than relying on external linkages; pop-up units use a pivoted rod and pivot nut or a linkage concealed behind the overflow to raise and lower a gasketed plug, while push-button models employ a spring-loaded plunger that locks down to seal and retracts to open.
Routine issues include worn seals, misaligned pivots, and spring fatigue.
Drain body, tailpiece, and slip nut
The drain body, tailpiece, and slip nut form the core connection that channels water from the tub into the drain line and seals the joint between fixture and plumbing.
The drain body secures to the tub, the tailpiece extends downward, and the slip nut compresses a washer to create a watertight seal.
Proper alignment and tightened connections prevent leaks and facilitate removal for maintenance.
P-trap and trap arm
A P-trap, shaped like a sideways “P,” and its connecting trap arm form the water-sealed barrier that prevents sewer gases from entering the bathroom. The curved trap holds a small water column while the trap arm carries effluent to the branch drain.
The assembly also captures debris, enabling blockages to form at the trap rather than deeper in the drain line, simplifying access for cleaning.
Gaskets, washers, and seal components
Beyond the P-trap and trap arm, a network of gaskets, washers, and seals secures watertight connections between the tub, strainer, waste assembly, and overflow.
These components compress to prevent leaks, absorb vibration, and allow disassembly for maintenance. Proper seating and torque guarantee effectiveness; degraded or misaligned seals cause seepage, odors, and corrosion.
Routine inspection and timely replacement preserve drain integrity.
Common materials and how material affects performance
Materials determine a drain’s durability, corrosion resistance, and long-term sealing behavior.
Brass offers excellent corrosion resistance and machinability for threads and fittings; stainless steel resists rust and looks modern but costs more.
PVC and ABS are lightweight, chemical-resistant, and inexpensive but less heat-resistant.
Rubber and silicone gaskets provide flexibility and aging resistance; plated metals risk flaking and galvanic corrosion over time.
Flow Mechanics: How Water Travels From Tub to Sewer
Water flows from the tub basin through the stopper into the waste line, driven primarily by gravity as it follows the piping down to the sewer.
A P‑trap holds a water seal that blocks sewer gas while vents balance air pressure to maintain steady drainage; restricted vents or obstructions reduce flow speed and can cause gurgling or slow emptying.
Typical residential bathtub flow rates are modest and decline with partial clogs, damaged seals, or undersized venting and piping.
Path of water from tub basin through the stopper to the waste line
Several clear stages govern how liquid leaves a bathtub: it collects in the basin, passes the stopper or overflow inlet, flows through the drain body into the trap, and continues into the waste line toward the sewer or septic system.
Water moves through openings and fitted seals, navigates bends in the trap where solids settle, then enters straight pipe sections and fittings that direct flow downstream for disposal.
Role of gravity, venting, and trap seal in flow
Although gravity provides the primary driving force that moves liquid from the tub toward the sewer, proper venting and an intact trap seal are equally essential to maintain steady, odor-free flow.
Gravity creates the downward pressure, the vent prevents siphoning and allows air to replace discharged water, and the trap seal blocks sewer gases while retaining enough water to preserve that barrier.
Venting maintains pressure balance; a compromised seal allows odors and backflow.
How the P-trap prevents sewer gas entry
Moving from the roles of venting and gravity, the P-trap operates as a simple yet effective mechanical barrier that prevents sewer gases from entering the bathroom by holding a small, permanent water seal in its curved bend.
This trapped water blocks odor and gas flow while allowing wastewater to pass; occasional evaporation, siphoning, or leaks can break the seal, requiring refill or repair.
How air pressure and venting affect drainage speed
When air can freely enter and exit a drain line through properly placed vents, wastewater flows more quickly because atmospheric pressure equalizes on both sides of moving water, preventing vacuum formation or airlocks that would slow or intermittently stop the column of water.
Proper venting maintains steady flow, reduces gurgling and sputtering, and prevents negative pressure that could siphon trap seals or cause slow, sputtering drainage.
Typical flow rates and what reduces them
Having proper venting keeps pressure balanced, which directly impacts how quickly water can travel from a bathtub to the sewer.
Typical flow rates through bathtub drains are governed by pipe diameter, slope, fittings, and obstructions. Typical clear-drain flow ranges 10–20 gallons per minute in residential tubs.
Reduced rates result from hair and debris buildup, partial blockages, improper trap or vent configuration, flat or reverse slopes, and undersized piping.
Installation and Assembly Basics
The section outlines the standard steps for assembling a bathtub drain, from flange placement and gasket fitting to tailpiece connection.
It emphasizes correct sealing materials and torquing of the flange and tailpiece.
It explains how the overflow links to the drain underneath the tub and notes differences between built-in and freestanding installation layouts.
Practical attention to seal integrity and alignment prevents leaks and guarantees proper function across common installation variations.
Standard drain assembly steps (overview)
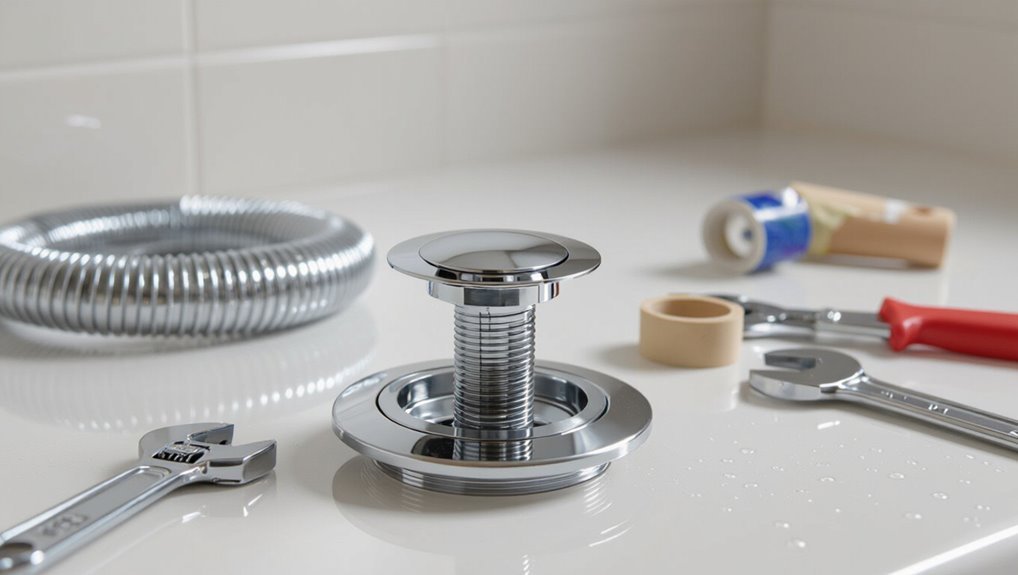
Begin by laying out the components and tools to confirm a complete, compatible kit before assembly: stopper, flange, drain body, gasket, locknut, tailpiece, and necessary sealant or plumber’s putty, plus a wrench and plumber’s tape.
Insert flange and seat gasket, thread drain body into tub opening, secure locknut beneath, attach tailpiece, align stopper, tighten connections, and test for proper drainage and leaks.
Proper sealing and torque for flange and tailpiece
Apply plumber’s putty or a compatible gasket evenly under the flange and make certain the tailpiece’s gasket seats flush against the tub base before tightening.
Tighten nut incrementally, using hand force then controlled wrench turns until snug; avoid over-torquing which can crack porcelain or deform gaskets.
Confirm alignment, wipe excess putty, and test for leaks.
Re-torque after first water use if needed.
How overflow and drain connect under the tub
When connected beneath a tub, the overflow assembly and main drain form a sealed pathway that prevents overfilling and channels water to the trap. The overflow faceplate, its tailpiece, and the drain tailpiece must align and mate with gaskets or seals designed for the specific tub model.
Rigid or flexible connectors join tailpieces, maintaining slope to the trap, while clamps or threaded couplings secure seals and allow service access.
Common installation variations (built-in tub vs. freestanding)
After outlining how the overflow and main drain connect beneath a tub, attention shifts to how installation differs between built-in and freestanding tubs.
Built-in tubs tie directly into framed walls and concealed plumbing, requiring integrated overflow housings and trap placement.
Freestanding tubs demand flexible tailpieces, exposed or floor-mounted drains, and careful alignment to finished flooring; access for maintenance is more limited.
Common Drain Problems and How They Occur
Common bathtub drain problems arise from predictable mechanical and buildup issues that affect flow, seals, and odor control.
Typical examples include:
- slow drainage from hair and soap residue
- frequent clogs in the stopper, tailpiece, or P-trap
- leaks at the flange, tailpiece, overflow, or P-trap
- stopper mechanism failures that prevent sealing or opening
- sewer gas smells from failed trap seals or dry traps
Understanding these failure points helps prioritize inspection and repair.
Slow drainage causes
Many tubs experience slow drainage due to gradual buildup or mechanical issues in the drain system.
Mineral deposits, soap scum, and partial sediment accumulations reduce flow area. Corroded or misaligned trap and pipe fittings create resistance.
Faulty or partially closed trip lever assemblies and damaged overflow valves impede water exit.
Reduced venting or minor slope problems also diminish drainage efficiency.
Frequent clogs and typical blockage locations
Several frequent clogs in bathtub drains typically form where hair, soap scum, and grime collect—most often at the strainer, inside the trap, and at bends in the drainpipe.
Accumulation reduces flow, causing standing water. Mineral buildup and small debris lodge near pipe joints and tight elbows.
Organic matter compacts over time, creating partial or complete blockages that impede venting and increase odor risk.
Leaks at flange, tailpiece, overflow, and P-trap
When seals or connections around the flange, tailpiece, overflow, or P-trap fail, water escapes at predictable points and can damage surrounding finishes or cabinetry.
Leaks arise from deteriorated gaskets, loose slip nuts, corroded fittings, or improper installations.
Slow drips or hidden seepage cause mold, rot, and structural harm.
Detection requires visual inspection, dye tests, and tightening or replacing compromised components.
Stopper mechanism failures
Inspecting the stopper mechanism reveals a common source of bathtub drainage trouble: worn, misaligned, or clogged moving parts that prevent a tight seal or smooth operation.
Corroded linkages, broken springs, mineral buildup, or damaged gaskets cause sticking, slow closing, or leakage. Misadjusted pop-ups and lift-and-turn stoppers alter alignment.
Routine cleaning, replacement of worn components, or adjustment restores reliable sealing and function.
Sewer gas smells and failed trap seals
Problems with the stopper can lead homeowners to notice odors as well as leaks; another frequent issue is the loss of the water seal in the trap that blocks sewer gas.
Evaporation, siphoning from adjacent fixtures, or leaks in trap connections let sewer odors enter the bathroom. Restoring or replacing the trap, correcting venting and fixing leaks typically resolves smells and prevents hazardous gas intrusion.
Corrosion and material wear
Corrosion and material wear gradually degrade drain components through chemical reactions and mechanical abrasion, reducing structural integrity and leading to leaks, blockages, or failures.
Metal parts corrode from moisture and chemicals; seals and gaskets harden or crumble.
Abrasive debris and hair cause wear.
Progressive deterioration alters clearances and sealing surfaces, accelerating failure.
Regular inspection and timely replacement mitigate risks and restore function.
Diagnosing Drain Issues: Step-by-Step Checks
A systematic approach begins with a visual inspection above and below the tub to note obvious leaks, debris, or loose fittings.
Next, flow tests and isolation of slow drains help determine whether the obstruction is in the tub branch, shared drain, or farther down. Inspection methods can distinguish hair, soap buildup, or mineral scale.
Finally, the decision to remove the P-trap versus working from the drain involves the suspected clog type and available tools. Homeowners use basic augers and plungers, while professionals employ camera inspection and powered equipment.
Visual inspection points above and below the tub
Before any disassembly, inspect both the visible fixtures and the accessible plumbing under the tub to locate obvious signs of wear, misalignment, or buildup.
Check the stopper, overflow plate, and trim for corrosion, loose screws, or mineral deposits.
Below the tub, examine trap seals, joint fittings, pipe sagging, and water stains indicating leaks.
Note debris accumulation and odor sources for targeted cleaning.
Testing flow and isolating slow drains
Begin by running water at different flow rates and observing how quickly the tub drains to establish a baseline for performance.
Next, test with the stopper open and closed, timing drainage and noting air noise or gurgles.
Isolate sections by removing the overflow plate and checking for flow changes.
Record results, compare against expected empty times, and decide if further disassembly is needed.
How to locate and identify the clog type (hair, soap, mineral)
When diagnosing a slow bathtub drain, the technician first narrows down the likely clog type—hair, soap scum, or mineral buildup—by combining visual inspection, tactile checks, and simple tests.
Visible dark fibrous mats indicate hair, slippery pale residue signals soap scum, and hard white crystalline deposits point to minerals.
Gentle probing with a hook and vinegar test confirm texture and composition before choosing treatment.
When to remove the P-trap vs. unclogging from the drain
After identifying the likely clog type—hair, soap scum, or mineral buildup—the technician decides whether to attack the blockage from above the trap or to remove the P-trap for inspection.
If slow flow and visible debris near the strainer suggest an upper clog, clear from above.
If odors, persistent backups, or opaque drainage persist, remove and inspect the P-trap for lodged debris, damage, or seal failure.
Tools and diagnostics for homeowners vs. pros
How should a homeowner decide which tools and tests are appropriate before calling a professional? A checklist guides decisions: visual inspection, plunger, drain snake, and basin wrench for accessible traps.
Perform simple flow and leak tests. If odor, repeated backups, or inaccessible blockages persist, escalate.
Professionals use camera inspection, hydro-jetting, and specialized extraction. Prioritize safety, permits, and warranty implications when escalating to a pro.
DIY Repair and Maintenance Guide
The guide outlines practical, safe techniques for common tub drain problems and routine upkeep.
Key actions include:
- Clearing hair and soap scum safely
- Proper use of plungers, drain snakes, and augers
- Removing and servicing common stopper types
- Resealing the flange and replacing washers/gaskets
- Cleaning overflow channels and vents
Readers are encouraged to follow basic precautions and consult a professional for complex or persistent issues.
Safe methods to clear hair and soap scum
Begin by evaluating the clog: observe water level, test drain speed, and note any visible hair or residue.
Use gloved hands or a bent wire hook to remove surface hair.
Flush with hot water to dissolve soap scum.
Apply a mild enzyme cleaner per instructions for organic buildup.
Rinse thoroughly.
Repeat inspection and avoid harsh chemical drain cleaners that can damage pipes and finishes.
Using plungers, drain snakes, and augers correctly
When small tools and correct technique are combined, plungers, drain snakes, and augers can remove most bathtub clogs without professional help.
A flange plunger seals around the drain; use firm, controlled pumps.
Insert a hand-crank snake or auger gently, rotate to catch debris, then withdraw slowly.
Clean tools afterward and test flow.
Stop if resistance feels like pipe damage; call a pro.
Removing and servicing common stopper types
After clearing a clog with a plunger or snake, attention often turns to the stopper, since many blockages and leaks originate there.
Service begins by identifying type: lift-and-turn, pop-up, toe-touch, or trip lever. Each requires specific removal—unscrew caps, unclip linkages, or lift collar.
Clean debris, inspect springs and pivots, replace corroded parts, then reassemble and test for smooth operation.
Resealing flange and replacing washers/gaskets
Seal the bathtub drain flange and replace worn washers and gaskets to stop leaks and restore a watertight connection between the tub and plumbing.
Remove the flange, clean mating surfaces, inspect gasket and washer condition, and apply plumber’s putty or silicone before reinstalling.
Replace deteriorated rubber or fiber washers, tighten fittings evenly, and test for leaks.
Repeat as needed until sealed.
Cleaning overflow channels and vents
Clean the overflow channels and vents to restore proper drainage and prevent slow fills or sewage odors.
Inspect the overflow plate, remove debris, and flush channels with water.
Access vent openings, clear blockages with a flexible brush or compressed air, and sanitize surfaces to deter buildup.
Reassemble components, test flow, and verify no leaks or unusual gurgling remain after cleaning.
Preventive maintenance schedule and tips
Once overflow channels and vents are cleared and reassembled, a regular maintenance schedule keeps the drain performing reliably and prevents minor issues from becoming costly repairs.
Inspect and tighten fittings quarterly, clear hair and debris monthly, lubricate moving parts biannually, and flush with hot water after heavy use.
Record actions, watch for slow drainage, and address odors or leaks immediately to avoid escalation.
When to Call a Professional and What to Expect
Persistent backups, foul odors, recurring clogs after repeated DIY attempts, or visible leaks indicate a job that warrants a licensed plumber.
Professionals commonly inspect the trap and drain line, perform snaking or hydro-jetting, replace corroded fittings or pop-up assemblies, and repair or reseal pipe joints.
Typical repairs often take one to a few hours and can range from modest flat-fee service charges to several hundred dollars for more extensive line work.
Signs a job requires a plumber
When does a clog or leak cross the line from DIY to requiring a plumber?
Persistent backups after basic clearing, recurrent slow drainage, foul odors indicating sewer issues, visible pipe leaks or corrosion, water damage to floors or ceilings, and failed DIY fixes signal professional help.
Also call a plumber for complex access, unfamiliar tools, or when local codes and warranties may be affected.
Typical repair procedures professionals perform
Callers can expect a plumber to follow a predictable sequence: diagnose the issue using inspection tools (visual checks, plunger/snaking trials, and sometimes camera scopes), isolate and test affected fixtures to confirm the source, then perform the appropriate repair—clearing clogs with augers or hydro-jetting, replacing corroded or damaged drain/trap sections, resealing joints and gaskets, or repairing leaks with soldering, compression fittings, or replacement parts.
Technicians also verify drainage and test for residual leaks before cleanup.
Estimated costs and time for common repairs
Several common bathtub drain repairs typically fall into predictable cost and time ranges, helping homeowners decide whether to hire a professional.
Hair clogs: $50–$150, 15–45 minutes.
Stopper replacement: $75–$200, 30–60 minutes.
Drain assembly replacement: $150–$400, 1–2 hours.
Pipe repair or replacement: $200–$800+, 2–6 hours.
Emergency service and regional variation increase prices.
Comparing Drain Types and Upgrades
A brief comparison highlights how stopper styles and drain materials affect function, maintenance, and cost.
| Stopper Types | Pros / Cons / Ideal Uses |
|---|---|
| Lift-and-turn | Simple, inexpensive; can clog easily; good for basic tubs |
| Pop-up | Sleeker, easier to clean; more parts to fail; suited to modern fixtures |
| Materials (Brass, PVC, Stainless) | Longevity and cost vary: brass is durable/expensive, PVC is cheap/shorter-lived, stainless resists corrosion at mid-range cost |
Choices should align with expected use, budget, and willingness to perform maintenance.
Table: Stopper types, pros/cons, and ideal uses
Understanding stopper types helps readers choose the right drain solution for performance and maintenance. A concise comparison highlights trade-offs: ease of use, sealing reliability, and maintenance demands guide selection based on bathing habits and plumbing access.
| Stopper Type | Notes |
|---|---|
| Lift-and-turn | Simple, moderate seal, occasional removal for cleaning |
| Pop-up | Integrated lever, good seal, more complex repair |
| Trip-lever | Overflow-controlled, reliable seal, harder to service |
Table: Drain materials (brass, PVC, stainless) and longevity/cost
Brass, PVC, and stainless steel represent the most common bathtub drain materials, each balancing upfront cost, corrosion resistance, and expected service life. Selection depends on budget, plumbing chemistry, and desired longevity; brass lasts long but costs more, PVC is cheap and easy but less durable, stainless resists corrosion with moderate cost.
| Material | Longevity / Cost |
|---|---|
| Brass | 30+ years / High |
| PVC | 10–25 years / Low |
Long-Term Prevention and Best Practices
Long-term prevention focuses on simple habits—rinsing soap and hair from the tub after use, using a hair catcher, and avoiding grease or heavy residues down the drain—to reduce clogs and odors.
Regular upkeep with recommended tools like a plunger, drain snake, and enzymatic cleaner helps maintain flow without harsh chemicals.
Seasonal checks of seals, pop-up assemblies, and trap components, with timely replacement when wear appears, prevents failures and costly repairs.
Habits that reduce clogs and odors
While routine maintenance cannot eliminate every clog or odor, adopting a few simple habits greatly reduces their frequency and severity.
Regular removal of visible hair and debris after each use, flushing drains with hot water, avoiding grease and large solids, using a drain strainer, and addressing slow drainage immediately prevents buildup.
Consistent habits extend drain performance and minimize odors without invasive measures.
Recommended products and tools for upkeep
Several essential products and a few basic tools make ongoing bathtub drain upkeep simple and effective.
Recommended items include a silicone sink strainer, biodegradable enzyme drain cleaner, and nonabrasive tub cleaner.
Tools: a plumber’s snake for hair removal, a flathead screwdriver for stopper plates, adjustable pliers, and a small brush for trim cleaning.
Keep replacement washers and plumber’s grease on hand.
Seasonal checks and when to replace components
Regularly, homeowners should perform seasonal checks on bathtub drains to catch wear and minor issues before they become costly repairs.
Inspect the stopper, flange, and visible seals for corrosion, calcium buildup, and leaks. Test water flow and listen for slow drainage.
Replace rubber gaskets every 1–3 years, metal stoppers or flanges when pitted, and replace entire assemblies after persistent leaks or repeated repairs.
Troubleshooting Quick Reference
A compact symptom-action checklist helps identify common drain problems and the quickest corrective step for each.
The list pairs observable symptoms with simple actions—slow drain, trap clean; gurgling, vent check; leak, tighten or replace seal.
A short inventory of handy parts (washer, O‑ring, slip-joint nut, plunger) supports faster in-place repairs.
Symptom-action checklist for common scenarios
What to check first when a bathtub drain misbehaves: a concise symptom-action checklist helps isolate the cause and speed repairs.
Observe symptom, note odor, test flow, and inspect visible hardware. Then act per symptom.
- Slow draining: remove stopper, clear hair
- Gurgling: check venting
- Odor: clean trap
- Leak: tighten connections
- No drain: inspect stopper mechanism
Parts to keep on hand for fast fixes
After checking symptoms and performing simple tests, having a small stock of common replacement parts speeds repairs and prevents repeat trips to the store.
Essential items enable quick fixes and accurate diagnosis.
Typical stock includes:
- Rubber stopper or pop-up assembly
- Lift rod and pivot linkage
- Tailpiece and slip nuts
- Plumber’s putty and silicone
- Compression washers and O-rings
Conclusion
In conclusion, the bathtub drain is likened to a small river’s gatekeeper: its parts, from stopper to trap, steer water safely from tub to sewer. Understanding flow mechanics, installation basics, and common failures helps identify clogs, leaks, and worn seals before they worsen. Routine care, appropriate upgrades, and timely professional help preserve function and prevent damage. With attentive maintenance, the drain continues to guide water away efficiently, quietly protecting the home.