How to Bleed Heaters: Step-by-Step Guide to Remove Air and Restore Heat Quickly
To bleed your heaters and restore consistent heat, follow these steps: First, ensure the heating system is cool. Gather a bleed key, a cloth, and a container. Begin at the highest radiator, using the bleed key to turn the valve a quarter turn. Let air escape until steady water flows out, then close the valve. Wipe up any spills, repressurize the system to the recommended PSI, restart the boiler, and check all radiators for even warmth. Additional instructions cover variations, troubleshooting tips, and preventive measures to maintain optimal performance.
How to Bleed Heaters Quickly and Safely
The article explains when and why radiators require bleeding, emphasizing that trapped air reduces heating efficiency and creates cold spots.
It outlines common signs of air in the system — such as gurgling sounds, uneven warmth, and cool sections on the radiator.
Before proceeding, it lists essential safety precautions including turning off the system, allowing components to cool, and using appropriate tools and protective gear.
When and why you need to bleed radiators
Occasionally, radiators trap air that prevents hot water from circulating efficiently, causing uneven heat, cold spots, and higher energy use.
Bleeding radiators is required after system maintenance, installation, or prolonged shutdowns to restore performance.
Regular bleeding improves efficiency, reduces boiler strain, and prolongs component life.
Homeowners following clear how to bleed heaters steps prevent inefficiency and avoid premature repairs.
Signs of trapped air and cold spots
Cold patches and gurgling noises are common indicators that air has become trapped in a heating circuit.
Radiators showing cool upper sections while bottoms stay warm, irregular heating across multiple units, or intermittent system noise suggest air pockets.
Reduced heat output, longer warm-up times, and uneven room temperatures point toward trapped air requiring bleeding to restore consistent circulation and efficiency.
Safety precautions before you start
Before bleeding a heater, confirm basic safety steps: isolate the heating system by turning off the boiler and letting components cool, shut power to circulating pumps, and check manufacturer guidance for model-specific warnings.
Wear gloves and eye protection, release pressure gradually, and have a cloth and container ready.
Verify room ventilation, avoid hot surfaces, keep children and pets away, and know emergency shutoff locations.
Tools and materials required
A concise list of essential tools and materials establishes what is required to bleed a heater safely and effectively.
The discussion will separate mandatory items from optional tools that speed the job and note recommended protective gear.
This helps readers prepare at a glance before proceeding to procedures.
Essential tools checklist
Several basic tools and a few consumables are required to bleed most domestic radiator or baseboard heating systems safely and efficiently.
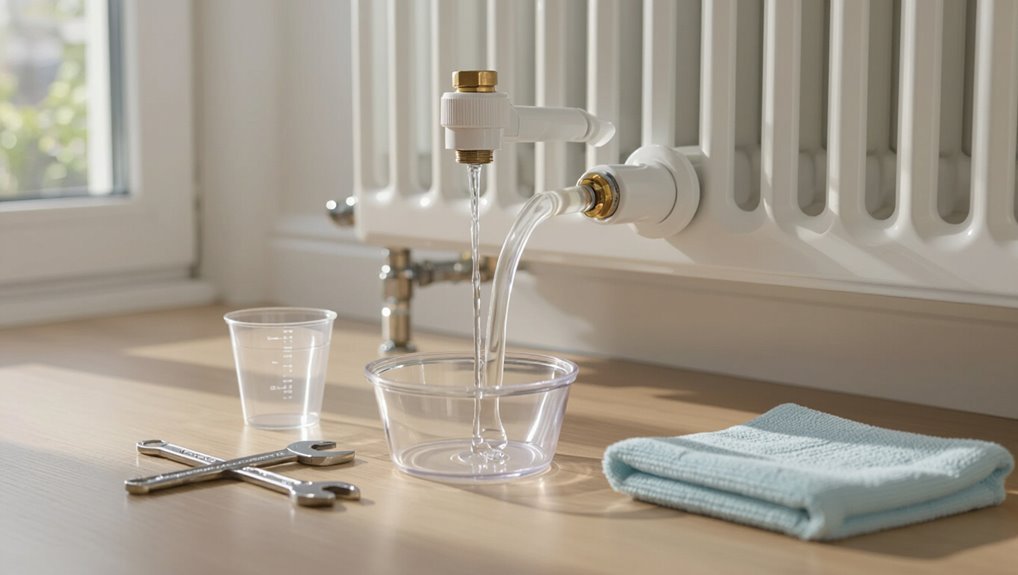
A compact bleed key or flat screwdriver, a small container to catch water, and a cloth for spills suffice. Protective gloves and eye protection are recommended.
Check for a working pressure gauge and know valve locations before starting.
- Bleed key or flat screwdriver
- Small catch container
- Clean cloth
Optional tools that speed up the job
Time-saving gadgets and a few extra consumables can make bleeding radiators quicker and less messy. A magnetic key, small bleed funnel, and absorbent cloth speed work, prevent spills, and gather trapped air efficiently.
Optional items reduce trips and cleanup while improving control. Practical choices shorten the job and protect surfaces.
- compact magnetic radiator key
- silicone bleed funnel
- microfiber drip cloth
Recommended protective gear
Personal protective equipment guarantees the bleeding process stays safe and clean. Recommended gear includes heat-resistant gloves, eye protection, and a long-sleeve shirt to prevent burns and splashes.
Closed-toe shoes protect feet from spills. A face shield is useful when pressure release is uncertain.
Disposable towels and a waterproof apron protect clothing and simplify cleanup, minimizing contamination and injury risk.
Preparing your heating system
Before any bleeding begins, the boiler should be switched off and the heating system isolated to prevent circulation.
The radiators are then located and their bleed valves identified so each can be accessed in turn.
Finally, system pressure and boiler settings are checked to verify they are within safe operating ranges.
Turning off the boiler and isolating the system
Shut down the boiler and isolate the heating circuit to guarantee safety and prevent water flow while bleeding radiators.
The technician switches off the boiler at the main control and closes the zone or radiator valves to isolate affected loops.
If fitted, the system’s isolation valves or lockshield valves are used.
Verify pump is off and allow pressure to stabilise before proceeding.
Locating radiators and identifying bleed valves
With the boiler off and the circuit isolated, the technician moves on to locate each radiator and identify its bleed valve.
They visually inspect radiators room by room, noting mains and return pipes, valve types and orientation.
The bleed valve—typically a small square or slotted screw at a top corner—is confirmed, and a drip tray and appropriate key or screwdriver are prepared before proceeding.
Checking system pressure and boiler settings
Confirm the boiler is powered down and the heating circuit isolated.
Then check the system pressure gauge on the boiler to verify it sits within the manufacturer’s recommended range—typically 1–1.5 bar when cold.
Inspect expansion vessel and pressure relief settings for faults.
Adjust filling loop to restore pressure if low, following manufacturer instructions.
Record settings, then wait and recheck pressure after bleeding to ascertain stability.
Step-by-step radiator bleeding procedure
The procedure begins by ensuring the system is cool and the necessary tools are assembled.
Technicians then work from the highest radiator downward, opening each bleed valve correctly and allowing trapped air to escape until water appears.
Each valve is closed afterward and any spills are wiped up to complete the process.
Step 1 Cool the system and gather tools
Before any work begins, allow the heating system to cool completely to prevent burns and check that the boiler is off and pressure has dropped to a safe level. Then gather tools: radiator key, cloth, container, adjustable wrench. Inspect valves and note system layout before proceeding.
| Item | Purpose |
|---|---|
| Radiator key | Open bleed valve |
| Cloth | Catch drips |
| Container | Collect water |
| Wrench | Adjust fittings |
Step 2 Start with the highest radiator
Having prepared tools and verified the system is cool, attention moves to the highest radiator in the property.
Begin there because trapped air collects at topmost points. Inspect for visible valves and access points, position a drip tray and cloth, and make certain a wrench or key is at hand.
Work methodically from top down to prevent air migrating upward during the procedure.
Step 3 Open the bleed valve correctly
Loosen the bleed valve a quarter to half a turn with a radiator key or appropriate wrench, turning slowly until a hissing sound indicates air escaping; once water begins to flow steadily, tighten the valve to stop the leak.
The technician watches pressure and valve condition, keeps a cloth ready for drips, and avoids over‑loosening to prevent damage or uncontrolled water loss while preparing to monitor fluid appearance next.
Step 4 Release air until water appears
Turn the bleed valve slowly until the escaping air hisses and then diminishes; the technician continues to open it in small increments, watching for a steady stream of water.
Once water flows consistently without spurting, air removal is complete.
The technician maintains a controlled grip, observes flow rate, and verifies no remaining sputtering indicates trapped air before proceeding to the next maintenance step.
Step 5 Close the valve and wipe up spills
Close the bleed valve firmly once a steady stream of water flows, taking care not to overtighten and damage the valve seat.
Use a cloth or small tray to capture drips, then dry the radiator surface and surrounding floor to prevent stains or slips.
Dispose of contaminated water properly and store tools.
Note any persistent leaks for professional inspection.
Step 6 Repressurize the system and check boiler
After bleeding radiators, restore system pressure and verify the boiler’s operation before considering the job complete. Refill the system via the filling loop to the recommended PSI, close valves, and restart the boiler. Check for pressure stability, leaks, and normal ignition cycles. Record readings and monitor for several minutes to confirm proper circulation and safety.
| Item | Action |
|---|---|
| Target PSI | Refill to spec |
| Check | Leaks |
| Observe | Ignition |
| Note | Record readings |
Step 7 Test each radiator and repeat if needed
With system pressure restored and the boiler running normally, each radiator should be checked individually to confirm full circulation and absence of trapped air.
The operator inspects for even warmth top-to-bottom, opens valves slightly, listens for gurgles and vents any remaining pockets.
Repeat bleeding where cold spots persist until stable heat distribution is achieved.
- Warm top, warm bottom
- No gurgling sounds
- Steady thermostat response
Bleeding different radiator types
Different radiator types require specific bleeding approaches to guarantee efficient heating.
Traditional panel and column radiators, modern flat-panel units, underfloor heating manifolds, and combo systems with towel rails each present distinct valve locations and access considerations.
The following section outlines the key steps and precautions for each type.
Traditional panel and column radiators
Traditional panel and column radiators require a straightforward bleeding approach because their vents are typically accessible and standardized.
A radiator key or flat screwdriver opens the bleed valve at the top until hissing stops and water appears.
Work from the highest radiator downward, isolate the system if instructed, collect spillage, and retop up boiler pressure.
Repeat until heat and circulation normalize.
Modern flat-panel radiators
Modern flat-panel radiators often have concealed or edge-mounted bleed valves that differ from the exposed valves on older models, so identifying the valve type and access point is the first step.
Once located, use the correct key or screwdriver, open slowly until air hisses, close when water appears, check for leaks, and top up system pressure if needed.
Underfloor heating manifolds
Underfloor heating manifolds require careful venting because trapped air can reduce flow and cause uneven floor temperatures; locate the manifold’s individual circuit bleeds—usually small screw or push-fit valves on the supply or return rail.
Open each slowly until a steady stream of water replaces the sputtering, then close and check the system pressure, topping up as necessary.
Confirm pump runs and test each zone for consistent warmth.
Combo systems and towel rails
After addressing manifold circuits, attention shifts to combo systems and towel rails, which often combine hot-water radiators with a domestic hot-water cylinder and may include ladder-style heated rails with integrated valves.
Bleeding requires isolating cylinder circuits, venting radiators first, then towel rails. Use correct bleed keys, purge pump if fitted, and check system pressure and thermostatic valve settings after removing trapped air.
Troubleshooting common problems
Common issues that can follow bleeding include radiators remaining cold, valves that produce no air or water, persistently low boiler pressure, and leaking bleed valves.
Each symptom points to different causes—trapped air, blocked valves, system leaks, or faulty fittings—and requires targeted checks.
The following section outlines how to identify each problem and the practical fixes to restore proper heating.
Radiator still cold after bleeding
If a radiator remains cold after bleeding, several causes should be checked before assuming the bleed was ineffective.
Confirm the valve is fully open, the lockshield setting allows flow, and the central heating system is running and at correct pressure.
Inspect for trapped air elsewhere, closed thermostatic radiator valves, or sludge buildup restricting circulation.
Call a professional if basic checks fail.
No air or water from the bleed valve
Check the bleed valve for obstruction and confirm the system pressure before assuming a fault; when no air or water emerges, the valve may be seized, capped, or located on a section of radiator isolated by a shut valve.
Inspect valve head with an appropriate key, gently loosen and tap to free it. Remove any caps, and verify adjacent isolation valves are open before further investigation or calling a technician.
Persistent low boiler pressure
Investigate persistent low boiler pressure by first confirming the reading on the pressure gauge and noting whether the drop is gradual or sudden.
Gradual declines typically indicate slow leaks or corrosion, while sudden losses suggest a burst pipe, failed pressure relief valve, or rapid leak.
Check visible pipework, radiators, and boiler fittings for leaks.
Inspect the expansion vessel and pressure relief components, and consult a qualified engineer for repairs.
Leaking bleed valves and how to fix them
Several common causes can make radiator bleed valves leak, including worn valve seats, loose or corroded fittings, trapped debris, or excessive system pressure; identifying the specific cause guides the appropriate remedy.
Inspect the valve, tighten connections, replace seals or the valve cartridge, flush debris, and test system pressure.
If corrosion or damage persists, replace the valve and consult a qualified technician to prevent recurrence.
When to call a professional
If bleeding does not resolve cold spots, persistent noises, leaks, or pressure loss, the problem may indicate faults beyond simple air removal.
In such cases, a qualified heating engineer should be called for diagnostic work, repairs, or component replacement.
Brief guidance on typical service costs and what to expect during a professional visit helps homeowners prepare.
Signs of system faults beyond bleeding
When should a homeowner stop blaming trapped air and call a professional?
Persistent cold spots after bleeding, loud banging or gurgling indicating pump or pipe faults, repeated pressure loss, visible leaks or corrosion, unexplained thermostat failures, and boiler lockouts signal deeper issues.
If basic bleeding and pressure topping fail, arrange professional diagnosis to prevent damage, inefficiency, or safety hazards.
Situations that require a heating engineer
Recognize the limits of DIY maintenance and call a heating engineer whenever bleeding and routine checks fail to restore normal operation or any sign points to complex faults. Professional intervention is advised for persistent cold radiators, strange noises, leaks, pressure loss, electrical issues, or gas-related concerns. Do not attempt complex repairs alone; a qualified engineer diagnoses, repairs, and guarantees safety and compliance.
| Symptom | Risk | Action |
|---|---|---|
| Cold radiators | System imbalance | Call engineer |
| Persistent noise | Pump or airlock | Inspect professionally |
| Leaks | Water damage | Shut off, call |
| Pressure loss | Boiler fault | Diagnose |
| Gas smell | Immediate danger | Evacuate, call |
Estimated costs and what to expect
A typical call-out for a heating engineer to bleed radiators or resolve related issues commonly ranges from a modest fixed fee for a single visit to higher charges when diagnostics, parts, or extended labour are required.
Homeowners should expect inspection, labour, and part costs; simple bleeds cost less, pumps or valves raise prices.
Emergency call-outs and warranty work affect final billing; obtain quotes and receipts.
Preventive maintenance to avoid trapped air
A routine preventive program reduces the likelihood of trapped air and maintains heater efficiency.
Recommended actions include a scheduled bleeding cadence, measures to limit air ingress such as checking expansion vessels and valve seals, and seasonal boiler servicing.
Adherence to these checks and timely professional servicing minimizes recurring air-related issues.
Regular bleeding schedule recommendations
Because trapped air gradually accumulates during normal operation, establishing a regular bleeding schedule prevents performance loss and extends system life.
Inspect radiators and zones monthly during heating season, increasing frequency to biweekly for older systems or after maintenance.
Record dates, actions, and pressure changes. Adjust intervals based on symptom recurrence and professional recommendations to maintain steady circulation and efficiency.
Tips to reduce air ingress into the system
Monthly or biweekly bleeding routines help catch air early, but preventing air from entering the system in the first place reduces the need for intervention.
Inspect for leaks, maintain correct system pressure, and keep fill valves tight. Use closed-loop expansion tanks and air vents, and purge newly installed sections thoroughly.
- Dripping joint specks on a pipe
- Shiny, pressurized gauge reading
- Technician opening an automatic vent
Seasonal checks and boiler servicing
When seasonal changes approach, homeowners and technicians should schedule thorough boiler servicing to prevent trapped air from compromising circulation. Regular inspections, pressure checks, valve lubrication, and system flushing reduce air buildup and prolong equipment life.
| Task | Frequency | Benefit |
|---|---|---|
| Pressure check | Annually | Stable circulation |
| Valve service | Annually | Prevent leaks |
| Flush | Every 3–5 years | Remove debris |
| Inspection | Biannually | Early issue detection |
Quick-reference bleeding checklist
A one-page action checklist summarizes the steps a homeowner should follow when bleeding radiators, including tools, safety checks, and step-by-step order.
It highlights common mistakes to avoid, such as overtightening valves, failing to repressurize the system, or ignoring cold spots.
The checklist is designed for quick reference during maintenance or emergency bleeding.
One-page action checklist for homeowners
Refer to this concise checklist to quickly and safely bleed home radiators or baseboard heaters:
locate thermostats and bleed valves, shut off the heating system or isolate the zone, gather a radiator key or screwdriver and a bowl/towel, open each valve slowly until air stops hissing and water appears, close valves securely, restore system pressure if needed, and check for leaks and even heat distribution before resuming normal operation.
- A warm hand testing each radiator
- A steady drip into a towel-lined bowl
- A closed valve with no escaping air
Common mistakes to avoid when bleeding radiators
Often overlooked, several simple errors can undermine the effectiveness of bleeding radiators and create mess or damage: homeowners should avoid common pitfalls to keep the system safe and efficient.
- Opening valves fully without a cloth — scalding water spurts, wet floors.
- Neglecting to turn off the boiler — pressure changes, noisy flow.
- Skipping pressure check — leaks, system imbalance.
Conclusion
In a world where a single trapped bubble can freeze an entire empire, bleeding heaters becomes heroic routine. With the right tools and steps, stubborn radiators surrender warmth like defeated villains, restoring cosy victory to every room. Skipping the process risks chilly chaos and thermostat tantrums; follow the guide, act quickly, and problems shrink to whispers. For anyone who values comfort, bleeding radiators is the small, dramatic act that saves winter.