How to Repair My Furnace: Step-by-Step Troubleshooting and Fixes for Common Problems
To effectively repair your furnace, start by diagnosing common issues with a systematic approach: check the thermostat settings, ensure power and breakers are functioning, and replace clogged filters. Listen for unusual noises, inspect the ignition, pilot, or flame sensor, and verify the airflow and duct condition. Use a multimeter to test the blower and limit switches. Always shut off power and gas before starting any repairs. If you detect gas smells, experience ignition failures, encounter major electrical faults, or have a sealed-combustion system, it’s best to call a professional. For detailed fixes and further guidance, continue reading below.
How to Repair My Furnace: Quick Overview and When to Call a Pro
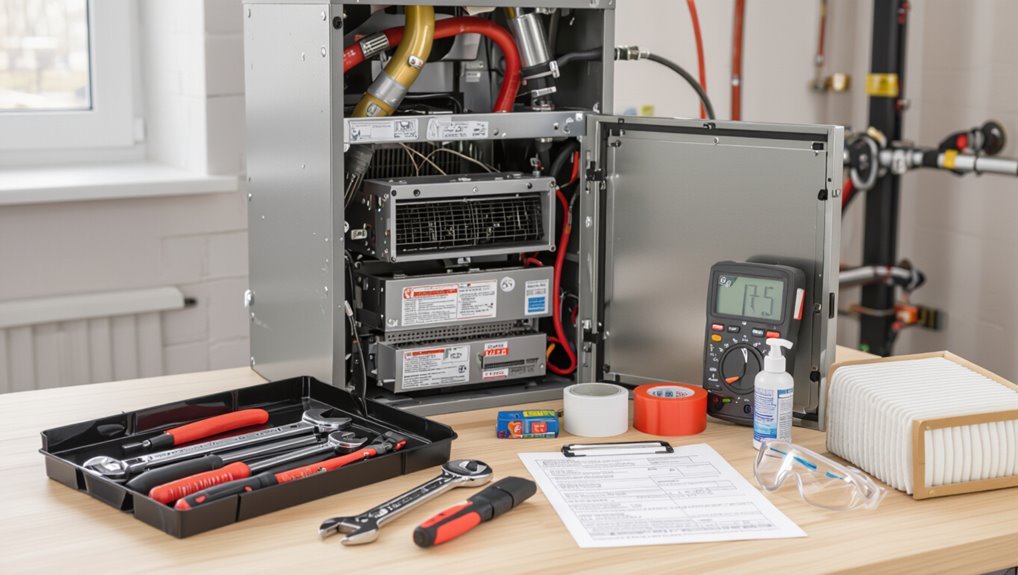
A concise checklist helps determine whether a homeowner can safely attempt a repair or should call a professional.
Typical repairs, their expected costs, and time estimates give context for when DIY is practical versus when the expense and complexity warrant hiring a technician.
Before any attempt, basic safety warnings and clear shutdown steps are required to prevent injury or equipment damage.
Fast checklist to determine DIY vs. professional repair
When should a homeowner attempt furnace repairs and when is it safer to call a professional?
A concise checklist: try basic steps from “how to repair my furnace” (thermostat, filters, power/reset).
Call a pro for gas smells, pilot/ignition failures, persistent electrical faults, unusual noises, or if working at height or with sealed combustion.
Prioritize safety and warranty considerations.
Typical costs and time estimates for common repairs
Following the checklist that separates simple homeowner tasks from jobs needing professional help, typical repair costs and timeframes help decide whether to proceed or call a technician.
Common fixes: thermostat recalibration or filter replacement—$20–$150, 15–60 minutes; ignition/ flame sensor—$80–$250, 30–90 minutes; motor or control board—$300–$1,200+, 1–4 hours.
Estimates vary by region, unit age, and parts availability.
Safety warnings and shutdown steps before any repair
Before any repair begins, homeowners must prioritize safety by fully shutting down power and fuel to the furnace and confirming zero energy sources remain.
Technicians should also ventilate the area, test for gas with a detector, and wait for cooling.
Lockout/tagout procedures, protective gloves and eyewear, and clear emergency exit access are mandatory.
If uncertainty exists, call a licensed HVAC professional immediately.
How Furnaces Work Basics Homeowners Should Know
A furnace’s major components—burner or heating element, heat exchanger, blower, thermostat, and safety controls—work together to generate and distribute heat.
Common furnace types include gas, electric, oil, and heat pump systems, each with distinct fuel sources, efficiency characteristics, and maintenance needs.
Homeowners should note that furnaces typically last 15–20 years and that rust, frequent repairs, uneven heating, and rising energy bills are common signs of age-related failure.
Key furnace components and their functions
Understanding a furnace’s main parts helps homeowners recognize how heat is generated, distributed, and controlled.
Key components include the burner or heating element, heat exchanger, blower motor, air filter, thermostat, ignition system, gas valve or electrical controls, flue or vent, and safety devices like limit switches and pressure switches.
Each part performs a specific role in safe, efficient operation and diagnosis.
Types of furnaces (gas, electric, oil, heat pump) and common differences
Having reviewed the furnace’s main parts and their roles, the discussion now moves to the different types of systems homeowners are likely to encounter: gas, electric, oil-fired furnaces, and heat pumps.
Gas and oil burn fuel to generate heat; electric uses resistive elements. Heat pumps transfer heat, offering heating and cooling.
Each differs in efficiency, installation needs, venting requirements, and typical maintenance tasks.
Typical lifespan and signs of age-related failure
Although furnaces vary by type and usage, most residential units exhibit predictable lifespans—typically 15–30 years for gas and oil furnaces, 15–20 years for electric resistance units, and 10–25 years for heat pumps—after which age-related failures become increasingly likely.
Common signs include rising energy bills, frequent cycling, weak airflow, strange noises, more repairs, yellow burner flames (gas), rusted heat exchangers, and recurring thermostat faults.
Step-by-Step Troubleshooting Process
A clear troubleshooting process begins with an initial inspection that notes visible issues, unusual sounds, smells, and precise symptom timing.
The technician then follows a diagnostic sequence—check power and breakers, verify thermostat settings, assess airflow, evaluate ignition and fuel delivery, and inspect exhaust—while recording findings at each step.
Essential tools and materials for basic diagnostics include a multimeter, manometer or pressure gauge, screwdrivers, flashlight, filters, and safety gear.
Initial inspection: what to look for and how to document symptoms
Begin the inspection by observing the furnace from a distance and noting any obvious signs of malfunction—unusual noises, visible soot or corrosion, water leaks, or unexpected cycling.
Record model, serial, date, ambient conditions, and symptom onset.
Photograph affected areas, note odor, flame color if visible, error codes, recent service history, and any temporary fixes applied to create a clear baseline for diagnosis.
Diagnostic sequence: power, thermostat, airflow, ignition, fuel, exhaust
With a documented baseline in hand, the technician proceeds through a fixed troubleshooting order: power, thermostat, airflow, ignition, fuel, and exhaust.
Each step verifies normal operation before moving on: confirm electrical supply and switches; verify thermostat settings and signals; inspect filters, ducts, and blower; observe ignition sequence and flame; check fuel delivery and pressure; assess venting and carbon monoxide paths for blockages or leaks.
Tools and materials you’ll need for basic diagnostics
Several essential tools and a few consumable materials equip a technician to perform basic furnace diagnostics safely and efficiently.
A multimeter, clamp meter, and non-contact voltage tester confirm electrical integrity. Refrigerant gauges aren’t needed for gas furnaces; instead, a manometer and combustion analyzer assess draft and burner performance.
Basic hand tools, flashlights, HVAC gloves, replacement fuses and wire nuts complete the kit for common checks.
Common Furnace Problems and How to Fix Them
Common furnace problems include failure to start, running without producing heat, frequent on-off cycling, weak or no airflow, and abnormal noises such as banging, squealing, or rattling.
Each issue typically stems from a limited set of causes—electrical or thermostat faults, ignition or fuel delivery issues, airflow restrictions, or mechanical wear.
The following sections identify likely causes and provide targeted, practical fixes for each problem.
Furnace won’t turn on
When a furnace fails to start, initial checks should focus on thermostat settings, circuit breakers, and external power switches to rule out simple electrical issues.
For gas furnaces, resetting the control board and pilot assembly can often restore operation after a fault.
If those steps do not work, replacement of a malfunctioning thermostat or control board may be necessary.
Checking thermostat settings, breakers, and power switches
Begin by confirming that the thermostat is set to “heat,” the temperature is above the current room temperature, and the fan control is on “auto” rather than “on.”
Next, inspect the furnace power switch, nearby service switch, and circuit breaker for tripped positions.
Replace dead thermostat batteries.
Restore any tripped breaker, toggle switches off and on, then recheck thermostat settings before testing furnace operation.
Resetting the furnace control board and pilot (gas furnaces)
Resetting the furnace control board and pilot is a common troubleshooting step for gas units that fail to ignite. It clears electronic faults and restarts the ignition sequence so the system can be evaluated afresh.
Follow manufacturer reset steps: turn off power and gas, wait, restore power, and relight the pilot per instructions.
Observe LEDs and listen for ignition attempts; if unsuccessful, record error codes for technician review.
Replacing a faulty thermostat or control board
If a control-board reset and pilot relight do not restore operation, the problem may lie with the thermostat or the furnace control board itself.
Test the thermostat by substituting a known-good unit or measuring 24VAC at the furnace terminals.
If the board fails diagnostics or shows burnt components, replace it per manufacturer instructions, label wiring, disconnect power, and verify operation after installation.
Furnace turns on but won’t heat
When the furnace runs but produces no heat, the inspection should begin with the pilot light or electronic ignition to confirm proper spark or flame.
Next, the gas valve and supply must be tested with appropriate safety precautions to guarantee fuel is reaching the burner.
If ignition occurs but the system still fails, a faulty flame sensor or igniter is likely and can be diagnosed and replaced following manufacturer guidelines.
Inspecting the pilot light or electronic ignition
A malfunctioning pilot light or electronic ignition is a common reason a furnace will power on but fail to produce heat.
Inspect visually: pilot should burn steady blue; replace glass shield if obscured.
For electronic ignitions, check for visible damage or loose connectors and verify control board signals.
Clean soot and debris, follow manufacturer instructions, and replace faulty components as needed.
Testing the gas valve and gas supply (safety precautions)
Begin by shutting off power to the furnace and closing the gas shutoff valve at the appliance to eliminate ignition and leak hazards before any testing begins.
Verify no odor of gas; if present, evacuate and call the gas company.
Use a manometer or multimeter per manufacturer instructions to check inlet pressure and valve actuation.
Wear PPE and work in well-ventilated conditions.
Diagnosing a failed flame sensor or igniter and replacement steps
Diagnosing a failed flame sensor or igniter requires systematic checks to distinguish ignition-system faults from control or gas-supply issues.
Inspect and clean the flame sensor with emery cloth; test continuity with a multimeter.
Observe the igniter for cracks or glow failure; test resistance per manufacturer.
Replace the faulty component, reassemble, restore power and gas, then confirm proper ignition and stable flame.
Furnace cycles on and off frequently (short cycling)
Short cycling often stems from restricted airflow or a failing blower motor, so technicians begin by checking the air filter and vents for clogs and inspecting the blower assembly.
They also test limit switches and evaluate thermostat placement to rule out false temperature readings.
Simple fixes frequently include replacing a clogged filter and cleaning or clearing vents to restore proper airflow.
Checking air filter, airflow restrictions, and blower motor
Inspecting the air filter, examining airflow pathways, and evaluating the blower motor are essential steps when a furnace cycles on and off frequently.
Replace or clean a dirty filter, clear obstructed vents and return grilles, and confirm ductwork is unobstructed.
Listen for blower noise, check motor capacitor and bearings for wear, and verify proper fan speed and operation before proceeding to electrical or safety control diagnostics.
Testing limit switches and thermostat placement
Begin by locating the furnace’s high-limit switch and any rollout or secondary limit sensors. Then test them with a multimeter to confirm continuity when the system is cool and open when overheated.
Inspect mounting and wiring for damage or corrosion.
Verify thermostat placement away from drafts, direct sunlight, or heat sources and guarantee proper height and calibration to prevent false cycles.
Replacing clogged filters and cleaning vents
After confirming limit switches and thermostat placement are functioning and correctly located, attention should turn to airflow restrictions that commonly cause frequent on-off cycling.
Inspect and replace clogged filters with correctly rated new ones. Clear returns and supply vents of dust and obstructions.
Vacuum registers and clean ducts where accessible. Improved airflow reduces heat buildup, prevents short cycling, and restores efficient furnace operation.
Weak or no airflow from vents
Weak or no airflow from vents often stems from clogged filters, obstructed ducts, or closed registers, so inspecting filters, ductwork, and vents is the first step.
If filters and ducts are clear, the blower motor or capacitor should be tested and, if faulty, replaced following manufacturer instructions or a step-by-step guide.
If airflow remains poor despite those checks, the heat exchanger or duct integrity may be compromised and professional inspection and duct repair are recommended.
Inspecting air filters, ductwork and vents
Inspecting air filters, ductwork, and vents pinpoints the most common causes of weak or no airflow from a furnace: clogged filters, obstructed or leaky ducts, and closed or blocked supply vents.
Technicians check filter condition and replace if dirty, inspect visible ducts for gaps or crushed sections, and verify all vents are open and unobstructed.
Sealing leaks and clearing blockages restores proper circulation.
Testing blower motor and capacitor; how to replace them
Diagnose the blower assembly and capacitor next when airflow problems persist despite clean filters and clear ducts.
Power off, then inspect motor for burn, wobble, or debris.
Test capacitor with multimeter (microfarads) after discharge; replace if outside tolerance.
Check motor windings and bearings; replace motor if faulty.
Reinstall correct-rated capacitor, secure wiring, and verify blower operation before restoring panels.
When to check the heat exchanger or call for duct repair
When airflow remains poor after confirming blower and filter issues, it may be time to examine the heat exchanger for blockages or call a technician to evaluate the ductwork for leaks and restrictions.
A cracked or clogged heat exchanger reduces flow and poses safety risks; sealed, insulated, and unobstructed ducts guarantee balanced distribution.
Professional inspection and targeted repair restore performance and safety.
Unusual noises (banging, squealing, rattling)
Unusual furnace noises—banging, squealing, or rattling—often point to specific components such as burners, the blower assembly, belts, or worn bearings.
Simple fixes include lubrication, belt replacement, and securing loose parts. However, persistent or sharp sounds can signal serious problems like a cracked heat exchanger.
The following guidance helps identify the noise source and determine when professional inspection is required.
Identifying noise source: burners, blower, belts, bearings
Start by isolating the sound—note whether it occurs at startup, during steady operation, or when the thermostat cycles—so the likely source can be narrowed to burners, the blower, belts, or bearings.
Listen location: front (burners/combustion chamber), cabinet or ductwork (blower), or motor area (belts/bearings).
Match sound character—bang, rattle, squeal—to probable component before further inspection.
Lubrication, belt replacement, and securing loose parts
Inspecting and addressing lubrication, belt wear, and loose components resolves many common furnace noises by restoring smooth mechanical operation.
Technicians check bearings and motor shafts for dry or contaminated oil ports, apply proper lubricant sparingly, inspect belts for fraying or glazing, replace worn belts and adjust tension, and tighten or secure panels, mounting bolts, and duct connections to eliminate squeals, rattles, and banging.
When noises indicate serious issues like cracked heat exchanger
When persistent banging, popping, or metallic cracking sounds accompany a decrease in heat output or the smell of exhaust, they can signal a cracked heat exchanger—an urgent safety and performance issue.
Immediate actions: shut off the furnace, ventilate the area, and avoid using it.
Arrange professional inspection and replacement; continuing operation risks carbon monoxide leaks, fire hazards, and irreversible damage to the furnace and home.
Strange smells (gas, burning, mildew)
Strange odors from a furnace can indicate serious issues that require prompt attention.
A persistent gas smell warrants immediate evacuation, calling the gas provider or emergency services, and checking for leaks with a soap solution or a certified inspector.
Burning odors should prompt an electrical and dust inspection, while moldy or musty smells call for duct cleaning and investigation of moisture sources.
Gas odor emergency actions and leak detection
Any detectable smell of natural gas or propane near a furnace should be treated as an immediate emergency: evacuate occupants, avoid sparks or flames, and move a safe distance away.
From outside, shut off the gas supply if trained and able. Call emergency services and the gas utility.
Do not re-enter until professionals confirm safety; document observations for responders.
Burning smells: electrical vs. dust inspection steps
A brief burning odor from a furnace often stems from two main causes: accumulated dust heating on burners or filters, or an electrical component overheating.
Inspect visually for dust buildup, burned debris, or soot; check and replace filters.
Smell near the blower, motor, control board, and wiring for hot-electrical scent.
If electrical overheating is suspected, power down and call a qualified technician.
Moldy smells: duct cleaning and moisture source checks
While burning odors usually point to dust or electrical heat, a persistent musty or moldy smell typically indicates moisture and biological growth within ducts or components.
Technicians should inspect condensate lines, drip pans, humidifiers and roof or crawlspace leaks.
Recommend professional duct cleaning, HEPA filtration, mold remediation if present, and correct ventilation or dehumidification to prevent recurrence and protect indoor air quality.
Pilot light or ignition problems specific to gas furnaces
Pilot light and ignition failures are common in gas furnaces and often stem from a faulty thermocouple/thermopile or a worn igniter.
Technicians begin by cleaning and testing the thermocouple/thermopile to guarantee it senses flame and allows the gas valve to stay open.
If the igniter is cracked or weak, replacing it and reestablishing a proper, stable flame restores reliable ignition.
Cleaning and testing the thermocouple/thermopile
Inspecting and maintaining the thermocouple or thermopile is a key step when addressing pilot light or ignition issues in gas furnaces.
Visually check for soot, corrosion, or misalignment. Clean gently with fine sandpaper or emery cloth, avoiding damage.
Test voltage with a multimeter: thermocouples ~25–30 mV, thermopiles higher.
Replace if readings are absent, unstable, or below specification.
Replacing the igniter and reestablishing proper flame
Replace the igniter when it is cracked, brittle, or fails to produce a consistent spark or glow, since a faulty igniter prevents reliable ignition and can leave the furnace unable to light.
Power off, remove access panel, note wiring and bracket orientation, disconnect and replace with correct OEM part, secure wiring, restore power, test ignition cycles, observe stable flame and proper sensor response.
Thermostat not controlling temperature correctly
When a thermostat fails to hold the set temperature, simple fixes often resolve the issue: recalibrating the sensor, reprogramming schedules, or replacing worn batteries.
If problems persist, upgrading to a smart thermostat can improve accuracy and energy management, but proper wiring and compatibility with the furnace control board must be confirmed.
A brief checklist of calibration steps, battery replacement, and wiring considerations helps determine whether a homeowner can proceed or should call a technician.
Recalibrating, reprogramming, and replacing batteries
Calibrating a thermostat, updating its programming, or changing its batteries can resolve many issues where the furnace fails to maintain the set temperature.
Verify accuracy with a separate thermometer, adjust offset per manufacturer instructions, reset schedule and hold settings, and guarantee firmware is current.
Replace alkaline batteries annually or when low-battery alerts appear.
After changes, observe cycle behavior and confirm stable temperature control.
Upgrading to a smart thermostat and wiring considerations
If thermostat adjustments, firmware updates, and fresh batteries still leave temperature control unreliable, upgrading to a smart thermostat can offer better sensing, scheduling, and remote diagnostics.
Compatibility with existing furnace wiring must be verified—common C‑wire requirements or included adapters. Proper voltage, fan control, and heat/cool staging should match the furnace.
Professional installation is recommended when wiring or control logic differs.
Preventive Maintenance to Avoid Future Repairs
A concise seasonal maintenance checklist helps prevent many common furnace failures by scheduling filter changes, burner cleaning, and vent inspections at appropriate intervals.
Clear guidance on how and when to change filters, clean burners, and inspect vents reduces wear and maintains efficiency.
A recommended professional tune-up every 1–2 years, outlining tasks such as combustion analysis, safety checks, and thermostat calibration, completes the preventive plan.
Seasonal maintenance checklist
Because seasonal wear accumulates quietly, a concise maintenance checklist helps prevent minor issues from becoming costly breakdowns.
- Verify thermostat calibration and batteries.
- Inspect electrical connections for corrosion or looseness.
- Test safety controls and ignition sequence.
- Check for unusual vibrations, noises, and condensate drainage.
How and when to change filters, clean burners, and inspect vents
When routine filter changes, burner cleaning, and vent inspections are performed on a scheduled basis, a furnace maintains efficiency, reduces the risk of breakdowns, and extends component life.
Change disposable filters every 1–3 months, washable filters monthly. Clean burners annually or when soot appears; inspect flame color.
Check vents and flues seasonally for blockage, corrosion, or loose connections; clear obstructions promptly.
Recommended professional tune-up frequency and what it includes
Regular professional tune-ups every 12 months—more often for older systems or high-use environments—help identify wear, optimize efficiency, and prevent costly failures.
Technicians inspect heat exchanger, burners, ignition, safety controls, and airflow; clean components; calibrate thermostats; test combustion and carbon monoxide; replace filters and worn parts; and provide a written report with recommended repairs and efficiency improvements to extend service life and maintain safe operation.
Parts, Tools, and Cost Estimates
The section outlines common replacement parts (filters, igniters, thermostats, motors) and their typical price ranges to help set expectations.
It also lists essential tools a homeowner should have for basic repairs and safety.
Finally, it explains how to source reliable parts and confirm compatibility using model numbers and supplier documentation.
Common replacement parts and typical prices
A handful of common furnace components—filters, ignition modules, thermostats, blower motors, and gas valves—account for most homeowner repairs and will largely determine parts and labor costs. Typical retail ranges: filters $5–$30, ignitors $30–$120, thermostats $20–$250; motors and valves cost more. Quick reference:
| Part | Typical Price | Notes |
|---|---|---|
| Filter | $5–$30 | Disposable or washable |
| Ignitor | $30–$120 | Model-specific |
| Thermostat | $20–$250 | Non-programmable to smart |
Essential tools for homeowner repairs
Equipped with an understanding of common replacement parts and their price ranges, a homeowner can assemble a basic toolkit that covers most small furnace repairs.
Essentials balance cost and function: durable hand tools, diagnostic meters, replacement fasteners, safety gear. Estimated starter cost ranges $75–$200 depending on quality and needs.
- Screwdrivers, nut drivers, pliers
- Multimeter, manometer
- Replacement screws, wiring connectors
- Gloves, goggles, mask
How to source reliable parts and verify compatibility
Where should replacement parts come from, and how can a homeowner confirm they fit before purchase?
Homeowners should source OEM parts from authorized dealers or reputable HVAC suppliers; cross-reference model and serial numbers, part numbers, and schematics.
Verify compatibility via manufacturer databases, online parts catalogs, or dealer confirmation.
Prefer new over refurbished for safety; retain receipts and return policies for warranty and fit issues.
Safety, Codes, and When Not to DIY
The article emphasizes strict gas safety procedures and the carbon monoxide risks associated with furnace work, including the need for leak checks and functioning detectors.
It notes that local building codes and permits often apply to major repairs or system replacements and must be checked before starting work.
It lists clear warning signs — unexplained gas smells, persistent CO alarm activation, flame instability, or severe combustion problems — that require immediate professional intervention.
Gas safety procedures and carbon monoxide risk
Because furnaces that burn natural gas or propane can produce carbon monoxide (CO) when combustion is incomplete, strict gas safety procedures are essential before attempting any repair.
Technicians should shut off fuel supply, ventilate the area, use calibrated CO detectors, and verify combustion and venting.
Suspected leaks or persistent CO readings require immediate evacuation and licensed professional intervention; do not attempt complex gas work DIY.
Local code considerations and permits for major work
When major furnace work is planned, local building codes and permitting requirements determine what can be done legally and safely. Homeowners and technicians must confirm jurisdictional rules before starting.
Codes govern venting, combustion air, fuel connections, electrical modifications and appliance replacement.
Permits, inspections and licensed contractor requirements protect occupants and guarantee compliance.
Failure to follow regulations can result in fines, voided warranties and unsafe installations.
Signs that require immediate professional intervention
If gas odors, visible flames outside the burner area, persistent carbon monoxide detector alarms, heavy soot or yellow instead of blue pilot flames appear, immediate professional intervention is required to protect occupants and comply with codes.
Trained technicians must address suspected gas leaks, combustion irregularities, electrical faults, and damaged venting.
Homeowners should shut off equipment, evacuate, and call emergency service or a licensed HVAC professional.
Troubleshooting Examples and Step-by-Step Repair Scenarios
The following examples present concise troubleshooting and repair sequences for common furnace faults.
They cover a full diagnostic walkthrough for a unit that refuses to start, steps to resolve short cycling caused by a dirty filter including cleanup and verification, and testing plus replacement procedures for an electric furnace element that produces no heat.
Each scenario emphasizes clear checks, required tools, and safe execution.
Example 1: Furnace won’t start full diagnostic walkthrough
Begin by establishing the symptom: a furnace that refuses to start despite thermostat demand and power present.
The technician checks thermostat settings, circuit breakers, and furnace switch.
Next, inspect the filter, flame sensor, ignition module, and gas valve.
Verify blower motor function and error codes on the control board.
Replace or service faulty components, restore power, and confirm safe operation and heat delivery.
Example 2: Short cycling due to dirty filter cleanup and verification
Diagnose short cycling by confirming rapid on-off cycles under thermostat call for heat while noting a visibly clogged air filter as a likely cause.
Power off furnace, remove and inspect filter, and replace with correct size and MERV rating.
Restore power, run several heat cycles, and monitor runtime.
If short cycling stops, document filter change interval; if not, escalate to blower or control board inspection.
Example 3: No heat from electric furnace element testing and replacement
Inspecting an electric furnace element begins with confirming a lack of heat output while the blower runs and the thermostat calls for heat.
Then shut power, open access, visually inspect elements for breaks or discoloration, and test continuity with a multimeter.
Replace faulty elements, verify proper resistance values, reassemble, restore power, and test system operation and safety cutouts before returning to normal service.
Tips to Improve Furnace Efficiency and Longevity
Smart thermostats and zoning strategies can cut run time and target heat where it’s needed most.
Proper airflow, balanced humidification, and sealed ductwork maintain efficient heat transfer and reduce cycling.
Simple habits—regular filter changes, moderate temperature setbacks, and prompt attention to unusual noises—lower wear and energy costs.
Smart thermostat and zoning tips for efficiency
When a thermostat can learn household patterns and control temperature by zone, the furnace runs less often and energy use drops.
Pairing a programmable, Wi‑Fi–enabled thermostat with zoning dampers or multiple thermostats directs heat only where it’s needed, reduces cycling, and extends equipment life.
Proper setup includes scheduling, setback limits, and sensible temperature differentials.
Professional calibration guarantees sensors, dampers, and control logic operate reliably.
Airflow optimization and humidification balance
After configuring thermostats and zoning, attention shifts to airflow and humidity, which directly affect combustion efficiency, heat distribution, and component wear.
Inspect and clean ducts, seals, and blower; adjust fan speeds to match duct capacity.
Maintain indoor relative humidity between 30–50% to reduce corrosion and static while preventing condensation.
Balance humidifier output with ventilation to protect heat exchanger and sustain efficient operation.
Simple habits that reduce wear and energy bills
Adopt a few consistent habits to cut furnace wear and lower energy bills: change filters on schedule, keep vents and registers unobstructed, and program thermostats for gradual temperature shifts to reduce cycling.
Routine tasks extend lifespan and lower consumption.
- Replace filters every 1–3 months.
- Seal duct leaks and insulate.
- Maintain clear airflow around unit.
- Schedule annual professional tune-ups.
Conclusion
Like a seasoned mechanic closing a well-worn toolbox, the homeowner who learns furnace basics and careful troubleshooting holds winter at bay. Small fixes—cleaned filters, tightened wires, reset controls—act as stitches mending a tired system; knowing the limits signals when to summon a pro. With steady maintenance and mindful safety, the furnace hums like a dependable friend, stretching its life and warming the house through many cold mornings to come.