How to Hide a Sump Pump: 10 Stylish, Practical Ways to Conceal It Without Sacrificing Access
To effectively hide a sump pump in your finished basement while ensuring easy access, consider using ventilated, removable enclosures and cleverly designed furniture. Options include louvered utility closets, decorative cabinets with quick-release panels, faux benches with hinged tops, or discreet screens. It’s crucial to use moisture-resistant materials and allow for airflow with grilles, as well as ensure clearances for float switches and cords for safety and maintenance. Read on for practical design ideas, material suggestions, and an installation checklist.
Why You Might Want to Hide a Sump Pump Without Sacrificing Access
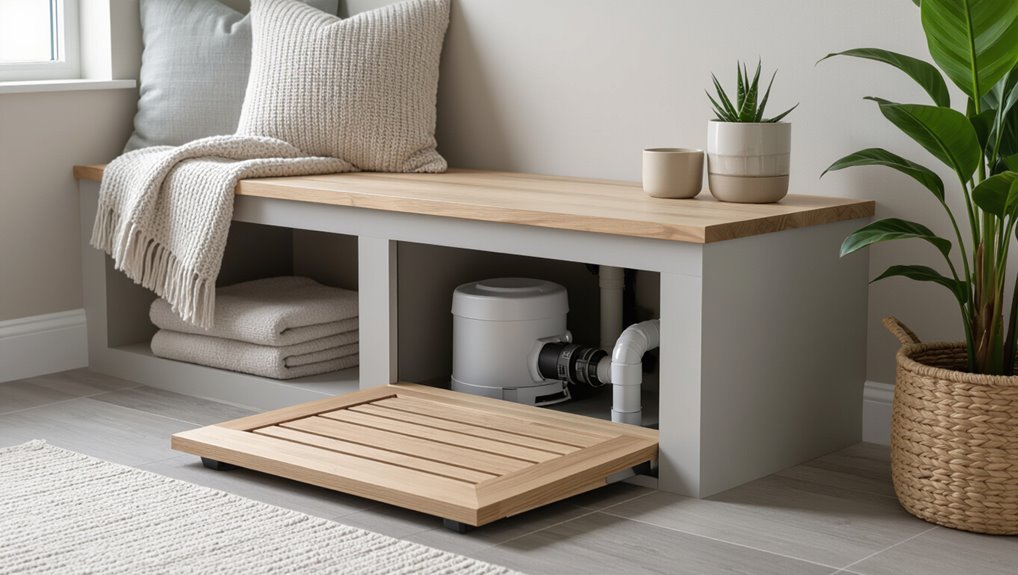
Visible sump pumps can clash with finished basements or utility rooms and may interfere with usable space.
Proper concealment should preserve clear access for routine maintenance, emergency inspection, and adherence to local electrical and plumbing codes.
Safety concerns—ventilation, moisture management, and unobstructed float switch operation—must guide any hiding solution.
Common aesthetic and functional concerns with visible sump pumps
Although often tucked into basements or utility closets, a sump pump can draw unwanted attention because its exposed basin, discharge piping, and electrical cords clash with finished spaces. Homeowners worry that this industrial look undermines room aesthetics, reduces resale appeal, and creates an impression of dampness or neglect.
Practical concerns include noise, accidental damage, and access for service. Guides on how to hide sump pump should balance concealment with functionality.
Safety, maintenance, and code considerations when concealing equipment
Several practical reasons justify concealing a sump pump while keeping it accessible: protection from accidental damage, reduction of noise, and improved basement aesthetics, all without compromising emergency readiness.
Compliance with local codes, ventilation, access panels, and unobstructed float switch operation remain essential.
Routine inspection, easy electrical disconnects, and corrosion-resistant materials guarantee safe, reliable performance when hidden behind cabinetry or enclosures.
Quick Considerations Before Concealing a Sump Pump
Before concealing a sump pump, one should confirm measurements, access points, and required service clearances to guarantee maintenance remains possible.
Consideration must also be given to ventilation, moisture control, and safe electrical access to prevent malfunctions or hazards.
Finally, local building codes and insurance rules should be reviewed to avoid violations or coverage issues.
Measure, access points, and service clearance requirements
Proper planning begins with accurate measurements and clear access points to secure a sump pump can be concealed without compromising serviceability.
Measure basin diameter, pump height, and discharge piping path. Identify removable panels or hinged doors for routine inspection.
Maintain manufacturer-recommended clearance around the unit and guarantee unobstructed access for removal, repair, and float switch operation.
Mark locations before building enclosures.
Ventilation, moisture, and electrical access needs
Consider ventilation, moisture control, and electrical access as interdependent requirements when concealing a sump pump: adequate airflow prevents heat buildup and condensation, moisture-resistant materials and drainage keep enclosures from deteriorating, and accessible, code-compliant electrical connections (including GFCI protection and a readily reachable disconnect) guarantee safe operation and servicing.
Confirm vents, removable panels, sealed seams, corrosion-resistant finishes, and clear conduit paths for inspections and repairs.
Local building codes and insurance implications
Attention to ventilation, moisture control, and electrical access naturally leads to questions about compliance and liability when a sump pump is concealed.
Homeowners should verify local building codes, permitting, and required clearances. Insurers may require unobstructed access and documented maintenance; concealment that impedes function could risk denied claims.
Consult local authorities and insurance providers before enclosing a pump to guarantee coverage and code compliance.
10 Stylish, Practical Ways to Conceal a Sump Pump
The following options balance aesthetics and access for concealing a sump pump while keeping maintenance straightforward.
Consider these practical coverings:
- Decorative cabinet with removable panels
- Built-in utility closet with louvered door
- Faux storage bench with hinged top
- Custom shelving unit with concealed compartment
Each option can be tailored to the space, and a decorative screen or room divider offers a non-permanent alternative.
Decorative Cabinet with Removable Panels
A decorative cabinet with removable panels can be built from moisture-resistant materials such as PVC, marine-grade plywood, or metal to withstand basement conditions.
Adequate ventilation—using louvered panels, perforated sections, or concealed vents—must be incorporated to prevent overheating and allow condensate evaporation.
Practical hinge and access designs, including quick-release panels or piano hinges with removable pins, balance ease of maintenance with a finished appearance.
Materials, ventilation options, and hinge/access design
Select materials that balance moisture resistance, durability, and aesthetics when designing a decorative cabinet with removable panels to conceal a sump pump.
Choose marine-grade plywood or PVC board, sealed with waterproof paint.
Include ventilated louvered panels or discreet grille openings for airflow.
Use corrosion-resistant hinges, quick-release pins or magnetic catches for tool-free access, and rubber gaskets to minimize vibration and water intrusion.
Built-In Utility Closet with Louvered Door
A built-in utility closet with a louvered door requires careful layout planning to guarantee the sump pump, battery backup, and access clearances fit without obstructing maintenance.
Selection of door types—fixed louver, operable louver, or ventilated solid—affects airflow and sound control while preserving a finished look.
Passthroughs for piping should be positioned and sealed to allow service access and prevent moisture or pest entry.
Layout planning, door types, and passthroughs for piping
Plan the utility closet with circulation, access, and plumbing in mind: position the sump basin, pump, and discharge piping to allow straight runs where possible, leave clearance for service and replacement, and route electrical and control lines separately from wet areas.
Choose louvered or slatted doors for ventilation, use removable panels or dedicated passthroughs for discharge and cleanouts, and confirm seals prevent drafts while allowing quick maintenance.
Faux Storage Bench or Seating with Hinged Top
A faux storage bench with a hinged top can disguise a sump pump while serving as seating, but the designer must account for load capacity to prevent damage or restricted access.
Waterproofing the interior and using moisture-resistant materials will protect the pump and bench from condensation and spills.
Quick-access latches or gas struts should be incorporated so the pump remains easily reachable for inspection and maintenance.
Load considerations, waterproofing, and quick-access latches
Consider load limits, waterproofing measures, and access mechanisms when designing a faux storage bench to conceal a sump pump: the bench must support expected seating and storage loads without transferring stress to the pump housing.
Incorporate a watertight base and sealed seams or a removable drip tray to protect electronics, and include a quick-access hinged top with secure but easily operable latches for routine inspection and emergency retrieval.
The structure should isolate vibrations, use corrosion-resistant hardware, and allow clearances for ventilation and piping while keeping latch operation intuitive under low light.
Custom Shelving Unit with Concealed Compartment
A custom shelving unit can hide a sump pump while keeping access and ventilation in mind.
Thoughtful shelf placement and removable panels allow the pump to be reached for maintenance without dismantling the whole unit.
Discreet cable routing and clearances for hoses reduce tripping hazards and maintain a tidy appearance.
Shelf placement, removable panels, and cable routing
Place shelving so it balances concealment with access: shelves should sit high enough to hide the pump when the removable panel is in place but low enough to allow clear room above the sump for maintenance.
Removable front panels should latch securely yet detach easily.
Route power and discharge lines through discrete, accessible channels with strain relief and labeled connections, keeping cords off the floor and away from moisture.
Decorative Screen or Room Divider
A decorative screen or room divider can provide a portable, non-permanent way to hide a sump pump while maintaining access for maintenance.
Choosing moisture-resistant materials like treated wood, metal, or plastic panels helps prevent rot and corrosion in damp basements.
The design should allow ample airflow—slatted panels or cutouts—to avoid trapping moisture or overheating the pump.
Portable options, moisture-resistant materials, and airflow
Consider lightweight folding screens or rolling room dividers that can be repositioned for maintenance while shielding the sump pump from view. Selecting models with removable panels simplifies access.
Use moisture-resistant materials like PVC, treated wood, or powder-coated metal to prevent degradation.
Guarantee adequate airflow with slatted designs or ventilated panels to avoid trapping humidity and allow heat dissipation, preserving pump performance and preventing mold.
Raised Platform with Skirted Covering
A raised platform with a skirted covering can elevate the sump pump for easier access while disguising it from view.
Attention should be paid to platform stability and materials that resist moisture and rot.
Choosing durable skirt fabrics and including removable panels guarantees maintenance access without sacrificing appearance.
Platform stability, skirt materials, and removable panels
Make certain the raised platform sits level and securely anchored to prevent wobble or sag under the pump’s weight and vibration.
Use pressure-treated wood, composite decking, or sealed marine plywood for durability.
Choose water-resistant, breathable skirt fabrics or slatted panels for ventilation.
Incorporate hinged or removable panels with quick-release fasteners for tool-free access and guarantee panels seal loosely to permit airflow while blocking debris.
Closet-Style Door with Magnetic or Snap Access Panels
A closet-style door with magnetic or snap access panels offers quick, tool-free entry for pump inspection and maintenance.
Proper sealing around the panels prevents moisture and odor transfer while maintaining an airtight barrier.
Adding foam or rubber lining to the door and panels reduces operational noise for a quieter installation.
Fast access methods, sealing, and sound dampening
Several homeowners prioritize both quick access and neat appearance when enclosing a sump pump. Closet-style doors with magnetic or snap access panels offer a compact, user-friendly solution that balances convenience, sealing, and sound control.
Quick-release latches, recessed handles, and hinged panels enable rapid inspection. Neoprene gaskets, weatherstripping, and acoustic foam reduce moisture ingress and motor noise while preserving ventilation and serviceability.
Faux Wall Paneling or Accent Wall with Hidden Door
Faux wall paneling or an accent wall with a hidden door requires careful framing and access planning to guarantee the sump pump remains serviceable.
Construction tips include building a removable section with sturdy hinges or quick-release fasteners, sealing gaps for a finished look, and routing the discharge pipe so it aligns with the wall opening without kinking.
Proper finishing—trim, paint, and weatherproofing where the pipe exits—prevents leaks and preserves the concealment’s appearance.
Construction tips, finishing, and alignment for pump discharge
Begin by planning the panel frame to accommodate the sump pump, discharge pipe, and access door while keeping clearances for airflow and maintenance.
Cut openings precisely for the discharge, align the pipe with a slight slope toward the exit, and secure fittings to prevent vibration.
Use moisture-resistant materials, seal joints with silicone, and finish panels for easy removal and visual cohesion with surrounding trim.
Outdoor Hideaway Box for Exterior Sump Pumps
An outdoor hideaway box must balance appearance with protection by addressing weatherproofing, anchoring, and drainage from the start.
The design should include sealed seams or gaskets, tie-downs or bolted bases to resist wind and movement, and raised or sloped floors plus drain channels to prevent water pooling.
Choosing materials and installation methods that meet these requirements preserves pump function while keeping the enclosure unobtrusive.
Weatherproofing, anchoring, and drainage considerations
When placed outdoors, a sump pump hideaway must be weatherproofed, securely anchored, and fitted with proper drainage to protect the equipment and preserve function; neglecting any of these elements can allow water intrusion, shifting, or clogging that defeats the purpose of concealment.
Durable seals, sloped bases, screened outlets, and corrosion-resistant fasteners guarantee longevity; periodic inspection and unobstructed discharge paths maintain reliable operation.
Integrating the Pump Into Built-In Laundry or Utility Cabinets
Integrating a sump pump into built-in laundry or utility cabinets requires careful space planning to guarantee access for maintenance while keeping the unit out of sight.
Plumbing integration must be coordinated so discharge lines, vents, and electrical connections meet code without compromising cabinet function.
Proximity to appliances should be considered to minimize routing, reduce noise transfer, and allow shared drain or electrical solutions where appropriate.
Space planning, plumbing integration, and appliance proximity
Although often overlooked, careful space planning is essential to fit a sump pump into built‑in laundry or utility cabinets without compromising function.
The layout should allow service access, ventilation, and clearances for hoses and electrical conduits. Integrate a dedicated drainage channel, check valve access, and routing that minimizes bends.
Maintain safe distances from water heaters and washers to prevent interference and moisture conflicts.
Step-by-Step Guide to Building a Concealment Solution
The author recommends first evaluating site conditions to choose an appropriate concealment type and compile a checklist of required tools, materials, and safety gear.
Next, a concise construction sequence for a typical cabinet concealment is outlined, including provisions for vents, access hatches, and quick-disconnect features.
Finally, the guide emphasizes testing pump operation and confirming unobstructed drainage before finishing.
Assess site conditions and plan the concealment type
Begin by surveying the installation site to document clearances, access points, electrical hookups, drainage paths, and any local code or warranty restrictions that affect modifications.
Determine whether a removable cover, ventilated cabinet, false wall, or decorative screen suits space and maintenance needs.
Match materials and design to moisture levels, ventilation requirements, and ease of pump inspection, prioritizing unobstructed access and code compliance.
Required tools, materials, and safety gear checklist
With site constraints and the chosen concealment approach established, the next step lists the specific tools, materials, and protective gear required to build and maintain the enclosure without compromising pump function or safety.
Essential tools: drill, circular saw, level, screws, silicone caulk gun, wrench set.
Materials: rot-resistant panels, slotted vents, rubber grommets, fasteners, waterproof sealant.
Safety: gloves, eye protection, dust mask.
Construction steps for a typical cabinet concealment
Start by confirming that all tools and materials are on hand and that the sump pump is powered down and disconnected.
Measure space, mark cabinet footprint, and cut panels to fit.
Assemble frame with screws and wood glue, ensuring removable front panel alignment.
Drill holes for pipes and cords, seal edges with silicone, sand, and paint.
Reinstall pump and test operation before final placement.
Installing vents, access hatches, and quick-disconnect features
Install vents, access hatches, and quick-disconnect fittings to maintain serviceability and ventilation without exposing the sump pump; proper placement and sealing guarantee airflow, moisture control, and rapid maintenance access while preserving the concealment’s aesthetics.
Locate vents near pump top and basin, use screened or louvered grilles, fit a discreet hinged hatch with gasket, and install accessible hose/electrical quick-disconnects for fast isolation.
Testing pump operation and ensuring unobstructed drainage
After vents, access hatches, and quick-disconnects are in place, testing the sump pump and verifying clear drainage paths confirms the concealment functions without failure or water backup.
Perform full-cycle tests: pour water until float activates, observe discharge flow and check for leaks, listen for unusual noises, and confirm check valve operation.
Remove panels to inspect for debris and verify outlet piping slopes freely to exterior drains.
Materials, Finishes, and Waterproofing Recommendations
A practical selection of materials and finishes can markedly extend the life of a sump pump concealment in a damp basement.
Recommendations should cover moisture-tolerant substrates, corrosion-resistant hardware and appropriate paints and sealants to prevent rust and water infiltration.
Soundproofing options, such as acoustic foam or resilient channels, should also be considered to minimize operational noise.
Best materials for basements and humid environments
Moisture-resistant choices are essential when selecting materials for basements and other humid spaces; durable, nonporous finishes and proper waterproofing methods greatly reduce mold risk and extend the life of concealed systems like sump pumps.
Preferred options include closed-cell foam insulation, cement backer board, PVC or composite trim, tile or sealed concrete flooring, and stainless-steel or plastic access panels for longevity and low maintenance.
Paints, sealants, and corrosion-resistant hardware
Building on those material choices, attention then shifts to protective coatings, sealants, and hardware that prevent corrosion and water intrusion around a sump pump.
Use marine-grade epoxy or rust-inhibiting primer with moisture-tolerant enamel for metal covers.
Apply silicone or polyurethane sealants at joints and penetrations.
Specify stainless steel or brass fasteners, hose clamps, and galvanized brackets to extend service life in damp environments.
Soundproofing options to reduce pump noise
Several practical measures can greatly reduce sump pump noise, focusing on material selection, enclosure finishes, and waterproofing details.
Use closed-cell neoprene or mass-loaded vinyl panels for vibration damping, and resilient mounting pads under the pump.
Line enclosures with acoustic foam behind a waterproof barrier.
Seal joints with silicone, install drainage channels to prevent moisture accumulation, and choose rustproof fasteners and mildew-resistant finishes for durability.
Maintenance, Troubleshooting, and Access Best Practices
After concealment, a concise routine inspection checklist helps guarantee the sump pump remains accessible and functional, including checks of the discharge line, float, power connection, and any visible seals.
Attention should be paid to signs of restricted flow, unusual noise, overheating, or poor ventilation that can indicate blockage or motor stress.
Incorporating quick-access features—such as removable panels, labeled shutoffs, and a clear path to the pit—facilitates rapid emergency servicing.
Routine inspection checklist after concealing the pump
A concise routine inspection checklist guarantees the concealed sump pump remains accessible, functional, and safe; it covers visual checks, operational tests, and confirmation of unobstructed access for maintenance.
Inspect enclosure integrity, hinges, and latches; verify power connection and cord condition; test float switch and automatic cycling; confirm discharge line routing and trap seals; clear debris from pit; log findings and schedule repairs as needed.
Signs of restricted flow, overheating, or ventilation issues
The routine inspection checklist should also prompt attention to symptoms indicating restricted flow, overheating, or poor ventilation around a concealed sump pump.
Warning signs include reduced discharge rate, frequent cycling, unusual motor noise, elevated surface or cabinet temperatures, plastic or paint warping, and faint burning odors.
Any such indications warrant prompt investigation of inlet blockage, venting obstruction, or impeller strain to prevent failure.
Quick-access methods for emergency pump servicing
Prioritize rapid, safe access routes to a concealed sump pump so emergency servicing can proceed without delay.
Install hinged panels, removable soffits, or sliding shelves with clear labeling.
Keep a dedicated, unobstructed pathway and a quick-disconnect for power and discharge lines.
Store basic tools nearby.
Train household members on panel release and electrical shutoff locations to minimize response time and risk.
Comparison of Concealment Options by Cost, Accessibility, and Durability
Several common concealment methods—built enclosures, decorative cabinets, recessed housings, and disguised covers—vary greatly in upfront cost, ease of access for maintenance, and long-term durability. A concise comparison highlights tradeoffs: lower-cost covers may limit serviceability; sturdier enclosures raise cost but improve protection.
| Option | Tradeoff |
|---|---|
| Built enclosure | High cost, excellent durability |
| Decorative cabinet | Moderate cost, good access |
| Recessed housing | Higher cost, limited access |
| Disguised cover | Low cost, minimal protection |
Common Mistakes to Avoid When Hiding a Sump Pump
When concealing a sump pump, common mistakes can compromise safety and functionality.
Examples include blocking vents or service access, using non-waterproof materials in wet areas, and ignoring code, warranty, or insurance requirements.
Attention to these issues prevents costly repairs and compliance problems.
Blocking vents or service access
Covering vents or sealing off access panels may make a sump pump installation look neater, but it compromises ventilation, electrical access, and routine maintenance.
Obstructed vents trap moisture and heat, risking corrosion and mold. Blocked panels impede sump inspection, float switch adjustment, and emergency wiring access.
Designers should provide removable, ventilated enclosures and clearly labeled service points to preserve safety and functionality.
Using non-waterproof materials in wet areas
After noting that blocked vents and sealed access panels hinder maintenance and airflow, attention must turn to material selection around a sump pump.
Using non-waterproof materials like untreated wood, fabric, or particleboard invites rot, mold, and structural failure.
Waterproof, mildew-resistant finishes and removable, corrosion-resistant enclosures preserve durability and permit inspections, preventing hidden damage and costly repairs.
Ignoring code, warranty, or insurance requirements
Although concealing a sump pump may seem purely cosmetic, neglecting local codes, manufacturer warranties, or insurance requirements can convert a tidy installation into a costly liability.
Installers and homeowners should verify clearance, ventilation, access, electrical permits, and approved covers. Noncompliance may void warranties, deny claims, or incur fines.
Prioritizing regulations preserves protection, resale value, and functionality while still allowing discreet, code-compliant concealment.
Real-Life Examples and Design Inspiration
The article presents real-life examples showing compact sump pump solutions that fit into tight basements without sacrificing access.
It also highlights finished utility room integrations where pumps are concealed within cabinetry or behind removable panels for a polished look.
Outdoor concealment case studies address both aesthetics and practical drainage details to prevent overflow and soil erosion.
Small basement solutions for tight spaces
When space is tight, creative concealment and multiuse solutions make a sump pump both unobtrusive and accessible.
Examples show shallow wall niches with hinged panels, compact utility cabinets doubling as shelving, and recessed trays beneath storage benches.
Flexible tubing routes and removable tops preserve service access.
Materials resist moisture and allow ventilation.
Each solution balances concealment with clear maintenance access in cramped basements.
Stylish utility room integrations for finished basements
Moving from compact concealments, finished basements invite integrated designs that treat a sump pump as part of the room rather than an afterthought.
Examples include recessed utility closets with hinged panels matching millwork, built-in bench seating concealing the basin with removable tops, and framed access doors disguised as cabinetry.
These approaches balance aesthetics and serviceability, using durable finishes and discreet ventilation while preserving clear pump access for maintenance.
Outdoor concealment examples with drainage details
Because outdoor sump installations must withstand weather and still direct water away efficiently, successful concealments combine durable housings with clear drainage paths.
Examples include ventilated cedar boxes with sealed discharge chases, faux rock covers over grated outlets, and raised planter enclosures routing pipes into gravel trenches.
Each solution prioritizes accessibility, frost protection, and unobstructed gravity or forced-flow discharge to prevent ponding and backflow.
Final Checklist Before Closing Up the Concealment
Before sealing the concealment, a concise checklist should confirm safety measures, verify pump function, and outline basic maintenance tasks.
It should include testing the pump, ensuring clear access to controls and alarms, and confirming ventilation and electrical protections.
Contact information for a qualified plumber or electrician should be noted in case professional assistance is required.
Safety, function, and maintenance verification steps
Verify safety, operation, and access one last time before sealing the concealment.
Inspect electrical connections, GFCI functionality, and cord condition.
Confirm float switch movement, unobstructed discharge line, and proper check valve orientation.
Run multiple pump cycles, listen for unusual noises, and check for leaks.
Guarantee ventilation and easy panel removal.
Document findings and leave clear access markers for future maintenance.
Contact points for professional help if needed
Who should be contacted if a problem arises during final checks?
Homeowners should compile a short list: licensed plumber or sump pump specialist for mechanical faults, licensed electrician for wiring or GFCI issues, general contractor for structural or concealment repairs, and the local building department for code questions or permits.
Keep contact info, warranties, and service records accessible for prompt professional response.
Conclusion
Concealing a sump pump need not compromise function; thoughtful planning balances aesthetics and access. Homeowners who combine durable, waterproof materials with hinged or removable panels preserve serviceability while achieving cohesive design. Practical options—from cabinets to decorative screens—offer varied costs and maintenance profiles, akin to choosing a pocket watch in a smartphone era to underscore timeless reliability. Before sealing anything, verify pump operation, electrical safety, and clearances to avoid costly future repairs.