How to Replace a Rusted Toilet Flange: Step-by-Step DIY Repair Guide
To replace a rusted toilet flange, start by shutting off the water supply and draining the toilet. Next, unbolt and lift the toilet fixture, then cut away the corroded flange. Clean and inspect the drain, measuring it for a proper fit. Test-fit a matching replacement flange or repair ring, secure it to the pipe, and ensure it’s bolted level to the floor. As you reset the toilet, compress a new wax or wax-free seal. Finally, check for leaks, stability, and odors to ensure a successful repair. Follow the additional steps provided for further adjustments and options.
Overview of Replacing a Rusted Toilet Flange
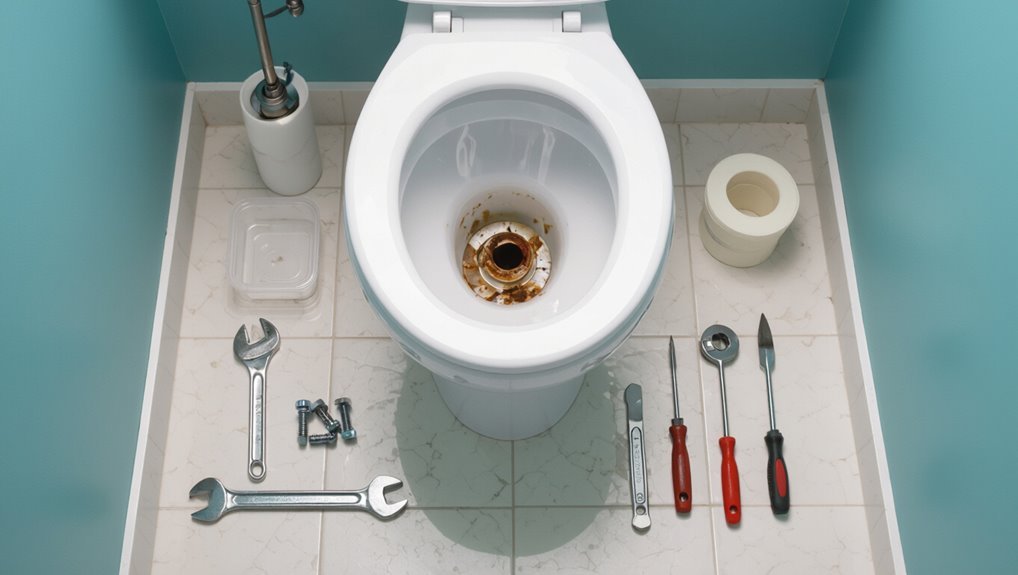
A toilet flange secures the fixture to the drain and seals the connection to the waste pipe, so corrosion can cause leaks, instability, and sewer gas entry.
Common signs that the flange needs replacement include wobbling of the toilet, visible rust or cracks on the flange, and recurring wax ring failures or odors.
Replacing a rusted flange typically requires a replacement flange or repair kit, a wrench or socket set, a hacksaw or grinder for removing corroded sections, sealant or new wax ring, bolts, and safety gear.
What a toilet flange does and why rust is a problem
Understanding a toilet flange’s role is essential before attempting any repair: it secures the toilet to the floor and seals the waste outlet to the drainpipe, ensuring a watertight connection and proper alignment.
A corroded flange compromises seal integrity, causes leaks, and destabilizes the fixture. This explains why instructions on how to replace a rusted toilet flange emphasize inspection, material choice, and proper fastening to restore function.
Signs you need to replace the flange
Since a corroded flange undermines the seal and stability described above, homeowners should watch for clear indicators that replacement is necessary.
Common signs include rocking or wobbling toilet movement, persistent leaks around the base, foul sewer odors, visible flange corrosion or gaps, and water damage to surrounding flooring.
Recurrent flange-related issues after repeated wax ring replacements also signal replacement is due.
Tools and materials needed
Several basic and specialty items are required to replace a rusted toilet flange: protective gear, plumbing tools, replacement flange (or repair ring), mounting hardware, sealant materials, and floor-repair supplies.
- Wrenches, screwdriver set, hacksaw
- Flange kit or repair ring, wax or rubber seal
- Bolts, anchors, stainless fasteners
- Safety gloves, goggles, plumber’s putty, replacement flooring patch
Safety Precautions and Preparations
Before any work begins, the water supply should be shut off and the bathroom floor protected to contain leaks and debris.
Appropriate personal protective equipment and adequate ventilation are recommended to reduce exposure to mold, sewer gases, and cleaning chemicals.
The existing flange and surrounding drainpipe must be inspected to determine corrosion, cracks, or alignment issues that will affect the replacement approach.
Turning off water and protecting the bathroom floor
Shut off the water supply to the toilet at the shutoff valve and flush to empty the tank, ensuring residual water is removed with a sponge or towel.
Place absorbent towels or a waterproof mat around the base, then slide a folded tarp or plastic under the toilet to catch spills.
Keep a small bucket and additional towels nearby for controlled drainage and cleanup.
Personal protective equipment and ventilation
Proper personal protective equipment and adequate ventilation reduce exposure to bacteria, sewage gases, and dust when replacing a toilet flange.
Use nitrile gloves, eye protection, a long-sleeve shirt, and knee pads.
Wear an N95 respirator if dust or mold is present.
Open windows, run an exhaust fan, and consider a small portable fan to direct odors outside.
Dispose of contaminated PPE properly.
Assessing the existing flange and surrounding drainpipe
With protective gear in place and ventilation established, attention shifts to inspecting the existing flange and the surrounding drainpipe for damage, alignment, and seal integrity.
The inspector checks for corrosion, cracks, warped bolt slots, flange-to-floor gaps, and pipe corrosion or offset.
Confirm the pipe’s connection, measure flange height relative to finished floor, and note required repairs or replacement components before proceeding.
Types of Toilet Flanges and Replacement Options
The section outlines common flange materials—PVC, ABS, brass, stainless steel, and cast iron—and highlights how material choice affects durability and compatibility.
It then contrasts repair options (flange repair kits and extenders) with full replacement flanges.
Finally, guidance is offered for selecting the correct flange based on toilet type and drain pipe material.
Materials: PVC, ABS, brass, stainless steel, and cast iron
Choosing the right flange material depends on pipe type, durability needs, and budget.
PVC and ABS are lightweight, corrosion-resistant, and economical for plastic drain connections.
Brass and stainless steel offer superior strength and corrosion resistance for longevity and metal pipes.
Cast iron matches older soil stacks and provides mass and durability but can corrode and is heavier to install.
Repair vs. full replacement: flange repair kits, flange extenders, and replacement flanges
Assess whether a flange requires a quick repair or a full replacement by evaluating its condition, alignment, and the extent of damage to the pipe and surrounding floor. Repair kits fix cracks and bolt holes; extenders raise flange height; full replacement addresses corrosion or warped connections. Choose based on structural integrity, seal reliability, and long‑term access.
| Option | Use case |
|---|---|
| Repair kit | Minor cracks |
| Extender | Low flange |
| Replace flange | Severe corrosion |
| Temporary fix | Short-term solution |
| Permanent fix | Structural failure |
Choosing the right flange for your toilet and drain pipe
After determining whether a repair or full replacement is needed, attention turns to matching the flange to the toilet and drain pipe: material, diameter, height, and fastening method all affect fit and seal.
Choices include PVC, cast iron, brass, and stainless; hub, spud, and no-hub designs; closet bolts, snap-in, or flange extenders for offset/raised installations.
Select compatible diameter and flange height.
Step-by-Step Removal of a Rusted Toilet Flange
The procedure begins with safely shutting off water, draining the tank and bowl, and unbolting the toilet for removal.
Next, the installer clears the old wax ring and detaches corroded flange hardware, then separates a rusted flange from the cast-iron or PVC drain—using cutting tools or flange removal aids as appropriate.
Finally, the drainpipe is cleaned and inspected for damage or leftover corrosion before a new flange is fitted.
Draining and removing the toilet safely
Begin by shutting off the water supply at the shutoff valve and flushing the toilet to empty most of the tank and bowl; hold down the handle or sponge out remaining water to minimize spills.
Disconnect the supply line, cap it, and remove tank-to-bowl bolts if present.
Rock the toilet gently to break the seal, lift straight up with assistance, and set it on a protected surface for inspection and cleanup.
Removing the old wax ring and flange hardware
With the toilet removed and set aside, attention shifts to the flange area where the wax ring and mounting hardware remain.
Gloves and safety glasses are worn. The old wax ring is scraped away using a putty knife, debris cleared, and flange bolts and rusted screws are loosened or cut off.
Corroded bolt sleeves are removed and the flange surface is cleaned for inspection.
Cutting or separating a corroded flange from cast-iron or PVC pipe
Cut through corrosion carefully to separate the flange from the waste pipe without damaging the surrounding drain or flooring.
Use an angle grinder with a metal cutoff wheel for cast-iron, or a reciprocating saw with a fine-toothed blade for PVC. Score progressively, avoid deep cuts into the pipe, and remove rusted flange fragments with pliers.
Wear eye, hand, and respiratory protection.
Cleaning and inspecting the drainpipe after flange removal
After the flange is removed, the exposed drainpipe should be cleaned and carefully inspected before installing a new flange.
Debris, old wax, and corrosion are scraped and vacuumed. The interior and rim are checked for cracks, offsets, or pitting.
Measurements verify pipe diameter and level. Any damage prompts repair or replacement to guarantee a secure, watertight flange installation.
Installing a New Toilet Flange
Next, attention turns to preparing the drainpipe and test-fitting the replacement flange to confirm alignment and fit.
The guide then covers secure attachment methods for PVC/ABS (solvent-weld or adhesive with mechanical fasteners) and options for cast-iron connections (rubber adapter with stainless band or cutting in a hub).
Finally, it explains when to use repair kits or extenders for mismatched floor height or flange position and how to install new closet bolts and level the flange.
Preparing the drainpipe and test-fitting the new flange
With the old flange removed, inspect the drainpipe for cracks, corrosion, and debris that could prevent a secure seal; any damaged sections must be repaired or replaced before proceeding.
Clean the pipe interior and outer lip, removing mineral buildup and old sealant.
Dry and measure pipe diameter and flange height.
Test-fit the new flange to confirm alignment, proper seating, and unobstructed bolt placement.
Securing a flange to PVC or ABS pipe (adhesive/solvent-weld and fasteners)
Once the new flange sits correctly on the pipe, it must be secured to PVC or ABS using methods that create a watertight, mechanically stable connection.
Apply the proper solvent cement to cleaned, dry surfaces and assemble per manufacturer cure times.
Additionally, fasten the flange to the subfloor with corrosion-resistant screws through existing holes, ensuring alignment and level before final curing and reinstalling the toilet.
Securing a flange to cast-iron pipe (rubber adapter, stainless band, or cutting and inserting a hub)
Secure the new flange to cast-iron pipe using methods that accommodate its thicker, brittle material and older fittings: a flexible rubber adapter clamped with a stainless band, a two-piece stainless band that compresses a gasketed sleeve, or by cutting back the cast-iron hub and inserting a threaded or slip-in PVC/ABS hub to solvent-weld the flange.
Choose corrosion-resistant clamps, guarantee full gasket contact, and test for leaks.
Using flange repair kits or extenders when floor height or flange position is off
Address situations where the finished floor is higher or the flange sits below the toilet’s horn by using flange repair kits or extenders to restore proper sealing and bolt alignment.
These kits include stacked rings or adjustable extenders that raise flange height, silicone gaskets, and longer bolts.
Selection depends on gap size, flange condition, and toilet model.
Install per kit instructions, ensuring a flat, coplanar surface.
Installing new closet bolts and ensuring flange is level
Begin by positioning new closet bolts into the flange slots and verifying the flange sits perfectly level with the finished floor.
Tighten bolts hand‑snug, ensuring vertical alignment for the toilet base. Use shims or flange extenders if needed to achieve flush contact.
Confirm bolt heads are spaced to match the toilet horn, trim bolts to length, and protect threads with caps before setting the bowl.
Reinstalling the Toilet and Final Seals
Attention is given to selecting the appropriate wax ring or wax-free seal and positioning it correctly on the new flange.
The toilet is then lowered, leveled, and bolts are tightened evenly to avoid cracking while the water supply is reconnected.
Finally, the installation is checked for leaks and rocking, with adjustments made or bolts retightened as needed.
Choosing and installing the correct wax ring or wax-free seal
Select a wax ring or wax-free seal based on flange height, toilet type, and leak-prevention needs: traditional wax rings work well for flanges flush with the finished floor, while thicker or stacked rings and non-wax gaskets suit recessed or elevated flanges and installations requiring cleaner, reusable seals.
Center the chosen seal over the flange, align the toilet outlet, compress evenly when lowering, and inspect for squashed, continuous contact.
Setting and leveling the toilet, tightening bolts correctly
Set the toilet onto the sealed flange with steady, vertical pressure, ensuring the outlet aligns exactly with the wax ring or gasket to prevent shifts that could break the seal.
Seat bolts should protrude through base holes; add washers and nuts, tightening alternately and incrementally to compress evenly.
Use a level across the bowl; install shims where needed, then trim and cap bolt covers.
Reconnecting water, testing for leaks, and rocking checks
Reconnect the water supply by hand-threading the supply line to the fill valve, then tighten the coupling nut with an adjustable wrench until snug—avoid overtightening.
Open the shutoff slowly, observe fill and tank for leaks. Flush repeatedly, inspect base and supply connection.
Press gently on the bowl to check for rocking; if movement exists, retighten bolts or add shims and reseal with caulk as needed.
Troubleshooting Common Problems After Replacement
After replacing the flange, common issues may include persistent leaks at the flange-to-toilet junction, a wobbly toilet from uneven flange height, corrosion or leaks at the pipe connection, and lingering odors.
Each problem has distinct causes and targeted fixes, from reseating or replacing the wax ring to shimming or adjusting flange height and inspecting pipe fittings.
The following guidance explains how to identify the root cause and apply the appropriate repair.
Persistent leaks at the flange-to-toilet junction
Persistent leaks at the flange-to-toilet junction indicate a failure in the seal between the toilet base and the waste pipe, and they require systematic diagnosis because the causes vary—from a crushed or misaligned wax ring to a warped flange, loose bolts, or an uneven floor.
Inspect the wax seal, flange integrity, bolt tightness, and toilet seating.
Replace damaged seals or flange sections and retest for leaks.
Wobbly toilet or uneven flange height
When a toilet rocks or sits unevenly after flange replacement, the problem usually stems from an improper flange height or an unstable mounting surface.
Identifying whether the flange is too low, too high, or the floor is uneven is the first step toward a secure, leak-free installation.
Shim gaps with non-compressible washers or plastic shims, adjust flange height with spacer rings or replace the flange, then retighten bolts evenly.
Corrosion or leaks at the pipe connection
A rocking toilet or uneven flange height can mask underlying issues at the pipe connection, where corrosion or poor seals lead to leaks and odors.
Inspect the spud and drainpipe for pitting, cracks, or deteriorated lead or putty seals.
Tighten or replace corroded bolts and use an appropriate flange extender or repair sleeve.
Verify a watertight seal before reassembly.
Odors after replacement
Check for sewer gas or minute leaks early, since odors after a flange replacement usually indicate a compromised seal, trapped debris, or a dry trap rather than a faulty toilet.
Inspect wax ring or gasket seating, verify flange height and bolt alignment, clear debris from the flange and trap, run water into the bowl to refill the trap, and retighten connections.
Replace gasket if persistent.
Maintenance and Prevention to Avoid Future Flange Rust
When selecting flange material, stainless steel or brass is recommended over cast iron in damp or high-corrosion environments.
A simple inspection schedule—every six months, or after any leak—is advised, with wire-brushing and rust-inhibitor touch-ups for minor corrosion.
Preventive measures include sealing subfloor penetrations, ensuring adequate bathroom ventilation, and using waterproofing around the flange area.
When to use stainless or brass flanges instead of cast iron
Corrosion-prone environments and frequent moisture exposure justify choosing stainless steel or brass toilet flanges over cast iron, since these non-ferrous metals resist rust and maintain structural integrity longer.
Prefer stainless for coastal or high-humidity locations and heavy-use bathrooms where longevity matters.
Choose brass where galvanic compatibility with nearby fittings or ease of machining is important.
Both reduce long-term maintenance and leak risk.
Regular inspection schedule and quick fixes for minor corrosion
Because small signs of flange deterioration often precede larger failures, a brief, consistent inspection routine helps catch problems early and extend the life of the fitting.
Inspect flange annually and after any hard flush or floor work. Look for surface rust, loose bolts, or seal compression.
Remove light rust with wire brush, apply rust inhibitor, tighten hardware, and replace wax ring if leaks or deformation appear.
Tips for preventing moisture and corrosion in bathroom subfloors
Regular inspections and minor repairs reduce immediate flange issues, but long-term prevention depends on controlling moisture in the subfloor and surrounding structure.
Recommend sealing joints and penetrations, installing proper ventilation or exhaust fans, using moisture-resistant backer board and fasteners, applying water-repellent coatings, ensuring toilet wax ring and caulking are intact, and addressing leaks promptly to prevent rot, mold, and metal corrosion.
Cost, Time Estimates, and When to Call a Professional
Typical DIY replacement of a toilet flange can take one to three hours and often costs between $20 and $150 for parts, while labor and specialty parts raise expenses for professionals.
Homeowners should call a plumber if there is visible flange or subfloor rot, persistent leaks, misaligned drain piping, or uncertainty about wax ring compatibility.
When hiring a pro, ask for a written estimate, scope of work, warranty on parts and labor, and whether any structural repairs or permits are anticipated.
Typical DIY time and cost breakdown
A straightforward flange replacement usually takes 1–3 hours for a DIYer with basic tools and plumbing experience; more complex situations—corroded bolts, a cracked wax ring, or a damaged subfloor—can extend the job to a full day or require additional materials. Typical costs: parts $15–60, tools $0–50, contingency $20–100. When unsure, pause and reassess.
| Item | Cost | Emotion |
|---|---|---|
| Flange kit | $15–40 | Relief |
| Wax ring | $3–10 | Calm |
| Tools/fasteners | $0–50 | Confidence |
| Contingency | $20–100 | Security |
Signs the job requires a plumber or structural repair
If water repeatedly seeps around the base, floorboards sag near the toilet, or flange bolts strip and won’t secure the bowl, the problem likely goes beyond a simple DIY replacement and warrants professional assessment.
Persistent leaks, rot, mold, warped subfloor, corroded drainpipe, or complex cast-iron connections increase costs and time.
Hire a plumber or contractor when structural repair, code compliance, or excavation is needed.
Questions to ask a plumber and what to expect from a professional service
When structural damage, persistent leaks, or complex piping are suspected, homeowners should prepare to consult a professional and know which questions to ask and what outcomes to expect.
Ask about licensing, written estimates, warranty, estimated duration, and disposal.
Expect inspection, clear line-item pricing, and a timeline (often 1–4 hours).
Call a professional for hidden rot, sewer issues, or uncertain permits.
Quick Checklist Before You Start
Before beginning work, gather essential tools and materials—adjustable wrench, screwdriver, putty knife, new flange and bolts, wax or rubber ring, plumber’s putty or silicone, and a caulk gun—then confirm the water supply is off and the tank is drained.
- Verify flange size and toilet fit.
- Inspect subfloor for damage.
- Prepare protective gloves and eye protection.
- Lay down drop cloths and a bucket for water.
Conclusion
Like a ship steadying its keel after a storm, the renewed flange anchors the bathroom’s quiet order. The weary rust, stripped away, leaves a promise of smooth, reliable service; each tightened bolt is a small oath against future leaks. With care and the right parts, the task becomes proof that neglected things can be made whole again. Still, when uncertainty clouds the work, a professional hand can restore calm and certainty.