
How to Thaw Evaporator Coil Quickly and Safely: Step-by-Step Guide
To quickly and safely thaw a frozen evaporator coil, start by turning off the HVAC system and wearing personal protective equipment (PPE). Place pans or towels to catch any meltwater. Improve airflow by changing filters and clearing vents. You can allow the ice to melt naturally or use a hair dryer or warm towels from a safe distance. Ensure condensate drains are managed and check for leaks or damage before restarting the system. If freezing happens again or if you suspect refrigerant issues, it’s best to call a technician. The following steps will cover prevention and inspection.
Why an Evaporator Coil Freezes and Why Faster Thawing May Be Necessary
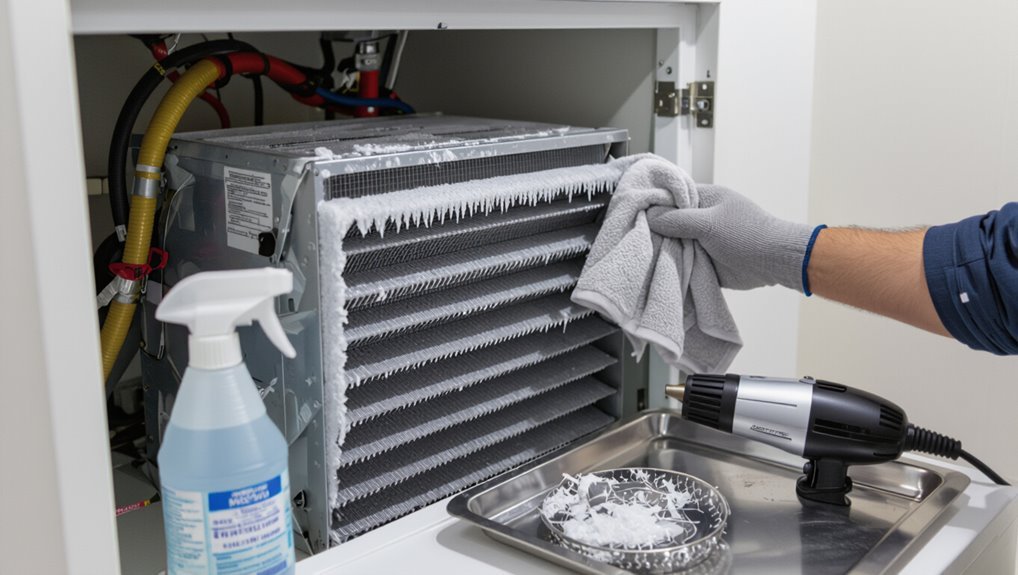
The evaporator coil can freeze due to restricted airflow, low refrigerant, or dirty coils, each reducing heat transfer and allowing ice to form.
Left untreated, a frozen coil can cause reduced cooling, compressor strain, water damage, and higher energy costs.
Quick thawing is suitable for minor ice buildup when the root cause is obvious and safe to address, but persistent, recurring, or uncertain problems warrant a professional inspection.
Common causes of coil freezing
Ice accumulation on an evaporator coil typically results from restricted airflow, refrigerant issues, or prolonged low ambient temperatures around the coil.
Common causes include clogged filters, blocked vents, dirty coils, fan failures, low refrigerant charge, or improper thermostat settings.
Identifying these factors helps prioritize repairs and informs safe how to thaw evaporator coil steps, minimizing recurrence and ensuring efficient system operation.
Risks of a frozen evaporator coil if left untreated
Left unaddressed, a frozen evaporator coil can quickly escalate from a nuisance to a system-threatening problem, causing reduced cooling capacity, compressor strain, and potential water damage as thawed ice floods condensate pans and surrounding areas.
Continued operation risks compressor failure, increased energy use, mold growth from persistent moisture, corrosion of components, and costly repairs or premature system replacement if icing persists and airflow or refrigerant issues remain unresolved.
When fast thawing is appropriate vs when to call a professional
Because frozen evaporator coils can stem from varied causes—restricted airflow, low refrigerant, or mechanical faults—deciding between a quick DIY thaw and a professional intervention depends on the suspected root cause and the risks of restarting the system prematurely.
Quick thawing suits clear airflow blockages or short-term icing; persistent freezes, suspected refrigerant leaks, electrical faults, or recurrent icing require technician diagnosis to prevent damage and guarantee safe repair.
Immediate Safety Precautions Before Thawing
Before attempting to thaw an evaporator coil, the technician guarantees all relevant power and dedicated circuits are shut off to eliminate shock and equipment damage.
They put on appropriate personal protective equipment, maintain ventilation to disperse any refrigerant or mold vapors, and work cautiously around exposed electrical components.
Finally, they place drip pans and protective covers to channel meltwater and protect surrounding finishes and insulation.
Power and circuit shutdown steps
Shut off power to the HVAC system and associated circuits to eliminate electrical hazard while thawing the evaporator coil.
Verify main disconnect at the service panel, label or tag breakers, and switch off the appropriate circuit breaker(s).
Confirm power is absent with a non-contact tester at the unit.
Leave the disconnect open and locked if possible until thawing and inspection are complete.
Personal protective equipment and ventilation
With power confirmed off and the service disconnect secured, personnel should don appropriate personal protective equipment and establish ventilation to protect against hazards during thawing.
Recommended PPE includes insulated gloves, eye protection, and respirator if mold or refrigerant odor is present.
Guarantee airflow to disperse fumes and moisture; use explosion-proof fans where refrigerant leak is suspected.
Verify PPE integrity before starting.
Preventing water damage to surrounding areas
Contain runoff and protect finishes by placing water-absorbent barriers—such as towels, absorbent pads, or a shallow drip pan—beneath and around the evaporator access area, extending coverage to nearby insulation, electronics, and finished surfaces.
Direct melted water to a temporary collection container or floor drain using funnels or tubing.
Elevate sensitive components, seal gaps, and monitor for leaks during thawing to prevent staining and mold.
Quick Tools and Materials You’ll Need
A concise list of hand tools and portable equipment can speed a safe thaw, including screwdrivers, a wet/dry vacuum, and a portable fan or space heater used cautiously.
Common household items for emergency thawing—warm towels, hairdryers on low, and bowls of hot water—are effective for small ice buildups.
Professional heating tools such as infrared heaters or service-grade heat guns should be reserved for stubborn or extensive freezes and handled by trained technicians.
Hand tools and portable equipment checklist
Essential hand tools and a few portable items make thawing an evaporator coil safe and efficient: a set of insulated screwdrivers, adjustable wrench, flashlight or headlamp, soft-bristle brush, coil-cleaning brush, spray bottle for water, shop towels, and a small plastic scraper.
Technicians should also carry portable essentials for access and cleanup, keeping tasks controlled and minimizing damage.
- Small cordless drill with bit set
- Compact wet/dry vacuum
- LED work light and extension cord
Recommended household items for emergency thawing
Keep a small collection of common household items on hand to handle an emergency evaporator coil freeze quickly and safely: a hair dryer or standard blow dryer (low heat setting), several clean towels or microfiber cloths, a shallow pan or tray to catch meltwater, a spray bottle filled with room-temperature water, and plastic or wooden spatulas to gently break up surface ice.
- Towels for absorption and insulation
- Tray for controlled drainage
- Soft spatulas to avoid fin damage
When to use professional heating tools
After listing common household items for emergency thawing, professionals recommend specific heating tools when the freeze is severe, persistent, or when DIY methods risk damaging the coil or surrounding components.
Use infrared heaters, heat guns with controlled settings, or specialized coil warmers only if trained or supervised. These tools prevent further harm, guarantee even thawing, and protect electrical components; otherwise, call a qualified HVAC technician.
Step-by-Step Fast and Safe Thawing Methods
The following section outlines practical, safety-minded procedures for thawing an evaporator coil, ranging from passive approaches to professional services.
It summarizes five options: turning off the system for a natural thaw, applying controlled warm air with a hair dryer or heat gun, using warm towels or hot-water bottles, employing portable heaters or directed fans with safety precautions, and arranging professional steam or hot-water treatment.
Each method includes step-by-step guidance and key safety notes to help determine the appropriate choice for different situations.
Method 1 Turn off system and allow natural thaw (fastest safe approach)
Shut off the HVAC system and let the evaporator coil thaw naturally to minimize risk to components and safely remove ice.
Monitor the coil and nearby drain pan for melting water. Place towels or a shallow pan to catch runoff.
Leave the access panel open to improve airflow.
Inspect for blocked filters or airflow issues before restarting.
Restart only after the coil is fully thawed and dry.
Method 2 Using warm air from a hair dryer or heat gun safely
If natural thawing is too slow, warming the coil with controlled hot air offers a faster option while still protecting components.
The technician uses a hair dryer on low or a heat gun at a safe distance, sweeping evenly to avoid overheating.
Maintain 6–12 inch clearance, move continuously, monitor temperature, and stop once ice softens.
Power remains off until fully thawed.
Method 3 Applying warm towels or hot water bottles
Prepare warm towels or hot water bottles to deliver steady, controlled heat to the frozen evaporator coil without risking sudden temperature shock.
Wrap warm, damp towels or place sealed hot water bottles against icy areas, replacing them as they cool.
Monitor progress frequently, ensuring no water contacts electrical components.
Continue until ice melts, then dry the coil and inspect for underlying issues before restarting the system.
Method 4 Using portable space heaters or directed fans (safety considerations)
Use a portable space heater or a directed fan to speed thawing while maintaining control over heat and airflow to avoid damaging the coil.
Position heater or fan at a safe distance, avoid direct high heat contact, and monitor temperature.
Guarantee electrical safety, keep water away from power sources, and never leave equipment unattended.
Stop if metal warps or insulation overheats.
Method 5 Professional steam or hot-water service procedure
Call a trained HVAC technician for professional steam or hot-water thawing, a controlled, rapid method that minimizes coil damage and downtime.
The technician isolates power, inspects access panels and drain paths, and applies low-pressure steam or heated water via appropriate nozzles.
They monitor coil temperature, prevent over-saturation, and verify system integrity and refrigerant levels before restoring operation, documenting work for safety and warranty.
How to Drain and Manage Meltwater During Thawing
Before thawing begins, locate and clear the drain pan and condensate lines to guarantee unobstructed water flow.
If the built-in drain cannot handle the load, set up a temporary drainage solution to prevent overflow and water damage.
After thawing, clean and disinfect the drain pan and lines to remove residue and inhibit mold or bacterial growth.
Locating and clearing the drain pan and condensate lines
Locate the drain pan and follow the condensate line from the evaporator to the nearest access point, since properly managing meltwater prevents overflow and secondary damage during thawing.
Inspect the pan for cracks, corrosion, and sediment. Clear visible debris from the pan and use a wet vacuum or a flexible brush to remove blockages in the line.
Confirm free flow before resuming operation.
Temporary drainage solutions to prevent overflow
With the drain pan and condensate lines cleared and flow confirmed, attention turns to managing the meltwater generated during thawing to prevent overflow and water damage.
Temporary solutions include placing a clean bucket or tray beneath the coil, routing a flexible hose from the pan to a nearby drain, and using absorbent towels or a wet/dry vacuum for rapid removal.
Monitor frequently.
Cleaning and disinfecting drain components after thaw
After thawing, inspect and clean the drain pan, trap, and condensate line to prevent clogs, odors, and bacterial growth that can cause future standing water.
Flush the line with a bleach solution or enzymatic cleaner, remove debris and biofilm with a soft brush or flexible auger, rinse thoroughly, and reinstall traps.
Verify proper slope and test drainage before restoring normal operation.
Inspecting the System After Thawing
After thawing, a visual inspection should confirm the coil and fins are free of ice, undamaged, and that surrounding components and drain lines are clear.
The technician then checks for refrigerant leaks and signs of restricted airflow—oil stains, hissing, weak fan movement, or abnormal pressure readings—before proceeding.
Finally, a controlled restart is performed and the system is monitored during the initial run for proper pressures, airflow, and temperature drop.
Visual inspection checklist for coils, fins, and surrounding components
A concise visual inspection focuses on the evaporator coil, fins, and adjacent components to confirm proper thawing and identify any damage or residual issues.
Inspect for frost-free coils, straight and intact fins, and clean drain pan and lines. Verify electrical connections are dry and secure.
- Coil surfaces: no ice, corrosion, or oil stains
- Fins: straightness and absence of gaps
- Surroundings: clean pan, dry insulation
How to check for refrigerant leaks and low airflow indicators
Begin by confirming system stability before proceeding to refrigerant and airflow checks: steady compressor operation, normal fan speeds, and room-temperature recovery indicate readiness for diagnostic testing.
Inspect fittings, valve cores, and service ports for oil residue or hissing. Use a leak detector or soapy water.
Measure static pressure and temperature split; unusually high suction pressure or low airflow (low delta T, reduced return airflow) suggests leaks or obstruction.
Restart procedure and monitoring first run
With leaks repaired and airflow restored, the system can be restarted and observed for correct operation.
The technician powers the unit, sets the thermostat to cooling, and listens for unusual noises.
Temperatures, suction and discharge pressures, and airflow are recorded at intervals during the first 15–30 minutes.
Any persistent frost, odd sounds, pressure anomalies, or weak cooling prompt immediate shutdown and further diagnostics.
Troubleshooting Persistent Freezing and Underlying Causes
Persistent freezing often signals deeper issues that warrant targeted troubleshooting.
Common causes include restricted airflow from clogged filters or duct problems, low refrigerant or leaks that require a technician, and mechanical failures such as a faulty blower motor or defrost control.
The following discussion outlines filter replacement guidelines, signs of refrigerant problems, and mechanical faults to check.
Restricted airflow problems and filter replacement guidelines
Several common airflow restrictions—clogged filters, blocked return vents, or obstructed supply registers—frequently cause evaporator coils to freeze by reducing the volume of warm air passing over the coil.
Regular inspection and replacing disposable filters every 1–3 months (or washable filters monthly) restores flow.
Clear obstructions near returns and supplies, confirm fan operation, and size filters correctly to balance filtration with minimal airflow resistance.
Refrigerant issues and signs you need a technician
When airflow problems and filter issues have been ruled out yet the evaporator coil continues to ice over, low refrigerant or system leaks are common underlying causes that require professional diagnosis.
Technicians check pressures, detect leaks with electronic tools, and recharge refrigerant if needed.
Warning signs include hissing sounds, reduced cooling, unusually long run times, and frozen sight glass; DIY leak repair is unsafe and not recommended.
Mechanical failures that cause recurrent freezing
Inspect mechanical components as potential culprits when evaporator coils repeatedly ice over: failed blower motors, seized fan bearings, stuck or misaligned dampers, malfunctioning expansion devices, and obstructed condensate drains can each reduce heat transfer or airflow enough to cause refreezing.
Technicians should verify motor amperage, fan rotation, damper alignment, TXV or orifice operation, and clear drain paths; replace or repair faulty parts promptly.
Preventive Maintenance to Avoid Future Freezing
Preventive maintenance focuses on simple steps that reduce the risk of evaporator coil freezing.
Regular cleaning and a strict filter replacement schedule help maintain proper airflow, while seasonal system checks and professional tune-ups catch refrigerant or airflow issues early.
When needed, targeted upgrades or retrofits can improve efficiency and airflow to prevent recurring freezes.
Routine cleaning and filter schedule
Establishing a regular cleaning and filter-replacement routine greatly reduces the risk of evaporator coil freezing by keeping airflow unobstructed and coil surfaces free of dirt and buildup.
Inspect filters monthly, replace or clean per manufacturer; vacuum accessible coil fins gently; remove debris from return vents and condensate pan.
- Replace or clean filters every 1–3 months
- Lightly vacuum coil fins quarterly
- Keep return vents clear
Seasonal system checks and professional tune-ups
Schedule seasonal system checks and professional tune-ups at least twice a year—typically before the cooling and heating seasons—to catch worn components, refrigerant leaks, and airflow issues that can lead to evaporator coil freezing.
Certified technicians should inspect refrigerant levels, blower operation, duct integrity, and electrical connections, performing calibrated diagnostics and preventive repairs so small faults are resolved before they escalate into coil icing or system failures.
Upgrades and retrofits to improve airflow and efficiency
When improving airflow and efficiency through targeted upgrades and retrofits, homeowners and building managers should prioritize interventions that directly reduce the conditions that cause evaporator coils to freeze.
Recommended measures include installing variable-speed blowers, upgrading to higher-MERV filters with proper sizing, sealing and insulating ductwork, balancing airflow with dampers, and adding smart thermostats or sensors to monitor coil temperature and airflow, preventing future freeze cycles.
Safety Mistakes to Avoid When Thawing an Evaporator Coil
Thawing an evaporator coil requires avoiding common safety mistakes that can cause fire, equipment damage, or legal trouble.
Using open flames to melt ice risks ignition and heat damage, while running the system with a frozen coil can harm the compressor and reduce airflow.
Attempting refrigerant handling or unauthorized repairs exposes the technician to toxic gases, pressurization hazards, and regulatory violations.
Why melting ice with open flames is dangerous
Using an open flame to melt ice on an evaporator coil poses multiple immediate hazards: it can ignite nearby insulation or wiring, damage the coil’s thin aluminum fins and refrigerant lines, and create hotspots that stress soldered joints.
Flames can also release toxic fumes from heated materials and compromise nearby electrical components, increasing fire risk and costly repairs.
Alternative, noncombustible thawing methods are safer.
Dangers of operating system while coil is frozen
Continuing to run an HVAC system with a frozen evaporator coil can quickly escalate minor icing into serious mechanical and safety failures.
Compressors may overheat or suffer liquid slugging, fans strain and motors burn out, and airflow restriction reduces indoor air quality.
Electrical components and controls face increased stress, raising fire risk.
Immediate shutdown and professional evaluation prevent costly damage and hazards.
Risks of DIY refrigerant handling and illegal repairs
Attempting refrigerant work or unauthorized repairs exposes homeowners to serious legal, health, and equipment hazards.
Untrained handling risks regulatory fines, refrigerant leaks, frostbite, poisoning, and fire. Improper procedures can damage compressors, void warranties, and create costly system failures.
Professionals hold certifications, proper tools, and disposal methods.
Call licensed HVAC technicians for refrigerant or sealed‑system issues to guarantee safety and compliance.
Cost and Time Estimates for Thawing and Repairs
Typical DIY thawing methods usually take 30 minutes to a few hours depending on ice buildup and access.
Professional thawing and repair services commonly range from $100–$500 for a service call and basic fix, while more extensive repairs or parts replacement can cost several hundred to over $1,500.
A replacement is generally considered when repair estimates approach or exceed 50–70% of the cost of a new compatible unit.
Typical time required for DIY thaw methods
A basic DIY thaw using household tools—hair dryer, space heater, or hot towels—usually takes between 30 minutes and 3 hours, depending on ice thickness, airflow access, and ambient temperature.
Minor surface frost can melt within half an hour, while a solid ice block around the evaporator often requires a few hours of sustained heat and monitoring.
Expect additional time for cleanup, reassembly, and system restart checks.
Estimated costs for professional thawing and repair services
After outlining DIY thaw times, attention turns to professional options and what they cost. Typical service calls range $75–$200; expedited or emergency visits add fees. Minor repairs (seal, clamp) often cost $100–$300; major coil or refrigerant work runs higher. Warranty status and location affect pricing.
| Service | Typical cost |
|---|---|
| Service call | $75–$200 |
| Minor repair | $100–$300 |
When repair costs justify replacement
When repair expenses approach or exceed half the replacement cost of an evaporator coil, replacement generally becomes the more economical choice. Factors such as coil age, frequency of breakdowns, and remaining warranty further tip the balance.
Consider long-term operating efficiency, refrigerant type, and labor complexity. If recurring repairs, reduced efficiency, or obsolete components persist, replacement minimizes lifetime costs and downtime.
Signs It’s Time to Call a Professional HVAC Technician
If the coil refreezes quickly, there is unusual leaking, or the system fails to restore proper airflow after thawing, it indicates a professional inspection is needed.
The technician should be given recent symptoms, timing of the thaw, ambient conditions, and any visible damage or error codes.
Homeowners should seek a licensed, insured HVAC provider with good reviews, transparent pricing, and relevant experience with coils and refrigerant work.
Red flags during or after thawing
Why does persistent ice or unusual sounds warrant immediate attention?
Persistent frosting, refrigerant odors, water pooling, or clicking/grinding noises indicate system faults beyond simple thawing.
Rapid refreezing, warm airflow, or tripped breakers suggest compressor or refrigerant issues.
Visible corrosion, oil stains, or electrical burning smell requires shutdown and professional inspection to prevent damage, safety hazards, or costly repairs.
What information and observations to provide the technician
What key details should a technician know on arrival?
Provide clear symptoms (continuous icing, reduced airflow, strange noises, water leaks), recent actions taken (thawing methods, timers reset), system specifics (make, model, age), thermostat settings, frequency and onset of the issue, and any odor or electrical concerns.
Note visible damage, error codes, and photographic evidence to speed diagnosis and repair.
How to choose a qualified HVAC service provider
Recognize the limits of DIY repairs and call a professional when an evaporator coil repeatedly freezes, produces unexpected noises, causes refrigerant odors, or leads to persistent water leaks despite basic troubleshooting.
A qualified HVAC provider should verify diagnosis, hold licenses and insurance, and provide written estimates and warranties.
- Licensed technician with refrigeration certification
- Transparent pricing and written scope
- Positive local references and documented guarantees
Conclusion
Like a frozen river that must be coaxed back into flow before spring, the frozen evaporator coil yields to careful warmth and steady hands. Quick, safe thawing restores the system’s heartbeat, while mindful draining keeps the banks clear. Regular upkeep acts as seasonal tending, preventing ice from reclaiming its course. When scars or stubborn ice remain, summoning a skilled keeper guarantees the stream runs true and damage stays downstream.
