How to Fix an Electric Hot Water Heater: Step-by-Step Troubleshooting and Repair Guide
To fix an electric hot water heater, start by isolating the power and water supply. Inspect critical components like thermostats, heating elements, breakers, wiring, and the temperature-pressure valve. Use a multimeter to test for continuity, and check for sediment build-up, leaks, or faulty anode rods. Document your findings before replacing any defective parts. Regular maintenance, including flushing and checking the T&P valve, can prevent future issues. When considering repair versus replacement, evaluate factors such as corrosion, cost, and safety. Follow the detailed step-by-step procedures, diagnostic flowcharts, and maintenance schedules provided to effectively troubleshoot and repair your unit.
How an Electric Hot Water Heater Works
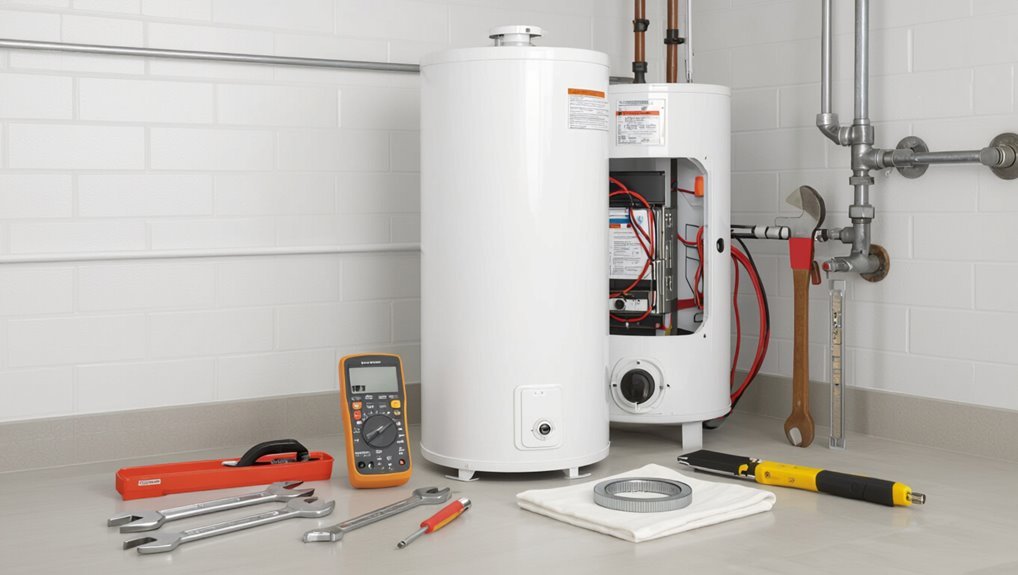
An electric hot water heater consists of a tank, heating elements, thermostats, and safety controls that work together to heat and store water.
The unit cycles as thermostats call for heat, energizing elements until set temperatures are reached and then resting until demand drops temperature again.
Common failure points include faulty elements, thermostat failures, sediment buildup, and leaking or corroded fittings that disrupt heating, control, or containment.
Main components and their functions
When electricity heats water in a residential tank, a handful of key components work together to store, regulate, and deliver hot water reliably.
The tank, cold inlet and hot outlet, upper and lower heating elements, thermostats, high-limit cutoff, anode rod, pressure relief valve, drain valve, and electrical junction/controls each serve distinct roles.
This aids diagnosing and guides how to fix electric hot water heater.
Typical operating cycle and temperature control
Having outlined the tank, inlet/outlet, heating elements, thermostats, safety cutoffs, and valves, attention turns to how these parts operate together over a daily cycle to maintain set temperature.
Cold water enters, heats via element(s) controlled by thermostats cycling on/off to restore setpoint.
Thermostats stage elements for recovery, mixing through outlet sampling and tempering valves maintains delivery temperature while safety cutoffs prevent overheating.
Common failure points to watch for
Inspecting an electric hot water heater for common failure points focuses attention on components that wear, corrode, or fail electrically: heating elements and thermostats, sacrificial anode rods, tank lining and fittings prone to leaks, temperature-pressure relief valves, electrical connections and breakers, and sediment buildup that degrades performance.
Regular checks reveal element failure, thermostat drift, anode depletion, pinhole leaks, TPR sticking, loose wiring, tripped breakers, and heavy sediment reducing efficiency.
Quick Safety Checklist Before You Start
Before any repair begins, the power to the heater should be isolated and locked out to prevent accidental energizing.
The water supply must be shut off and the tank depressurized according to procedure to avoid scalding or flooding.
Appropriate personal protective equipment should be worn and electrical hazards treated as live until proven otherwise.
Power isolation and lockout procedures
One concise checklist guarantees safe power isolation and lockout prior to working on an electric hot water heater:
Verify circuit breaker label, switch breaker to OFF, use a lockout/tagout device, attach a visible warning tag, test with a non-contact voltage tester at heater terminals, confirm zero voltage, and make certain only authorized personnel remove the lock/tag.
Follow facility LOTO policies and PPE requirements.
Water shutoff and depressurization steps
Shut off the water supply to the heater and relieve system pressure to prevent scalding and leaks: close the cold-water inlet valve, open a hot-water faucet at a nearby fixture to vent trapped pressure, and open the heater’s pressure-relief valve or drain valve slightly to guarantee complete depressurization before any maintenance begins.
Confirm no flow from the faucet, attach a hose to the drain for controlled discharge, and verify tank is empty.
Personal protective equipment and electrical hazards
A short, focused checklist should guarantee appropriate personal protective equipment is worn and electrical hazards are controlled before any work begins.
Verify power is isolated at the breaker and locked/tagged out.
Wear insulated gloves, safety glasses, and nonconductive footwear.
Use voltage tester to confirm de-energized circuits.
Keep tools insulated, area dry, and a fire extinguisher nearby.
Maintain clear escape paths.
Tools and Materials Needed
A concise inventory of tools, common replacement parts, and criteria for professional help prepares the reader to proceed safely and efficiently.
Useful items often include:
- adjustable wrench, screwdrivers, and pliers
- digital multimeter and test leads
- replacement heating elements, thermostats, and anode rods
- protective gear and contact info for a licensed electrician or plumber
Knowing which tasks can be handled DIY and which require a pro will be outlined next.
Essential hand tools and multimeter requirements
Before beginning any work on an electric hot water heater, gather a concise set of hand tools and a reliable multimeter to guarantee safe, accurate troubleshooting and repairs.
Essential tools include adjustable and flat/Phillips screwdrivers, nut drivers, pliers, insulated gloves, voltage-rated screwdriver, socket set, flashlight, and tape measure.
The multimeter should measure AC/DC volts, continuity, and resistance with proper safety ratings (CAT III/CAT IV).
Replacement parts commonly required
Stock common replacement parts to minimize downtime and guarantee repairs proceed smoothly.
Typical items include heating elements, thermostats, high-limit cutoffs, pressure-relief valves, sacrificial anode rods, gasket kits, element wrenches, terminal connectors, and cartridge or tank drain assemblies.
Also keep dielectric unions, T&P extension pipes, and appropriate replacement fuses or breakers.
Match parts to tank model and voltage specifications before purchase.
When to call a licensed electrician or plumber
Having the right replacement parts on hand reduces service time, but certain situations require a licensed electrician or plumber to guarantee safety and code compliance.
Call a professional for electrical faults beyond simple thermostat or element swaps, persistent leaks from tank or plumbing joints, pressure-relief valve failures, gas-related components (if present), or when local codes, permits, or insurance require certified work.
Safety and liability depend on it.
Initial Diagnosis: How to Identify the Problem
A clear initial diagnosis narrows the likely causes by following a simple no-hot-water flowchart and checking whether the tank produces some heat but not enough.
Attention should then turn to symptoms such as overly hot or fluctuating temperatures, visible leaks, and unusual noises or odors, each pointing to specific faults like thermostat failure, sediment buildup, or corrosion.
Systematic observation and basic tests guide the next repair steps.
No hot water diagnostic flowchart
Begin by tracing the symptoms and recent events to narrow the cause: check whether the issue affects all taps or only one.
Note any recent power outages or maintenance, and determine if the tank is producing lukewarm water or none at all.
Follow a flowchart: power supply → breakers/shore power → thermostat settings → element continuity → signs of leaks or sediment.
Record findings for next steps.
Not enough hot water distinguishing causes
Determine whether the shortage of hot water stems from capacity, temperature control, or distribution by comparing recent usage patterns, thermostat settings, and water flow at multiple fixtures.
Check tank size versus household demand, inspect for parallel simultaneous draws, verify thermostats set to expected temperature, and test hot recovery after full draw.
Evaluate cross-connections, partially closed valves, and sediment reducing effective capacity.
Water too hot or fluctuating temperature
When water from fixtures is uncomfortably hot or temperatures vary unpredictably, initial diagnosis focuses on identifying whether the issue is control-related, supply-related, or a mixing problem.
The technician checks thermostat settings, verifies thermostat and high-limit switch function, and inspects wiring and element operation.
They also evaluate incoming cold-water temperature, cross-connections, and malfunctioning mixing valves or shower cartridges to pinpoint the fault.
Leaks, strange noises, and odors what they indicate
Several common signs — visible drips, banging or popping sounds, and stale or rotten smells — quickly narrow the likely causes of hot water heater problems.
Drips suggest loose fittings, a failing tank, or a leaking pressure relief valve.
Popping indicates sediment buildup on the element.
Rotten odors point to bacterial growth in the tank.
Each symptom guides targeted inspection and corrective action.
Step-by-Step Troubleshooting Procedures
The technician proceeds through a clear sequence of checks to isolate the fault and restore operation. Key tasks include verifying power and breakers, testing thermostats and elements, and replacing faulty components as needed:
- confirm power and reset breakers
- test thermostats and heating elements with a multimeter
- inspect and replace heating elements or thermostats
- test and replace the high-limit (reset) switch
Each step is performed methodically to guarantee safety and accurate diagnosis.
Verifying power supply and reset breakers
Begin by confirming the heater has a reliable electrical supply before inspecting internal components.
Check the main breaker and the dedicated circuit breaker for the water heater, ensuring they are on and properly seated.
Inspect the GFCI or local disconnect, reset any tripped breakers, and verify the service panel for burned contacts.
Restore power only after confirming safe wiring and no visible damage.
Testing thermostats and heating elements with a multimeter
Proceed to test the thermostat and heating elements with a multimeter to pinpoint failures before replacing parts.
With power off and panels removed, check thermostat continuity and temperature sensor terminals per manufacturer specs.
Measure element resistance; compare to expected ohms.
Inspect for open circuits or short to ground.
Record readings, label wires, and only replace components when tests confirm failure.
Inspecting and replacing heating elements
Having verified thermostats and elements with the multimeter and documented the findings, the technician moves on to inspect and, if necessary, replace the heating elements.
After draining the tank and isolating power, the element access panels are opened, wires labeled and detached, and elements removed.
New elements are cleaned, fitted with proper gaskets, torqued to specification, rewired, and the tank refilled and tested for leaks.
Checking and replacing thermostats
When the heating elements are confirmed functional or replaced, attention shifts to the thermostats, which regulate temperature and control each element’s power. A faulty thermostat can mimic element failure or cause overheating.
Disconnect power, remove access panels and insulation, test thermostats with a multimeter for continuity and proper temperature setting.
Replace defective thermostats with exact-spec replacements, reconnect wiring, restore insulation and power, then verify operation.
Testing and replacing the high-limit (reset) switch
If the thermostats test good but the heater still trips or produces no heat, the high-limit (reset) switch is the next component to inspect.
Disconnect power, remove access panel and insulation, and test continuity across the switch with a multimeter.
Replace the switch if open or intermittently closing.
Reassemble, restore power, and verify normal operation and that trips no longer occur.
Flushing the tank to remove sediment and improve efficiency
Flush the tank to remove accumulated sediment that reduces heating efficiency and can cause noisy operation or premature element failure.
Drain power, close cold-water supply, attach hose to drain valve, open a hot-water faucet to vent.
Open drain, flush until clear, close drain, refill slowly, restore power.
Inspect valve for leaks and repeat annually or as needed based on water quality.
Inspecting and replacing the anode rod
After flushing the tank to remove sediment, attention turns to the anode rod, which protects the tank from corrosion by attracting corrosive elements.
The technician locates and removes the rod with proper tools, inspects for severe pitting or depletion, and measures remaining thickness.
If heavily corroded or less than manufacturer specs, the rod is replaced, tightened to proper torque, and the tank refilled and checked for leaks.
Repairing or replacing leaking valves and fittings
Begin by locating the source of the leak—common culprits include the pressure-relief valve, drain valve, inlet/outlet connections, and threaded fittings—and then isolate the water and power supply before proceeding.
Tighten loose fittings, replace deteriorated washers or packing, and swap corroded valves. Use plumber’s tape on threads, install a new pressure-relief or drain valve if necessary, then restore supply and test for leaks.
Detailed Repair Walkthroughs
The following section presents concise, stepwise repair walkthroughs for common electric water heater tasks.
It covers safe removal and replacement of heating elements, adjustment or replacement of thermostats, tank flushing and descaling, anode rod replacement, and repair or replacement of leaking valves including the temperature-pressure relief valve.
Readers are guided through required tools, safety precautions, and key diagnostic checks for each procedure.
How to safely remove and replace a heating element
To remove and replace a water heater element safely, the technician first isolates power and drains the tank to avoid electrocution and scalding.
Next, they disconnect wiring, remove the access panel and insulation, and loosen the element with a proper wrench.
After cleaning the flange and applying a new gasket, the replacement element is tightened, wired, tank refilled, and power restored while checking for leaks and correct operation.
How to adjust or replace thermostats
Technicians working on water‑heater thermostats should first verify power is isolated and the tank is cool to prevent shock or burns.
After confirming isolation, remove access panel and insulation.
Test thermostats and elements with a multimeter.
Adjust temperature dial or replace faulty thermostat with model-matching unit.
Reinstall insulation and panel, restore power, then verify correct temperature and absence of tripping breakers or leaks.
How to flush and descale the tank
After completing thermostat checks and repairs and restoring power, attention should shift to removing sediment and mineral buildup inside the tank to restore efficiency and prolong service life.
Shut power and cold-water supply, attach a hose to the drain valve, open a hot tap, and drain until clear.
Flush with fresh water; repeat until debris stops.
Close valves, refill, and restore power.
How to replace the anode rod
One clear step in maintaining an electric hot water heater is replacing the anode rod, a sacrificial component that prevents tank corrosion by attracting corrosive elements.
First, power and water supply are turned off and the tank is drained below the rod level.
The old rod is unscrewed with a breaker bar, inspected, and replaced with a matching new rod sealed and tightened before refilling.
How to repair common valve leaks and replace a pressure relief valve
Start by isolating the heater: shut off power at the breaker and close the cold-water supply, then relieve tank pressure by opening a hot tap.
Drain below the leak, inspect and tighten valve fittings, replace worn washers or packing.
For a faulty T&P valve, drain to below the valve, unscrew the old valve, apply thread sealant, install a compatible replacement, refill and test for leaks.
Troubleshooting Scenarios and Solutions
Troubleshooting common failure modes helps isolate whether the issue is electrical, thermal, or structural.
Typical scenarios include:
- breaker trips repeatedly after repairs
- element hums or cycles but no heating
- short supply of hot water after draining/maintenance
- persistent leak at tank seam or bottom
Each case requires specific tests and targeted remedies to restore reliable operation.
Case: Breaker trips repeatedly after repairs
When a circuit breaker trips repeatedly after service, it signals an unresolved electrical fault or improper reassembly rather than a cosmetic issue.
The technician should power down, verify correct wiring, secure terminals, inspect for pinched insulation or moisture, and test elements and thermostats for short-to-ground.
Replace damaged components, guarantee proper breaker rating and wiring connections, then retest under controlled conditions before restoring normal operation.
Case: Element hums or cycles but no heating
A humming or cycling element that fails to heat indicates an electrical, thermostat, or element failure rather than a simple audible quirk.
Inspect wiring and connections for loose or corroded terminals, test thermostats for proper switching, and measure element resistance and continuity.
Replace a failed element or thermostat.
If wiring and components are good, check for correct voltage at the element before final repairs.
Case: Short supply of hot water after draining/maintenance
Drainage or routine maintenance can sometimes leave a tank delivering less hot water than expected, typically due to issues like trapped cold water, incorrect thermostat settings, partially closed valves, or sediment redistribution.
Inspect inlet/outlet valves, reseat dip tube, flush to remove settled sediment, verify thermostat temperatures and proper element operation, and confirm recovery time.
Restore normal flow and allow full reheating before retesting.
Case: Persistent leak at tank seam or bottom
Addressing a persistent leak at the tank seam or bottom requires prompt identification of the leak source and assessment of the tank’s condition to determine whether repair or replacement is appropriate.
The seam or base leak usually indicates corrosion or structural failure; temporary patching is unreliable.
Recommend immediate drain, power off, and replacement of the tank. Salvageable parts (elements, thermostat) can be transferred by a qualified technician.
When Replacement Is Better Than Repair
The section outlines clear indicators that a water heater is nearing end-of-life, such as frequent breakdowns, rust, leaks, and inefficient heating.
It then compares repair costs to replacement expenses and expected remaining service life to determine the better financial choice.
Finally, it summarizes criteria for selecting an appropriate replacement electric unit, including capacity, energy efficiency, and installation considerations.
Signs the water heater is at end-of-life
When is it time to replace rather than repair a hot water heater?
Visible rust, persistent leaks, frequent element or thermostat failures, diminished capacity or fluctuating temperatures, loud rumbling from sediment buildup, and age beyond typical lifespan (usually 8–12 years) indicate end-of-life.
Recurrent problems despite repairs, corroded tank interior, or safety concerns (scaling, pressure issues) justify replacement over continued fixes.
Cost vs. benefit analysis for repair vs. replace
Deciding whether to repair or replace a hot water heater depends on comparing projected repair costs, remaining service life, efficiency losses, and potential failure risks. Repairs suit recent units with minor faults; replacement often wins for frequent failures, major corrosion, or high operating costs. Use this quick comparison:
| Factor | Consideration |
|---|---|
| Age | Years of service |
| Cost | Repair vs replacement |
| Reliability | Failure risk |
| Efficiency | Energy loss |
| Safety | Corrosion/leaks |
Choosing the right replacement electric water heater
How should one choose a replacement electric water heater to guarantee long-term value and reliable performance?
Selection hinges on capacity matching household demand, energy efficiency (look for high EF or Energy Star ratings), unit type (tank vs. tankless), warranty length, and reputable brand/service availability.
Consider installation complexity, local code compliance, and total lifecycle cost rather than upfront price alone for ideal long-term value.
Maintenance Schedule to Prevent Future Problems
A concise maintenance schedule helps prevent failures and extend an electric hot water heater’s life by assigning tasks at clear intervals.
Key items to track visually include:
- monthly anode and leak checks
- annual flush, thermostat calibration, and element inspection
- multi-year tank inspection and sacrificial anode replacement
- noted energy-saving settings, efficiency tweaks, and warranty dates
Keeping short records of each service and any warranty work simplifies future troubleshooting and claims.
Monthly, annual, and multi-year maintenance tasks
Regularly scheduled checks—monthly, annually, and every few years—keep an electric hot water heater operating efficiently and prevent small issues from becoming costly failures.
This maintenance schedule prioritizes quick visual inspections, periodic testing, and component replacement at defined intervals to extend service life and guarantee safety.
Monthly: check for leaks, pressure, and thermostat settings.
Annually: test T&P valve, flush tank, inspect wiring.
Every few years: replace anode rod, service elements.
Energy-saving settings and efficiency tips
Beyond routine inspections and component replacements, optimizing energy settings and simple efficiency measures can substantially reduce operating costs and slow wear on the heater.
Lower thermostat to 120°F, insulate tank and pipes, install a timer or smart controller, and fix leaks promptly.
Flush annually to remove sediment, use efficient showerheads, and consider heat pump or hybrid replacements when upgrading to maximize long-term savings and performance.
Record-keeping and warranty considerations
Keeping detailed records of maintenance, repairs, and component replacements helps guarantee warranty compliance and makes future troubleshooting faster and more accurate.
The owner should log dates, parts, serial numbers, technician names, receipts, and photos. Store documentation digitally and retain originals.
Review warranty terms for required intervals and authorized service providers. Timely entries support claims, extend equipment life, and simplify insurance or resale processes.
Safety and Code Compliance Reminders
When addressing repairs on an electric hot water heater, attention to electrical code and proper grounding is essential to prevent shock and fire hazards.
The temperature and pressure relief valve must meet current specifications and be tested or replaced when required to avoid catastrophic failures.
Local permit and inspection requirements should be confirmed before major work to guarantee compliance and safe installation.
Electrical code considerations and grounding
Electrical work on a hot water heater must meet local and national electrical codes to guarantee safety and legal compliance.
Grounding and bonding are essential: a dedicated circuit, correct wire gauge, and properly sized overcurrent protection are required.
Connections must be tight, junctions inside approved boxes, and grounding conductors continuous to the equipment grounding terminal.
Inspections and permits should be obtained where mandated.
Temperature and pressure relief valve requirements
Guarantee a properly sized and functioning temperature and pressure (T&P) relief valve is installed on every hot water heater to prevent overpressure and scalding hazards.
The valve must discharge to an approved drain, be rated for the heater’s maximum temperature and pressure, and be accessible for testing and replacement.
Tampering or sealing the valve is prohibited; follow manufacturer and code specifications.
Local permit and inspection triggers
Many jurisdictions require a permit and one or more inspections for installation, replacement, or major modification of a hot water heater to validate compliance with safety codes.
Homeowners should verify local requirements before starting work; failing to obtain permits can void insurance and lead to fines.
Inspectors confirm proper venting, electrical connections, seismic strapping, T&P valve installation, and drainage to ascertain safe operation and code compliance.
Troubleshooting Checklist and Quick Reference
A concise troubleshooting checklist and quick reference can help identify and resolve the most common electric hot water heater failures.
Below is a simple visual prompt to suggest what such a one-page guide and parts list might include:
- Fault checklist: no heat, insufficient heat, leaks, tripped breaker
- Diagnostic steps: power check, thermostat setting, element test, reset procedure
- Parts to keep on hand: heating element, thermostats, high-limit switch, replacement gaskets
- Emergency supplies: screwdriver, multimeter, plumber’s tape, portable heater
One-page diagnostic checklist for common failures
When diagnosing an electric hot water heater, a concise one-page checklist helps technicians and homeowners quickly identify probable causes and prioritize corrective actions.
It lists symptoms, likely failures, and immediate checks (power, thermostat, heating elements, tank leaks, and pressure-relief issues) so troubleshooting proceeds systematically and safely.
The checklist pairs symptoms with ranked probable causes and immediate tests, plus safety reminders and follow-up verification steps.
Parts checklist for emergency repairs
With the diagnostic checklist complete, attention shifts to the parts and tools needed for emergency repairs so responders can act without delay.
A compact kit should include replacement thermostats, heating elements, high-limit switches, thermostatic and pressure relief valves, drain pans, dielectric nipples, shutoff tools, pipe sealant, assorted fittings, electrical connectors, multimeter, insulated screwdrivers and gloves.
Inventory labeled, accessible, and periodically inspected.
Additional Resources and Where to Get Help
For complex or electrical issues, the reader is advised to locate qualified technicians or licensed electricians through local trade directories, review sites, or utility provider referrals.
Manufacturer support lines, product manuals, and parts lookup tools should be consulted for model-specific guidance and genuine replacement parts.
Reputable online guides and step‑by‑step video tutorials from manufacturers or trusted plumbing/electrical channels can supplement professional help and clarify basic procedures.
How to find qualified technicians and electricians
Where should homeowners begin when an electric hot water heater needs professional attention?
Homeowners should verify licensure, insurance, and local code compliance.
Check trade associations, utility company referrals, and certified review platforms for technicians with water-heater or residential electrical experience.
Request written estimates, ask about warranty coverage and parts sourcing, and confirm clear communication on timelines, safety procedures, and disposal of old equipment.
Manufacturer support, manuals, and replacement part lookup
After confirming licensure and obtaining estimates, homeowners should turn to the water heater’s manufacturer for technical guidance, manuals, and authentic replacement parts.
Manufacturer websites often provide model-specific installation guides, wiring diagrams, part numbers, and warranty details.
Contact authorized support for compatibility checks and genuine components.
Record model and serial numbers before ordering, and verify return policies and OEM certifications to guarantee safe, correct repairs.
Recommended online guides and video tutorials
Several reputable online resources and step‑by‑step video tutorials can guide homeowners through electric hot water heater troubleshooting, maintenance, and parts replacement.
Trusted sources include manufacturer channels, trade school videos, DIY blogs, and community forums offering clear procedures, safety emphasis, and parts guidance.
- Manufacturer video walkthroughs
- Vocational school demonstrations
- Detailed DIY blog guides
- Forum troubleshooting threads
Conclusion
The guide ends with a hush: the heater’s hum either steadies or stalls, and the next move will decide comfort for nights to come. Tools are laid down, a final safety check completed, and the sense of unfinished possibility lingers — repairs made, or a hidden fault waiting its moment. One careful test, one cautious reset, and the answer will arrive; until then, vigilance keeps the household warm and the story unresolved.