How to Install an Outdoor Gas Tankless Water Heater: Step-by-Step Guide for DIY & Pros
Installing an outdoor gas tankless water heater involves mounting the unit on an exterior wall, connecting it to your home’s gas and water systems, and integrating electrical controls for freeze protection. This task can vary from a straightforward DIY project to a complex job requiring licensed professionals, depending on safety and code requirements. Key considerations include proper sizing, gas-line capacity, venting clearances, and necessary permits. Always adhere to manufacturer guidelines and local codes for safe operation. Below, you will find a detailed step-by-step procedure to guide you through the installation process.
Quick overview: Outdoor gas tankless water heater installation at a glance
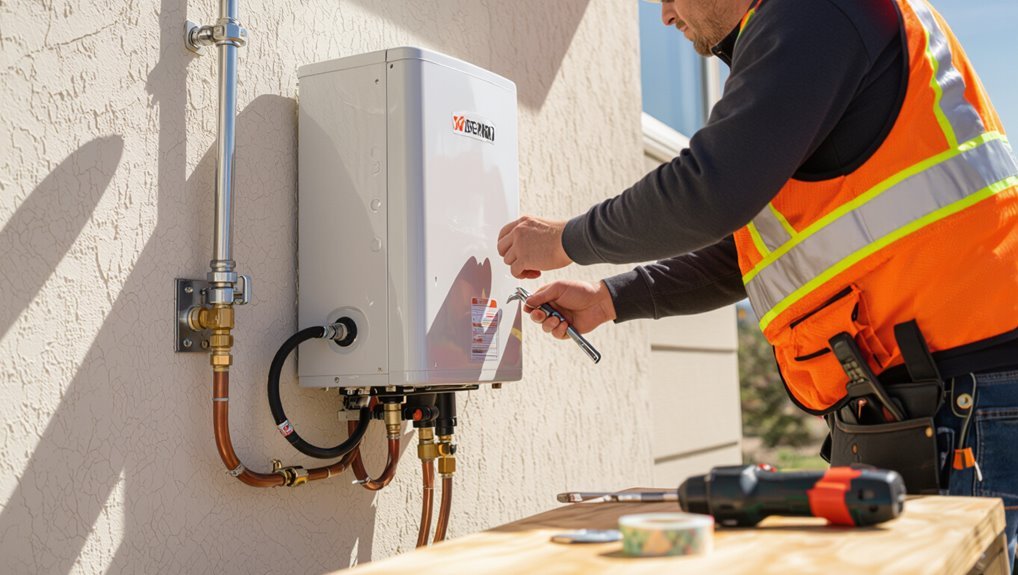
The overview outlines who can reasonably tackle an outdoor gas tankless water heater as a DIY project and when a licensed professional is advisable.
It summarizes typical project time, difficulty level, and cost ranges to set expectations.
It also highlights essential safety and legal considerations—permits, local codes, and required inspections—that can affect feasibility and liability.
Who should attempt DIY vs. when to hire a pro
Who is suited for a DIY outdoor gas tankless water heater installation depends on experience, local code familiarity, and comfort with gas and plumbing work.
DIY is appropriate for competent homeowners who have prior gas, venting, and plumbing skills and can follow manufacturer instructions for how to install outdoor gas tankless water heater.
Hire a licensed pro for gas hookups, permits, complex venting, or uncertainty.
Typical project time, difficulty, and costs
A straightforward outdoor gas tankless water heater replacement typically takes a skilled installer 3–6 hours.
In contrast, a first-time DIYer should budget a full day or more to allow for careful measuring, fitting, and troubleshooting.
Difficulty ranges from moderate to advanced depending on gas and venting work.
Typical costs: $800–$2,500 for unit and basic install; $2,500–$6,000+ for complex hookups or high-end models.
Key safety and legal considerations (permits, codes, inspections)
Several critical safety and legal steps govern outdoor gas tankless water heater installations: permits, local building and fuel-gas codes, proper venting and clearances, gas-line sizing and pressure requirements, and post-installation inspections.
Installers must verify jurisdictional requirements, obtain permits before work, follow manufacturer and code specifications, use certified gas fittings, and schedule inspections.
Noncompliance risks fines, voided warranties, and safety hazards.
How outdoor gas tankless water heaters work and why choose one
Outdoor gas tankless water heaters heat water on demand by igniting a gas burner as flow sensors signal a tap opening, providing a continuous stream without a storage tank.
Compared with indoor tanks and tankless units, they trade protected placement for simpler venting and reduced freeze risk, while presenting considerations for weather exposure, maintenance, and initial cost.
Typical applications include whole-house or point-of-use service, sized by required flow rate and temperature rise to match peak simultaneous fixtures.
Basic operating principles of gas tankless units
Installers and homeowners can expect a gas tankless water heater to heat water on demand by igniting a burner only when flow is detected. Cold water enters the unit, a flow sensor signals the gas valve and ignition system, and the heat exchanger raises the temperature before delivering hot water without storing it.
Controls modulate gas flow for set temperature, while exhaust vents combustion products and safety sensors prevent overheating or flame failure.
Advantages and disadvantages compared with indoor tank and tankless systems
Having outlined how gas tankless units heat water on demand, attention turns to comparing outdoor gas tankless models with indoor tank and tankless systems.
Outdoor units avoid indoor venting, save interior space, resist freeze with proper models, and simplify installation.
Downsides include exposure to weather, potential noise, limited placement options, and slightly higher risk of heat loss or theft compared with indoor alternatives.
Common use cases and sizing overview (flow rate and temperature rise)
A handful of typical scenarios — a small apartment with one shower, a family home with two simultaneous showers, or a vacation cottage needing freeze protection — illustrate when an outdoor gas tankless water heater is most appropriate and how to size it.
Calculate required flow rate (GPM) from fixture demand, determine temperature rise (incoming vs desired), then choose a unit whose GPM at that rise meets peak demand.
Pre-installation planning and requirements
Before any work begins, the installer evaluates site selection for outdoor mounting, confirming clearances, mounting substrate, and exposure to weather.
They verify local codes, obtain required permits, notify the gas utility if needed, and check that the gas meter and lateral can supply the heater’s demand with correctly sized piping.
Finally, the planner reviews water supply and return routing, electrical service and grounding for controls/ignition, and freeze-prevention measures to guarantee system compatibility and safety.
Site selection criteria for outdoor mounting
When selecting a location for an outdoor gas tankless water heater, the site must balance accessibility, ventilation, and protection from weather while complying with local codes.
Choose a stable, non-combustible surface near required utilities but clear of obstructions.
Guarantee adequate clearance for service and airflow, avoid direct spray or pooling, minimize exposure to prevailing winds, and position for secure mounting and condensate drainage.
Local code, permit, and utility notification checklist
Proper compliance with local codes, permit requirements, and utility notification procedures is essential to a lawful and safe gas tankless water heater installation.
Confirm applicable building and plumbing codes, obtain required permits, and submit plans if mandated.
Notify the utility of proposed work, schedule inspections, and secure clearances for outdoor venting and combustion air.
Retain documentation and inspection records before proceeding.
Gas supply assessment: meter capacity and line sizing
A thorough gas supply assessment evaluates whether the existing meter and piping can reliably deliver the heater’s peak and continuous BTU demand, accounting for other simultaneous gas appliances and future load growth.
It quantifies required BTU/hr, compares meter capacity, calculates pressure drop and appropriate pipe size (material, length, fittings), and identifies need for service upgrade, regulators, or balancing to guarantee safe, code-compliant operation.
Water supply and return plumbing considerations
Plumbing considerations for tankless gas water heaters require confirming that cold-water supply, hot-water distribution, and return lines match the unit’s flow and pressure specifications and comply with local codes.
Evaluate pipe sizing, materials, and fittings for pressure loss and thermal expansion.
Plan dedicated isolation valves, a properly sized recirculation loop if needed, inlet filtration, condensate drainage, and freeze protection per manufacturer guidance.
Electrical requirements and grounding (controls, ignition, freeze prevention)
With supply, distribution, and recirculation routes established, attention turns to the electrical systems that enable ignition, controls, and freeze-prevention features for a gas tankless water heater.
Dedicated circuit, proper voltage per manufacturer, and GFCI protection are required. Equipment grounding and bonded enclosure guarantee safety.
Controls, ignition modules, and optional heated-trace or pad thermostats must be wired per local code and manufacturer specifications.
Venting and clearances specific to outdoor units
When planning an outdoor gas tankless water heater installation, verify venting and clearances meet manufacturer specifications and local codes to prevent combustion hazards, allow service access, and avoid heat or exhaust exposure to nearby materials or openings.
Maintain required clearances from doors, windows, vents, eaves, and combustible siding. Confirm exhaust discharge angles and termination distances prevent downdrafts, water ingress, and impacts to neighboring properties.
Tools, materials, and safety gear checklist
Before beginning installation, assemble a concise checklist of tools, materials, and safety gear tailored to the specific gas tankless model and site conditions; this guarantees efficient workflow, compliance with codes, and reduced risk of injury or rework.
Recommended items include:
- Adjustable wrenches, pipe cutters, thread sealant.
- PVC/venting materials and mounting hardware.
- Gas line fittings and leak detection solution.
- Electrical supplies and conduit.
- PPE: gloves, eye protection, respirator, lockout/tagout.
Choosing the right outdoor gas tankless model
Selecting an outdoor gas tankless unit begins with accurate sizing: determine required GPM and temperature rise to meet peak household demand.
The buyer should compare fuel type and efficiency ratings (EF/UE) and review features such as freeze protection, condensate management, recirculation capability, and Wi‑Fi connectivity.
Warranty terms and available maintenance support are equally important for long‑term reliability and cost of ownership.
Sizing for demand: calculating GPM and temperature rise
Proper sizing for an outdoor gas tankless water heater requires calculating peak flow in gallons per minute (GPM) and the necessary temperature rise to meet household demand. Determine simultaneous fixture use, add individual GPMs, then subtract inlet temperature from desired output to find temperature rise. Match GPM×rise to unit capacity; allow margin for cold snaps.
| Need | Feeling |
|---|---|
| Accuracy | Relief |
| Margin | Confidence |
| Capacity | Security |
| Simplicity | Calm |
| Safety | Trust |
Fuel type and efficiency ratings (EF/ULE) to compare
How should one weigh fuel type and efficiency ratings when choosing an outdoor gas tankless water heater?
One evaluates available fuels—natural gas versus propane—by local supply, installation cost, and BTU output.
Compare Energy Factor (EF) and Uniform Energy Factor (UEF) values to estimate real-world efficiency and operating cost.
Higher EF/UEF means lower fuel consumption; balance initial price, venting needs, and expected usage patterns.
Features to evaluate (freeze protection, condensate, recirculation, Wi’Fi)
When evaluating outdoor gas tankless water heaters, buyers should prioritize features that affect reliability, maintenance, and convenience.
Essential elements include robust freeze protection (internal heating/insulation), condensate management for high-efficiency units, integrated or compatible recirculation for instant hot water and reduced waste, and Wi-Fi diagnostics/control for remote monitoring.
Each feature reduces weather, performance, and service issues; choose based on climate and usage.
Warranty and maintenance support considerations
Although features and performance drive initial selection, warranty terms and available maintenance support often determine long-term satisfaction with an outdoor gas tankless water heater.
Buyers should compare warranty length, coverage scope (heat exchanger, parts, labor), transferability, and claim process.
Assess manufacturer service networks, authorized technicians, documented maintenance requirements, and availability of replacement parts to minimize downtime and preserve warranty eligibility.
Step-by-step installation process
The installation begins with preparing the mounting surface and laying out the unit location to guarantee proper clearances and support.
Next, the heater is securely fastened to the exterior wall and the gas line is sized, fitted with a shutoff, and tested for leaks.
Finally, water connections—including supply, outlet, and pressure relief valve—are made and checked, followed by electrical hookup for power, grounding, and control wiring.
Preparing the mounting surface and location layout
Several clear measurements and checks must be completed before mounting a gas tankless water heater to guarantee safe operation and service access.
Assess wall strength, stud location, and exterior cladding; confirm clearance to windows, doors, and combustibles per code; plan gas, water, condensate, and venting runs with minimal bends; verify access for maintenance and service panel placement; mark mounting points and weatherproofing details.
Mounting the unit securely to exterior wall
With mounting points marked and clearances verified from the previous layout checks, the installer proceeds to secure the tankless unit to the exterior wall using a systematic, fastener-appropriate sequence.
Anchors are chosen for siding or masonry, level bracket placement is confirmed, fasteners torqued to manufacturer specs, and vibration isolation pads fitted.
Final checks guarantee plumb, secure attachment, and unobstructed venting paths.
Connecting the gas line: sizing, shutoff, and leak testing
Begin by confirming the correct gas pipe size, shutoff location, and pressure requirements on the manufacturer’s spec sheet and local code before making any connections.
Route approved piping to the inlet, install a readily accessible manual shutoff valve, and use proper fittings and supports.
After completing connections, pressurize the system with recommended test gas, apply a leak-detection solution, and rectify any bubbles or faults.
Water connections: supply, outlet, pressure relief valve, and checking for leaks
Once the gas line is verified and sealed, the installer proceeds to the water connections: attaching the cold-water supply to the inlet, routing the hot outlet to the domestic distribution, and fitting a temperature/pressure relief (TPR) valve per the manufacturer’s instructions and local code.
Shutoff valves and unions are installed for serviceability.
System is pressurized, inspected for leaks at fittings, joints, and TPR discharge; correct as needed.
Electrical hookup: power, grounding, and control wiring
Several basic electrical tasks are required to power a tankless gas water heater safely and reliably: providing the correct voltage and circuit protection, establishing a solid equipment grounding conductor, and routing control wiring between the unit and any external thermostats or remote controls.
Verify manufacturer voltage and amperage, install dedicated breaker and conduit, connect ground to chassis, run low-voltage control cable per diagram, and secure all connections.
Installing condensate/drain lines and freeze protection measures
Because high-efficiency gas tankless water heaters produce acidic condensate and can be vulnerable to freezing, the installer must route a dedicated condensate/drain line and incorporate freeze protection where required.
Use corrosion-resistant piping to a permitted drain or neutralizer, maintain proper slope, install a trap and access cleanout, and protect exposed lines with heat tape, insulation, or trace heating tied to thermostat controls to prevent freeze damage.
Testing ignition, burner operation, and initial startup procedure
Begin the initial startup by verifying all utility connections, venting, and safety devices are correctly installed and the system is filled and purged of air.
Open gas slowly, confirm correct gas pressure at the appliance, then power unit.
Observe ignition sequence, flame pattern, and burner stability.
Check for audible or visual fault indicators and immediate gas or water leaks.
Record initial operating parameters.
Commissioning: setting temperature, safety checks, and performance verification
Commissioning confirms the heater delivers required temperatures safely and efficiently.
The technician sets target outlet temperature, verifies thermostat calibration, and programs lockouts.
Perform gas leak, combustion, and ventilation safety checks, plus water pressure and drip tests.
Measure flow rate and temperature rise under typical loads, document results, adjust settings for efficiency, and explain operation and maintenance to the owner.
Post-installation tasks and maintenance
After installation, regular upkeep guarantees reliable performance and extends the unit’s lifespan.
Routine flushing and descaling, seasonal winterization for outdoor units, and attention to startup hiccups should be outlined with clear schedules and procedures.
A concise list of recommended spare parts and service intervals completes the maintenance plan.
Flushing and descaling schedule and procedure
Regular flushing and periodic descaling prevent mineral buildup that reduces efficiency and shortens the lifespan of a gas tankless water heater.
Establish a schedule based on local water hardness—typically flushing every 6–12 months and descaling every 12–24 months—and follow the manufacturer’s procedures for isolation, flushing with a pump and appropriate cleaner, and thorough rinsing before returning the unit to service.
Use compatible descalers, record dates, and inspect filters.
Seasonal maintenance and winterization tips for outdoor units
When exposed to freezing temperatures and seasonal weather extremes, outdoor gas tankless water heaters require specific maintenance and winterization to prevent freeze damage, vent blockages, and performance loss.
Owners should follow a concise checklist that includes insulating exposed pipes, protecting external components, and preparing the unit for extended idle periods.
Drain low spots, install heat tape with thermostat, clear vents of debris, cover during storms, and test freeze sensors.
Troubleshooting common startup and operation issues
Diagnose common startup and operation issues by systematically checking fuel supply, venting, water connections, and error codes to isolate the cause quickly.
Technicians then inspect sensors, pressure, and ignition paths, reset safely, and log failures for patterns.
- Verify gas valve and pressure
- Confirm combustion air and exhaust clearance
- Check inlet filter and flow rates
- Read and record error codes
- Test ignition sequence and flame stability
Recommended spare parts and service intervals
A concise kit of spare parts and a defined service schedule help minimize downtime and extend the unit’s life.
Recommended spares: ignition electrodes, flame sensors, pressure relief valves, inlet/outlet filters, condensate trap, gaskets, control board fuse.
Service intervals: visual inspection and filter cleaning every 6 months, descaling and combustion check annually, full diagnostic and gas-pressure calibration every 2–3 years; replace wear parts as needed.
Safety risks, code pitfalls, and common mistakes to avoid
Typical DIY errors—improper venting, undersized gas lines, and incorrect condensate routing—are the most frequent causes of malfunction and premature failure.
Gas-related hazards such as leaks, backdrafting, and inadequate combustion air require specific inspection checkpoints and immediate correction.
Failure to obtain permits or meet local code during installation often leads to costly rework and failed final inspections.
Typical DIY errors and how to prevent them
Because improper installation can create immediate hazards and long-term failures, DIYers should be aware of the most common errors when fitting a gas tankless water heater.
Typical mistakes include undersized venting, incorrect gas line sizing, poor mounting or lack of support, inadequate condensation management, improper water/pressure connections, and ignoring local codes.
Prevention: follow manufacturer specs, verify calculations, use proper fittings, inspect, and obtain permits.
Gas safety hazards and inspection points
Having covered common DIY errors, attention must turn to the gas-specific hazards and inspection points that determine safe operation.
Inspect for leaks, proper venting, correct gas line sizing, and secure fittings.
Verify combustion air, clearances, pressure settings, and proper condensate drainage.
Confirm appliance certifications and adherence to local codes.
Document testing and remedy any odor or CO indicators immediately.
Permitting and inspection failures that cause rework
Permit and inspection failures frequently force costly rework and prolong downtime when installations bypass code requirements or omit documentation.
Inspectors commonly reject improper venting, undersized gas lines, incorrect clearances, missing permits, and inadequate seismic or freeze protection.
Consequences include mandatory removal, fines, liability exposure, and delayed occupancy.
To avoid rework, secure permits, follow manufacturer and local codes, document stages, and schedule timely inspections.
Cost breakdown and ROI considerations
A clear itemization of upfront costs—unit price, materials, labor, and permit fees—frames the financial baseline for a gas tankless water heater installation.
Comparing long-term operating costs against tank heaters and electric alternatives helps quantify expected energy savings.
The decision to upgrade should hinge on payback period, household hot-water demand, and whether projected savings justify the initial expenditure.
Itemized typical costs: unit, materials, labor, permit
Cost estimates for installing a gas tankless water heater typically break down into four categories: the unit, installation materials, labor, and permits/inspections.
Typical unit prices range $700–$2,500.
Materials (venting, fittings, gas line, mounting) often add $150–$600.
Professional labor usually runs $500–$1,500 depending on complexity.
Permits/inspections vary by jurisdiction, commonly $50–$300.
Long-term operating cost comparison with alternatives
When comparing long-term operating costs, natural gas tankless units typically show lower fuel expenses per gallon-equivalent of hot water than standard tank heaters.
On the other hand, electric tankless models can be more efficient but often face higher utility rates.
Annual costs depend on local fuel prices, usage patterns, and standby losses.
Maintenance, venting, and descaling affect lifetime expenses; calculate payback against initial outlay for ROI.
When upgrading makes financial sense
If household hot-water demand, local fuel prices, and expected equipment lifespan align, upgrading to a tankless gas heater can be justified by a clear return on investment.
The decision hinges on comparing upfront purchase and installation costs, projected annual energy and maintenance expenses, and any available rebates or incentives against the savings from reduced fuel use and lower standby losses.
A concise cost breakdown, payback estimate, sensitivity to usage, and resale value impact guide the upgrade choice.
Real-world scenarios and examples
The section presents three practical installations to illustrate common choices and challenges.
First, replacing a failing outdoor tank with a tankless unit highlights key procedural steps and ventilation considerations.
Second and third examples cover a new-construction outdoor install with a long gas run and a cold-climate setup requiring a freeze-pack and recirculation strategy.
Example 1: Replacing a failing outdoor tank with a tankless unit (step highlights)
A homeowner removes the failing outdoor storage tank and prepares the area for a direct-replacement tankless gas unit, documenting existing gas, water, and electrical connections to inform layout and permit requirements.
They mount the new unit, adapt gas sizing and venting as needed, upgrade water fittings with isolation valves, install condensate/drain routing, complete electrical/ignition hookups, pressure-test, set temperature limits, and verify safe operation.
Example 2: New construction outdoor installation with long gas run
Begin planning the outdoor tankless gas heater installation by mapping the long gas run from the meter to the unit, noting pipe length, required diameter increases, and potential obstacles such as grading, driveways, or landscaping that affect trenching and routing.
Calculate pressure drop, select appropriate pipe material, size, and regulators.
Plan conduit for electrical and condensate, obtain permits, and schedule inspections before backfilling.
Example 3: Cold-climate installation with freeze-pack and recirculation
Moving from long outdoor gas runs to installations in cold climates highlights different priorities: protection against freezing and maintaining rapid hot-water availability.
The example describes an outdoor tankless unit with an integrated freeze-pack, insulated plumbing, and a demand-controlled recirculation loop.
Installation notes cover frost-resistant venting, pressure bypass, electric trace or insulated cabinet, and routing recirculation pump power and controls for reliable winter performance.
Additional resources and next steps
A concise checklist for final inspection and handover to the homeowner should be reviewed to confirm safe operation and completion of documentation.
Manufacturer manuals, relevant code references, and links to local permit offices provide the technical and regulatory details required for compliance.
Guidance on clear criteria for when to call a licensed plumber or gasfitter helps determine when professional intervention is necessary.
Checklist for final inspection and handover to homeowner
This checklist guarantees the installation meets code, manufacturer specifications, and homeowner expectations before final handover, covering safety systems, combustion venting, gas and water connections, condensate drainage, electrical components, and clearances.
- Verify gas pressure, leak tests, and proper fittings
- Confirm water tightness, flow, and anti-scald settings
- Inspect vent termination, clearances, and combustion air
- Test condensate routing and neutralization where required
- Demonstrate operation, controls, and provide maintenance guidance
Links to manufacturer manuals, code references, and permit offices
Once final inspection items and homeowner handover are complete, installers should collect and provide relevant manufacturer manuals, applicable code references, and contact information for local permit offices to support ongoing compliance and maintenance.
They must include clear links and brief notes on usage, warranty, and inspection requirements:
- Manufacturer installation and maintenance manual link
- Model-specific parts and warranty page
- Local building and gas code references
- Contact for municipal permit office
- Online permit lookup and inspection scheduling
When to call a licensed plumber or gasfitter
Judgment about when to call a licensed plumber or gasfitter hinges on safety, code compliance, and technical complexity. Homeowners should engage a professional for any work involving gas lines, combustion venting, pressure regulation, gas appliance connections, or structural modifications to flue or combustion air pathways.
Additionally, hire a pro for permits, leak testing, complex electrical integration, warranty-qualifying installations, or if uncertainty exists about local code interpretation.
Conclusion
After installing an outdoor tankless unit, the homeowner felt like a gardener transplanting a sapling: careful placement, roots (gas, water, venting) secured, and patience rewarded. One neighbor’s weatherproofed heater ran 30% more efficiently than the old tank, a small harvest from careful planning. The guide’s steps serve as the fertilizer—followed, they help installations take root reliably; ignored, they risk stunting performance or safety. Trust the process, cultivate prudence.