How to Install a Toilet Handle: Step-by-Step Guide for Beginners
How to Install a Toilet Handle: Step-by-Step Guide for Beginners
Installing a toilet handle is a straightforward process that can significantly improve your toilet’s functionality. To begin, shut off the water supply and drain the tank. Next, remove the old handle by loosening the retaining nut. Fit the new lever through the tank hole, secure it with the nut, and reconnect the lift chain to the flapper, ensuring there’s about half an inch of slack. Once everything is in place, restore the water supply, test the flush mechanism, and make any necessary adjustments for smooth operation. For additional assistance, refer to the troubleshooting tips and maintenance advice included in this guide.
What a Toilet Handle Does and When to Replace It
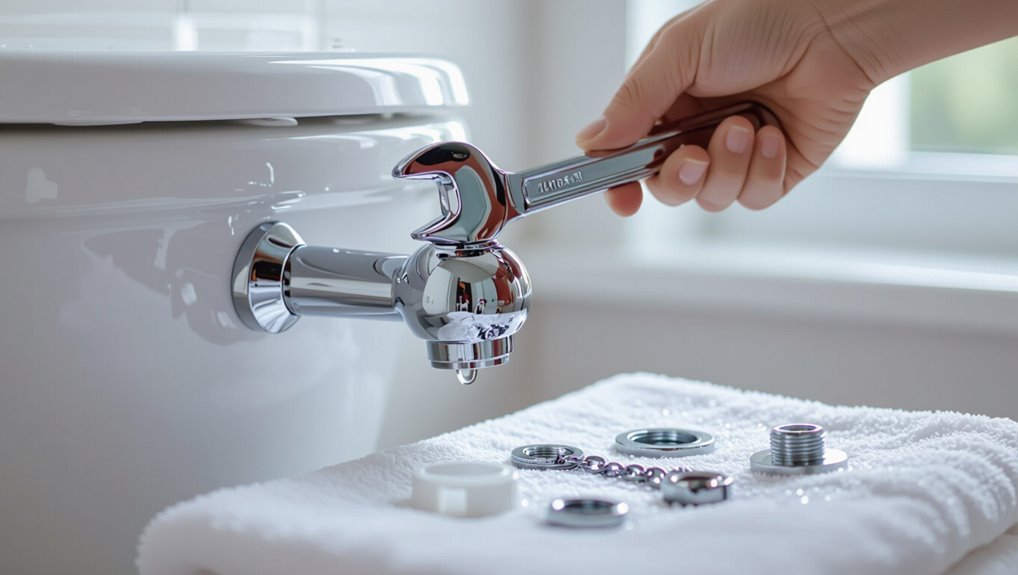
A toilet handle operates the flush mechanism and comes in several common styles, including lever, push-button, and decorative designs that connect to the flapper chain or lift arm.
Warning signs for replacement include sticking, wobbling, persistent corrosion, or a handle that fails to trigger a full flush.
Before beginning work, gather basic tools and parts such as an adjustable wrench, screwdriver, replacement handle assembly, and any needed lift chain or mounting hardware.
Purpose of the toilet handle and common handle types
Toilet handles serve as the mechanical interface between a user’s action and the flushing mechanism, transferring force to lift the flapper or activate a piston that releases water.
They guide proper operation in varied designs—lever, trip lever, push-button, and dual-flush systems—with materials like metal or plastic.
Understanding types aids decisions when learning how to install a toilet handle and selecting compatible replacements.
Signs your toilet handle needs replacement
When should a handle be replaced? Observable signs include loose or wobbly movement, visible corrosion, cracks or bent lever, persistent sticking or failure to return, and difficulty actuating the flush.
Repeated adjustments that don’t restore function, or internal arm breakage causing incomplete flushes, also indicate replacement.
Addressing issues promptly prevents leaks, incomplete flushes, or tank damage.
Tools and parts you need before starting
Because it connects the user’s action to the tank’s flushing mechanism, the handle and its linkages must be matched by specific tools and spare parts before beginning work.
Required items: replacement handle compatible with tank model, lift chain or strap, adjustable wrench, pliers, screwdriver, basin wrench if needed, thread seal tape, and a towel to catch drips.
Verify fit and finish.
Choosing the Right Replacement Handle
Choosing a replacement handle begins with confirming compatibility with the toilet’s tank lever style and internal flush mechanism to guarantee proper operation.
Attention to material, finish, and build quality affects longevity and resistance to corrosion in a humid bathroom environment.
Cost varies from inexpensive basic models to higher-end, more durable or decorative options, with upgrades justified for frequent use or visible fixtures.
Compatibility with tank lever styles and flush mechanisms
Although many replacement handles look similar, compatibility depends on two main factors: the tank lever style (left-, right-, or center-mounted) and the flush mechanism type (flapper, canister, or dual-valve systems).
Match handle arm length and mounting orientation to the lever position, and guarantee the connection method (chain clip, ballcock clip, or threaded nut) fits the tank’s actuator for reliable operation.
Material, finish, and durability considerations
A toilet handle’s material and finish affect both appearance and longevity, so selecting a replacement requires balancing corrosion resistance, wear characteristics, and compatibility with the bathroom’s environment.
Metal options (stainless, brass, zinc) offer strength and corrosion resistance; plastics resist mineral buildup and cost less.
Finishes (chrome, brushed, powder-coated) determine scratch and tarnish resistance.
Choose based on humidity, cleaning habits, and expected use.
Cost ranges and when to upgrade to a premium handle
Cost is a key factor when selecting a replacement toilet handle, typically ranging from economy options under $10 to premium models that can exceed $50.
Budget handles suit basic repairs, while mid-range choices balance durability and style.
Upgrade to premium for heavy use, distinctive finishes, smoother operation, or coordinated bathroom design; warranties and corrosion resistance justify higher cost for long-term value.
Step-by-Step Installation Process
The installation process begins with preparing the work area and, if needed, shutting off the water to prevent spills.
The old handle and lever assembly are removed, the tank arm and chain inspected and cleaned, and the new handle inserted through the tank hole.
Finally, the mounting nut is secured and the lever orientation adjusted for a proper flush.
Preparing the work area and turning off water (if necessary)
Before beginning, verify the immediate area around the toilet is clear of rugs, toiletries, and loose items to provide unobstructed access and prevent damage.
Inspect the supply line, shutoff valve, and tank for leaks. If work requires stopping water, turn the shutoff valve clockwise until snug, then flush to drain the tank.
Keep towels and a small bucket nearby for residual water.
Removing the old handle and lever assembly
Begin by locating the handle’s retaining nut inside the tank and the trip lever where it connects to the flush chain; these are the two components that must be disconnected to remove the assembly.
Hold the exterior handle, loosen the retaining nut with pliers or by hand, detach the trip lever from the chain, and slide the handle and lever out through the tank wall.
Inspecting and cleaning the tank arm and chain
After the handle and lever are removed, the tank arm and chain should be inspected for wear and proper alignment.
Examine the arm for bends or corrosion and the chain for rust, kinks, or stretched links.
Remove mineral buildup with a soft brush and vinegar.
Replace any damaged chain or straighten the arm to guarantee smooth, unrestricted movement before reassembly.
Installing the new handle through the tank hole
Insert the new handle shaft through the tank hole from the outside, aligning the decorative lever so it faces the bowl.
Feed the shaft gently, avoiding contact with the porcelain. Confirm the shaft passes fully through and the lever clears internal components.
Verify smooth rotation by turning the external lever; the internal arm should move without binding.
Withdraw if resistance occurs and reposition carefully.
Securing the mounting nut and adjusting lever orientation
Tighten the mounting nut onto the handle shaft from inside the tank, using fingers first and finishing with an adjustable wrench or pliers wrapped in tape to protect the finish.
Thread it snugly until the lever holds position without wobble but not so tight that the shaft binds.
Rotate the exterior lever to desired angle, guarantee smooth travel, and verify clearance against tank and lid before finalizing.
Reconnecting and adjusting the chain to the flapper
Reconnect the lift chain from the handle lever to the flapper by hooking it onto the flapper’s lift tab and selecting a link that allows the flapper to sit fully closed with the handle at rest.
Adjust chain length so there is slight slack but no droop that catches under the flapper.
Confirm clips or hooks are secure and not kinked; trim excess links if needed.
Testing the flush and making final adjustments
Begin by actuating the handle to perform several test flushes, observing the flapper seal, chain tension, and refill level on each cycle.
Adjust chain length to guarantee full flapper lift without overextension. Trim or reattach links as needed.
Verify the refill valve shuts off at the correct waterline. Confirm no leaks at the tank or handle mounting.
Repeat until reliable, efficient operation is achieved.
Troubleshooting Common Installation Problems
Common installation problems include a handle that feels loose or spins without engaging, a chain that is either too short or too long, and a handle that sticks or fails to return after flushing.
The discussion will cover chain-length fixes and the ideal slack, causes of continuous running after a handle replacement, and signs of corroded or broken parts inside the tank.
Recommended checks and simple repairs for each issue will be outlined.
Handle feels loose or spins without engaging
A loose or freely spinning toilet handle typically indicates a misaligned or improperly secured connection between the lever, nut, and lift arm; this prevents the trip mechanism from engaging and stops the flapper or flush valve from opening.
Inspect and tighten the retaining nut inside the tank, realign the lever and lift arm, replace stripped parts, and guarantee the handle shaft seats correctly to restore positive engagement.
Chain too short or too long’ fixes and ideal chain length
Adjusting the chain length between the handle lift arm and the flapper is essential for reliable flushing; if the chain is too short it can prevent the flapper from seating, while if too long it may tangle or fail to lift the flapper fully.
Aim for one-half inch of slack when the flapper is closed. Use the clip on the chain to shorten or add links to lengthen, testing until lift is complete.
Handle sticks or doesn’t return after flushing
If the handle sticks or fails to return after flushing, it usually indicates binding, corrosion, or misalignment in the lever assembly.
Inspect the lever, mounting nut, and arm for corrosion, bends, or loose fittings. Clean and lubricate pivot points with silicone grease, straighten or replace a warped arm, and tighten hardware.
Recheck clearance so the handle moves freely without catching.
Water continues running after replacing handle
When water keeps running after a handle replacement, the issue often lies beyond the visible lever and involves the flapper, chain length, or fill-valve adjustment.
Troubleshooting should begin by observing the tank while flushing to identify whether the flapper seals properly, the chain pulls taut, or the refill tube or float allows water to overfill.
Adjust chain slack, reposition the refill tube above the overflow, and fine-tune the float height to stop continuous flow.
Corroded or broken parts inside the tank
After confirming that the flapper, chain, refill tube, and float are functioning correctly, attention should shift to the condition of internal tank components themselves.
Corrosion, mineral buildup, or fractured parts—such as the fill valve, flush valve seat, or lever arm—can prevent proper sealing or movement.
Inspect, clean with vinegar or replace damaged components to restore reliable flushing and stop leaks.
Maintenance Tips to Extend Handle Life
Routine maintenance can prolong a toilet handle’s service life by keeping pivots and linkage clean and lightly lubricated.
Seasonal inspections and prompt minor repairs reduce the risk of sudden failure.
Replace worn chains, flappers, or arms at the first sign of damage to maintain reliable operation.
Cleaning and lubricating pivots and linkage
Inspect pivots and linkage for mineral buildup, corrosion, and worn pivots before attempting lubrication.
Remove loose debris with a soft brush and mild vinegar solution, then rinse and dry thoroughly.
Apply a small amount of silicone-based or PTFE lubricant to pivot points and sliding joints; avoid petroleum greases that attract grime.
Reassemble, operate the handle several times, and check for smooth, consistent movement.
Seasonal checks and quick fixes to prevent failure
Perform seasonal checks at the start of each heating and cooling cycle to catch wear before it causes failure.
Inspect the handle, mounting nut, and visible linkage for looseness, corrosion, or stiffness.
Tighten loose fittings, remove light rust, and apply a drop of silicone or Teflon-safe lubricant to pivot points.
Cycle the handle several times to confirm smooth operation and immediate correction of minor issues.
When to replace related components (chain, flapper, arm)
Replace the chain, flapper, or arm at the first signs of compromised function rather than waiting for a full failure.
Inspect for fraying, stretching, warped or hardened flappers, and bent or loose arms during monthly checks. Replace if leaks, weak flushes, repeated reseating, or corrosion appear.
Use compatible parts, test adjustments after installation, and keep spare common components on hand for quick maintenance.
Comparison of Handle Types and Mechanisms
Selection of a toilet handle often balances placement, material, and mechanism to suit both function and style. The table below highlights side- versus front-mount placement, plastic versus metal materials, and lever versus push-button/dual-flush mechanisms for quick comparison. Consider compatibility with the tank, user preference, and long-term durability when choosing.
| Placement | Material | Mechanism |
|---|---|---|
| Side-mount | Plastic | Traditional lever |
| Front-mount | Metal | Push-button |
| Compatibility/fit | Durability | Dual-flush conversion option |
Side-mount vs. front-mount handles
Handle placement—side-mount versus front-mount—affects both user ergonomics and the internal linkage used to operate the flush valve.
Side-mount handles typically connect to a horizontal lever and chain or lift wire, offering easier access for right- or left-handed users.
Front-mount handles attach to a vertical or offset rod, conserving tank rim space and simplifying alignment with certain flapper designs.
Plastic vs. metal handles
Both plastic and metal toilet handles balance durability, cost, and aesthetics in different ways.
Plastic handles are lightweight, corrosion-resistant, inexpensive, and easy to replace but can crack under stress.
Metal handles—brass, stainless, or zinc—offer greater strength, a premium look, and longer life, yet may corrode or tarnish without proper finish and often cost more upfront and require sturdier mounting.
Traditional lever vs. push-button or dual-flush conversions
Having covered material choices, attention turns to how the mechanism itself operates: traditional levers lift a flapper via a chain or lift wire, offering straightforward repair and wide compatibility, while push-button and dual-flush conversions use a top- or tank-mounted actuator to compress or lift an internal valve, often enabling water savings and a more compact appearance.
Choice depends on tank design, desired efficiency, and installation skill.
Safety and Best Practices
Care is advised to protect the porcelain tank by using padding and tightening fasteners only until snug to avoid cracks from overtightening.
Corroded or brittle parts should be handled with gloves and disposed of per local regulations to prevent injury and environmental harm.
A professional plumber should be contacted if leaks persist, threads are stripped, or the tank shows visible damage.
Protecting the porcelain tank and avoiding overtightening
When tightening a toilet handle or securing any tank-mounted hardware, it is essential to protect the porcelain from chips and cracks by using a protective washer or a small piece of rubber between metal and ceramic; applying even, moderate torque prevents damage that can result from overtightening.
Use hand tools with controlled force, check alignment before final snug, and test operation to confirm no stress or leaks at the contact points.
Safe handling of old corroded parts and disposal
Before touching corroded components, the installer should wear gloves and eye protection and guarantee the area is well-ventilated to avoid contact with rust particles or old chemical residues.
Corroded parts should be loosened gently with penetrating lubricant, inspected for structural failure, and contained in a sealed bag.
Dispose of metal and chemical-contaminated materials per local regulations; never mix with household recycling.
When to call a professional plumber
Who should be called in depends on the scope of the problem and the installer’s comfort level with plumbing tasks.
A professional plumber is advisable for persistent leaks, damaged or corroded internal tank components, unclear cause of flushing failure, or when access requires tank removal.
They guarantee proper diagnosis, parts compatibility, and water-safe repairs, preventing recurring issues and potential water damage.
Quick Reference Checklist
A compact checklist helps guarantee the toilet handle installation proceeds smoothly and without missing parts.
- Verify tools and parts: handle, mounting nut, chain, screwdriver, pliers.
- Follow the step-by-step action checklist: remove old handle, install new handle, adjust chain length.
Tools and parts checklist
An organized checklist lists the specific tools and replacement parts needed to swap or install a toilet handle, allowing a quick inventory before starting the job.
Include: adjustable wrench, flathead and Phillips screwdrivers, needle-nose pliers, small flashlight, replacement handle and lever, trip lever arm, lift chain or strap, optional silicone grease, and a rag.
Verify fit and condition before beginning.
Step-by-step action checklist for a successful install
Begin by confirming the water supply is shut off and the tank is empty.
Then gather the checklist tools within reach.
Remove old handle, note orientation, and inspect lever and mounting hole.
Fit new lever, secure nut hand-tight then quarter-turn with wrench.
Reconnect chain to flapper at proper slack.
Turn water on, test flush, adjust as needed, and verify no leaks.
Conclusion
A new toilet handle transforms a bathroom like a tiny, obedient lever that tames wild porcelain beasts. With the right part and a careful touch, balky flappers surrender and ghostly drips retreat into silent order. Simple tools become heroic instruments; fingers once clumsy now conduct precise mechanical ballet. Routine checks keep the peace, preventing sudden rebellions at dawn. In short, a modest swap restores domestic harmony as if plumbing itself bows to quiet mastery.