How to Install Flexible Ductwork: Step-by-Step Guide for DIY HVAC Success
Installing flexible ductwork is a straightforward DIY task that enhances your HVAC system’s efficiency. To begin, measure your desired duct routes, cut the flexible ducts to the appropriate lengths, and attach them to either round collars or rectangular flanges. Secure these connections with straps or clamps, and seal any gaps with HVAC foil tape or mastic. It’s essential to support the ductwork with hangers every 4 feet to avoid sagging. Additionally, conduct annual inspections for any tears, mold, or leaks, and replace any damaged sections promptly. This guide will also cover the necessary tools, common mistakes to avoid, and effective sealing techniques.
What Flexible Ductwork Is and When to Use It
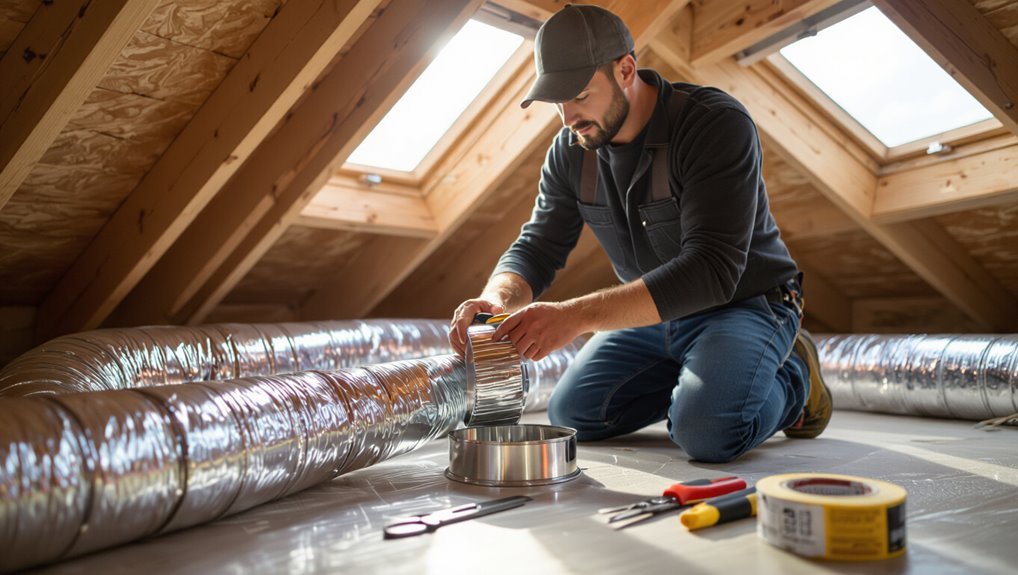
Flexible ductwork consists of a bendable inner core (often plastic or metal) wrapped in insulation and an outer jacket. It is available in common diameters such as 4–14 inches and in materials like polyethylene, foil, or metallized polyester.
Compared with rigid ducting, it offers easier installation and flexibility around obstacles but can have higher airflow resistance, increased leakage risk, and shorter service life if improperly supported.
It is frequently used for short runs to registers and tight spaces in residential HVAC, though it should be avoided for long trunk runs or where consistent low-resistance airflow is required.
Definition and common types of flexible duct (materials, sizes)
Ductwork that bends and compresses without rigid joints, flexible duct is a lightweight, often insulated conduit used to carry conditioned air between HVAC components.
It appears in various materials—foil, plastic, polyethylene with wire helix, and insulated options—commonly sized from 3 to 12 inches diameter for residential runs.
Guidance on how to install flexible ductwork focuses on matching type and diameter to system requirements.
Pros and cons compared with rigid ductwork
After choosing the appropriate material and diameter, homeowners and installers must weigh how this bendable conduit compares with rigid options. Flexible duct offers easier installation, lower cost, and routing versatility but can have higher friction losses, more leakage risk, and shorter lifespan. Consider space, airflow needs, and maintenance when choosing between flexible and rigid systems.
| Advantage | Drawback |
|---|---|
| Easier install | Higher friction |
| Lower cost | Leakage risk |
| Flexible routing | Shorter lifespan |
| Lightweight | Insulation limits |
| Quick repair | Aesthetics issues |
Typical applications and limitations in residential HVAC
Installers and homeowners commonly deploy bendable metal- or polymer-lined conduits for short runs between trunks and registers, tight attic or crawlspace paths, and retrofits where adding rigid ducts would be impractical.
These applications leverage the material’s compressibility and routing ease but are best limited to runs of a few feet to minimize pressure loss and leakage.
Proper support, smooth stretches, and sealed connections maintain efficiency and indoor air quality.
Tools, Materials, and Safety Precautions Needed
A concise list of materials and a matching set of tools are essential before beginning flexible duct installation to guarantee efficiency and a secure fit.
Required items typically include duct sections, clamps, tape, a utility knife or shears for cutting, support straps or hangers, and sealants or mastic for airtight joints.
Appropriate personal protective equipment—gloves, eye protection, and a dust mask—and basic job-site precautions such as secure ladder use and electrical awareness complete the preparation.
Complete materials checklist
Several essential tools, materials, and safety items are required before beginning flexible ductwork installation.
A concise checklist guarantees proper fittings, secure connections, and worker protection.
Include HVAC-rated flexible duct, metal collars/adapters, foil tape, zip ties, clamps, insulation, mastic, and PPE (gloves, eye protection, respirator).
Verify materials meet local code and system specifications.
- Flexible duct, collars, tape
- Sealants, fasteners, insulation
- PPE, verification documents
Tools required for cutting, supporting, and sealing
Gather essential cutting, supporting, and sealing tools before beginning work to guarantee clean cuts, secure hangings, and airtight connections.
Required items include tools for trimming flex duct, brackets and straps for support, and sealants plus tapes for joints. Choice quality affects longevity and performance.
- Utility knife, tin snips, and duct scissors
- Hangers, straps, and saddle clamps
- Mastic, foil tape, and silicone sealant
Personal protective equipment and job-site safety tips
Every worker should wear appropriate personal protective equipment and follow clear safety practices to minimize injury when installing flexible ductwork.
Protective gear includes gloves, eye protection, and a respirator for dust.
Secure ladders, confirm power isolation, and keep work areas tidy.
Follow manufacturer instructions and local codes to prevent hazards.
- Gloves and eye protection
- Respirator and knee pads
- Ladder safety and isolation
Preparing Your HVAC System and Layout
Before cutting or connecting any duct, the installer should evaluate the existing layout and measure each run to document lengths and connection points.
Routes should be planned to keep bends and overall length to a minimum to preserve airflow and reduce pressure loss.
Required duct diameters and target airflow for each branch must be calculated to guarantee the system meets the HVAC design and equipment specifications.
How to evaluate existing duct layout and measure runs
Inspecting the existing duct layout and accurately measuring each run establishes the foundation for a successful flexible duct installation.
Technicians note trunk locations, branch connections, register positions, and service clearances. Measurements include centerline lengths, diameter, and changeover fittings.
Record elevations, access points, and obstructions. Verify insulation condition and leakage.
Compile a scaled sketch with labeled runs and exact dimensions for materials and fittings ordering.
Planning routes to minimize bends and length
When laying out flexible ductwork, technicians should route runs to achieve the shortest possible centerline length with the fewest gentle bends.
This is important because each additional or sharp bend increases airflow resistance and reduces system efficiency.
They should map straight paths, avoid routing near obstacles, plan gradual changes, group runs to shared chases where practical, and allow service access while minimizing length and unnecessary offsets.
Calculating required duct diameter and airflow considerations
Accurate duct sizing balances required airflow, static pressure limits, and acceptable air velocity to guarantee comfort and system efficiency.
The installer calculates required cubic feet per minute (CFM) per room, sums branch flows, and selects diameters from duct tables or uses the continuity and continuity/velocity method.
Consider fan capacity, length, bends, and fittings; larger ducts reduce pressure loss but raise material costs.
Step-by-Step Installation Process
The technician begins with pre-installation checks of the air handler, registers, and dampers to confirm system readiness and proper airflow paths.
Next, the flexible duct is measured, cut to length, and fitted to round or rectangular collars before connections are secured with straps, clamps, and foil tape.
Finally, long runs are supported with hangers at proper spacing to prevent sagging and maintain system performance.
Pre-installation checks (air handler, registers, dampers)
Before any flexible duct is run, a thorough pre-installation check of the air handler, supply and return registers, and inline dampers is essential to verify capacity, clearances, and compatibility.
Inspect air handler connections, confirm fan capacity and static pressure limits, guarantee register placement and grille sizes match duct runs, and test damper operation for full travel and proper orientation.
Record any required modifications.
Cutting and sizing flexible duct to length
Measure the run and mark the flexible duct at the required length, taking into account connector fittings and any necessary service loops.
The installer compresses the duct to the mark, cuts the outer jacket and inner wire coil cleanly, trims insulation flush, and protects the cut edge.
Confirm length with a trial fit, allowing slight slack for alignment, then secure the end for final connection.
Connecting flexible duct to round and rectangular collars
With the length confirmed and the cut end prepared, the installer proceeds to attach the flexible duct to the collar.
For round collars, the duct is slipped over the bead, ensuring the liner seats evenly around the circumference.
For rectangular collars, the installer aligns the duct core with the opening, tucking the liner inside and fitting the outer jacket over the flange.
Excess material is trimmed for a neat fit.
Securing connections with straps, clamps, and foil tape
Begin by positioning the joint so the liner and outer jacket sit flush against the collar or flange. The installer then secures the connection using the appropriate combination of straps, clamps, and foil tape to create an airtight, mechanically sound seal.
Tighten clamps evenly, avoid cutting the liner, fasten straps over the outer jacket, and wrap foil tape smoothly around overlaps to prevent air leaks and vibration.
Supporting long runs and spacing hangers properly
After securing connections, attention turns to supporting long runs and spacing hangers to prevent sagging and maintain airflow.
Hangers should be placed every 4 feet for horizontal runs and every 6–8 feet for slight inclines, with closer spacing for heavier insulation.
Use straps or saddle supports that cradle the duct without compressing it.
Check alignment and tension to preserve roundness and slope.
Routing around obstacles and maintaining minimum bend radius
Plan the route to steer flexible ductwork around obstacles while preserving airflow and preventing kinks. Measure clearances, choose gentle bends, and avoid sharp angles or compression against framing.
Keep bends gradual and within manufacturer minimum radius, support ducts near curves, and allow service access.
Where tight turns are unavoidable, add junction fittings or short rigid sections to maintain proper flow and avoid strain.
Sealing joints and testing for air leaks
Seal all connections meticulously and then verify integrity with systematic testing to guarantee efficient, leak-free airflow.
Technicians apply approved foil tape or mastic to collars, slip joints, and seams, then secure with clamp rings.
After sealing, perform a smoke or pressure test, inspect for escaping air, and retighten or reseal as needed.
Document results and retest until no leaks remain.
Common Installation Scenarios and How to Handle Them
Common installation scenarios include attaching flexible duct to metal boots and takeoffs, splicing two flexible ducts mid-run, and shifting from flexible to rigid duct.
Techniques for routing and securing ductwork differ when working in attics, crawlspaces, or interior ceilings.
The following section outlines specific methods and precautions for each situation.
Attaching to metal boots and takeoffs
Attaching flexible ductwork to metal boots and takeoffs requires careful alignment and secure fastening to maintain airflow and prevent leaks.
The installer slides the duct over the collar, guarantees smooth, straight runs, and fastens with a clamp or sheet metal screws through the outer wire helix.
A bead of HVAC sealant or foil tape completes the joint, preventing air loss and vibration.
Splicing two flexible ducts mid-run
When runs of flexible ducting must be joined mid-run—due to length limits, access constraints, or repairs—a proper splice preserves airflow, minimizes turbulence, and prevents leaks.
Align cores, remove kinks, and insert a smooth metal coupling or rigid sleeve deep into each end. Secure with HVAC foil tape and multiple stainless steel zip ties.
Inspect for gaps and support the splice to prevent sagging.
Transitioning from flexible duct to rigid duct
Although flexible duct excels at maneuvering tight spaces, shifts to rigid duct are frequently required to join equipment, penetrate walls, or meet code.
These junctions demand careful matching of diameters, secure mechanical coupling, and smooth internal airflow to prevent pressure loss and noise.
Use approved adapters, clamp and seal connections with mastic or UL-rated tape, support both duct types to avoid sagging, and minimize sharp bends.
Installing in attics, crawlspaces, and interior ceilings
Installers should plan flexible-duct runs in attics, crawlspaces, and interior ceilings to account for limited headroom, temperature extremes, and access constraints. Proper routing, support spacing, insulation, and sealed connections reduce airflow loss, condensation risk, and long-term maintenance issues.
Use straight, short runs; support every 4 feet; avoid sharp bends and compression; insulate ducts in unconditioned spaces; provide access panels for inspections and repairs.
Troubleshooting and Avoiding Performance Issues
Common performance issues stem from air leaks, pressure loss, and damage such as excessive bends, kinks, or compression that restrict airflow.
Inspection should focus on joints and connectors, duct runs with sharp turns, and unsupported spans that sag.
Corrective steps include sealing leaks, straightening or rerouting bends, and adding proper supports at recommended intervals.
How to identify and fix air leaks and pressure loss
Detecting and repairing air leaks and pressure loss begins with systematic inspection and testing of the flexible ductwork system.
The technician seals joints, collars, and seams with approved mastic or foil tape, replaces torn sections, and secures loose connections.
Pressure testing and airflow measurements confirm repairs.
Any persistent loss prompts investigation of register dampers, filters, and fan performance before concluding duct-related causes.
Problems caused by excessive bends, kinks, or compression
Excessive bends, kinks, or compression in flexible ductwork reduce airflow, increase static pressure, and accelerate wear, leading to uneven heating or cooling, higher energy use, and premature duct failure.
Addressing these issues early preserves system performance and efficiency. Consequences include noisy airflow, reduced capacity, compressor or blower strain, and increased utility costs.
Correct routing, gradual curves, and restoring cross-section prevent these failures and extend duct life.
Signs of improper support or sagging and corrective steps
Alongside bends and compression, inadequate support frequently undermines flexible duct performance; sagging sections collect moisture and debris, restrict airflow, and increase noise and mechanical strain.
Indicators include visible droops, uneven airflow at registers, rattling, and higher energy bills.
Corrective steps: add spaced support straps, re-tension or replace damaged runs, straighten kinks, maintain gentle slopes toward returns, and verify airflow after repairs.
Maintenance, Inspection, and Longevity Tips
A concise maintenance plan helps preserve performance and prevent costly repairs.
The section outlines a routine inspection checklist, recommended cleaning and replacement intervals, and specific best practices to extend flexible duct lifespan.
Clear, scheduled actions guarantee the system remains efficient and durable.
Routine inspection checklist
Routine inspections help identify wear, damage, and performance issues in flexible ductwork before they escalate into costly failures.
A concise checklist guides consistent assessment, noting sealing, support, and airflow indicators. Use the following three checkpoints:
- Check joints and seals for gaps, tape failure, or detached collars.
- Inspect hangers and supports for sagging or strain.
- Verify unobstructed airflow and absence of unusual noises.
Cleaning and replacement intervals
Regular cleaning and timely replacement preserve airflow efficiency and prevent contaminants from circulating through the HVAC system.
Inspect flexible ducts annually for visible dust, mold, tears, or sagging. Clean ducts every 3–5 years or sooner after contamination events.
Replace sections showing permanent collapse, persistent mold, or repeated damage. Record dates and observations to guide future maintenance and replacement decisions.
Best practices to extend flexible duct lifespan
Inspect flexible ductwork at least annually and after any HVAC service or home renovation to catch wear, blockages, or damage early.
Schedule targeted cleanings, tighten connections, and replace crushed or kinked sections.
Protect ducts from rodents and UV exposure, maintain proper support to prevent sagging, and avoid excessive bends.
Keep records of inspections and repairs to inform future maintenance decisions.
Common Mistakes to Avoid During DIY Installation
Avoiding common mistakes during a DIY flexible duct installation prevents airflow loss, noise, and premature system wear; the most frequent errors include excessive bending, improper support, and insecure connections.
- Excessive bends and kinks that restrict airflow and reduce efficiency.
- Insufficient fastening or sagging supports causing stress and leaks.
- Poorly sealed or loose connections leading to air loss and contamination.
Cost, Time Estimate, and When to Call a Professional
Typical DIY costs are outlined with a brief material breakdown (duct, connectors, tape, insulation) and per-run estimates to help budget the job.
Time estimates note average hours for a single run versus a whole-house installation and factors that can extend schedules.
Clear criteria are given for when structural constraints, major layout changes, permit requirements, or system performance issues warrant hiring an HVAC professional.
Typical DIY cost breakdown and material estimates
A straightforward DIY flexible duct run for a small room generally costs between $50 and $200 in materials and can be completed in 1–3 hours by someone with basic tools and experience; major factors affecting price and time include duct length, number of bends, required fittings, insulation type, and whether registers or connectors must be replaced.
| Item | Typical cost |
|---|---|
| Flexible duct (10–25 ft) | $20–$80 |
| Fittings/clamps/insulation | $15–$60 |
Estimated time per run and for whole-house jobs
After outlining material costs and basic run estimates, attention turns to how long individual flexible duct runs and whole-house replacements actually take, and when professional help is advisable.
Typical single runs—measuring, cutting, sealing, and testing—average 45–90 minutes.
Small multi-room jobs may take a day; full-house replacements commonly require 1–3 days depending on complexity, access, and helpers.
Situations that require HVAC professional intervention
Because flexible-duct projects can range from simple room runs to complex system overhauls, certain situations clearly justify calling an HVAC professional:
suspected asbestos or knob-and-tube wiring, major alterations to furnace or air-handler connections, significant changes to static pressure or system layout, inaccessible or fire-rated plenums, and persistent airflow, noise, or balance problems after basic repairs.
Costs vary; expect $150–$1500+ and hours to days depending on scope.
Quick Reference: Step-by-Step Installation Checklist
Begin by gathering tools and materials and verifying the work area is accessible and clear of obstructions.
The checklist outlines concise steps covering measurements, secure connections, and testing. Follow sequence and safety protocols; stop if unexpected issues arise and consult a professional when needed.
- Measure, cut, and fit duct length precisely.
- Fasten, seal, and support connections.
- Restore airflow, test system, inspect for leaks.
Conclusion
The guide concludes that flexible ductwork, when chosen and installed correctly, reliably serves many residential HVAC needs. A careful DIYer proves a theory’s worth: that methodical preparation, correct tools, and measured technique produce efficient airflow and durable connections. Rhythm emerges from routine—measure, cut, secure, seal—while verification exposes errors before they persist. Where complexity or uncertainty appears, professional intervention validates safety and performance, preserving system longevity and occupant comfort.