How to Replace an Electric Water Heater Element: Step-by-Step DIY Guide
To replace an electric water heater element, start by cutting off the power to the unit and draining the tank. Next, test the element with a multimeter to ensure it’s faulty, then use a proper wrench to remove the old element. Install a compatible replacement element and gasket, ensuring they are seated and tightened to specifications. Rewire the connections exactly as they were before, refill the tank, check for leaks, and restore power to confirm the heater is functioning properly. Follow safety precautions, match parts carefully, and apply the correct torque. The following sections will provide detailed steps, troubleshooting tips, and cost estimates.
What Replacing an Electric Water Heater Element Involves
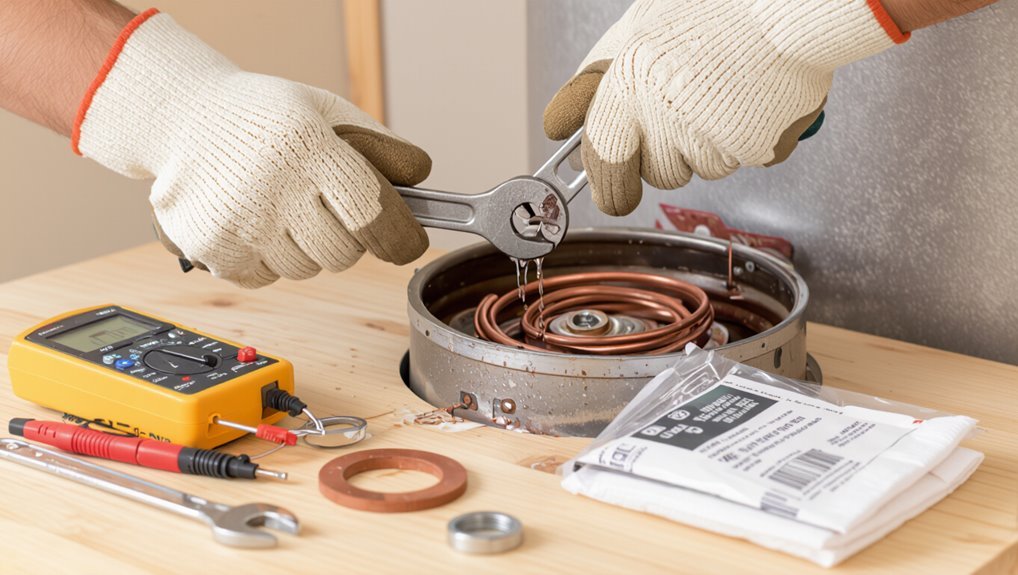
A heating element is a metal coil or rod inside the tank that converts electrical energy into heat to warm the water.
Signs that an element needs replacement include lack of hot water, fluctuating temperatures, or unusual noises from the tank.
Elements come in different types and sizes, so compatibility with the heater’s wattage, voltage, and mounting style must be confirmed before replacement.
Overview of electric water heater elements and their function
Electric water heater elements are electric-resistance rods that convert electrical energy into heat to raise the temperature of the tank’s water.
They sit submerged, transfer heat directly, and are typically screw-in or flange-mounted with thermostats and wiring.
Understanding element types, wattage, and materials helps when learning how to replace electric water heater element safely and select compatible replacements.
Signs a heating element needs replacement
Several clear indicators point to a failing water heater element, and recognizing them early can prevent cold showers and higher energy costs.
Signs include diminished hot water volume, fluctuating temperatures, longer recovery times, unusual noises (popping or rumbling), discolored or rusty water, and tripped circuit breakers or blown fuses.
Consistent recurrence of these symptoms suggests element degradation and the need for inspection or replacement.
Types of heating elements and compatibility
Different styles of water heater elements—primarily screw-in (plug-in) and flange-mounted types—determine how a replacement is selected and installed.
Compatibility depends on tank type, element length, wattage, voltage, and thread or flange bolt pattern. Materials (copper, stainless) affect corrosion resistance.
Always match specifications from the heater’s rating plate, confirm gasket type, and verify thermostatic control compatibility before purchasing a replacement.
Safety Precautions Before You Begin
Before any work begins, the power must be shut off at the correct breaker and confirmed dead with a voltage tester.
The water supply should be closed and the tank drained to a safe level.
Appropriate personal protective equipment should be worn and the workspace cleared and well-lit to prevent slips, shocks, and accidental contact.
Turn off power: locating and tripping the correct breaker
Locate and cut power to the water heater at the correct breaker in the electrical panel to eliminate the risk of shock while working.
Identify the breaker labeled for the water heater or a double-pole 240V breaker. Flip it firmly to the OFF position.
If unlabeled, shut off the main breaker.
Note panel warnings and keep the panel door closed during work.
Verifying power is off with a voltage tester
A non-contact voltage tester or a multimeter should be used to confirm the water heater is de-energized before any contact with wiring or heating elements.
Verify at the breaker first, then test the heater’s terminals and exposed leads. Confirm zero volts on all terminals and between terminals and ground.
Repeat testing after any panel adjustments. If any voltage is present, stop and troubleshoot.
Shutting off water supply and draining basics
With power confirmed off at the breaker and at the heater terminals, attention turns to stopping the water and removing the tank’s pressure.
Close the cold-water shutoff feeding the heater, open a nearby hot faucet to relieve system pressure, and attach a garden hose to the heater’s drain valve.
Open the drain valve and monitor flow; use a bucket for residual water and watch for sediment.
Personal protective equipment and safe workspace setup
Prepare a clear, well-lit work area and don appropriate personal protective equipment before touching the heater: insulated gloves rated for electrical work, safety glasses, long sleeves, and non-slip footwear.
Confirm the floor is dry, tools organized, and a fire extinguisher nearby.
Verify lockout/tagout of electrical supply, use insulated tools, keep bystanders away, and maintain good ventilation to avoid fumes during element removal.
Tools and Materials Required
Before starting the replacement, the reader should confirm they have the right tools and parts on hand.
A concise checklist might include:
- Multimeter and element wrench
- Replacement element and gasket
- Teflon tape and screwdrivers
- Bucket, hose and dielectric grease
Optional items like an anode rod wrench can make the job smoother.
Essential tools (multimeter, element wrench, screwdrivers, pliers)
Gather the right tools to diagnose and remove a faulty heating element safely and efficiently.
A multimeter verifies power and element continuity. An element wrench or socket fits common element sizes for removal.
Insulated screwdrivers disconnect terminal screws. Slip-joint or needle-nose pliers handle wire nuts, bending, and terminal grips.
Choose quality, insulated tools and test them before starting work.
Consumables and parts (replacement element, gasket, Teflon tape)
Select the correct replacement element, a new gasket, and a roll of plumber’s Teflon tape to guarantee a reliable seal and safe operation.
Verify element type, wattage, voltage, and thread size match the heater.
Choose a high-quality rubber or neoprene gasket rated for potable water.
Use Teflon tape on threaded fittings only, wrapping clockwise for proper sealing and corrosion resistance.
Optional helpful items (bucket, hose, dielectric grease, anode rod wrench)
After confirming the correct element, gasket, and Teflon tape, consider a few optional items that make the replacement smoother and reduce cleanup.
A bucket and hose permit controlled draining and flushing.
Dielectric grease protects electrical connections from corrosion.
An anode rod wrench proves useful if inspecting or replacing the sacrificial rod while the tank is open.
These items save time and prevent mess.
Preparing the Water Heater for Element Replacement
Before any work begins, the technician turns off power at the breaker and verifies the circuit is de-energized.
Next, the cold-water supply is shut off and system pressure is relieved.
Then the tank is drained partially or fully depending on whether the upper or lower element will be replaced.
Finally, the element access panel and insulation are removed to expose the element housing.
Turning off power and verifying isolation
Shut off the circuit breaker feeding the water heater and lock or tag the breaker to prevent accidental re-energizing.
Verify power is off by testing the heater’s terminals with a non-contact voltage tester and a multimeter set to AC volts.
Confirm zero voltage at both element terminals and the thermostat housing.
Only proceed when isolation is positively confirmed and tags remain in place.
Shutting off cold-water supply and relieving pressure
With electrical isolation confirmed and tags in place, attention turns to the plumbing: the cold-water supply to the heater must be closed and system pressure relieved to prevent leaks or hot-water discharge during element removal.
Locate and shut the inlet valve, then open a nearby hot faucet or the heater’s pressure-relief drain to release trapped pressure.
Confirm no flow before proceeding.
Draining the tank partially or fully depending on element location
At this stage, the tank must be drained either partially or completely depending on which element will be accessed: upper elements generally require only a small drawdown to expose the gasketed flange, while lower or submerged elements normally require full or near-full drainage to keep water from spilling when the element is removed.
Drain via the tank drain valve to an appropriate safe location, monitoring level and closing the valve when sufficient.
Accessing the element panel and insulation removal
After the tank level has been reduced to the appropriate point, attention turns to exposing the element access panel.
The cover is removed, revealing the insulation and plastic or foil barrier. Carefully peel back insulation to reach the element housing, preserving material if reusable.
Clear debris, note wiring positions, and set insulated cover aside. Maintain a tidy work area to prevent contamination or damage.
Step-by-Step Element Removal and Installation
The technician proceeds with a focused sequence to remove and install the element, ensuring each action confirms safety and function.
Key visual steps include:
- testing the element with a multimeter,
- disconnecting thermostat and wires,
- removing the old element with an element wrench,
- cleaning the opening and installing the new element with a fresh gasket.
Final checks verify tight seals and proper electrical connections before restoring power.
Testing the element with a multimeter to confirm failure
Prepare to verify the element’s condition using a multimeter to determine whether it is open, shorted, or operating within its expected resistance range.
With power confirmed off and element accessible, set the meter to the ohms setting, probe the element terminals, and note resistance.
An open circuit reads infinite, a short reads near zero; compare measured ohms to manufacturer specifications to confirm failure.
Disconnecting thermostat and wires safely
Once power is confirmed off and the element is accessible, the technician disconnects the thermostat and wiring using insulated tools and a systematic labeling method to prevent miswiring during reassembly.
They document terminal positions, take photos, and mark each conductor with durable tape or numbered tags.
Wires are loosened gently, secured away from moisture, and terminals inspected for corrosion before proceeding to the next removal step.
Removing the old element with the element wrench
Using a properly sized element wrench, the technician unscrews the heating element by turning counterclockwise while stabilizing the tank to prevent strain on fittings.
After loosening, the element is eased outward with steady pressure, avoiding twisting motions that could damage the gasket seat.
Any stubborn element is rocked gently and reapplied torque until free, then lifted straight out and set aside for disposal.
Cleaning the opening and inspecting the tank interior
With the element removed, the technician wipes the opening and surrounding flange with a clean rag to remove sediment and mineral buildup.
Then he shines a flashlight into the tank to inspect for corrosion, loose scale, or visible debris that could impair a new gasket seal or clog the element port.
He scrapes stubborn deposits with a plastic scraper, vacuums residue, and notes any pitting or leaks for repair.
Installing the new element and replacing the gasket
Begin by seating a new, correctly rated element and a fresh gasket into the cleaned opening, ensuring the gasket sits flat against the tank flange and the element aligns with the port.
Hand-tighten the element, then use an element wrench to torque it to manufacturer specifications.
Wipe away excess sealant if used and verify the element sits flush with no visible gaps before proceeding.
Reconnecting wires and restoring insulation and access panel
After confirming the element is properly seated and tightened, the electrician or homeowner reconnects the electrical leads to their original terminals, matching wire colors and noting any markings for high- and low-element designations.
Terminals are tightened securely, exposed conductors insulated with appropriate wire nuts or terminal covers, original insulation and vapor barrier replaced, and the access panel fastened.
Power is restored and the unit tested for leaks and proper heating.
Refilling, Testing, and Restoring Service
With the new element installed, the tank is refilled slowly while hot faucets are opened to bleed air from the lines.
The installation is then inspected for leaks around the element before power is restored and the heater’s operation is verified.
Finally, a multimeter is used to confirm the element’s current draw and the thermostat’s continuity.
Refilling the tank and bleeding air from hot water lines
Open the cold-water supply valve slowly to allow the tank to fill while watching the pressure relief valve and a nearby faucet for steady water flow; this prevents rapid pressure changes and helps displace air.
Once the tank is full and the faucet runs steadily, close the faucet.
Restore power only after confirming steady water flow and no unusual noises.
Bleed remaining air by opening hot taps briefly.
Checking for leaks around the new element
Inspect the area around the newly installed element for any signs of leakage as the tank refills and pressure stabilizes.
Observe the gasket, threads, and surrounding tank surface for drips or moisture.
Wipe exposed surfaces with a dry cloth to reveal slow leaks.
Tighten the element slightly if seepage appears, or drain and reseal if tightening fails.
Repeat inspection after several minutes.
Restoring power and verifying proper operation
Begin restoring service only after the tank is fully refilled and all air has been purged from the system.
Reopen the shutoff valve, confirm no leaks, then restore breaker power.
Allow time for the element to heat; check that hot water reaches fixtures and temperature rises within expected timeframe.
Monitor for unusual noises, odors, or leaks for several heating cycles before concluding the repair.
Using a multimeter to confirm element draws and thermostat function
With the tank refilled and power restored, use a multimeter to verify that each heating element draws the correct current and that thermostats respond properly; this confirms the electrical portion of the repair before relying on the heater for regular use.
Measure element amperage by clamping around the hot lead, compare to nameplate; check continuity/ohms with power off.
Cycle thermostats and observe switching.
Troubleshooting Common Problems
After replacing an element, the technician should verify whether the unit produces adequate heat and inspect for signs of leaks at the element flange or a compromised gasket.
Electrical checks for tripped breakers, loose connections, or faulty wiring are essential if the heater fails to operate or repeatedly trips the breaker.
Unusual noises or reduced performance may indicate sediment buildup or trapped air requiring flushing or further inspection.
Persistent no-heat or insufficient heat after replacement
If the water heater still produces little or no hot water after replacing the element, the issue usually lies with electrical connections, thermostat settings, or an incorrectly sized or faulty element rather than the replacement process itself.
Verify power at breaker and element terminals, confirm thermostat continuity and correct temperature settings, guarantee element wattage and type match tank specifications, and test the new element for open or shorted condition.
Leaks at the element flange or gasket issues
Inspecting the element flange and gasket is the first step when a water heater shows signs of leaking around the access plate; common causes include a degraded rubber gasket, a warped or corroded flange, loose mounting bolts, or improper seating during installation.
If leakage is observed, drain the tank below the element, tighten or replace bolts, and reseat or replace the gasket and flange, then retest for leaks.
Tripped breakers and electrical faults after installation
While resolving flange or gasket leaks addresses physical sealing issues, electrical problems can surface once power is restored and the element is energized.
A recurrent tripped breaker often signals a short, ground fault, or incorrect element resistance. Verify wiring connections, properly tighten terminals, and confirm element ohms match specifications.
If trips persist, isolate the element, test for continuity to ground, and consult a licensed electrician.
Strange noises and sediment-related performance problems
Clanking, popping, or rumbling sounds from a water heater often indicate sediment buildup on the tank bottom or around the heating element, which reduces heat transfer and causes localized boiling or element overheating.
Sediment also lowers capacity and can shorten element life.
Recommended actions include flushing the tank, inspecting and replacing the element if scorched, and installing a sediment trap or softener to prevent recurrence.
When to Replace vs. Repair or Replace the Whole Heater
A cost comparison between replacing a single element, addressing multiple failed elements, or installing a new heater helps determine the most economical option.
Age, visible corrosion, and signs of tank failure typically favor full replacement over repair.
Any complex electrical issues, suspected tank leaks, or uncertainty about diagnosis should prompt professional intervention.
Cost comparison: element replacement, multi-element failure, full replacement
Compare costs for single-element repair, dual-element failure, and full tank replacement to determine the most economical and practical option.
Single-element replacement is cheapest: part plus basic labor or DIY time.
Replacing both elements raises parts and labor; justify if multiple failures occur.
Full tank replacement carries highest upfront cost but may save long-term if repairs become frequent or efficiency is substantially reduced.
Age, corrosion, and tank condition indicators for full replacement
After weighing the costs of element repair versus full replacement, attention turns to the heater’s age, corrosion, and visible tank condition to decide whether repair is worthwhile.
Heaters older than 8–12 years, persistent rust around fittings, leaking seams, heavy sediment buildup, or widespread exterior corrosion indicate imminent failure. In such cases, full replacement is typically more cost-effective and reliable than repeated repairs.
Situations requiring professional intervention
When diagnostic signs point beyond a single faulty element—such as recurrent failures, significant tank corrosion, persistent leaks, or electrical issues that resist straightforward repair—a professional evaluation is warranted to determine whether replacing an element, performing broader repairs, or installing a new heater is the safest and most cost-effective option.
A technician assesses leak sources, wiring, insulation, and anode condition, then recommends targeted fixes or full replacement based on safety and lifespan.
Maintenance Tips to Extend Element and Heater Life
Routine maintenance preserves heating elements and the tank by addressing common wear factors.
Suggested actions include:
- Flush tank annually to remove sediment
- Inspect and replace the sacrificial anode rod as needed
- Perform visual and electrical checks every 6–12 months
- Run a simple temperature and recovery test to confirm performance
Following these steps helps prevent premature failure and maintains efficiency.
Regular flushing to reduce sediment buildup
Flush the tank periodically to remove accumulated sediment that can insulate the heating element and reduce efficiency.
Draining several gallons or fully flushing annually clears grit that shortens element life and lowers performance.
Briefly shut power, attach a hose to the drain valve, and run until water runs clear.
Repeat as needed in high-mineral areas and document each service for maintenance records.
Checking and replacing sacrificial anode rod
Sediment removal helps protect the heating element, but inspecting the sacrificial anode rod offers another line of defense against corrosion and premature element failure.
Technicians should locate, visually inspect, and measure rod thickness; replace if heavily corroded, pitted, or less than half original diameter.
Use the correct replacement material (magnesium or aluminum) and tighten fittings to prevent leaks while maintaining electrical bonding.
Recommended inspection intervals and simple tests
While annual visual checks of the tank, thermostat settings, and access panels suffice for most households, more frequent inspections are warranted in areas with hard water or heavy use.
Every three to six months, technicians should run simple performance tests—temperature, recovery time, and element continuity—to catch early signs of scaling, electrical degradation, or thermostat drift.
Additionally, record test results, inspect wiring for corrosion, and descale elements as indicated.
Parts and Model Compatibility Reference
A concise parts and compatibility reference helps identify common element sizes, wattages, and threaded fittings before ordering a replacement. The table below summarizes typical specifications to check against a heater’s model plate or manual. Guidance follows on locating the correct replacement part by matching those specifications to the unit’s model number.
| Element Size | Wattage Range | Thread Type |
|---|---|---|
| 4.5 in / 5.5 in / 7 in | 1500–5500 W | 3/4″ NPT, BSP |
| Single-phase / Three-phase | Low to high density options | Flanged or screw-in options |
Common element sizes, wattages, and threaded fitting types
Electric water heater elements come in a few standardized diameters, wattages, and threaded fittings, and knowing these specs prevents ordering mismatched parts.
Typical diameters are 3/4″ NPT for screw-in elements; common wattages range from 1500W to 5500W depending on capacity and voltage.
Popular threaded fittings include 3/4″ NPT and bayonet types.
Match element length and terminal style to the heater.
How to find the correct replacement part for your model
Knowing the element’s diameter, wattage, and fitting type narrows the search, but identifying the correct replacement requires matching the heater’s model number, serial number, and element location as listed on the tank’s data plate.
Consult the manufacturer’s parts diagram or online lookup, cross-reference OEM part numbers, and confirm terminal type and length.
When unsure, provide photos to supplier or contact manufacturer support.
Estimated Time, Difficulty, and Cost Breakdown
A straightforward electric water heater element replacement typically takes one to two hours for a DIYer with basic tools and plumbing familiarity.
The task rates as moderate skill—adequate for someone comfortable with electrical shutoff, drain and refill procedures, and using a wrench; a licensed plumber or electrician is recommended if wiring is unfamiliar or complications arise.
Parts for a DIY swap generally range from $20–$60, while professional service including labor commonly totals $150–$400 depending on region and complexity.
Typical time required for DIY replacement
Most homeowners can expect a straightforward water heater element replacement to take roughly 1 to 2 hours from start to finish, including draining, element removal and replacement, and refilling the tank.
Preparation and cleanup add 15–30 minutes. Allow extra time for corroded elements or tight fittings—these can extend work to 2.5–3 hours.
Typical parts cost $20–$60; tools may already be on hand.
Skill level assessment and when to call a pro
When homeowners lack basic electrical and plumbing experience, replacing a water heater element can quickly become more complex and risky.
Assess skill by reviewing comfort with shutoff procedures, multimeter use, wiring, and seal integrity. Moderate DIYers may handle straightforward swaps in an hour.
Call a licensed electrician or plumber if uncertain about wiring, connections, corroded tanks, or local code compliance to avoid hazards and damage.
Estimated parts and labor costs for DIY vs. professional service
Budgeting for a water heater element replacement requires weighing parts, time, and labor differences between DIY and professional service.
DIY parts typically cost $15–$60; tools and sealant may add $10–$50. Time: 1–2 hours for a competent DIYer.
Professional service: $150–$450 total, reflecting labor, diagnostics, and warranty. Complexity or electrical issues increase professional fees.
Conclusion
When the time comes to address a failing element, one can thoughtfully usher it into retirement and welcome a fresh, more energetic component. With precautions taken and the correct tools at hand, the replacement process becomes a small, manageable change rather than a dramatic upheaval. Routine care and attentiveness will keep the system contented longer, sparing surprises and conserving resources. In short, a gentle, considered swap restores reliable warmth without excessive fuss.