How to Drain a Water Heater With a Plastic Drain Valve Safely and Easily
To safely and easily drain a water heater with a plastic drain valve, start by cutting off the power or gas supply and shutting the cold water inlet. Next, open a hot faucet to relieve pressure. Attach a hose to the drain valve, directing it to a safe drainage area. Slowly open the valve, using short bursts to flush out sediment, then close it and refill the tank while venting air. Always wear gloves and goggles, inspect for any leaks, and promptly replace a cracked valve. For additional troubleshooting steps, refer to the following guidelines.
Why You Should Drain a Water Heater with a Plastic Drain Valve
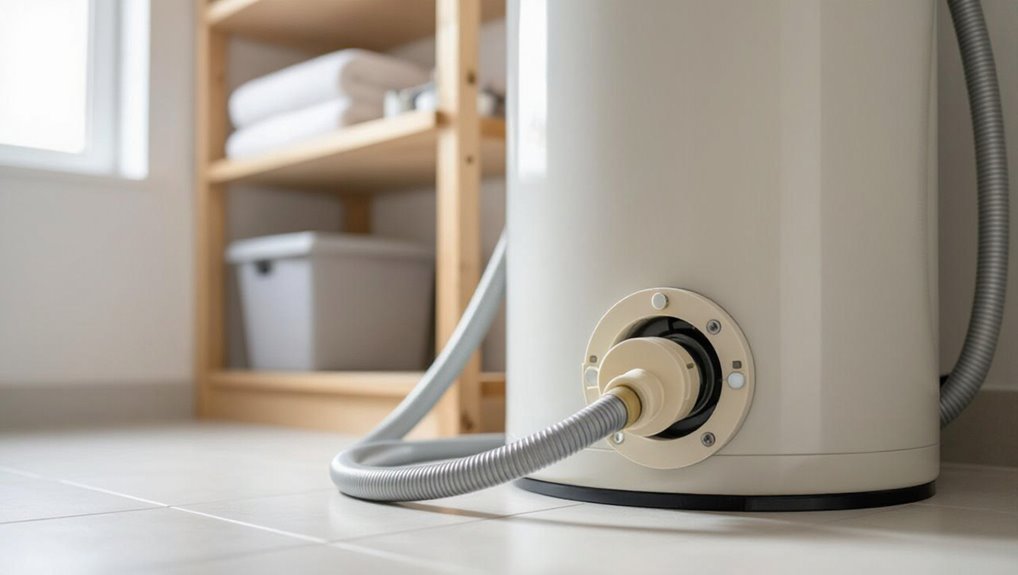
Regularly draining a water heater with a plastic drain valve helps maintain efficiency, extend the tank’s lifespan, and remove sediment buildup.
Neglecting this maintenance can lead to reduced performance, accelerated corrosion, and disruptive noises.
Using a reliable plastic valve makes the task easier and safer, encouraging consistent upkeep.
Benefits of regular draining (efficiency, lifespan, sediment removal)
Flushing a water heater removes mineral sediment that accumulates over time, improving heat transfer efficiency, reducing energy use, and preventing premature tank corrosion and element failure.
Regular draining with a plastic drain valve keeps recovery times faster, extends component and tank lifespan, and minimizes maintenance costs.
Following clear how to drain water heater with plastic valve steps guarantees consistent performance and longer service life.
Risks of neglecting drainage (reduced performance, corrosion, noise)
Neglecting to drain a water heater with a plastic drain valve accelerates performance decline as trapped mineral sediment insulates the tank bottom, reducing heat transfer and lengthening recovery times.
Left unchecked, sediment promotes corrosion, risking leaks and premature tank failure. Accumulation also causes rumbling, popping, and vibration noises.
Regular draining prevents efficiency loss, structural damage, and noisy operation, preserving safety and service life.
Safety Precautions Before You Start
Before beginning, a concise checklist of required tools and materials should be confirmed and staged.
Appropriate personal protective equipment—gloves, eye protection, and heat-resistant clothing—along with clear safety steps for depressurizing and cooling the tank must be observed.
If valves show visible damage, leaks, or refuse to operate smoothly, a qualified professional should be contacted rather than proceeding.
Tools and materials checklist
A concise list of required tools and materials helps confirm the draining process proceeds safely and without interruption.
The homeowner or technician should gather items that prevent spills, enable valve operation, and allow sediment removal. Verify compatibility with the plastic drain valve and hot-water components before beginning.
- Garden hose (fit to valve)
- Bucket and towels
- Adjustable wrench or pliers
- Wet/dry vacuum
Personal protective equipment and safety tips
With the tools and materials assembled, attention turns to personal protective equipment and safety measures to prevent burns, cuts, and electrical hazards during draining.
Wear heat-resistant gloves, safety goggles, long sleeves, and closed-toe shoes.
Shut off power or gas and confirm cold water supply.
Keep a towel or bucket for spills, guarantee good ventilation, and position a reliable hose and steady footing before opening the drain valve.
When to call a professional (signs of valve failure or damage)
When should a homeowner stop and call a professional? If the drain valve leaks profusely, cracks, sticks, or produces sediment-clogged flow, cease work.
Also call a pro for corroded fittings, stripped threads, unusual noises, gas smell, or inability to shut off water or power.
Persistent high-temperature water, visible tank damage, or unfamiliar plumbing complications require licensed assistance to prevent injury and further damage.
How to Prepare the Water Heater for Draining
Before draining, the model should be made safe by cutting power to electric units at the breaker or turning off the gas supply and pilot for gas models.
The cold-water inlet must be closed, the plastic drain valve inspected for cracks or corrosion, and any visible damage noted.
Finally, pressure should be relieved by opening a hot faucet and briefly testing the drain valve for leaks before proceeding.
Turning off power or gas safely (electric vs gas models)
While handling the fuel or electricity supply, the homeowner must disconnect the appropriate source to prevent injury or equipment damage.
For electric heaters, switch off the breaker at the panel and verify power is off with a noncontact tester.
For gas units, turn the gas control to “off” and follow manufacturer shutdown instructions; allow pilot and gas lines to cool before proceeding.
Shutting off the cold-water supply
Locate and close the cold-water shutoff valve to stop incoming water to the tank, preventing refilling during draining.
Verify the valve is fully closed by attempting to turn a nearby hot tap; minimal or no flow confirms success.
If the valve is stuck or leaks, shut off the home’s main water supply and consider repairing or replacing the shutoff before proceeding with tank draining.
Locating the plastic drain valve and checking for visible damage
After the cold-water supply is shut off and flow at a hot tap confirms the tank will not refill, attention turns to the drain assembly at the water heater’s base.
The plastic drain valve is typically near the bottom, on the side. Inspect for cracks, warping, mineral buildup, or previous repairs.
Note any loose fittings or corrosion on surrounding metal before proceeding.
Reducing pressure and testing for leaks
Reduce the tank’s internal pressure before opening any drains by partially lifting the pressure-relief valve or briefly opening a nearby hot-water tap to vent trapped air; this prevents a sudden rush of water and reduces stress on the drain fitting.
After pressure relief, inspect the drain connection and hose while slowly opening the drain valve, watching for leaks.
Tighten fittings or replace the valve if seepage appears.
Step-by-Step Guide to Draining a Water Heater with a Plastic Drain Valve
The procedure begins by attaching a hose to the plastic drain valve and routing the other end to a safe, heat-tolerant drain.
A hot water faucet is opened to prevent vacuum lock while the drain valve is opened and flow is managed, using short bursts to flush stubborn sediment as needed.
After draining and flushing, the valve is closed and the tank refilled carefully to avoid trapped air.
Positioning a hose and placing the other end to a safe drain location
Attach the garden hose firmly to the water heater’s plastic drain valve, ensuring the connection is tight and the clamp (if present) is secured to prevent leaks.
Route the hose downhill if possible, avoiding kinks and tripping hazards.
Place the discharge end into a floor drain, utility sink, or approved outdoor area away from foundations, landscaping, and electrical equipment.
Secure the hose to prevent movement.
Opening a hot water faucet to prevent vacuum lock
Open a hot water faucet near the house before draining to allow air into the plumbing and prevent a vacuum that can slow or stop flow.
The operator selects a nearby hot tap, opens it fully, and verifies steady air entry. This equalizes pressure, enabling continuous drainage from the heater.
Once draining finishes, the faucet is closed after tank refill checks.
Opening the drain valve and controlling flow
Before turning the tank’s drain valve, the operator guarantees the hot tap is open and a hose is securely connected to the plastic valve outlet.
Then, the operator slowly begins to crack the valve to establish a controlled flow.
The operator watches hose connections, listens for steady drainage, adjusts valve opening to prevent surges, and closes the valve slightly if spray or leaks occur before continuing gradual emptying.
Flushing sediment and when to use short bursts of water
Flush the tank by letting water flow steadily through the hose while periodically closing and reopening the drain valve in short bursts to dislodge compacted sediment.
These controlled pulses loosen settled particles so they break up and exit the tank without causing sudden pressure surges or hose blowouts.
Continue pulses until runoff runs clear, monitoring hose and drain for clogs; repeat gentle agitation as needed.
Closing the valve and refilling the tank safely
Close the drain valve firmly once the discharge runs clear and all agitation has removed visible sediment.
Then begin the controlled refill to prevent airlocks and protect the plastic valve from stress.
Open a hot faucet slowly to vent trapped air while admitting cold supply water.
Monitor the drain for leaks, listen for steady flow into the tank, and stop refilling once full.
Restoring power or gas and checking for normal operation
Restore power or relight the pilot only after confirming the tank is full, the drain valve is closed, and the cold-water supply is steady to avoid running the heating element or burner dry.
After restoring electricity or gas, monitor for proper ignition, listen for normal burner or element cycling, check for leaks around fittings, verify hot water at fixtures, and observe pressure and temperature for stable, expected operation.
Dealing with Common Problems When Draining
When problems arise while draining, simple remedies often restore function without immediate replacement. A stuck or brittle plastic valve may respond to gentle taps, lubricant, or careful warm-air application.
Slow flow and clogs can be cleared by running a garden hose or backflushing through the drain line. If the valve leaks after draining, temporary sealing methods can limit dripping until a proper replacement is installed.
Stuck or brittle plastic valve solutions (gentle taps, lubricant, heat cautions)
Tap the plastic drain valve gently with a small hammer or screwdriver handle to break mineral deposits loose, taking care not to strike hard enough to crack brittle plastic.
If it still resists, apply a penetrating lubricant sparingly, allow dwell time, then try again.
Avoid open flame or excessive heat on plastic; heat softens and weakens components.
Replace visibly cracked valves before reuse.
Slow flow or clog issues and using a garden hose or backflush technique
Begin by checking flow at the drain spigot and garden hose connection: slow or no flow usually indicates sediment buildup in the valve or tank outlet, a kinked or clogged hose, or airlock.
Clear kinks, flush the hose, and open the temperature/pressure valve briefly to break airlock.
If blockage persists, insert a soft wire or reverse-flush from the hose end to dislodge sediment.
Leaking valve after draining and temporary fixes vs replacement
A leaking drain valve after flushing commonly results from worn seals, mineral buildup, or a cracked stem. Deciding between a temporary fix and full replacement depends on leak severity and the valve’s condition.
Small drips may respond to tightening, Teflon tape, or replacing the rubber washer. Persistent leaks, visible cracks, or frequent failures warrant replacing the valve or calling a professional for safe repair.
When and How to Replace a Plastic Drain Valve
The article outlines common signs that a plastic drain valve needs replacement, such as persistent leaks, cracks, or difficulty operating the handle.
It compares plastic and brass replacement valves, noting durability and corrosion resistance trade-offs to guide selection.
Finally, it summarizes basic replacement steps—shutting off power and water, draining remaining water, removing and installing the new valve—and advises when a licensed plumber should be called for safety or warranty reasons.
Signs the valve needs replacement
When plastic drain valves show persistent drips, visible cracks, difficulty turning, or leaks around their fittings, replacement is warranted to prevent water damage and guarantee safe draining.
Other signs include corrosion at the connection, softened or warped plastic, and valve sticking after use. If performance degrades or leaks recur despite tightening, replace the valve promptly to maintain system integrity and avoid emergency failures.
Choosing the right replacement valve (plastic vs brass)
Several factors determine whether a plastic or brass replacement valve is most appropriate for an individual water heater: durability, temperature and pressure ratings, ease of installation, and budget.
- Plastic: cheaper, corrosion-resistant, limited temperature/pressure tolerance.
- Brass: higher durability, better heat/pressure performance, costlier.
- Compatibility: match thread type and tank outlet size.
- Safety margin: choose brass for older or high-demand systems.
Basic replacement steps and when to hire a plumber
Selecting the correct valve material sets the stage for a straightforward replacement; for many homeowners, a plastic drain valve is the economical choice provided the heater is low-pressure and not near its temperature limits.
Turn off power and water, drain tank, remove old valve, install new gasketed valve, tighten, refill, check leaks.
Hire a plumber for corroded fittings, tank damage, or uncertain comfort with plumbing tasks.
Cost, Time, and Frequency Recommendations
Typical draining takes 30–60 minutes for a homeowner with basic tools, and complexity increases if sediment removal or valve replacement is needed.
Frequency should be guided by water hardness and tank type—annually for hard water or older tanks, and every 2–3 years for soft-water areas or newer models.
DIY costs are generally low (mostly time and a replacement valve if needed), while hiring a pro typically ranges from $75–$200 depending on service and local rates.
Typical time required and difficulty level
A routine drain and flush of a residential water heater usually takes 30 to 60 minutes for a DIYer with basic tools, while a professional service can complete the same job in 20 to 45 minutes depending on tank size and site access.
Difficulty is low to moderate: basic plumbing skills suffice for most homeowners, while confined spaces, corroded valves, or sediment buildup increase time and complexity.
How often to drain based on water hardness and tank type
How often a water heater should be drained depends largely on local water hardness and the tank design:
Soft-water areas with glass-lined or stainless-steel tanks typically require flushing every 12–36 months.
In contrast, hard-water regions and tanks with conventional steel liners or older units often need flushing every 6–12 months to prevent sediment buildup.
Mid-hardness water merits annual flushing; very hard water may justify quarterly checks and more frequent flushing.
Estimated costs for DIY vs professional service
Because labor, parts, and regional rates vary, cost comparisons between DIY flushing and hiring a professional focus on typical price ranges, time commitments, and recommended service frequency.
DIY costs: $0–$75 for basic supplies, 30–90 minutes per session, annual to biannual.
Professional service: $100–$250 per visit, 45–120 minutes, recommended every 1–2 years for most tanks.
Tips to Extend the Life of Your Water Heater and Drain Valve
Practical steps can considerably extend a water heater’s lifespan and keep the drain valve functioning reliably.
Recommended measures include managing sediment with periodic flushing and water softening, following a regular inspection and simple maintenance schedule, and installing upgrades such as replacing the anode rod and fitting a higher-quality drain valve.
Implementing these strategies reduces corrosion, improves efficiency, and lowers the risk of leaks or failures.
Water softening and sediment management strategies
Implementing water softening and regular sediment management greatly reduces scale buildup and prolongs both the tank and drain valve lifespan.
Employ ion-exchange or template-assisted crystallization to lower hardness.
Periodic flushing removes settled sediment before it abrades valves.
Consider upstream sediment filters and a water test to tailor treatment.
Monitor system performance and replace media as recommended.
- Install softener
- Use sediment filter
- Flush periodically
- Test water
Regular inspection schedule and simple maintenance tasks
Establish a consistent inspection schedule—monthly visual checks and annual detailed reviews—to catch minor issues before they escalate.
Inspect the drain valve for leaks, corrosion, and proper operation; test the pressure-relief valve; check connections and hoses for tightness; verify no standing water or unusual odors.
Record findings, perform simple cleaning, tighten fittings, and replace worn seals promptly to maintain reliable performance.
Upgrades and preventive measures (anode rod checks, valve upgrades)
Extend service life by addressing key wear points: routinely inspect and replace the anode rod to prevent tank corrosion.
Upgrade the drain and pressure-relief valves to corrosion-resistant or ball-style models for improved reliability.
Consider installing a sediment-reducing filter or softener to lower mineral buildup.
Periodic flushing, timely valve replacement, and professional inspection of sacrificial anodes reduce leaks, prolong tank integrity, and guarantee safe operation.
Quick Troubleshooting Checklist for Draining Sessions
Before beginning a drain, the technician runs a concise checklist to confirm key conditions: verify cold supply off, power/gas disabled, outlet for hose secure, and verify pressure relieved. He inspects valve integrity, tests flow, checks for leaks, and guarantees safe discharge.
| Item | Action | Status |
|---|---|---|
| Supply | Shut off | OK |
| Power | Disable | OK |
| Valve | Inspect | OK |
| Drain | Test flow | OK |
Conclusion
A cool morning light finds the drained tank like a quiet well, its sediment swept away and the plastic valve resting like a small, faithful gate. Hands long practiced in the task step back, tools set down, watching the clear flow vanish into the garden hose. The heater, freed of grit, hums with renewed purpose; the valve, checked and snug, promises many more reliable seasons under watchful maintenance.