How to Check for Sediment in a Hot Water Heater: Simple Steps to Diagnose and Fix the Problem
To check for sediment in your hot water heater, listen for rumbling noises during heating cycles, observe any discolored or gritty water, and test the drain valve by flushing a small amount into a bucket. If you notice these signs, it may indicate sediment buildup. Before inspecting, ensure your safety by turning off the power or gas and allowing the tank to cool. If sediment is present, a full flush or component inspection may be necessary to restore your water heater’s efficiency.
What Sediment in a Hot Water Heater Means and Why It Matters
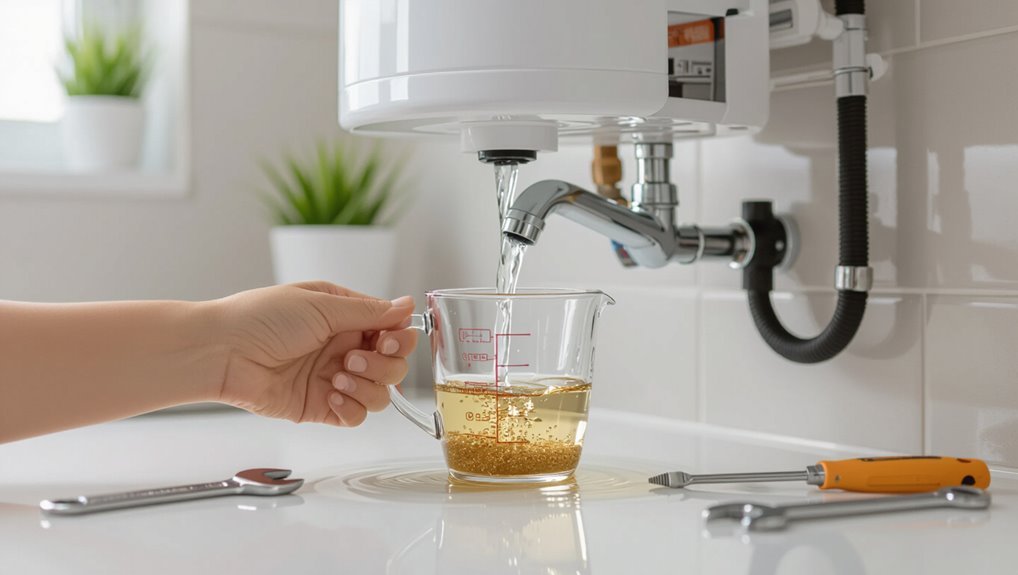
Sediment in a tank-style water heater forms as minerals and debris settle out of heated water and accumulate on the tank bottom over time.
This buildup reduces heating efficiency, causes popping or rumbling noises, lowers usable hot water capacity, and can accelerate corrosion of tank components.
Understanding these effects helps prioritize inspection and routine flushing to maintain performance and extend tank life.
How sediment forms in tank-style water heaters
A layer of mineral debris commonly accumulates at the bottom of tank-style water heaters as dissolved calcium, magnesium, and other particulates precipitate out when cold water is heated.
Over time, this material compacts into grit and sludge that reduces efficiency, causes noise, and can shorten the appliance’s lifespan.
Sediment forms from hard water minerals, corrosion flakes, and suspended solids settling, informing how to check for sediment in hot water heater.
Common consequences of sediment buildup (efficiency loss, noise, reduced capacity, corrosion)
Accumulation of mineral and particulate deposits in a hot water heater undermines performance and accelerates wear:
Sediment reduces heat transfer, increasing fuel or electricity use and raising bills.
Pockets of trapped water cause popping and rumbling noises.
Tank capacity falls as solids occupy volume, delivering less usable hot water.
Abrasive deposits promote corrosion and premature failure of the tank and heating elements.
Quick way to tell if your water heater has sediment
Audible signs such as popping or rumbling often indicate trapped water boiling under sediment.
Visual and performance clues — discolored water, reduced hot-water supply, or fluctuating temperatures — further point to buildup.
If those symptoms appear alongside leaks, faulty thermostats, or burner issues, a technician should distinguish sediment from other causes.
Audible signs to listen for (popping, rumbling)
When sediment builds up on the tank’s heating element or bottom, it often produces distinct popping or rumbling noises as trapped water flashes to steam and forces its way through the deposits.
These sounds typically occur during heating cycles and intensify over time. Regularly noting new or louder noises helps identify sediment accumulation early, prompting flushing or professional inspection to prevent reduced efficiency and potential damage.
Visual and performance clues (discolored water, short supply, fluctuating temps)
Besides noises, sediment reveals itself through visible and performance-related signs that are often easier for homeowners to spot.
Discolored or rusty water, especially after running taps, suggests tank rust or mineral buildup.
Reduced hot water duration and uneven or fluctuating temperatures indicate reduced heat transfer and sediment insulation.
Cloudy or gritty water and slow recovery times further point toward accumulated sediment requiring flushing or inspection.
When to suspect sediment vs other problems
How can a homeowner quickly distinguish sediment from other water heater issues?
Listen for rumbling or popping as burners or elements heat trapped particles; check for rusty or sandy particles when draining a few gallons; note reduced tank capacity with normal incoming cold pressure.
If focused smell, leaks, or complete cold suggests component failure or supply issues rather than sediment buildup.
Tools and safety precautions before inspecting a water heater
Before beginning an inspection, a basic set of tools and materials—garden hose, bucket, adjustable wrench, screwdriver, and gloves—should be gathered.
The operator must shut off power or gas, turn off the water supply, and allow the tank to cool before opening any valves.
For gas units, extra caution around the pilot and venting is required, while electric units require confirming the breaker is off to prevent shock.
Required tools and materials (hose, bucket, wrench, screwdriver, garden hose, gloves)
Gather the right tools and observe safety precautions to inspect a hot water heater for sediment: a length of garden hose to drain the tank, a bucket for collecting water, an adjustable wrench and screwdriver for opening valves and access panels, gloves to protect hands from hot water and sharp edges, and safety goggles if available.
Include pliers, a flashlight, rags, and a sturdy hose clamp for secure connections.
Safety steps (shut off power/gas, turn off water supply, cool-down time)
Although the tank may seem idle, the inspector must first render the unit safe by cutting its energy and water sources: shut off the electrical breaker or gas supply to the heater, close the cold-water supply valve, and allow the tank to cool for at least an hour (longer for recently used or high-capacity systems) before any drain or access procedures are attempted.
Then verify power is off, relieve pressure by opening a hot faucet, wear gloves and eye protection, and guarantee a clear work area prior to draining.
Precautions for gas vs electric units
Several specific tools and safety measures differ between gas and electric hot water heaters and should be checked before inspection.
For gas units, verify gas is shut off, pilot/light controls are secure, and ventilation is clear; use a gas detector and avoid sparks.
For electric units, confirm breaker off, test for voltage, and use insulated tools.
Always wear gloves and eye protection.
Step-by-step inspection and testing for sediment
The inspection proceeds through a concise sequence of safety shutdown, sampling, and component checks to identify and address sediment buildup.
Suggested actions include:
- Turn off power/gas and water supply; drain a small sample and look for particles or discoloration.
- Flush the tank, inspect the drain valve for clogs, and examine the dip tube, anode rod, and heating elements for sediment-related wear.
Each step verifies condition and guides whether further cleaning or part replacement is needed.
Step 1 Turn off power/gas and water supply
Before inspecting the tank for sediment, shut off the water supply and isolate the heater’s energy source to guarantee safety and prevent damage.
The technician confirms electric power at the breaker or turns off the gas pilot and valve.
Close the cold-water inlet. Allow pressure to equalize, and verify valves remain locked.
Document settings before proceeding to testing steps.
Step 2 Drain a small sample and check for particles or discoloration
With power and water secured, the technician opens a hot-water faucet and attaches a hose to the tank’s drain valve to collect a small sample.
A brief drain yields water into a clear container; the technician observes for sand-like particles, rusty flakes, cloudiness, or brown discoloration.
Notes on quantity and appearance guide whether further cleaning or component inspection is needed.
Step 3 Flush the tank to remove loose sediment
Begin flushing by opening the drain valve and a hot-water faucet simultaneously to create steady flow through the tank, allowing accumulated grit and debris to be carried out.
Continue until the discharged water runs clear, periodically closing and reopening the cold inlet briefly to stir settled material.
Monitor flow rate and water temperature, then close the drain, refill, and restore power or gas when the tank is full.
Step 4 Inspect drain valve for clogging or mineral buildup
Inspect the drain valve for signs of clogging or mineral buildup by visually examining the exterior and testing flow behavior.
The technician opens the valve briefly with a hose attached, observes water clarity and pressure, and notes sputtering or restricted flow.
Mineral crust, sand, or reduced discharge indicate partial blockage.
If present, the valve should be cleaned, replaced, or temporarily cleared to restore proper draining.
Step 5 Check dip tube, anode rod, and heating elements for sediment-related wear
The technician now evaluates the dip tube, anode rod, and heating elements for signs that sediment has accelerated corrosion or impaired function.
He inspects the dip tube for cracks or blockage, examines the anode rod for heavy pitting or depletion, and removes or tests electric elements for encrustation.
Any compromised components are noted for cleaning or replacement to restore efficient operation.
Step 6 Refill, restore power/gas, and verify operation
After any sediment removal and component work, the technician refills the tank, restores power or gas, and conducts a methodical verification sequence to confirm the heater operates correctly and remains free of sediment-related problems.
They check for leaks, venting, pilot or ignition function, thermostat settings, and proper heating cycles.
Final checks include temperature at taps and a short reinspection of drain valve and anode condition.
How to perform a full tank flush to remove heavy sediment
Before beginning a full tank flush, the homeowner should allow time for the water heater to cool and identify an appropriate discharge location for hot, sediment-laden water.
The flush procedure then follows a clear sequence: shut power or gas, close the cold-water inlet, open a hot-water tap, attach a hose to the drain valve, and flush until the outflow runs clear.
If heavy deposits do not break up, a wet/dry vacuum or sump pump can be used at the drain valve to remove remaining sediment.
Preparing for a full flush (time, water disposal location)
Several simple preparations ascertain a full tank flush proceeds safely and efficiently: estimate about 45–90 minutes for the job, confirm an appropriate discharge location for hot, sediment-laden water, shut off power or gas and cold-water supply, and gather a hose, bucket, wrench, and protective gloves.
Verify local disposal rules, ascertain drainage slope and capacity, protect floors and landscaping, and have an assistant available if needed.
Detailed flushing procedure with step-by-step actions
With preparations complete and the work area secured, the procedure for a full tank flush proceeds methodically:
Turn off power/gas and close cold inlet, attach hose to drain valve, open a hot faucet to vent, open drain valve slowly and let water flow until clear, periodically briefly open cold inlet to stir and flush sediment, close drain, remove hose, refill tank, restore power/gas and check for leaks.
When to use a wet/dry vacuum or sump pump for stubborn sediment
Consider using a wet/dry vacuum or sump pump when repeated standard flushing fails to clear dense, compacted sediment or when multiple brief inlet flushes still yield murky discharge.
Shut power/gas, close cold inlet, open drain and pressure-relief valves, then attach vacuum or pump to extract settled solids.
Agitate tank base gently via inlet flow or hose to loosen deposits, repeat until discharge is clear.
When sediment has damaged components and what to inspect
If sediment persists, it can foul heating elements or burners, often indicated by reduced heat output, strange noises, or visible corrosion.
The deposit also accelerates anode rod depletion and can corrode the tank lining, so both should be inspected for pitting, heavy wear, or perforation.
Common repairs include replacing the drain valve, heating elements, and the anode rod to restore function and slow further damage.
Signs of damaged heating elements or burners
Inspect the heating elements and burners for physical and performance clues that sediment has caused damage.
Look for crusting, pitting, or visible scaling on elements and burner surfaces.
Note uneven heating, frequent cycling, reduced hot water output, strange noises (banging or popping), or ignition failures.
Corroded connections, discolored insulation, and soot indicate compromised components needing cleaning or replacement.
How sediment affects the anode rod and tank integrity
Several factors determine how sediment compromises the anode rod and tank integrity, but the common result is accelerated corrosion at contact points where debris traps moisture and concentrates electrolytes.
Sediment abrades the anode, shortens its lifespan, and creates localized corrosion pockets on the tank floor and seams.
Inspect for pitting, reddish or flaky deposits, thinning metal, and weakened welds; note odors or persistent leaks as signs.
Replacing common parts: drain valve, heating elements, anode rod
When sediment has eaten through seals, clogged passages, or ground down sacrificial metals, replacing the affected drain valve, heating elements, or anode rod becomes necessary rather than optional.
Inspect the drain valve for leaks and reduced flow, test elements for continuity and sediment coating, and examine the anode rod for heavy pitting or depletion.
Replace corroded or nonfunctional parts and flush before reassembly.
Comparison of tank types and sediment issues
Different water heater designs show varied vulnerability to mineral buildup and require distinct maintenance schedules. The following comparison highlights traditional tank, tankless, and heat-pump models alongside typical sediment susceptibility and recommended flushing or descaling intervals. This allows informed decisions about inspection frequency and preventive action.
| Heater Type | Sediment Susceptibility | Maintenance Frequency |
|---|---|---|
| Traditional tank | High — accumulation on bottom and around elements | Flush every 6–12 months |
| Tankless | Low internal sediment, but scale on heat exchanger | Descale every 6–12 months in hard water |
| Heat-pump (hybrid) | Moderate — sediment affects heat transfer | Flush every 6–12 months; check filters quarterly |
Traditional tank vs tankless vs heat-pump water heaters
Although all residential water heaters deliver hot water, their designs affect how sediment forms, accumulates, and is managed:
Traditional tank units collect mineral deposits on the bottom, requiring periodic flushing and anode checks.
Tankless models largely avoid accumulation but can suffer scale on heat exchangers, needing descaling.
Heat-pump systems combine a tank with lower operating temperatures, potentially altering sediment behavior and maintenance approaches.
Susceptibility to sediment and recommended maintenance frequency
Because design and operating temperature dictate how and where minerals settle, water heater types vary in their susceptibility to sediment and consequently in recommended maintenance intervals.
Conventional storage tanks accumulate sediment fastest and need annual or biannual flushing.
Tankless units resist sediment but require periodic descaling every 1–3 years depending on water hardness.
Heat-pump models benefit from yearly checks to preserve efficiency and prevent clogging.
Preventing future sediment buildup
Preventing future sediment buildup begins with a routine maintenance schedule that includes periodic flushing of the tank at recommended intervals.
Installing a whole-house water softener or a dedicated sediment filter can reduce incoming mineral and particulate load.
Additional protections include using sacrificial anode rods and targeted water treatment to limit corrosion and scale formation.
Regular maintenance schedule and flushing frequency
When establishing a maintenance routine for a hot water heater, homeowners should balance frequency with local water quality, tank type, and usage patterns to minimize sediment buildup without unnecessary effort.
Inspect annually; perform a full drain-and-flush every 6–12 months for conventional tanks, or annually for newer, well-maintained units.
Increase frequency for hard water or heavy use; document dates and observations for trend tracking.
Installing a whole-house water softener or sediment filter
Consider installing a whole-house water softener or a sediment filter to reduce the mineral and particulate load entering the water heater.
These systems trap grit and soften hard water before it reaches the tank, lowering sediment accumulation and extending appliance life.
Choose filtration based on particle size and flow rate, follow manufacturer installation guidance, and schedule periodic cartridge or resin maintenance to retain effectiveness.
Using sacrificial anode rods and water treatment options
Inspecting and maintaining sacrificial anode rods is a straightforward, cost-effective method to slow corrosion and reduce mineral-derived sludge in a water heater tank.
Regular rod replacement prevents tank deterioration and lessens sediment generation.
Complementing rods with targeted water treatment—softeners, phosphate feeders, or point-of-use filters—reduces hardness and particulates.
Combine periodic inspections and appropriate treatments to minimize future buildup and extend heater life.
Cost, time, and DIY vs professional service considerations
A simple DIY inspection and tank flushing typically takes 30–90 minutes and requires only basic tools, though access and sediment levels affect difficulty.
Homeowners should call a plumber or HVAC technician if they encounter leaks, persistent discolored water, unusual noises, or if tank flushing does not improve performance.
Professional service or parts replacement can range from $150–$800 for repairs and $700–$2,500+ for full water heater replacement depending on unit type and labor.
Estimated time and difficulty for DIY inspection and flushing
Estimating time, cost, and difficulty for checking and flushing a water heater helps homeowners decide whether to tackle the job themselves or hire a pro.
A DIY inspection and basic flush typically takes 45–90 minutes, minimal tools, and low material cost.
Moderate difficulty suits DIYers with basic plumbing skills; limited access, corroded fittings, or complex systems increase time and favor professional service.
When to call a plumber or HVAC technician
When should a homeowner call a plumber or HVAC technician for sediment issues in a hot water heater?
If flushing fails, noises persist, leaks appear, or mineral buildup affects water temperature and pressure, professional assessment is recommended.
Technicians offer diagnostic tools, safe valve or element replacement, and time-efficient solutions.
Call sooner if unfamiliar with plumbing, the unit is under warranty, or risks of damage or scalding exist.
Typical repair and replacement cost ranges
Cost clarity matters: homeowners can expect a range of expenses for sediment-related hot water heater work that depends on the problem’s severity, the heater type (tank vs. tankless), local labor rates, parts required, and whether the job is DIY or handled by a professional.
Typical costs:
- flush or minor repairs $50–$250 DIY or pro;
- element/thermostat replacement $100–$400;
- full tank replacement $800–$2,500;
- tankless replacement $1,000–$3,500.
Troubleshooting common problems after flushing
If noise or weak heating persists after flushing, the next steps include checking the heating element or burner and inspecting the drain valve for partial blockage.
If cloudy or discolored water returns, the source should be traced to residual sediment, compromised anode rods, or incoming supply issues and addressed accordingly.
Regular monitoring and follow-up checks—such as periodic short flushes and temperature/performance tests—help confirm that sediment has been effectively removed.
Persistent noise or poor heating after flush next steps
Inspecting the water heater after a flush is essential when persistent rumbling, popping, or reduced hot water output continues. These symptoms often indicate remaining sediment, a damaged heating element or burner, or issues with thermostats and dip tubes.
Verify drain valve and inlet sediment, test elements/burner operation, confirm thermostat settings and wiring, and replace faulty parts.
If unresolved, consult a licensed technician.
Dealing with cloudy or discolored water that returns
Several homeowners notice cloudy or discolored water returning after a flush, a sign that sediment, mineral deposits, or disturbed corrosion residue remains in the tank or distribution lines.
Recommended actions include re-flushing until clear, inspecting and replacing the anode rod if corroded, cleaning or replacing inlet sediment filters, and briefly running faucets to purge lines.
If discoloration persists, consult a plumber.
Monitoring and follow-up checks to ensure sediment removal
Begin regular monitoring immediately after a flush to confirm that sediment removal was effective and to catch any recurring issues early.
Inspect drain water clarity, test hot-water temperature stability, and note unusual noises or reduced flow.
Recheck the drain valve and sediment trap after one week, then monthly for three months.
Schedule another flush if sediment or performance problems recur.
Checklist for ongoing water heater maintenance
A concise checklist helps guarantee the water heater remains efficient and safe throughout the year.
Suggested items include seasonal tasks and annual inspections, plus a simple record-keeping routine to note actions and results:
- Seasonal tasks and yearly inspections
- Record-keeping: date, action taken, and observations
- Notes on parts replaced or professional service visits
Seasonal tasks and yearly inspections
Establishing a concise seasonal and annual checklist helps guarantee a water heater operates safely and efficiently year-round.
Inspect for leaks, corrosion, and proper venting each season.
Flush sediment in spring or fall, test the temperature-pressure relief valve annually, and check anode rod condition yearly.
Verify thermostat settings and insulation before winter.
Schedule professional inspection every 12 months.
Record-keeping: what to log after each maintenance action
Log every maintenance action promptly and consistently to create a reliable history for the water heater.
Record date, time, technician name, and specific task performed (flushing, valve replacement, sediment removal).
Note observed issues, water temperature settings, pressure readings, parts used, and follow-up recommendations.
Include photos or video links and next scheduled maintenance date.
Keep records accessible and backed up.
Conclusion
Detecting and addressing sediment preserves heater efficiency and extends appliance life. In short, regular inspection, simple tests and periodic flushing are prudent; most homeowners can perform basic maintenance, though complex issues warrant a professional. With a pocket watch tucked into the toolbox as a playful anachronism, following safety steps, using the right tools, and adhering to a maintenance schedule keeps hot water reliable, minimizes repairs, and prevents costly early replacement—practical care pays off.