How to Install a Sink Drain Pipe: Simple DIY Guide for Beginners
To install a sink drain pipe, begin by gathering your tools, shutting off the water supply, and clearing the area under the sink. Start by removing the old P-trap and cleaning the sink hole. Next, set the flange using plumber’s putty or a gasket, then thread and tighten the locknut. Attach the tailpiece and connect the P-trap to the wall stub with slip nuts and washers. Tighten everything gradually, test for leaks, and make any necessary adjustments for alignment. For detailed troubleshooting, measurements, and special connections, refer to the full guide.
Quick Install Overview: Steps To Install A Sink Drain
For a straightforward sink drain installation, begin by gathering the necessary parts—tailpiece, P-trap, slip nuts, washers, and plumber’s putty—then confirm the sink and pipe openings align.
Remove old drain components and clean mating surfaces.
Apply plumber’s putty to the drain flange underside, insert flange into sink hole, and secure from below with the locknut and washer.
Attach tailpiece to the flange, hand-tighten slip nuts on connections, then fit the P-trap between tailpiece and wall stub-out, ensuring proper trap arm slope.
Tighten nuts incrementally, check alignment, and test for leaks by running water.
Why Install Or Replace A Sink Drain: Benefits
Whether renovating a kitchen or addressing chronic leaks, installing or replacing a sink drain improves function and prevents damage. It restores proper drainage, reduces clogs, and eliminates lingering odors from corroded or trapped debris.
A new drain enhances water flow and seal integrity, lowering risk of leaks that cause mold, rot, and structural harm. Upgrading materials—such as using corrosion-resistant fittings—extends service life and simplifies maintenance.
Improved seals and modern trap designs also conserve water and prevent pests. Overall, replacing a faulty or outdated drain increases reliability, home value, and peace of mind with relatively low cost and effort.
When To Replace Versus Repair A Sink Drain
Determining whether to replace or repair a sink drain depends primarily on the extent of damage and the cost versus benefit of each option.
Minor leaks or clogged traps often justify repair, while widespread corrosion, cracks, or repeated failures favor replacement.
Homeowners should compare repair expenses and remaining service life against the upfront cost and long-term reliability of a new drain.
Extent Of Damage
A clear assessment of the sink drain’s condition guides the choice between repair and replacement: minor issues such as a single cracked washer, loose slip-joint connections, or surface corrosion often warrant targeted repairs, while extensive pipe corrosion, multiple fractured segments, persistent leaks despite prior fixes, or significant misalignment indicate replacement is the more reliable option.
Inspect for hairline cracks, pitting, and soft spots in metal or brittle plastic. Check joint integrity and thread wear. Consider hidden damage within wall cavities or under-sink cabinets.
If damage spans several components or compromises structural support, replacement reduces recurrence and restores long-term reliability.
Cost Versus Benefit
Weighing repair against replacement requires comparing immediate expenses, long-term savings, and the likelihood of recurring problems.
The decision hinges on leak severity, corrosion, part availability, and labor cost. Minor clogs, isolated gasket failure, or easily accessible P-traps favor repair for lower upfront cost.
Extensive corrosion, recurring leaks, mismatched parts, or frequent repairs indicate replacement yields better value, reduced future labor, and improved performance. Consider material upgrades (PVC vs. metal) and warranty differences.
Factor homeowner skill level; DIY repairs reduce cost but risk improper fixes.
A simple cost-benefit calculation—repair cost plus projected repeat repairs versus replacement cost—guides choice.
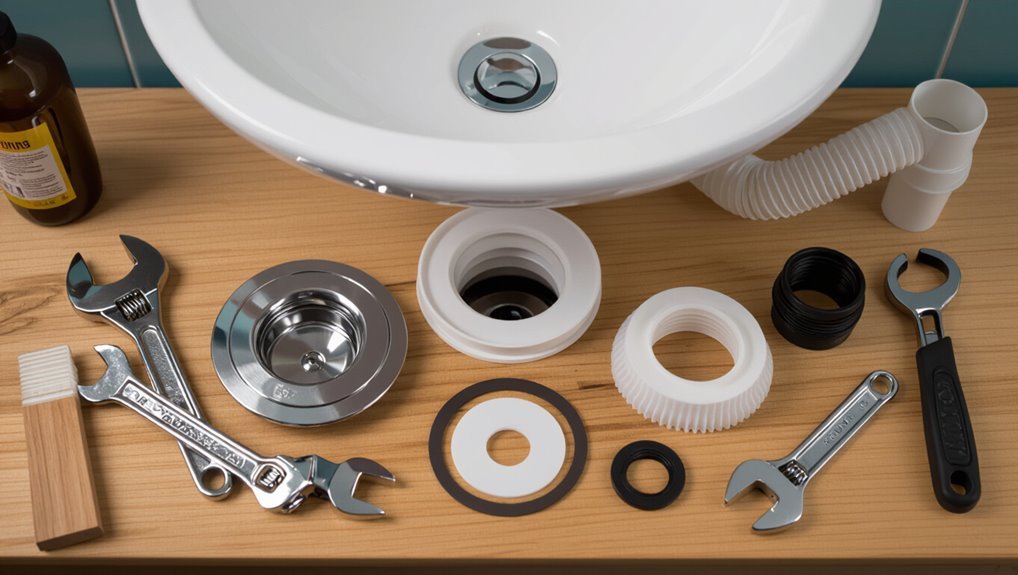
Tools You Need For A DIY Sink Drain Installation
Before beginning a sink drain installation, assemble a compact kit of essential hand tools such as adjustable wrenches, slip-joint pliers, and screwdrivers.
Include plumbing-specific parts and fittings—tailpieces, trap assemblies, gaskets, and plumber’s putty or thread tape—matched to the sink type.
Add basic safety and prep gear like gloves, eye protection, a bucket, and rags to protect the workspace and contain spills.
Essential Hand Tools
Essential tools—wrench set, adjustable pliers, pipe cutter, and plumber’s putty knife—form the backbone of a DIY sink drain installation.
A basin wrench reaches tight nuts beneath the sink; slip-joint pliers handle larger fittings and provide leverage.
A hacksaw or tubing cutter produces clean pipe ends for PVC or metal tubing.
Channel-lock pliers assist with slip nuts and compression fittings.
A screwdriver set (flat and Phillips) secures mounting hardware.
A tape measure guarantees accurate lengths and alignment.
Utility knife trims sealant and gaskets.
A small flashlight improves visibility.
Gloves and safety glasses protect hands and eyes during assembly.
Plumbing-Specific Parts
Having the right hand tools sets the stage for the specific plumbing parts that complete a sink drain installation. Essential components include a tailpiece, sink flange, rubber and fiber gaskets, and a locknut to secure the flange.
A P-trap assembly—comprised of trap bend and trap arm—prevents sewer gas entry. Slip-joint nuts and washers allow adjustments; PVC or chrome-plated metal pipe sections match existing plumbing.
Plumber’s putty or silicone sealant guarantees a watertight flange seal. Compression fittings, escutcheons, and adapter fittings accommodate different pipe materials and finishes. Select parts by sink type and drain size for proper fit.
Safety And Prep Gear
When preparing to install a sink drain, attention to safety and proper prep gear reduces mistakes and prevents injury.
The installer should gather essential protective equipment and preparation tools: gloves to avoid cuts and chemical exposure, eye protection against debris and splashes, and knee pads for prolonged crouching.
A reliable bucket and towels catch water, while a flashlight improves visibility in tight spaces.
Properly sized wrenches, plumber’s putty, and replacement washers reduce rework.
Clear workspace organization prevents dropped parts and accidental strain.
Planning the sequence of tasks and confirming tool readiness shortens the job and limits hazards.
- Gloves, eye protection, knee pads
- Bucket, towels, flashlight
- Wrenches, plumber’s putty, washers
Materials And Parts List For Most Sink Drains
For most sink installations, a concise set of parts covers the full drain assembly: a strainer or pop-up drain, tailpiece, trap adapter, P-trap (usually a U-bend and trap arm), slip nuts and washers, plumber’s putty or silicone sealant, and any required mounting hardware or extension pieces to match the sink and waste outlet.
Additional common items include a flange gasket and rubber seal, extension tailpieces for deep sinks, a waste arm for wall outlets, and replacement washers or copper/crush washers.
Basic tools often paired with parts are channel-lock pliers, basin wrench, tape measure, and thread sealant or plumber’s tape.
How To Identify Your Sink And Drain Type
The installer first determines the sink material—porcelain, stainless steel, composite, or cast iron—to select compatible fittings and sealants.
Next, the drain style is identified (pop-up, basket, grid, or flange) to match replacement parts.
Finally, pipe dimensions including tailpiece diameter and trap arm length are measured to make sure proper fit.
Determine Sink Material
Before any plumbing work begins, identify the sink’s material and drain type to select compatible tools, sealants, and replacement parts. The inspector examines surface texture, weight, and seams to classify sinks as stainless steel, cast iron with enamel, fireclay, porcelain, composite granite, or acrylic. Each material demands specific gasket types, sealants, and torque limits to avoid damage. Corrosion sensitivity, heat tolerance, and mounting style influence part choice. If unsure, consult manufacturer markings under the rim or compare edge cross-sections. Proper identification prevents leaks and failures during drain replacement.
- Check texture and weight.
- Inspect edges and markings.
- Match sealant to material.
Identify Drain Style
When identifying a drain style, an inspector first observes visible features—top flange shape, presence of overflow, and type of stopper—to narrow possibilities quickly. They note whether the drain is grid, pop-up, lift-and-turn, or center set, and whether an overflow hole connects to the tailpiece. Finish and mounting type (threaded vs. bonded) are recorded to select compatible parts.
| Feature | Common types |
|---|---|
| Flange | Flat, rounded, slotted |
| Stopper | Pop-up, lift-and-turn, push-button |
| Overflow | Present, absent |
| Mounting | Threaded, glued/bonded |
Measure Pipe Dimensions
Measure the pipe dimensions precisely to make sure replacement parts fit and seals hold.
The installer notes diameters, lengths, and thread types.
Using a caliper or tape, measure inner and outer diameters of tailpieces, trap arms, and tailpiece outlets.
Record thread pitch for threaded couplings and note whether pipes are NPT, BSP, or slip-fit.
Measure distance from sink outlet to wall or floor to determine trap length.
Photograph fittings and labels for reference.
Accurate measurements prevent leaks, reduce returns, and speed installation.
Consult manufacturer specs when in doubt to match materials and tolerances.
- Diameter accuracy
- Thread type
- Fit length
Measure The Tailpiece And Trap For A Proper Fit
How far does the tailpiece extend beneath the sink and how will the trap align with the wall outlet? Measure the tailpiece from the sink flange down to its end. Note vertical distance and centerline offset to the wall trap inlet. Compare trap arm length and bend placement so the trap seats without forcing connections.
| Item | Measure | Note |
|---|---|---|
| Tailpiece length | inches/cm | From flange to tailpiece end |
| Trap arm offset | inches/cm | Horizontal to wall centerline |
| Trap height | inches/cm | Top of trap to floor of cabinet |
Record values, select appropriate trap, and test-fit before final assembly.
How To Shut Off Water And Prep The Workspace Safely
Before any plumbing work begins, the water supply must be shut off and the immediate area prepared to prevent leaks and protect finishes.
The practitioner locates and closes the sink’s shutoff valves or the home’s main valve, then opens the faucet to drain residual water.
Protective measures include laying towels, a shallow pan beneath the trap area, and waterproof tape on nearby cabinetry.
Safety gear—gloves and eye protection—reduces injury risk.
Make sure adequate lighting and clear floor space to avoid trips.
Confirm tools are within reach and electronics are moved away from wet zones.
- Isolate water
- Contain spills
- Wear protection
Removing The Old Drain And Trap Step By Step
With the water supply confirmed off, the procedure for removing the existing drain and trap can begin.
The P-trap should be loosened and removed slowly to contain residual water and debris.
Careful handling prevents damage to fittings and simplifies reinstallation.
Turn Off Water Supply
To begin turning off the water supply, locate the shutoff valves under the sink and confirm both the hot and cold handles are fully closed.
The person inspects valves for corrosion, guarantees supply lines are tight, and checks for secondary shutoffs for the house if valves are seized.
They relieve residual pressure by opening the faucet and place a bucket beneath to catch drips.
Confirm no flow before proceeding to remove drain components.
- Verify valve positions and condition.
- Open faucet to drain remaining water.
- Place container and towels to catch leaks.
Remove P-Trap Carefully
Having confirmed the water is shut off and the faucet drained, the next step is removing the P-trap.
The person places a bucket beneath the trap to catch water and debris, then inspects slip nuts on both ends.
Using channel-lock pliers or by hand if loose, they loosen the nuts, turning counterclockwise, while supporting the trap to prevent sudden drops.
Once freed, the trap is lowered carefully, emptied into the bucket, and rinsed.
The drain tailpiece and wall elbow are checked for corrosion or buildup.
Any damaged or warped components are set aside for replacement before installing the new drain.
Clean The Sink Flange And Countertop Before Installation
Before installing the new sink drain, the installer wipes the sink flange and surrounding countertop to remove old plumber’s putty, grease, and mineral deposits.
A clean surface guarantees proper seating and prevents gaps that cause leaks or uneven fittings.
The process uses a soft scraper for residue, a mild cleaner for oils, and a descaler for mineral build-up; all residues are rinsed and dried thoroughly.
Inspect surfaces for nicks or unevenness and address minor damage with appropriate fillers so the drain will sit flush.
Proper cleaning reduces future maintenance and improves seal reliability.
- Remove residue
- Degrease and descale
- Inspect and repair
Apply Plumber’s Putty Or Silicone Correctly
When sealing the drain, the installer chooses either plumber’s putty for metal sinks or silicone for porcelain and composite bowls, noting each material’s properties and cure times.
The chosen compound is rolled into a uniform rope or applied in a continuous bead around the flange base, avoiding gaps.
Excess putty is pressed outward and removed after tightening; excess silicone is smoothed with a wet finger or tool before skinning.
Work quickly with putty, allow full cure for silicone per manufacturer instructions, and keep surfaces clean and dry during application.
Proper seating prevents leaks without over-compressing the seal.
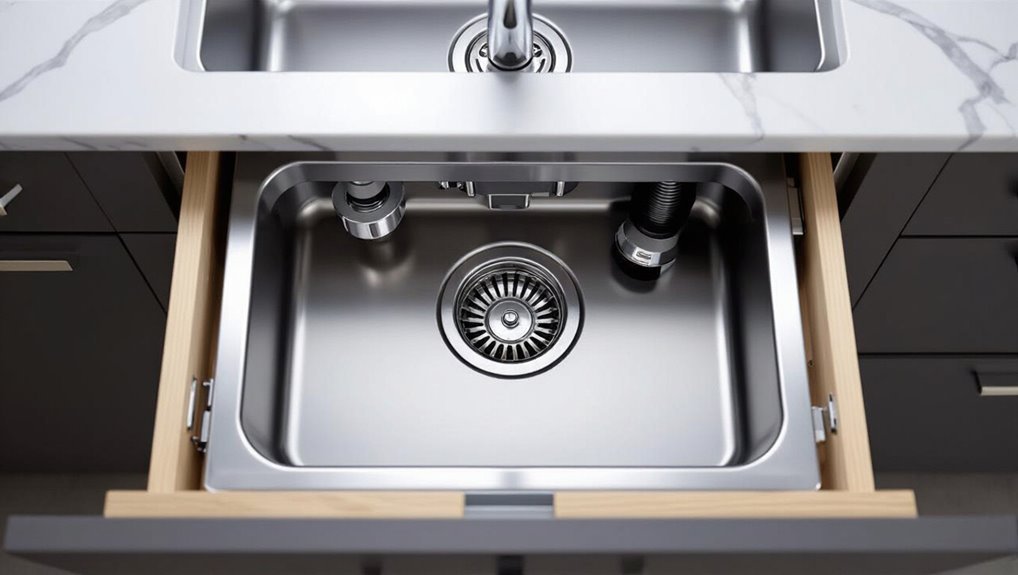
Install The Sink Flange And Strainer Assembly
With the sealant in place on the flange base, the installer sets the flange into the sink hole and aligns the strainer basket beneath it. The two parts are brought together, guaranteeing the flange sits flush and the basket threads engage smoothly.
Fastening hardware is hand-started, then tightened incrementally with a screwdriver and wrench to compress the seal evenly. Excess sealant is removed before it skins. The assembly is checked for level and rotation; adjustments are made while the sealant remains pliable. Final tightening secures the joint without overcompressing.
- Even compression prevents leaks.
- Incremental tightening guarantees alignment.
- Clean workspace aids inspection.
Attach The Tailpiece To The Strainer
Next, the tailpiece is brought up to the installed strainer so its end aligns straight with the strainer outlet.
The slip nut and flat washer are slid onto the tailpiece and positioned over the strainer threads. The nut is hand-tightened and then given a quarter-turn with a wrench to secure a watertight connection.
Align Tailpiece With Strainer
Before securing the tailpiece, position it so its inlet aligns squarely with the strainer’s outlet, ensuring the flared end seats evenly against the gasket; this prevents leaks and uneven stress on the connection.
The installer checks axial alignment, correct rotation, and full gasket contact before proceeding.
Slight adjustments with gentle pressure keep parts concentric without twisting seals.
Visual and tactile inspection confirms no gaps and that metal faces meet flatly.
Avoid forcing misaligned pieces; realignment preserves threads and gaskets.
Once alignment is perfect, the assembly is ready for the next fastening step.
- Check concentricity
- Verify gasket seating
- Avoid twisting during placement
Secure Slip Nut Connection
Having confirmed proper alignment and gasket seating, the installer tightens the slip nut to secure the tailpiece to the strainer.
Using steady hand pressure and an adjustable wrench if needed, the nut is turned clockwise until finger-tight plus a quarter to half turn.
The fitter avoids over-tightening, which can deform plastic fittings or compress the gasket excessively, causing leaks.
After tightening, the assembly is inspected visually for even compression around the gasket and checked by hand for play.
Finally, the water supply is briefly run to observe for drips; any leak prompts slight readjustment until fully watertight.
Choose And Cut The Correct Trap Arm Length
Measure the distance from the sink tailpiece to the wall outlet, then subtract the length of the trap’s inlet and any slip-nut engagement to determine the correct trap arm length. The installer marks the trap arm, allowing a small allowance for final alignment and slip-joint compression. A straight, square cut guarantees a reliable fit; deburr the edge and test-fit before final trimming.
Consider local code for maximum horizontal run and slope: maintain a slight downward pitch toward the outlet. If using PVC, use a solvent- or threaded-adapter as required for material compatibility and secure measurement.
- Accuracy preserves seal integrity.
- Square cuts prevent leaks.
- Code guarantees proper drainage.
Assemble The P‑Trap And Slip‑Joint Connections
With the trap arm cut and test-fitted, the installer assembles the P‑trap by sliding slip nuts and washers onto the tailpiece and trap bend, ensuring the tapered faces of the washers are oriented correctly to form a seal.
The trap bend is fitted to the tailpiece, the washer seated, and the slip nut hand-tightened.
The trap arm receives its nut and washer before coupling to the trap bend.
After aligning components, the installer tightens slip nuts evenly with a wrench a fraction of a turn beyond hand-tight, avoiding overtightening.
Finally, the assembly is checked for proper engagement and readiness for leak testing.
Align The Trap To The Wall Drain Stubout
Before securing the trap assembly, the installer lines up the trap arm with the wall drain stubout so the slip-joint faces meet squarely and the trap arm enters the stubout without binding.
The installer checks horizontal and vertical alignment, holding the trap so the tailpiece drops naturally into the inlet and the trap arm remains level toward the stubout.
Gentle adjustments prevent stress on joints and guarantee proper slope for drainage.
Once aligned, the trap stays supported while slip nuts are readied.
- Confirm parallel alignment to avoid twisting.
- Guarantee correct trap arm insertion depth.
- Support components before final fastening.
Tighten Slip Nuts Without Overcompressing Washers
Before tightening slip nuts, the installer checks that each washer sits evenly in its seat to prevent pinching.
Nuts are started and snugged by hand, then given slight additional turns to compress the joint without flattening the gasket.
If needed, a strap or small adjustable wrench applies gentle, controlled torque rather than heavy force.
Check Washer Alignment
When aligning the rubber washers, the installer should seat them evenly in the slip-joint fittings so that the sealing faces meet flatly; this prevents leaks without requiring excessive torque.
The installer inspects each washer for nicks or warping, confirms correct orientation, and makes certain the washer sits flush against the pipe shoulder.
Slight finger pressure centers the washer; a misaligned washer causes pinched seals or uneven compression.
Reassemble the joint and snug the nut until resistance is felt, avoiding excessive force that deforms the washer.
Verify alignment visually before final tightening to reduce leak risk.
- Inspect for damage
- Seat flush and centered
- Avoid overcompression
Hand-Tighten Then Adjust
Often, the installer hand-tightens the slip nuts first, bringing the joint snug enough to compress the washer without deforming it.
After hand-tightening, the installer inspects the washer for even seating and ensures the tailpiece aligns with the trap inlet. Small adjustments rotate or shift the pipe slightly so the washer remains centered and gap-free.
If seams still leak, the nut is tightened incrementally—quarter turns—while rechecking alignment and washer condition. Overcompression is avoided to prevent cracking or flattening that causes leaks. Final checks include a brief water test and visual confirmation that washers retain their designed shape.
Use Gentle Torque Tools
Occasionally a wrench is needed after hand-tightening, but using a torque-limited or strap wrench prevents overcompressing slip-nut washers while achieving a reliable seal.
The installer selects a tool with controlled force, aligns the nut squarely, and applies steady, minimal turns until resistance increases slightly.
Excess torque risks washer deformation and leaks; insufficient torque allows movement.
Verification involves running water and inspecting for seepage, then backing off or retightening in small increments.
Periodic checks after several uses confirm stability.
Proper gentle torque preserves washer life and guarantees a durable, serviceable connection without cracking plastic fittings.
- Choose controlled-force tools.
- Apply steady, minimal turns.
- Test and adjust incrementally.
Install A Pop‑Up Drain Assembly With Lift Rod
Begin by assembling the pop‑up drain components and inspecting the sink’s tailpiece and overflow opening to guarantee compatibility; the pop‑up mechanism must seat squarely in the drain and align with the lift rod linkage to form a watertight, operable seal.
Insert the drain body through the sink, apply plumber’s putty or supplied gasket, and tighten the locknut beneath without over‑torquing.
Attach the horizontal pivot rod into the drain’s flap and secure the retaining clip.
Connect the lift rod to the clevis and adjust linkage length so the stopper opens fully and seals when closed.
Test for smooth operation and leaks, then retighten if needed.
Add A Dishwasher Inlet To The Drain Line
Next, the installer selects the correct dishwasher tailpiece or adapter to match the sink drain and dishwasher hose.
Careful positioning with a slight continuous slope prevents standing water and guarantees proper flow.
All fittings are tightened or clamped, and the assembly is pressure-tested for leaks before finishing.
Choose Proper Dishwasher Adapter
When adding a dishwasher inlet to the sink drain line, selecting the correct adapter guarantees a secure, leak-free connection between the appliance hose and existing plumbing.
The installer identifies pipe material (PVC, ABS, metal) and thread type (NPT, BSP, garden) before choosing an adapter.
Size matching—typically 3/8″, 1/2″, or 7/8″—prevents cross-threading or stress.
Use rubber or silicone gaskets and tighten per torque recommendations; avoid over-tightening.
Consider a dedicated branch with a dishwasher tailpiece or air gap for backflow prevention.
Verify compatibility with local codes and test under full water pressure for leaks.
- Match material and thread
- Make certain correct size and gasket
- Confirm code and test
Positioning And Slope
For a reliable dishwasher connection, the inlet must be placed and pitched to promote smooth drainage and prevent backflow or siphoning.
The inlet should join the branch drain above the trap arm and below the sink tailpiece, positioned so effluent flows downhill without pooling.
Maintain a consistent slope of about 1/4 inch per foot (2%) toward the main drain.
Avoid uphill runs, dips, or low spots where water can collect.
When routing, allow enough straight length for air gap fittings or high loop placement.
Account for cabinet constraints and future access while keeping the inlet clear of strainers and shutoffs.
Secure Connections And Testing
With the inlet positioned and sloped to promote steady flow, attention turns to making watertight connections and verifying the installation under load.
The dishwasher inlet is attached to the branch tailpiece using a dedicated inlet kit or a proper tee; threads get plumber’s tape and a hand-tightened nut followed by a quarter turn with a wrench.
Secure all slip joints with new washers and tighten clamps on flexible hoses.
Perform a leak test by running the dishwasher and inspecting joints. If seepage appears, tighten or reseat fittings; replace damaged washers.
Make sure the air gap or high loop is maintained for backflow prevention.
- Use correct inlet kit and tape
- Hand-tighten then wrench-turn
- Test with dishwasher running
Working With Oil‑Rubbed Bronze And Coated Finishes
Typically, installers handle oil‑rubbed bronze and other coated finishes with extra care to protect their appearance and integrity during drain pipe installation.
Gloves prevent fingerprints and oils; soft cloths cushion parts. Protective tape covers visible surfaces where tools might contact fittings.
Threaded connections receive gentle tightening to avoid scratching or compressing coatings; a torque‑aware approach reduces risk.
Avoid abrasive cleaners and steel wool that strip finishes. If minor nicks occur, touch‑up kits matched to the finish restore appearance.
Finally, document installed components and advise homeowners on maintenance to preserve patina and coating longevity.
Joining Galvanized, PVC, And ABS Connections
When moving from handling delicate finishes to assembling the actual drainage network, installers encounter a different set of priorities: material compatibility, proper sealing, and corrosion control. Galvanized, PVC, and ABS require distinct approaches. Galvanized resists mechanical damage but corrodes; inspect threads and use dielectric fittings where metals meet plastic.
PVC and ABS use solvent welding or compatible mechanical couplings; clean, primer, and solvent-weld PVC, and follow ABS-specific cement. Shifting between plastic types or to metal needs approved adapters and correct gaskets. Tighten fittings without deforming plastic, support runs to prevent stress, and test for leaks before finishing.
- Inspect materials and choose approved adapters.
- Prepare surfaces: clean, primer, cement or gasket.
- Support and pressure-test assemblies.
Use Thread Sealant And Tape Where Needed
In threaded plumbing joints, applying the correct thread sealant or PTFE tape prevents leaks and eases future disassembly. The installer inspects threads for damage, cleans debris, and selects sealant compatible with pipe material and fluid type.
For metal fittings, wrap PTFE tape clockwise three to five turns, smoothing it into crests; liquid anaerobic or pipe dope may be used where specified. Avoid overuse that can inhibit proper engagement.
For plastic threads, prefer non-solvent tapes and manufacturer-recommended compounds to prevent stress cracking. After assembly, tighten to recommended torque and verify for leaks with a brief water test.
Adjust For A Double‑Basin Sink Drain Setup
When fitting a double‑basin sink, attention turns to aligning the two tailpieces so they meet cleanly at the trap.
The installer measures and trims each tailpiece to guarantee proper slope and clearance.
A waste arm is then installed to connect the combined outlet to the wall drain.
Aligning Two Tailpieces
For a double‑basin sink, the two tailpieces must be adjusted so their outlets meet the T‑shaped trap assembly without stress or misalignment. The installer measures vertical and horizontal offsets, trims tailpieces squarely, and uses slip nuts and washers to permit slight angling. Alignment guarantees watertight seals, avoids strain on connections, and allows smooth flow into the trap arm.
If metal tailpieces differ in height, use a short extension or coupling; if plastic, trim carefully to maintain thread engagement. Final checks include hand‑tightening, testing for leaks, and confirming both basins drain simultaneously.
- Measure and trim precisely
- Use slip connections
- Test and adjust
Installing A Waste Arm
With the tailpieces aligned, the installer fits the waste arm to connect the T‑shaped trap assembly to the drain line, ensuring the arm’s slope, length, and orientation accommodate both basins without causing backflow or stress on joints.
The installer measures and trims the waste arm so the sanitary tee lines up with the trap inlet and the wall drain, maintaining a slight downward pitch toward the wall.
Slip nuts and washers are tightened hand‑firm then snugged with a wrench, avoiding overtightening.
For double‑basin setups, a crossover arm or equalizer is checked for clearance and sealed; the system is tested for leaks.
Install An Air Admittance Valve (AAV) Correctly
In plumbing systems where venting options are limited, an air admittance valve (AAV) provides a one-way vent that admits air into the drain to prevent siphoning while keeping sewer gases out.
The installer locates the AAV above the trap arm, inaccessible to water spray, and assures vertical orientation.
Threaded or spigot connections must be clean, sealed with appropriate fittings, and supported to avoid strain.
Manufacturer clearances and local codes determine allowable use; compliance is mandatory.
Periodic inspection is recommended to confirm operation and replace aging units.
- Proper placement
- Secure, sealed connection
- Code compliance
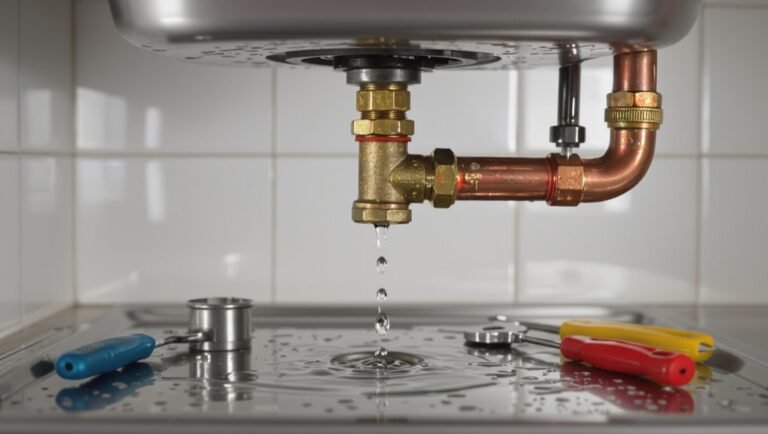
Test For Leaks And Common Leak Locations
After installation, the system is pressurized and each junction is checked for seepage, paying special attention to threaded and compression joint connections.
The P-trap area is inspected under running water to reveal slow leaks or misaligned seals.
Finally, water supply lines and shutoff valves are tested for drips and proper engagement.
Check Joint Connections
Before leaving the work area, the installer checks each joint connection for leaks by running water and observing common trouble spots: slip-nut fittings, trap seals, tailpiece junctions, and threaded adapter threads.
Attention centers on slow weeps and immediate drips; the installer tightens hand-tight then quarter-turn, repositions washers, and reapplies plumber’s tape to threaded joints when needed.
Any persistent leak prompts disassembly and component inspection for cracks or worn gaskets.
Final verification includes cycling hot and cold water and watching for moisture over several minutes.
- Tighten incrementally, avoid overtightening
- Replace damaged washers promptly
- Retest after adjustments
Inspect P-Trap Area
With the water running, the installer inspects the P-trap area for leaks by observing the trap seal, slip-nut fittings, tailpiece junction, and any threaded adapters for drips or slow weeps.
They check under-bend joints where washers seat, feeling for moisture and watching for slow bead formation that signals loose nuts or damaged gaskets.
Connections to the wall drain and dishwasher branch are inspected for weeping threads and hairline cracks.
Any persistent dampness prompts hand-tightening, washer replacement, or reseating of compression rings.
After repairs, the area is retested until no leaks appear and the trap holds water properly.
Test Water Supply Lines
How should the installer verify the supply lines carry water without leaks? The installer opens both hot and cold valves slowly, observing fittings, flex lines, and shutoff valves for drips. After pressurizing, connections at the tailpieces, angle stops, and hose ferrules receive close inspection. Trapped moisture is dried and rechecked after a few minutes to catch slow seepage. If leaks appear, tighten fittings incrementally or replace faulty components. Record corrective actions and confirm no leaks under load by running the faucet for several minutes.
- Check visible joints first.
- Inspect under-sink areas and cabinet floor.
- Re-test after tightening or replacing parts.
Fix A Slow Drain After Installation
If a newly installed sink drain runs slowly, the likely causes are trapped debris, an improperly seated trap, or a venting issue.
Inspect the strainer and basket for installers’ debris, clear with a brush or pick, then run water to test flow.
Remove and reseat the P-trap, checking alignment and gasket compression; confirm no pinch or overtightening restricting passage.
Use a hand auger or plumber’s snake for minor clogs reachable from the tailpiece, avoiding harsh chemicals that can damage seals.
If slow drainage persists, verify venting by observing multiple fixtures; consult a professional before dismantling further.
Deal With Sewer Gas Smells After New Drain Work
A persistent slow drain can sometimes signal problems beyond debris or alignment, and an unwelcome follow-up is the smell of sewer gas after new drain work. The technician checks traps, seals, and venting rather than rushing to replace visible pieces. Common causes include dried P-traps, loose seals at connections, or blocked vent stacks allowing gases to backflow. Quick inspections and targeted fixes prevent health risks and odors without major demolition.
- Verify trap water level and refill if dry.
- Tighten or reseal slip joints and flange connections.
- Inspect or hire for vent obstruction clearance.
Replace A Damaged Tailpiece Or Trap Without Redoing The Flange
When a tailpiece or P-trap is cracked, corroded, or leaking but the sink flange and tailpiece opening remain sound, the damaged section can usually be replaced without removing or redoing the flange. The process involves isolating water, removing slip nuts, matching new parts, and testing seals. Correct measurements and compatible materials (plastic vs. metal) prevent leaks. Reuse clean nuts and replace worn washers. Assure proper alignment and slope for drainage before final tightening. Test under pressure and check for slow drains indicating blockage.
| Step | Action |
|---|---|
| 1 | Shut off water |
| 2 | Remove old trap |
| 3 | Fit new pieces |
| 4 | Tighten and test |
When To Call A Professional Plumber
During complex repairs, persistent leaks, or signs of sewer odors and backflow, a professional plumber should be engaged.
A plumber assesses underlying causes, handles trapped or corroded pipes, and guarantees code compliance when drains connect to vents or main lines.
Safety, proper sealing, and long-term reliability justify calling a pro rather than continuing DIY attempts.
Homeowners should consider expertise when tools or access are inadequate, when multiple fixtures are affected, or when water damage and mold risk exist.
Clear communication about observed symptoms and prior DIY steps helps the plumber diagnose and prioritize repairs efficiently.
- Safety and code compliance
- Hidden damage detection
- Multi-fixture or persistent failures
Sink Drain Costs: DIY Parts Versus Hiring Pros
Comparing costs for a sink drain repair requires evaluating parts, time, and the likelihood of complications: DIY installations typically demand only basic components—tailpiece, P-trap, slip nuts, and sealant—costing $20–$70, while hiring a plumber adds labor that commonly raises total expenses to $150–$400 or more depending on region and complexity.
The homeowner should factor skill level, required tools, and time value; straightforward replacements favor DIY savings, while confined spaces, corroded fittings, or unfamiliar drain configurations increase risk and time.
Warranty, liability, and guaranteed leak-free service often justify professional fees despite higher upfront cost.
Local Code Basics You Need To Know
Local building codes determine whether a permit is required for sink drain work and when inspections are needed.
They also specify venting distances and configurations to prevent siphoning and guarantee proper flow.
Trap dimensions and placement rules are enforced to stop sewer gases and secure reliable drainage.
Permit Requirements
What permits are required for replacing or installing a sink drain depends on the municipality’s plumbing code, which typically distinguishes between simple repairs and work that alters drainage, venting, or pipe routing.
Homeowners should contact local building departments to confirm permit triggers, required plans, and approved materials.
Licensed plumbers often must obtain permits for substantial changes; inspections guarantee compliance and protect warranties.
Failure to permit can lead to fines or required rework during resale.
Typical steps include application, fee payment, and scheduling inspections.
Recordkeeping of permit and inspection documents is advisable for future property transactions.
- Verify local permit thresholds
- Use licensed contractors when required
- Keep permit and inspection records
Venting And Trap Rules
When replacing or installing a sink drain, understanding venting and trap rules is essential to guarantee proper drainage, prevent sewer gas entry, and maintain fixture performance.
Local codes require a P-trap sized and installed to retain water seal, positioned within specified trap arm lengths to the vent.
Venting prevents siphonage; vents must rise vertically and connect at regulated distances above the trap weir.
Combined fixture drains and island sinks have special venting methods.
Backflow, cleanout access, and slope standards apply.
Inspectors check trap depth, trap primer needs, and correct fittings.
Consult local code for exact dimensions and permitted materials.
Accessibility Tips For Cramped Cabinets And Tight Spaces
In cramped cabinets and tight under-sink spaces, maintaining access to the drain assembly requires systematic planning and compact solutions.
Space-conscious installers measure clearances, choose low-profile fittings, and arrange piping to allow tool access.
Removable panels and slide-out trays permit inspection without full disassembly.
Labeling shutoff valves and photographing arrangements aid future repairs.
Consider flexible connectors only where code allows.
- Use low-profile P-traps and angled fittings to maximize reach.
- Install removable access panels or sliding trays for fast entry.
- Keep shutoffs, unions, and coupling points unobstructed and documented for service.
Install A Trap Adapter For Unusual Drains
For unusually sized or shaped sink outlets, a trap adapter creates a reliable junction between the fixture tailpiece and the P-trap, ensuring a proper seal and correct trap arm alignment.
Select an adapter matching tailpiece diameter and outlet profile—compression, slip, or hub types are common.
Clean mating surfaces, slide on any supplied gasket or washer, then hand-tighten the nut before final quarter-turn with pliers to avoid overcompression.
Position the trap so the arm aligns horizontally to the waste line; adjust length or use a slip joint extension if needed.
Test for leaks by running water and inspect all connections.
Maintain Your New Sink Drain To Prevent Clogs
Regularly inspect and care for the drain to prevent slowdowns and costly clogs.
The homeowner should clear visible debris, test for leaks, and confirm seals remain tight.
Routine attention reduces buildup and extends component life.
Simple preventative steps avoid disruptive repairs and preserve flow.
- Run hot water after use and flush with a quarter cup of baking soda followed by vinegar weekly to dislodge light residue.
- Install and clean a hair/food strainer; remove trapped material after each use.
- Periodically remove and clean the P-trap to eliminate accumulated gunk and inspect for corrosion or damage.
Eco‑Friendly And Odor‑Reducing Drain Options
With attention to materials and simple habits, homeowners can reduce odors and environmental impact from their sink drains. The section outlines low‑impact components and easy routines: use stainless or recycled plastic traps, install mesh strainers, prefer enzyme cleaners over harsh chemicals, and adopt weekly hot‑water and vinegar rinses. Regular removal of trapped food prevents buildup and smells. Choices balance longevity, cost, and ecology.
| Option | Benefit | Maintenance |
|---|---|---|
| Stainless P‑trap | Durable, recyclable | Wipe, inspect |
| Mesh strainer | Catches debris | Empty frequently |
| Enzyme cleaner | Biodegrades waste | Weekly use |
| Vinegar rinse | Neutralizes odors | Simple routine |
Quick First‑Hour Leak And Performance Checklist After Installation
Typically within the first hour after installing a sink drain pipe, a focused leak and performance check guarantees connections are secure and the assembly functions correctly. The installer observes visible joints, runs water at varying flow rates, and inspects for slow drains or gurgling.
Fixtures and trap alignment are confirmed; any odors or standing water noted. Tightening or reseating fittings occurs immediately if leaks appear. Documentation of findings and any corrective steps supports future maintenance. Safety measures, such as turning off water supply before adjustments, are followed.
- Check all joints and slip nuts for visible leaks.
- Run full and partial flows; watch drainage speed.
- Smell and inspect trap for standing water or odors.
Common Beginner Mistakes And How To Avoid Them
After completing the initial leak and performance check, many novice installers still make predictable mistakes that lead to leaks, slow drainage, or premature part failure.
Common errors include overtightening slip nuts which cracks plastic fittings, under‑seating rubber gaskets, misaligning trap arms causing stress and leaks, skipping thread sealant where metal threads join, and neglecting to deburr cut pipe ends.
Poorly sized traps or wrong trap orientation invite clogs and odors. To avoid these, follow manufacturer torque guidance, confirm gasket seating visually, dry‑fit before final assembly, use appropriate sealant sparingly, and verify correct pipe slope and trap alignment.
Time Estimate And Step Sequence For A Weekend Install
For a competent DIYer allocating a weekend, a sink drain replacement or new installation can usually be completed in 3–6 hours of active work spread across a single day, or in two shorter sessions totaling 4–8 hours when allowing for drying times, parts shopping, and troubleshooting.
The sequence: remove old fittings, test-fit new components, assemble trap and tailpiece, seal and secure, then run water to check for leaks.
Allow buffer for unexpected corroded nuts or misfit parts. Time each stage realistically; prioritize leak testing and adjustments before final clean-up.
- Remove and clean (1–2 hr)
- Assemble and fit (1–3 hr)
- Test, adjust, finish (1–3 hr)
Tool And Parts Checklist You Can Print Before Starting
Having a printed checklist streamlines the weekend schedule by ensuring parts and tools are ready before work begins.
A concise list prevents pauses and returns to the store.
Include parts: tailpiece, slip-joint nuts, rubber and fiber washers, P-trap, slip washers, plumber’s putty or silicone, plumber’s tape, and extension tailpieces if needed.
Tools: adjustable wrench, channel-lock pliers, pipe cutter or hacksaw, screwdriver, bucket, flashlight, rag, and tape measure.
Optional: basin wrench, pipe thread sealant, and replacement trap adapter.
Recommend printing one copy for the work area and one for shopping; check fit against existing plumbing before purchase.
Conclusion
After replacing a kitchen sink drain, the homeowner noticed steady water flow—no leaks after a 10-minute test—like a well-tuned clock. That simple data point became a metaphor: small, careful fixes keep bigger systems running smoothly. The anecdote shows newcomers that patience, proper tools, and a checklist transform an awkward weekend project into reliable daily habit. With clear steps and a quick leak check, confidence and function go hand in hand.