How to Tighten Water Supply Line Connectors Quickly and Prevent Leaks
To quickly tighten water supply line connectors and prevent leaks, first shut off the water supply. Open a nearby faucet to relieve any pressure and dry the area. Hand-tighten the nut or fitting, then use an adjustable wrench to turn it a quarter to half turn for compression or braided threaded connectors. For threaded joints, clean the threads and wrap PTFE tape clockwise before tightening. For push-fit connectors, ensure they are fully inserted and lock the collar in place. After tightening, test slowly for leaks and make incremental adjustments as needed. If you notice any faulty, corroded, or bulging parts, replace them immediately. Further troubleshooting steps are available if needed.
How to Quickly Tighten Water Supply Line Connectors to Stop Leaks
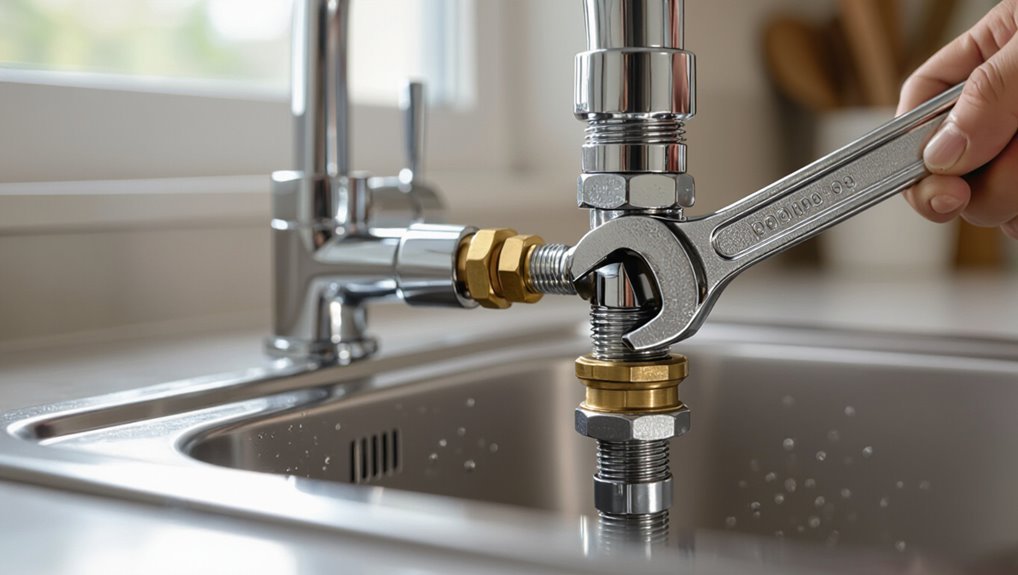
Before attempting a quick tighten, the person should shut off the water supply and open a nearby faucet to relieve pressure and drain residual water.
They should confirm the area is dry and place a bucket or towels to catch any remaining drips.
A compact checklist—adjustable wrench or pliers, plumber’s tape, replacement washers, and a flashlight—ensures the repair can be completed rapidly.
Immediate safety steps before tightening
If a supply line shows a leak, the person should quickly stop the water flow, isolate the fixture, and relieve built-up pressure to prevent sudden sprays when tightening connectors.
Then they should drain remaining water, clear the area of electrical risks, wear gloves and eye protection, and verify the shutoff fully closed.
These steps guarantee safe, controlled conditions for how to tighten water supply line connectors.
Quick checklist of tools and supplies for fast fixes
A compact kit of essential tools and supplies lets a homeowner stop most supply-line leaks quickly and safely.
The checklist focuses on speed and reliability: basic tools, sealing materials, and quick replacements for common failures. Keep items organized and accessible for rapid response.
- Adjustable wrench
- Slip-joint pliers
- PTFE (Teflon) tape
- Replacement supply line
Fast, Step-by-Step Tightening Procedure
First, the technician confirms the connector type—compression, threaded, push-fit, or braided—and shuts off the water supply, then relieves line pressure.
Next, each connector is addressed with its proper tightening method: compress the ferrule and nut for compression fittings, wrap threaded connections with plumber’s tape and tighten, and guarantee push-fit or quick-connect fittings are fully engaged.
Finally, the work area is inspected for residual leaks and the supply is restored slowly to verify a secure seal.
Locate and identify the connector type (compression, threaded, push-fit, braided)
When preparing to tighten a water supply line connector, the technician quickly inspects the fitting to determine whether it is a compression, threaded, push-fit, or braided connector; identifying the type dictates the tools and method required.
- Compression: nut and ferrule visible, requires wrench.
- Threaded: tapered threads, plumber’s tape may be present.
- Push-fit: smooth plastic or metal sleeve, no tools usually.
- Braided: flexible hose with threaded ends.
Shut off water and relieve pressure safely
With the connector type confirmed, the technician shuts off the correct water source and relieves line pressure before tightening.
They close the fixture shutoff or main valve, open a nearby faucet to drain residual water, and flush a toilet if applicable.
After pressure drops, they wipe the area, inspect for residual leaks, and proceed once the line is empty and safe to work on.
Tightening method for compression fittings
Begin by seating the compression nut and ferrule firmly against the fitting body and hand-tightening the nut until it contacts the fitting shoulder; this guarantees the ferrule is properly aligned before any wrench turns.
Use one wrench to hold the fitting body and a second to turn the nut one additional quarter to half turn for soft tubing, or one full turn for hard tubing, then check for leaks.
Tightening method for threaded fittings with plumber’s tape
After seating and tightening a compression nut as described, attention shifts to threaded fittings that use plumber’s (PTFE) tape for a leakproof seal.
Clean male threads, wrap tape clockwise three to five times without overlapping the first thread, hand-tighten the fitting, then finish with a wrench quarter to half turn beyond hand-tight.
Test for leaks and retighten minimally if necessary.
Tightening method for push-fit and quick-connect fittings
Slide the pipe fully into the push-fit or quick-connect fitting until it seats against the stop, then secure the connection following the manufacturer’s simple, step-by-step checks:
- verify full insertion,
- push collar or ring to lock,
- tug gently to confirm engagement,
- inspect O-ring seating visually,
- cut and deburr if redoing, and
- restore water slowly while observing for leaks.
Use only compatible tubing and fittings.
Tightening method for braided flexible supply lines
One concise, reliable method for tightening braided flexible supply lines involves hand-starting the coupling nut onto the fixture or valve.
Then, use a wrench to turn the nut an additional one-quarter to one-half turn while holding the valve body stationary; this guarantees a snug, leak-free seal without overtightening.
After tightening, visually inspect the ferrule and connector alignment, wipe connections dry, and test under normal pressure for leaks.
How tight is tight enough torque and hand-tight guidelines
When tightening supply line connectors, the goal is a secure seal without deforming fittings. Hand-tighten the coupling nut until it seats, then apply measured increments with a wrench—typically a quarter to a half turn beyond hand-tight for braided lines, and specified torque values (when provided by the manufacturer) for compression or flared fittings.
Use a calibrated torque wrench when values exist and avoid overtightening.
How to test for leaks after tightening
Turn the water back on slowly and observe the connection point for any signs of dripping or seepage.
After steady pressure returns, inspect visually and feel around fittings with a dry tissue or paper towel to detect moisture.
Cycle fixtures on and off to raise pressure. Recheck after several minutes.
If leaks persist, tighten incrementally or disassemble and reseal with tape or new washers.
Quick Diagnosis: Why a Connector Is Leaking
A quick diagnosis starts by matching symptoms to connector type, since compression, flare, and braided supply lines each have typical failure modes.
Visual and tactile inspection—looking for corrosion, loose fittings, kinks, or bulging hose covers—can often identify problems without disassembly.
Noting whether water appears at the fixture connection or along the supply line helps determine if the line, the connector, or the fixture is the source.
Common causes by connector type
Identifying why a water supply connector leaks begins with recognizing that each connector type has characteristic failure modes: compression fittings commonly fail from loose nuts or deteriorated ferrules, braided stainless hoses often leak at crimped ends or fittings, and threaded connectors typically leak due to worn tape, damaged threads, or insufficient sealant.
- Compression: ferrule deformation or nut under-torque
- Braided hose: crimp failure or corrosion at ends
- Threaded: missing/old PTFE or cross-threading
- Push-fit: O-ring wear or debris preventing seal
How to inspect connectors and hoses without disassembly
How can a leaking water-supply connector be diagnosed without taking fittings apart?
Visual inspection for corrosion, mineral buildup, hairline cracks, or loose ferrules identifies obvious faults.
Wipe connections dry, then watch for fresh drips or moisture after running water.
Listen for hissing.
Check hose flex and kinks, and verify supply shutoff is fully closed.
Note odor or discolored water indicating internal failure.
When a leak is caused by the supply line vs. the fixture
Why is water appearing at the connector rather than the fixture? The writer observes that water at the connector often indicates line, nut, or washer failure, not the fixture.
Test by isolating the supply valve and checking for seepage with the fixture off.
Movement, corrosion, or cracked tubing points to the supply line; pooled water on the fixture or spray patterns implicate the fixture itself.
Fast Temporary Fixes and When to Use Them
For quick, temporary seals a technician may wrap plumber’s tape or apply thread sealant to leaking threads to stop minor weeps until a permanent repair can be made.
For larger pinhole leaks an emergency hose clamp with a rubber sleeve can provide short-term containment and pressure relief.
Choice between using a leak sealant and replacing the connector depends on leak severity, connector age, and whether a reliable long-term fix is required.
Using plumber’s tape and thread sealant for temporary seals
Apply plumber’s tape or a thread sealant sparingly to the male threads of a leaking water supply connector to create a fast, temporary seal that reduces drips until a permanent repair can be made.
The tape should wrap clockwise three to five turns; liquid sealant needs brief curing time.
These measures are short-term, suitable for low-pressure leaks, and should be followed by proper replacement or professional repair.
Applying an emergency hose clamp or rubber sleeve
Clamp a ruptured supply line immediately with an emergency hose clamp or a rubber sleeve to stem leaks until a proper replacement can be installed.
Position the sleeve over the hole, slide the clamp securely, and tighten incrementally to avoid cutting the hose.
Monitor for drips, restrict water pressure if possible, and arrange for permanent repair promptly; these measures are strictly temporary.
When to use a leak sealant vs. replacing the connector
After using an emergency clamp or rubber sleeve to stop an immediate leak, a homeowner must decide whether a leak sealant will suffice as a temporary measure or if the connector needs replacement.
Use sealant for small pinholes, smooth fittings, and short-term fixes while monitoring.
Replace when corrosion, damaged threads, persistent seepage, or frequent repairs occur; replacement guarantees long-term reliability and safety.
When to Replace Instead of Tightening
When a connector shows corrosion, visible cracks, or signs of metal fatigue, replacement is safer than further tightening.
The choice of a replacement should match the system’s material and size requirements to guarantee a proper seal and long-term reliability.
Simple replacement steps—shutting off water, removing the old connector, and installing a correctly sized new one—cover most common scenarios.
Signs a connector needs replacement (corrosion, cracks, metal fatigue)
Inspect the connector closely for visible deterioration: deep corrosion pitting, hairline or jagged cracks, and obvious metal deformation or thinning indicate structural failure rather than a simple loose joint.
- Flaking or powdery rust compromising threads
- Visible split lines or fracture edges
- Bent, warped, or flattened metal sections
Recurrent leaks despite retightening suggest fatigue and replacement required.
Choosing the right replacement connector (materials and sizes)
Select a replacement connector that matches the pipe type, thread standard, and pressure rating to guarantee a durable, leak-free repair. Choose brass for corrosion resistance, stainless steel for high pressure, or plastic for low-pressure cold lines. Verify size, thread pitch, and temperature rating. Use compatible seals and avoid mixing dissimilar metals.
| Property | Recommendation |
|---|---|
| Material | Brass/Stainless/Plastic |
| Size | Match pipe OD |
| Thread | NPT/BSP as needed |
| Pressure | Rated ≥ system |
| Seal | Compatible type |
Quick replacement steps for common scenarios
Replace a connector rather than attempt tightening if visible damage, persistent leaks after tightening, corrosion that has compromised threads, or incompatible materials are present; these conditions indicate a seal or structural failure that tightening alone cannot correct.
Then shut off water, drain lines, remove the old connector, clean threads, select a proper replacement, apply plumber’s tape or sealant as appropriate, install, and test under pressure.
Preventing Future Leaks
Preventing future leaks begins with correct installation techniques, including hand-starting threads, avoiding overtightening, and checking for cross-threading before final torquing.
A simple maintenance schedule—periodic visual inspections, feeling for dampness, and testing connections after appliance moves—helps catch issues early.
Choosing durable materials such as brass, stainless steel, or reinforced braided lines further reduces failure risk.
Proper installation tips to avoid overtightening or cross-threading
A few simple habits during installation greatly reduce the risk of overtightening or cross-threading water supply connectors.
Technicians should hand-start threads, align fittings squarely, and use appropriate thread tape or sealant sparingly.
Once hand-tight, apply a wrench for a quarter to half turn only, checking manufacturer torque recommendations.
Avoid forcing misaligned fittings; back off and realign to prevent damage and future leaks.
Routine maintenance schedule and inspection points
When scheduled inspections occur every three to six months, technicians can catch early signs of wear—such as corrosion, loose fittings, or degraded sealant—before they develop into leaks.
Routine checks focus on connectors, valves, and surrounding areas to guarantee integrity and prompt repairs.
- Check for dampness or mineral deposits
- Verify tightness without overtightening
- Inspect hose condition and crimps
- Replace failing seals promptly
Best materials and connectors for durability (brass, stainless, reinforced braided)
Durability in water supply connections hinges on material choice and connector design: brass fittings resist corrosion and deform under stress. Stainless steel offers superior corrosion resistance in aggressive or saline environments.
Reinforced braided hoses combine flexibility with burst resistance for dynamic installations. Select connectors rated for pressure and temperature, prefer EPDM or PTFE seals, avoid dissimilar metals without dielectric unions, and choose certified components.
Common Mistakes and How to Avoid Them
Common errors when tightening water supply connectors include overtightening that strips threads, pairing incompatible metals that cause galvanic corrosion, and ignoring manufacturer torque or specification guidance.
Each mistake undermines seal integrity or accelerates component failure. Identifying and correcting these issues prevents leaks and extends system life.
Overtightening and stripping threads
Overtightening water supply line connectors can shear threads, deform fittings, and cause leaks that appear later under pressure.
Technicians should tighten by hand until snug, then use a wrench for a quarter to half turn. If resistance increases sharply, stop.
Replace damaged fittings or use thread sealant appropriate for the material.
Test under pressure and recheck connections for slow leaks.
Mixing incompatible materials (galvanic corrosion)
Mixing different metals on water supply lines can trigger galvanic corrosion, where contact between dissimilar materials in the presence of an electrolyte causes one metal to corrode faster.
To avoid accelerated deterioration and leaks, installers should match metals (e.g., brass to brass), use dielectric fittings or isolation sleeves where dissimilar metals meet, and inspect joints periodically for early corrosion signs.
Ignoring manufacturer torque/spec recommendations
While matching metals and using dielectric fittings prevents electrochemical damage, following the manufacturer’s torque and specification guidance is equally important to keep fittings reliable.
Ignoring specified torque risks under‑tightening (Leaks) or over‑tightening (thread damage, crushed washers).
Technicians should use calibrated tools, consult product documentation, and record applied torque.
Adhering to specs extends component life and guarantees warranty compliance.
Tools and Materials Cheat Sheet
The article lists the essential tools for quick tightening jobs, such as adjustable wrenches, basin wrenches, and slip-joint pliers.
It also identifies recommended sealants and tapes—thread seal tape and plumber’s putty—and suggests commonly needed replacement parts like washers and supply lines.
This cheat sheet enables quick prep and efficient repairs.
Essential tools for quick tightening jobs
A compact set of reliable tools makes quick tightening jobs faster and less error-prone.
A concise kit focuses on versatility, grip, and access for common supply-line connections. Essential items minimize time and damage while ensuring proper torque and alignment.
- Adjustable wrench (smooth jaws)
- Slip-joint pliers
- Basin wrench or long-reach wrench
- Flashlight or headlamp
Recommended sealants, tapes, and replacement parts
Select sealants, tapes, and spare parts that match the connector type, pipe material, and water system pressure to guarantee a reliable, leak-free joint.
Recommended items include thread seal tape, pipe dope, compression olives, and replacement nuts. Use materials rated for potable water and temperature.
Inspect fittings before installation; replace corroded components to prevent future leaks.
- PTFE thread seal tape
- Non-hardening pipe dope
- Brass compression olives
- Replacement nuts and ferrules
Troubleshooting Table for Persistent Leaks
Several common causes of persistent leaks are listed with symptoms, likely faults, and straightforward corrective actions to guide quick diagnosis and repair. The table below helps identify source, probable cause, and action quickly, enabling efficient repairs or part replacements.
| Symptom | Probable Fault | Action |
|---|---|---|
| Drip at fitting | Loose nut | Tighten to spec |
| Wet hose | Damaged washer | Replace washer |
| Seepage at valve | Worn packing | Replace packing and test |
Conclusion
Swift action calms household chaos: a snug turn or a fresh washer can hush a stubborn drip and spare greater damage. Readers learn to spot the cause, apply fast fixes, and know when replacement is wiser than repair. Like a metronome restoring order, routine checks and correct tools keep connections steady. With clear steps, common pitfalls avoided, and timely upgrades made, the quiet confidence of a dry home is easily reclaimed.