How to Drain Hot Water Heater in Camper: Step-by-Step Guide for Safe Winterizing
To safely drain your camper’s hot water heater for winterizing, start by shutting off all electrical and gas power. Level the camper and relieve pressure by opening the pressure-relief valve. Attach a hose to the drain valve, open it, and let the water flush out until it runs clear. Check the drain plug and anode for wear, replacing them if necessary. For winterization, bypass the heater and pump non-toxic RV antifreeze through the lines, leaving valves open. For a comprehensive guide on safety steps, bypass fittings, and troubleshooting, refer to the full instructions.
How to Drain the Hot Water Heater in Your Camper Safely
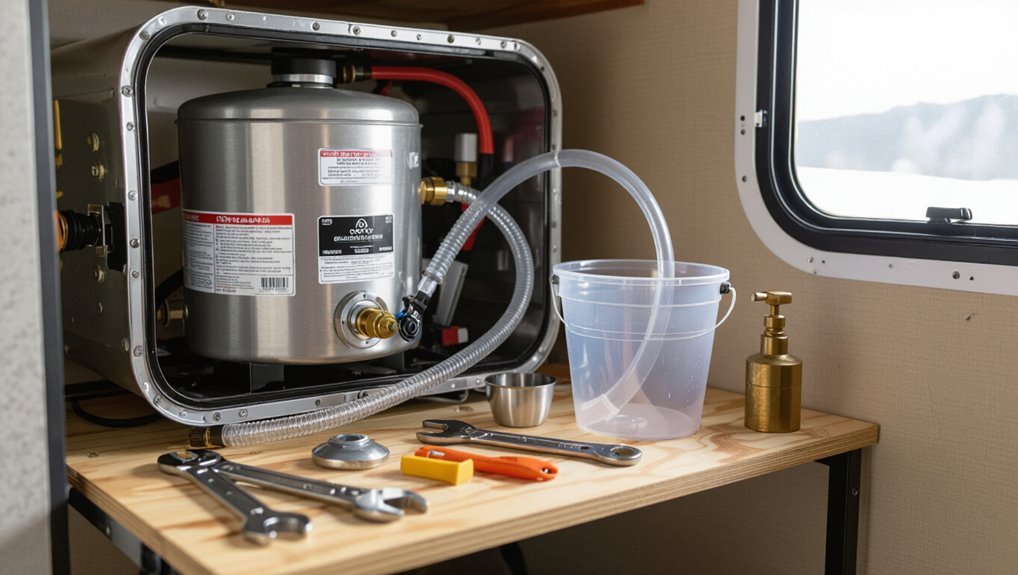
A concise overview explains the steps to empty the camper’s hot water heater and why complete drainage is essential for winterizing to prevent freeze damage.
It also lists the basic tools and materials required, such as wrenches, a garden hose, bucket, and safety gloves.
Clear preparation and the right equipment reduce risk and guarantee the task proceeds efficiently.
Quick overview of the process and why it matters for winterizing
Draining the camper’s hot water heater removes standing water that can freeze, crack the tank, and damage plumbing during winter storage.
A concise how to drain hot water heater in camper summary: shut off power and water, relieve pressure, open drain valve and hot taps, flush until clear, and leave valves open.
Completing this prevents costly freeze-related repairs and preserves system integrity.
Tools and materials you will need
Before beginning, gather the specific tools and materials required to drain a camper’s hot water heater safely:
- basic hand tools (adjustable wrench, screwdriver)
- a suitable hose for the drain valve (vinyl or antifreeze-rated)
- a bucket
- garden hose or RV sewer hose adapter if needed
- gloves and eye protection
- towels or rags
- a container of non-toxic RV antifreeze if winterizing.
Also include a sump pan, inspection flashlight, and replacement anode wrench.
Understanding Your Camper’s Water Heater Types and Components
The article notes that campers use either tank-style water heaters, which store and heat a fixed volume of water, or tankless units that heat on demand.
Before draining, it is important to identify key components such as service and pressure relief valves, the anode rod, the drain plug, and any bypass valves.
Knowing each component’s location and function guarantees the draining process is performed safely and correctly.
Common camper water heater types (tank vs tankless)
Although both tank and tankless systems serve the same purpose, they operate differently and require distinct maintenance and draining procedures.
Tank units store heated water, need periodic flushing and winter draining.
Tankless units heat on demand, require descaling and specific winterizing.
Choose based on space, fuel type, recovery rate and maintenance tolerance.
- Storage tanks
- On-demand (tankless)
- Fuel: gas vs electric
- Size and recovery rate
Key components to locate before draining (valves, anode rod, drain plug, bypasses)
Having identified whether a camper uses a tank or tankless heater, attention turns to the specific components that must be located prior to draining.
Locate the hot and cold shutoff valves, the drain plug or petcock, the sacrificial anode rod access (on tanks), pressure relief valve, and any winterizing bypass valves.
Note electrical/gas disconnects and labeling for safe isolation.
Safety Precautions Before You Begin
Before any work begins, all electrical power and propane or gas supply to the water heater should be turned off and verified to prevent ignition or current flow.
The tank must be depressurized and cooled to avoid scalding from hot water or steam.
Protective coverings and drip pans should be placed to shield fittings and the camper interior from spills.
Electrical and gas shutdown steps
One critical step is to fully isolate both the camper’s electrical supply and its propane/gas system before any water is drained.
Power should be disconnected at the service breaker and battery terminals.
Propane must be shut off at the tank and appliance valves; verify gauges read zero or closed.
Confirm no pilot lights remain lit and post clear signage indicating systems are offline.
Preventing scalding and pressure buildup
Check that the water heater is fully cooled and depressurized before any service begins: close the cold-water supply, open a hot faucet to relieve residual pressure, and wait until the tank temperature drops to a safe level.
Confirm pressure relief valve operation, wear heat-resistant gloves and eye protection, and verify gauges read zero.
Proceed only when no steam, hot water flow, or pressure is detected.
Protecting fittings and interior from spills
Several simple precautions will protect the heater’s fittings and the camper interior from water and chemical spills during servicing:
Place absorbent towels or a drip tray beneath the heater drain and valve, wrap nearby electrical connections with waterproof tape or plastic, and position a bucket with a secure lid to catch flushed tank water.
Additionally, cap exposed fittings, use corrosion-resistant tape on threads, and keep spill-cleaning supplies nearby.
Step-by-Step Drain Procedure for Tank Water Heaters
The procedure begins with preparing the camper—leveling, securing utilities, and ensuring a safe working area.
Next, power and fuel sources are turned off before the tank is drained by opening the pressure relief valve and drain plug.
After flushing out sediment and cleaning the tank, the drain plug and anode are inspected and replaced if necessary.
Preparing the camper (leveling, securing utilities)
Before beginning the drain procedure, verify the camper sits level and stable and that all utility connections—electric, propane, and city water—are secured or disconnected as appropriate; this prevents shifting, accidental power or gas flow, and water pressure from interfering with the task.
Inspect stabilizers, chocks, and hitch; confirm valves and external connectors are closed or capped.
Ascertain access to the water heater compartment and drain fittings.
Shutting off power and fuel sources
Cut power and fuel to the water heater to eliminate ignition and electrical hazards during draining.
Disconnect shore power or switch off the dedicated breaker.
Shut the propane supply valve and close the camper’s main gas valve if applicable.
Verify pilot lights are extinguished and any electric control panels are powered down.
Confirm isolation by testing with a multimeter or visual check before proceeding.
Draining the tank: opening pressure relief valve and drain plug
With power and gas sources secured, attention shifts to releasing the tank’s internal pressure and emptying its contents.
The pressure relief valve is lifted slowly to vent trapped steam; a hose is attached to the drain plug and routed to a safe drain or outside.
Once flow is steady, the drain plug is fully opened.
Close valve and plug after tank drains completely.
Flushing sediment and cleaning the tank
Begin by flushing the tank to remove accumulated sediment that can reduce efficiency and cause noise or premature failure.
Close incoming water, open a hot faucet, then open the drain valve fully. Allow flow until clear; gentle agitating with a short blast of water helps dislodge deposits.
Repeat flush cycles if necessary. Rinse until discharge runs clean, then close drain and restore normal settings.
Inspecting and replacing drain plug/anode if needed
After flushing the tank, inspect the drain plug and sacrificial anode for corrosion or damage before reassembly.
The drain plug threads and gasket should be clean, tight, and leak-free; replace if stripped or cracked.
Examine the anode rod for heavy pitting or depletion—replace when more than 50% consumed.
Use proper replacement parts and tighten to manufacturer torque specifications.
Reassembly and testing after draining
Reassemble the components in the reverse order of disassembly, ensuring each seal, fitting, and fastener is clean, correctly seated, and torqued to the manufacturer’s specification before testing.
Close drains and valves, reinstall the drain plug and anode, reconnect electrical and gas lines per safety procedures.
Refill the tank slowly, purge air via hot taps, check for leaks, verify proper burner/element operation, and confirm thermostat function.
Special Steps for Winterizing (After Draining)
After draining, attention turns to preparing the heater and plumbing for freezing temperatures. This includes bypassing the heater’s antifreeze loop so antifreeze circulates through coach plumbing only.
Next, add the correct amount of RV-safe antifreeze by pump or hand-pouring according to manufacturer guidelines.
Ensure external lines and fittings are insulated or removed to prevent damage.
Clear verification of bypass placement, antifreeze coverage, and protected external components completes the winterizing setup.
Bypassing the water heater antifreeze loop
One concise, deliberate step in winterizing is bypassing the water heater antifreeze loop to prevent unnecessary use of antifreeze and guarantee proper flow during winter prep.
The technician locates the bypass kit, closes inlet and outlet valves to the heater, then routes the antifreeze through the bypass lines.
Confirm fittings are secure and labeled to restore the normal configuration after winter.
Adding RV-safe antifreeze: amounts and methods
Next, the technician introduces RV‑safe (non-toxic propylene glycol) antifreeze into the water system in measured amounts and via approved methods to protect plumbing and fixtures from freeze damage.
They calculate volume from tank and line capacity, pour or pump antifreeze through low points, fixtures, and drains until pink fluid appears.
Then, they close valves and label the system for winter storage.
Protecting external lines and fittings
Exterior hoses, valves, and fittings require targeted protection to prevent freeze damage and corrosion once the interior system is drained.
External components should be flushed, dried, and insulated with foam covers or heat tape where applicable.
Drain and cap low-point drains, remove detachable hoses, and apply corrosion-inhibiting lubricant to exposed threads.
Secure and label protected lines for spring reassembly.
Draining Procedure for Tankless Water Heaters
Tankless water heaters in campers rarely require draining because they have no storage tank. However, conditions such as extended freezing risk or maintenance needs may make isolation and draining of connected lines appropriate.
Periodic descaling and flushing of tankless units is essential to remove mineral buildup and maintain heat exchanger efficiency. The procedure focuses on bypassing the unit, circulating a descaling solution through the heat exchanger, and following manufacturer instructions for frequency and safety.
When draining is (or isn’t) necessary for tankless units
How does a camper owner know whether draining is required for an on-demand unit? Owners check manufacturer guidance and local freeze risk.
Many tankless models have built-in freeze protection; if functional and powered, draining may be unnecessary.
If winterizing without power, or if manual drain ports exist and instructions advise, follow draining steps.
When unsure, consult the manual or manufacturer support before proceeding.
Descaling and flushing tankless systems
If the manufacturer’s guidance indicates that a unit can remain powered for freeze protection, owners still should consider periodic descaling and flushing to maintain performance.
These procedures address mineral buildup that powering alone will not remove. The process uses a pump, hoses, and vinegar or pump-specific descaler to circulate solution through hot and cold service valves, followed by clear-water flushing and inspection of filters to prevent clogging and efficiency loss.
Common Problems and How to Fix Them
The section outlines typical issues encountered when draining a camper hot water heater and practical fixes for each.
It covers stuck or corroded drain valves, steps to address persistent leaks after reassembly, and signs of sediment buildup with recommended remedies.
Clear, step‑by‑step actions and safety notes follow to help diagnose and resolve these problems.
Stuck or corroded drain valves
Encountering a stuck or corroded drain valve is a common obstacle when draining a camper’s hot water heater. Mineral buildup, age, and exposure to moisture can seize the valve or cause leaks.
Apply penetrating oil, wait, then gently work the valve with the correct tool. If immovable, replace the valve assembly.
Verify compatible replacement parts and tighten fittings to manufacturer torque specifications.
Persistent leaks after reassembly
Address persistent leaks after reassembly by systematically isolating their source and addressing common failure points such as improperly seated gaskets, loose fittings, damaged threads, or cracked components.
Inspect each joint, tighten fittings to spec, replace compromised gaskets or O-rings, repair or replace damaged fittings, and apply proper thread sealant where appropriate.
Pressure-test the system and recheck for slow seepage before finalizing reassembly.
Sediment buildup signs and remedies
When sediment accumulates in a camper’s hot water heater, performance declines and component wear accelerates. Owners will notice reduced water flow, longer heat-up times, strange noises (like rumbling or popping), and discolored or gritty water at taps.
Regular flushing, using the drain valve to purge debris, installing a sediment filter, and descaling with vinegar or a commercial cleaner restore efficiency. Inspect and repeat seasonally.
Maintenance Checklist and Schedule
A concise maintenance checklist outlines seasonal tasks—winterizing, flushing, and inspecting anode rods—to preserve long-term heater performance.
It also specifies routine intervals for checks after heavy use or prolonged storage.
Clear indicators for when to call a professional, such as persistent leaks, unusual noises, or failed heating elements, should be included.
Seasonal tasks for long-term heater health
Establishing a seasonal maintenance checklist helps preserve a camper’s hot water heater performance and prevents costly failures. It outlines specific tasks, timing, and frequency so owners can systematically inspect, winterize, flush, and test components throughout the year.
- Inspect anode rod, pressure relief valve, and connections (spring/fall).
- Drain and flush tank to remove sediment (annual).
- Winterize lines and fittings before freezing temperatures.
- Test operation and leak-tightness after reactivation (spring).
When to call a professional
Recognize signs that exceed routine maintenance and require a professional’s expertise: persistent leaks, unusual noises during heating, repeated pilot failure or ignition issues, visible corrosion of the tank or fittings, and inability to maintain set temperature despite proper controls.
Schedule service promptly for electrical or gas component faults, sediment-blocked heat exchange, compromised anode rods, bad pressure relief valves, or suspected interior tank failure to prevent damage and guarantee safety.
Cost, Time, and Supplies Estimate
Typical time varies by experience: a novice may need 60–90 minutes while a familiar owner can finish in 20–30 minutes.
Common replacement parts and materials—drain hose, replacement anode, washer seals, and basic tools—generally cost between $10 and $80 depending on quality and whether parts are OEM.
The following section breaks down time estimates by skill level and itemized cost ranges for planning.
Typical time required by experience level
How long the job takes depends largely on the user’s familiarity with RV systems and the tools on hand; a novice should budget more time than a seasoned DIYer.
Typical estimates:
- Beginner: 90–120 minutes allowing for learning and troubleshooting;
- Intermediate: 45–75 minutes with basic tools;
- Experienced DIYer: 20–40 minutes.
Include setup, drain, flush, inspections, and cleanup in the total time.
Estimated cost of common replacement parts and materials
Budgeting for a water heater drain and minor repairs in a camper usually requires only a handful of inexpensive parts and basic consumables. Typical items include replacement anode rods, pressure relief valves, hose fittings, Teflon tape, and small quantities of antifreeze; total costs often range $20–$75.
| Item | Typical cost |
|---|---|
| Anode rod | $15–$35 |
| Relief valve | $10–$25 |
| Supplies | $5–$15 |
Troubleshooting Quick Reference
The troubleshooting quick reference lists common fixes for no hot water after draining, such as checking the power or gas supply, resetting the thermostat, and purging air from the system.
It also provides a concise safety checklist to confirm valves are secure, pressure relief and drain fittings are intact, and the anode and heating elements show no obvious damage before reuse.
The section aims to equip the reader with fast, practical steps to restore service and guarantee safe operation.
Quick fixes for no hot water after draining
Check a few common, fast-to-test causes before assuming a major repair is needed: verify the water supply valve is fully open, confirm the RV’s water pump has power and pressure, and inspect the heater’s bypass valves to guarantee they are in the normal position for hot water flow.
Also purge air by opening hot taps, reset or relight the heater’s pilot/igniter, and check fuses or breakers.
Safety checklist to run through before reusing the heater
After verifying supply valves, pump operation, bypass positions, and pilot/igniter status, operators should run a concise safety checklist before restoring regular use of the camper hot water heater.
Inspect for leaks, corrosion, loose fittings, and proper venting. Confirm temperature/pressure relief valve function, electrical isolation, and correct propane/gas connections.
Test for normal heat-up and stable pressure before occupancy.
Additional Tips to Prolong Camper Water Heater Life
Practical steps can notably reduce sediment build-up and slow corrosion, such as regular flushing, using a sacrificial anode, and running water filters.
Proper storage and winterization routines—draining tanks, adding antifreeze where appropriate, and insulating exposed lines—prevent freeze damage and costly repairs.
Implementing these habits extends heater life and lowers long-term maintenance expenses.
Best practices for reducing sediment and corrosion
Regularly flushing the tank and inspecting anode rods are the two most effective measures to minimize sediment buildup and slow corrosion in a camper water heater.
Drain and flush annually or after heavy use, remove loosened debris, and replace a depleted anode rod promptly.
Use a mild descaling agent if mineral deposits persist, and check fittings for leaks or corrosion during each service interval.
Storage and winter prep habits that save money
Many simple storage and winterization habits can prevent costly damage and extend a camper water heater’s lifespan.
Regularly drain and dry tanks, remove anode rods for inspection, and flush lines before storage.
Insulate exposed pipes, use RV antifreeze in drain systems, and store the camper in a sheltered, ventilated area.
Schedule annual checks to catch issues early and avoid expensive repairs.
Conclusion
A frost-bright morning settles on the camper’s roof as the emptied heater echoes quiet relief, its valves like small, faithful sentries. Drained and inspected, pipes gleam beneath a hush of preparedness, ready to sleep through winter’s hush. Regular care—draining, flushing, sealing—keeps metal and seam unmarred, promising warm returns when spring thaws the road. With simple attention and ritual, the camper’s water system rests secure, awaiting the next sunrise and journey.