How to Drain a Whirlpool Water Heater Safely: Step-by-Step Guide for Homeowners
To safely drain a Whirlpool water heater, follow these steps: First, turn off the power or gas supply. Next, close the cold-water inlet and open a hot faucet to relieve pressure. Attach a hose to the drain valve, directing it to a suitable drainage area. Open the drain valve to empty the tank, flushing until the outflow is clear. Once drained, close the valve, refill the tank, check for leaks, and restore power or gas. For further guidance, additional troubleshooting steps are available.
What a Whirlpool Water Heater Is and Why Draining Matters

A Whirlpool water heater stores and heats water in an insulated tank using an electric element or gas burner and a thermostat to maintain temperature.
Periodic draining is recommended for routine maintenance, sediment removal, winterizing, and when repairs are required.
Failing to drain as needed can lower efficiency, accelerate corrosion, and cause noisy or unreliable operation.
How a Whirlpool water heater works
Understanding how a Whirlpool water heater operates helps explain why periodic draining is essential. The unit heats water via a thermostat-controlled electric element or gas burner, storing it in an insulated tank.
Cold inlet and hot outlet pipes manage flow while pressure and temperature valves maintain safety. Recognizing these components clarifies steps for how to drain a whirlpool water heater safely and effectively.
Common reasons to drain the tank (maintenance, sediment removal, winterizing, repair)
Knowing the components and operation of a Whirlpool water heater makes it clear why periodic draining is recommended: routine maintenance preserves efficiency, sediment removal prevents performance loss and tank damage, winterizing protects against freeze-related ruptures in unheated spaces, and draining is often required for repairs or component replacement.
Homeowners drain to flush sediment, inspect or replace elements and valves, prepare units for cold storage, or isolate tanks during service.
Risks of not draining regularly (reduced efficiency, corrosion, noisy operation)
When neglected, a Whirlpool water heater quickly loses performance as sediment builds along the tank bottom and on heating elements, reducing heat transfer and raising energy use.
Over time, this deposit layer encourages corrosion, shortens component life, and causes popping or rumbling noises that signal trapped steam and local overheating.
Untreated buildup also clogs valves, impairs thermostat accuracy, increases leak risk, and raises repair or replacement costs.
Safety Precautions Before You Begin
Before beginning, the technician should assemble personal protective equipment and the necessary tools, and confirm the cold-water shutoff valve is located and accessible.
For electric units the power must be turned off at the breaker, while gas models require shutting off the gas and verifying the pilot light is handled safely.
Finally, the thermostat should be lowered and water temperature tested to prevent scalding during the procedure.
Personal protective equipment and tools checklist
A concise personal protective equipment and tools checklist helps guarantee the draining process is performed safely and efficiently.
The homeowner should assemble PPE and basic tools before starting: splash-resistant goggles, leather gloves, and sturdy footwear; adjustable wrench, garden hose, and bucket; flashlight, pliers, and Teflon tape.
- PPE: goggles, gloves, footwear
- Tools: wrench, hose, bucket
- Extras: flashlight, pliers, tape
Electrical safety: turning off power to electric models
For electric Whirlpool water heaters, cutting electrical power at the circuit breaker is essential to prevent shock or damage during draining.
Confirm the correct breaker by checking the panel label, switch it off, and lock or tag it if possible.
Verify absence of power with a noncontact voltage tester at the thermostat or terminals before proceeding.
Re-energize only after all work and inspections are complete.
Gas safety: shutting off gas and checking pilot light
After cutting electrical power, attention should turn to gas-fired Whirlpool water heaters to prevent leaks, fire, or carbon monoxide hazards.
The gas supply valve should be turned off at the appliance or service pipe. Confirm the pilot light is extinguished; follow manufacturer instructions for relighting only after work is complete.
If gas odor or damage is detected, evacuate and contact the gas utility immediately.
Water supply safety: locating and turning off the cold-water shutoff valve
One essential step before draining a Whirlpool water heater is locating and turning off the cold-water shutoff valve to stop incoming water and prevent refilling during the procedure.
Identify the valve at the water line entering the tank—usually a gate or ball valve.
Turn it clockwise (or to the perpendicular position for ball valves) and verify flow has stopped at a nearby faucet.
Preventing scalding: lowering thermostat and testing water temperature
With the cold-water supply secured, attention should turn to reducing the heater’s thermostat to lower stored water temperature and minimize scald risk during draining.
The homeowner should set the thermostat to 90–100°F (32–38°C), allow time for cooling, then carefully test an outlet with a thermometer or brief hand exposure.
Restore settings after draining and maintenance are complete.
Required Tools and Materials
A concise list of tools and materials is essential before beginning the draining process. The basic set typically includes a wrench, screwdriver, and protective gloves.
Optional items such as a garden hose, wet/dry vacuum, hose adapter, and a bucket can make the job quicker and cleaner. Having these items on hand helps guarantee the procedure proceeds safely and efficiently.
Basic tool list
Essential tools and materials for draining a Whirlpool water heater include items for safety, water control, and sediment removal.
The homeowner should gather basic, reliable equipment before starting. Required items focus on protecting the person and controlling flow while allowing sediment evacuation.
- Gloves, safety glasses, and work clothes
- Adjustable wrench or pliers for valves and fittings
- Sturdy hose and shutoff valve access
Optional helpful items (garden hose, wet/dry vacuum, hose adapter, bucket)
Garden hoses, wet/dry vacuums, hose adapters, and buckets can streamline draining and sediment removal on a Whirlpool water heater by improving flow control and cleanup.
A sturdy garden hose directs hot water away; a wet/dry vacuum extracts residual sludge; adapters guarantee secure fittings.
Buckets catch small volumes during sampling or flushing.
- Garden hose
- Wet/dry vacuum
- Hose adapter and bucket
Step-by-Step Guide to Draining a Whirlpool Water Heater
The procedure begins by cutting power or gas to the heater and shutting off the cold-water supply.
Next, a hot-water faucet is opened to relieve pressure before a hose is attached to the drain valve and routed to a safe discharge point.
Finally, the drain valve is opened to allow the tank to empty.
Step 1 Turn off power or gas supply
Before draining, cut power to the Whirlpool water heater: switch off the circuit breaker for electric models or shut the gas valve and pilot light for gas units.
Confirm power is off by testing nearby fixtures or the heater’s pilot status. Post visible tags or notes to prevent accidental restoration.
Wearing protective gloves, proceed only after verifying isolation to guarantee safety during draining.
Step 2 Shut off cold-water supply to the heater
With power confirmed off and the area safe, shut the cold-water supply to the Whirlpool heater to stop incoming flow.
Locate the shutoff valve on the cold inlet pipe—typically marked or on the top.
Turn the valve clockwise (or close the ball valve quarter-turn) until fully closed.
Verify no water enters the tank by checking the inlet pipe for flow or vibration.
Step 3 Open a hot water faucet to relieve pressure
Open a nearby hot water faucet to relieve built-up pressure in the tank; this creates an air path that allows water to flow out smoothly when the drain valve is opened.
The faucet should be the closest hot tap, left running slightly open. This prevents vacuum formation, reduces sputtering, and speeds draining.
Confirm steady flow before proceeding to the drain valve step.
Step 4 Attach hose to drain valve and route to safe drainage location
Connect a garden hose to the water heater’s drain valve, ensuring the threaded fitting is tight and the rubber washer is seated to prevent leaks.
Route the hose downhill or to a utility drain, avoiding living areas and electrical components.
Secure connections with hose clamps, keep the hose straight to prevent kinks, and verify the discharge end is positioned where hot water can safely flow away without causing damage.
Step 5 Open the drain valve and allow tank to empty
Turn the drain valve counterclockwise to begin releasing water; doing this after the hose is secured and the hot-water supply is shut off allows the tank to empty safely.
Water should flow steadily through the hose; monitor for leaks and guarantee the discharge point remains clear.
Remain patient as draining can take from several minutes to over an hour, depending on tank size and water pressure.
Step 6 Flush tank to remove sediment (agitating and refilling cycles)
Begin agitating and refilling the tank in short cycles to loosen and flush out accumulated sediment.
The technician partially opens the cold-water supply to stir settled debris, then reopens the drain so loosened particles exit.
Repeat several times until runoff runs clear.
Periodically check the drain screen and sediment trap, and use a garden hose to help flush stubborn deposits without overpressurizing the tank.
Step 7 Close drain, refill tank, and remove air from lines
After the runoff clears and the drain screen is inspected, the drain valve is closed and the cold-water supply is reopened to refill the tank.
A nearby faucet is opened to vent trapped air; water running steadily indicates full tank and purged lines. Once flow steadies, the faucet is closed.
The drain hose is disconnected and stored; the area is checked for drips.
Step 8 Restore power or relight pilot and check for leaks
Reapply power and guarantee the pilot is relit according to the unit’s instructions. Then verify the heater resumes normal operation.
After restoring electricity or gas, observe the burner or element ignition and thermostat response. Inspect all fittings, the drain valve, and pressure relief for dampness.
Tighten or replace any leaking components, then monitor for several minutes to confirm seals hold and no further adjustments are needed.
How Long Draining and Flushing Takes and What to Expect
Typical drain-and-flush times vary by tank size and condition, with small residential tanks often emptying in 15–30 minutes.
Larger or neglected tanks can take an hour or more.
Heavy sediment — indicated by discolored water, low hot-water output, or loud rumbling during operation — can lengthen the process due to slower flow and the need for repeated flushing.
The following section outlines time expectations for different tank sizes and troubleshooting steps when sediment is present.
Typical time estimates by tank size and condition
Drain and flush times vary with tank capacity, sediment level, and water pressure; a clean, well-maintained Whirlpool 40-gallon unit usually empties in 10–20 minutes while a sediment-clogged 80-gallon tank can take 45 minutes to over an hour.
Typical estimates: 30–45 minutes for 50–60 gallons, 20–30 minutes for lightly scaled 40 gallons, and up to 90 minutes when low pressure or partial blockages slow flow.
Signs of heavy sediment and how that affects process
When heavy sediment accumulates, the drain water runs gritty and discolored and the flow rate from the drain valve slows noticeably; this usually signals compacted mineral layers or debris at the tank bottom that will lengthen flushing time and may require repeated backflushes or a larger hose to clear.
Technicians should expect multiple drain-refill cycles, occasional agitation, and longer overall service time to restore efficiency and prevent blockages.
Troubleshooting Common Problems During Draining
When problems arise during draining, common causes include a stuck or leaking drain valve, poor flow from the cold-water inlet or lack of air admission, and heavy sediment or rust in the tank.
Temporary fixes such as lubricating or replacing the valve, clearing the inlet or opening an air line, and using a wet/dry vacuum or reverse-flush can restore flow.
Persistent rusty water or failed clearing attempts indicate continued flushing or full tank replacement may be needed.
Stuck or leaking drain valve: temporary fixes and replacement options
If a drain valve sticks or leaks during the flushing process, the homeowner can apply a few quick remedies to gain temporary control before considering replacement.
Tighten packing nut, spray penetrating oil, or tap gently to free a stuck stem.
For leaks, wrap threads with plumber’s tape or install a rubber washer.
Replace the valve promptly with a brass or ball-type unit if issues persist.
Slow drainage or no flow: checking the cold-water inlet and air admission
Although a clogged drain valve or a kinked hose can appear to be the culprit, slow or nonexistent flow during water heater draining often stems from issues with the cold-water inlet or a lack of air admission to the tank.
Diagnosing these areas first saves time and prevents unnecessary parts replacement. Inspect the inlet shutoff, confirm it’s fully open, check for sediment blockage, and open a hot-side faucet to admit air for proper drainage.
Rusty or discolored water after flushing: when to continue flushing vs. replace tank
Why does water turn rusty after flushing a heater, and when does that signal a salvageable tank versus one needing replacement?
Rust usually indicates corrosion or disturbed scale. If discoloration clears after several flushes and anode rod inspection/replacement, the tank is likely salvageable.
Persistent brown water, leaks, or visible pitting inside the drain opening suggests internal corrosion and imminent replacement.
Sediment clogs and using a wet/dry vacuum or reverse-flush methods
Encountering a clogged drain is a common hurdle when flushing a water heater; compacted sediment or mineral deposits can block the drain valve and slow or stop flow entirely.
Technicians may attach a wet/dry vacuum to extract debris from the valve, or employ reverse-flush by forcing water upward through the drain to dislodge buildup.
Always shut off power and use proper fittings to prevent leaks.
When to Call a Professional
If unusual noises, persistent leaks, nonfunctional controls, or signs of corrosion appear during or after draining, a licensed plumber or technician should be called.
Professional service is also recommended for gas or electrical issues, flange or tank repairs, and when diagnostic tools or permits are required.
Comparing the typical costs and scope of professional servicing to DIY work helps homeowners decide whether to hire help or proceed with a safe, simple maintenance task.
Warning signs that require a licensed plumber or technician
Recognize persistent or severe issues with a Whirlpool water heater as signals to contact a licensed plumber or technician rather than attempting DIY fixes.
Call a professional for continuous leaks, rusted or bulging tanks, unexplained pressure fluctuations, no hot water despite power or gas supply, repeated pilot light failures, unusual noises indicating sediment or mechanical failure, or gas odor.
Immediate action prevents hazards and further damage.
Cost and scope of professional servicing vs. DIY
After identifying symptoms that warrant professional help, homeowners must weigh the cost and scope of hiring a licensed plumber or technician against DIY options.
Professionals charge for diagnosis, labor, parts, permits and warranty—typically higher but safer for complex issues (tank replacement, gas lines, electrical repairs).
DIY suits routine draining and minor maintenance; evaluate skill, tools, time and potential liability before deciding.
Maintenance Schedule and Best Practices After Draining
Post-drain maintenance should be scheduled according to local water hardness, with annual flushing for soft water and biannual or quarterly intervals for moderately to highly hard water.
The sacrificial anode should be inspected at each service and replaced when more than 50% consumed or coated with heavy corrosion.
Regular checks of temperature settings, insulation, and sediment levels, plus timely anode replacement, will extend heater life and maintain efficiency.
Recommended frequency for draining and flushing based on water hardness
Regularly scheduling drain-and-flush cycles according to local water hardness helps maintain a Whirlpool water heater’s efficiency and lifespan.
In soft-water areas, annual flushing is typically sufficient.
Moderate-hardness regions should flush every six months.
Hard-water locations benefit from quarterly or more frequent flushing, coupled with routine sediment checks.
Adjust frequency if performance declines or heating efficiency drops.
Inspecting sacrificial anode and when to replace it
A periodic inspection of the sacrificial anode is essential to prevent tank corrosion and extend the water heater’s service life.
After draining, visually check the anode rod for heavy pitting, significant loss of diameter, or corrosion down to the steel core.
Replace when more than 50% consumed or if coated in hard scale; document replacement date for future maintenance.
Tips to prolong heater life and improve efficiency
With the anode checked and replaced if needed, attention turns to routine actions that preserve tank integrity and optimize performance.
Regular maintenance extends life and reduces costs. Follow a concise schedule:
- Flush annually, test pressure relief valve, inspect for leaks.
- Lower thermostat to 120°F, insulate tank and pipes.
- Check anode and sediment biannually; replace as required.
Comparison of Draining Procedures for Different Unit Types
Different unit types require distinct draining steps, safety checks, and attention to manufacturer-specific instructions for Whirlpool models. The table below highlights key distinctions and notes to guide appropriate procedures. Readers should follow the correct sequence for electric, gas, and tankless units and consult Whirlpool guidance when available.
| Unit Type | Key Consideration |
|---|---|
| Electric | Power off at breaker, avoid element damage |
| Gas | Shut gas supply and pilot, venting precautions |
| Tankless / Whirlpool Models | Follow manufacturer flushing instructions and warranty notes |
Electric vs. Gas vs. Tankless considerations
How does the draining process vary between electric, gas, and tankless Whirlpool water heaters?
Electric units require power cutoff and element access before draining; gas models need pilot and gas supply shutdown plus venting considerations.
Tankless systems generally avoid full-tank draining but require descaling and isolating valves for flushing.
Each type demands attention to pressure relief and safe cooling before service.
Manufacturer-specific notes for Whirlpool models
Several Whirlpool models share core draining principles but include model-specific steps and safety checks that affect the procedure.
Owners should consult the model manual for drain valve location, integrated sediment-management features, and recommended isolation of power or gas.
Some units have built-in bypasses, pressure-relief orientations, or electronic diagnostics requiring specialist reset.
Following Whirlpool’s instructions preserves warranty and guarantees safe, effective draining.
Quick Checklist to Follow Each Time You Drain Your Heater
A concise checklist helps guarantee safety and efficiency every time the heater is drained.
It separates tasks into clear stages so nothing important is missed.
The following numbered items summarize the key pre-, during-, and post-drain actions to follow.
- Pre-drain checklist
- During-drain checklist
- Post-drain checklist
Pre-drain checklist
Before opening any valves, the user should confirm a short pre-drain checklist is complete: verify power/gas is off, shut cold-water supply, allow tank to cool, locate drain outlet and hose, guarantee hose leads to safe drain point, open a hot-water tap to relieve pressure, have bucket/pliers ready, and wear protective gloves and eyewear.
During-drain checklist
During the drain, follow a concise checklist to maintain safety and confirm proper flow:
- wear gloves and eye protection,
- keep the area clear of children and pets,
- verify the drain valve is fully open,
- monitor water temperature and pressure,
- ascertain steady flow without sputtering,
- watch for leaks at fittings,
- keep the hose secured, and
- close gas or power only after drainage is controlled.
Post-drain checklist
Confirm that the heater and surrounding area are safe and functional before restoring service:
check for leaks at drain and fittings, tighten or replace components as needed, verify the pressure relief valve operates, close drain valve fully, remove hose and store, refill tank slowly to expel air, restore power/gas only after tank is full and thermostat set correctly, monitor for proper operation and any anomalies.
Visual Aids and Diagrams
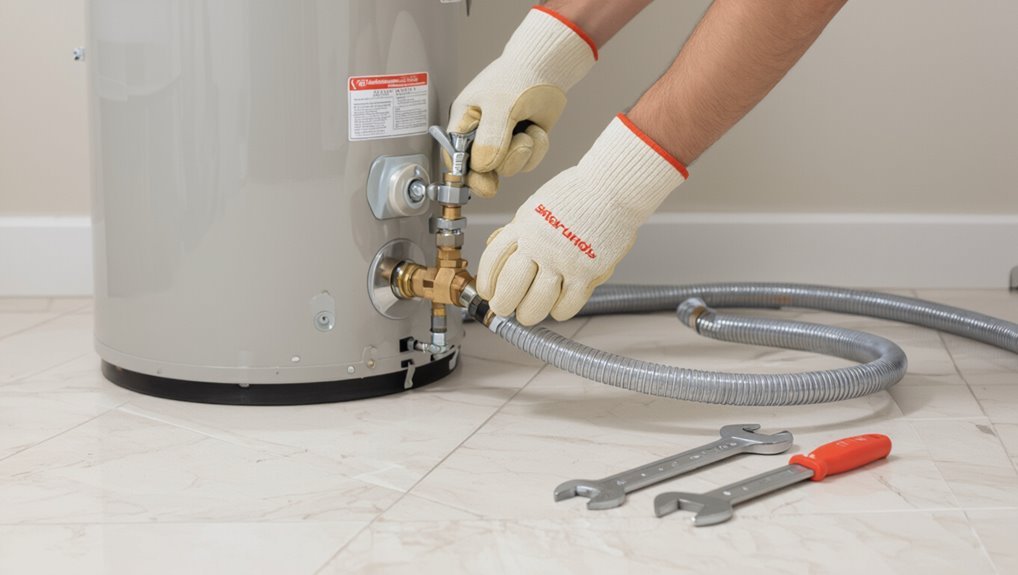
The article presents clear diagrams showing the location of valves and controls on a Whirlpool water heater to aid identification before draining.
Separate illustrations demonstrate correct hose attachment and recommended drainage routing to prevent leaks and backflow.
Readers are encouraged to compare their unit to the visuals to guarantee safe, proper setup.
Locating valves and controls on a Whirlpool water heater
A clear diagram of the Whirlpool water heater’s exterior simplifies identification of the key valves and controls—including the cold-water shutoff, pressure-relief valve, drain valve, and thermostat access—by showing their relative positions and labeling each component with concise annotations.
The accompanying legend notes common symbols, operational direction (open/close), and safety markings, enabling quick visual reference before any maintenance or inspection.
Proper hose attachment and drainage routing
Attach the garden hose securely to the water heater’s drain valve using a threaded, crush-resistant connector and a hose clamp to prevent leaks; route the hose downhill or to a designated drain, keeping it straight and free of kinks, sharp bends, or trip hazards.
Verify slope, secure with stakes or clips, avoid electrical contacts, and position the outlet away from foundations, landscaping, and pedestrian areas to prevent damage.
Conclusion
Like a river eased from a dam, the drained Whirlpool heater becomes a quiet reservoir of renewal. The homeowner stands apart, tools laid like ritual tokens, watching mineral ghosts slip away with each careful turn. This small rite clears unseen burdens and restores hidden warmth, promising steadier mornings ahead. In that emptied chamber, patience and prudence mingle, leaving a system ready to accept fresh flow—clean, light, and ready for winter’s demand.