How to Clean an Electric Water Heater: Step-by-Step Guide to Flush Sediment and Improve Efficiency
Flushing an electric water heater is essential for removing sediment that hinders heat transfer, decreases efficiency, and accelerates corrosion. To clean your heater, start by turning off the power and closing the cold-water supply. Next, attach a garden hose to the drain valve and open a hot faucet to prevent a vacuum. Drain the tank until the water runs clear, then refill it and briefly drain again to dislodge any remaining deposits. After refilling, check for leaks, restore power after a brief wait, and inspect the anode rod and heating elements. Follow these steps for effective maintenance and improved performance.
What Flushing an Electric Water Heater Does and Why It Matters
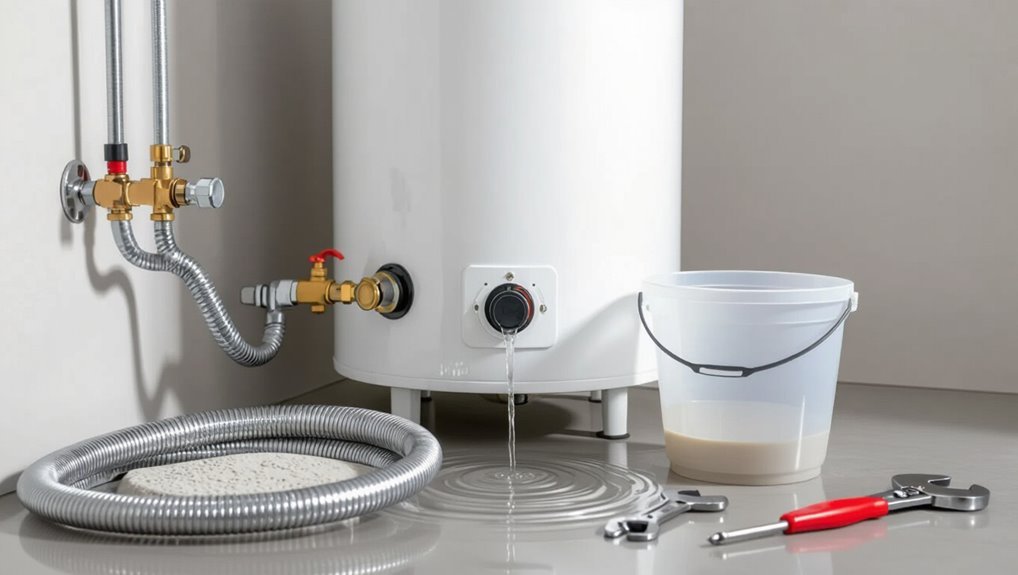
Sediment gradually accumulates on the tank bottom, reducing heating efficiency and accelerating corrosion that shortens the unit’s lifespan.
Common signs that flushing is needed include rattling noises, reduced hot water volume, longer recovery times, and cloudy or discolored water.
Regular flushing restores heating efficiency, lowers energy use, and helps maintain water quality and appliance longevity.
How sediment builds up and its impact on efficiency and lifespan
Over time, mineral particles like calcium and magnesium settle to the bottom of an electric water heater tank, forming a dense layer that reduces heat transfer and creates hot spots against the tank lining.
Sediment accumulation insulates the element, raises energy use, fosters corrosion, and shortens component life.
Regular maintenance, including how to clean an electric water heater, restores efficiency and prolongs service life.
Signs your water heater needs flushing
Because mineral buildup gradually degrades performance, homeowners can spot several clear signs that a water heater needs flushing: rumbling or popping noises from the tank, reduced hot-water capacity, fluctuating water temperatures, and cloudy or discolored tap water.
Additional indicators include longer recovery times, sediment visible when draining, and foul or metallic odors; ignoring these can accelerate wear and lead to premature component failure.
Benefits of regular flushing for energy savings and water quality
Regular flushing of an electric water heater removes accumulated mineral deposits that otherwise insulate heating elements and force longer run times, which increases energy use and shortens component life.
Routine flushing restores heat transfer efficiency, reduces energy bills, extends element and tank lifespan, lowers repair frequency, and minimizes rusty or cloudy hot water.
It also improves water flow and maintains consistent temperature delivery.
Safety Precautions and Tools Needed Before You Start
Before beginning, the reader should confirm the heater is powered off, the water supply is isolated, and tank pressure is relieved to prevent injury or damage.
A concise list of required tools and materials—such as a garden hose, bucket, adjustable wrench, and replacement anode if needed—should be prepared.
If corrosion, leaks, or wiring issues are suspected, a licensed plumber or electrician should be contacted instead of proceeding.
Safety checklist: power off, water supply, and pressure considerations
Shut off the heater’s power and water before any cleaning begins, then confirm the tank is isolated and depressurized.
Verify circuit breaker is labeled and switched off, close cold-water inlet, open a hot faucet to relieve tank pressure, and attach a garden hose to the drain valve.
Check relief valve position and monitor for leaks; never work on a pressurized or energized tank.
Tools and materials required
A compact, organized set of tools and materials makes the cleaning task safer and faster. The preparer assembles essentials: adjustable wrench, garden hose, bucket, screwdriver, towels, and protective gloves and goggles.
A checklist reduces mistakes and speeds work, instilling confidence.
- Adjustable wrench, hose, bucket — relief.
- Protective gloves and goggles — reassurance.
- Screwdrivers, towels, flashlight — calm.
When to call a professional
With tools and protective gear assembled, recognition of situations that require professional help keeps homeowners safe and prevents costly mistakes.
A professional should be called for electrical issues, damaged heating elements, tank leaks, persistent sediment problems after flushing, corroded anode rods, inaccessible shutoff valves, or unclear diagnostics.
Licensed plumbers or electricians guarantee safe repairs, warranty compliance, and reliable long-term performance.
Preparatory Steps: Turning Off and Isolating the Heater
Before any cleaning begins, the electric water heater must be isolated by switching off its circuit breaker at the service panel and confirming the power is off with a non-contact tester.
Next, the cold-water supply valve should be closed and pressure relieved by opening a nearby hot faucet or the heater’s pressure-relief drain.
Finally, draining plans should account for tank location—basement heaters can gravity-drain to floor drains, while elevated tanks require a hose to a suitable low-point or the use of a pump.
How to turn off electric power safely (breaker procedure)
Several simple steps guarantee the electric water heater is safely de-energized before any maintenance begins.
The technician locates the home’s main or dedicated circuit breaker panel, identifies the breaker labeled for the water heater, and switches it to OFF.
They verify power removal with a non-contact voltage tester at the heater’s access panel, then lock or tag the breaker if available.
How to shut off the cold-water supply and relieve pressure
After confirming the heater is de-energized, the technician isolates the water supply to prevent inflow while draining.
They close the cold-water shutoff valve at the tank, verify upstream isolation if present, and open a nearby hot faucet to relieve system pressure.
Finally, they attach a garden hose to the drain valve and momentarily open it to release trapped air before full draining.
Draining considerations for homes with basement vs. elevated tank placement
When planning to drain a water heater, tank location dictates a few important steps and precautions:
In basement installations, route the garden hose to a floor drain or exterior outlet, check for backflow and slope, and use a pump if needed.
For elevated tanks, maintain safe hose routing to avoid spills below, secure connections, and verify discharge points can handle hot water without causing damage.
Step-by-Step Guide to Flushing Sediment from an Electric Water Heater
The procedure for flushing sediment from an electric water heater begins by attaching a garden hose to the drain valve and preparing a nearby hot water faucet to prevent a vacuum.
With those precautions in place, the drain valve is opened for a basic flush. Then the tank is refilled and drained repeatedly for a full flush.
For heavy buildup, compressed air or a vinegar soak can be used as an optional clearing step.
Step 1 Attach a garden hose to the drain valve
Begin by locating the drain valve at the bottom of the water heater and threading a garden hose onto its male fitting until snug; this creates a secure channel for sediment-laden water to exit.
Position the hose toward a safe drainage area, elevate the hose end if needed, and hand-tighten the connection.
Inspect for leaks and verify the hose is unwound for unobstructed flow.
Step 2 Open a hot water faucet to prevent vacuum
Open a nearby hot water faucet and leave it running at a steady trickle to allow air into the tank so water can flow out smoothly; this prevents a vacuum that would slow or stop drainage.
Doing so equalizes pressure, guarantees continuous flow during draining, and reduces strain on the heater.
Confirm the faucet remains open until draining is complete to maintain consistent airflow.
Step 3 Open the drain valve and perform a basic flush
With the faucet trickling to equalize pressure, attention shifts to the tank’s drain valve at the base.
A garden hose attaches securely and directs water to a safe drain. The valve opens slowly; amber water with sediment flows out.
Let it run until clearer water appears. Close the valve, remove the hose, and keep the hot tap open before restoring power.
Step 4 Perform a full flush with tank refill cycles
Proceed to a full flush that uses repeated refill cycles to dislodge and purge stubborn sediment from the bottom of the tank.
Close the drain briefly, allow cold water to refill partially, then open the drain again to agitate and carry out loosened particles.
Repeat until runoff runs clear.
Monitor pressure, temperature, and electrical isolation throughout the process.
Step 5 Optional: Clearing with compressed air or vinegar for heavy buildup
For persistent, compacted sediment that resists standard flushing, consider using compressed air or a vinegar soak as targeted, optional methods to break up and dissolve deposits.
These approaches should be employed only after tank isolation, electrical disconnection, and cautionary checks for pressure and temperature.
Compressed air pulses can dislodge solids via the drain; a diluted vinegar soak softens mineral scale.
Rinse thoroughly until clear.
Step 6 Close valves, refill the tank, and restore power
Close the drain valve and any open hot-water taps.
Then reopen the cold-water supply slowly to begin refilling the tank while watching for leaks and steady flow from a nearby hot faucet to purge air.
Once full, close the faucet, guarantee the drain is sealed, restore power at the breaker after waiting five minutes for thermostat reset, and verify normal operation and temperature.
Inspecting and Cleaning Additional Components
Next, attention turns to other components that affect tank longevity and performance.
The anode rod should be checked and replaced if heavily corroded, while heating elements and thermostats are inspected for signs of failure or scaling.
Inlet screens and any sediment traps also require cleaning to maintain proper water flow and prevent future buildup.
How to check and replace the anode rod
Inspecting the anode rod helps determine whether it is still protecting the tank from corrosion or needs replacement.
The technician drains a few gallons, loosens the rod with a socket wrench, and inspects for heavy corrosion or depletion. If deteriorated, replace with a matching rod and tighten.
Proper anode care prolongs tank life and prevents costly leaks.
- Relief
- Confidence
- Security
Inspecting heating elements and thermostats
Several simple checks reveal whether heating elements and thermostats are functioning or need attention.
With power off, test element continuity with a multimeter and inspect for corrosion or burn marks; replace faulty elements.
Verify thermostat settings and test for voltage and continuity; clean contact surfaces and tighten connections.
Reassemble covers with new gaskets if needed, restore power, and confirm proper heating operation.
Sediment traps and inlet screen cleaning
Check sediment traps and the inlet screen for mineral buildup and debris, since blockages reduce flow and accelerate tank sedimentation.
Turn off water and power, drain enough to access the trap, remove and clean or replace the screen, and clear the trap of sludge.
Reassemble, refill slowly while checking for leaks, then restore power and verify normal flow and operation.
Troubleshooting Common Problems During Flushing
When issues arise during flushing, the guide outlines steps for addressing a stuck or leaking drain valve and measures to take if water runs cloudy or retains an odor.
It also highlights signs of rust, corrosion, or concealed leaks that indicate the tank or fittings may need replacement.
Clear, safety-minded diagnostics and next steps are provided to help determine whether repair or replacement is required.
Dealing with a stuck or leaking drain valve
A stuck or leaking drain valve can halt a flush and waste water, so it should be addressed promptly and methodically.
First, shut off power and water supply, then relieve pressure.
Apply penetrating oil to a stuck valve, wait, and attempt gentle turning with pliers.
For leaks, tighten packing nut or replace the valve with a compatible brass replacement, draining tank as needed.
What to do if water runs cloudy or continues to smell
If water runs cloudy or retains an unpleasant odor after flushing, the issue often stems from trapped sediments, bacterial growth, or residual anode rod corrosion.
Diagnosing the cause quickly helps prevent recurring contamination and preserves water quality.
Recommendation: flush repeatedly until clear, sanitize tank with a diluted bleach solution per manufacturer guidelines, inspect or replace the anode rod, and run cold taps to purge lingering odor.
Signs of rust, corrosion, or hidden leaks that require replacement
Persistent cloudiness or odors after repeated flushing and sanitizing can indicate deeper issues beyond simple sediment or bacteria, prompting inspection for rust, corrosion, or hidden leaks that may necessitate replacement.
Signs include reddish or brown water, flaking metal particles, visible exterior rust, pitted or bulging tank surfaces, unexplained pressure drops, dampness around fittings or floor, and recurring failures despite repairs—replace promptly.
Maintenance Schedule and Tips to Prevent Future Sediment Build-Up
A clear maintenance schedule helps prevent sediment accumulation and prolongs tank life by matching flushing frequency to local water hardness and tank capacity.
Monthly checks of pressure relief valves, visible leaks, and temperature settings, plus an annual flush and anode inspection, catch issues early.
Replacement should be considered when repeated sediment problems persist, repair costs approach the value of a new unit, or the tank shows corrosion.
Recommended flushing frequency by water hardness and tank size
Because sediment accumulation depends primarily on local water hardness and tank capacity, flushing schedules should be tailored rather than uniform.
Recommendations balance performance, cost, and peace of mind. Consider frequency by hardness and size:
- Soft water, any tank: flush annually to maintain efficiency.
- Moderately hard water, 40–80 gal: flush every 6 months to avoid buildup.
- Very hard water or >80 gal: flush quarterly and consider softening.
Simple monthly and annual checks to extend heater life
Performing a few quick monthly checks and one thorough annual inspection can greatly extend an electric water heater’s service life and reduce sediment-related issues.
Monthly: inspect for leaks, test the pressure relief valve, check thermostat settings, and listen for unusual noises.
Annually: flush the tank, inspect and replace the anode rod if needed, verify electrical connections, and document maintenance dates.
When to consider replacing the water heater
When should a homeowner consider replacing an electric water heater?
A replacement is advisable if the unit is over 10–15 years old, shows persistent corrosion, has recurrent leaks, requires frequent repairs, or fails to maintain temperature despite descaling and element replacement.
Upgrading to a more efficient model can reduce energy costs and minimize future sediment issues through better insulation and advanced anode designs.
Cost, Time, and Environmental Considerations
Typical DIY flushing and sediment removal can take one to three hours and cost mainly in basic supplies, while professional services often charge a flat fee or hourly rate with higher labor costs.
Proper disposal of drained water may require following local regulations to avoid contaminant discharge into storm drains or sensitive areas.
Regular flushing can improve efficiency, with modest energy savings that accumulate over time depending on sediment levels and usage.
Typical time and cost estimates for DIY vs. professional service
In comparing DIY and professional water heater maintenance, time and cost vary widely based on tank size, sediment level, and homeowner skill. DIY typically takes 1–3 hours and costs $0–$50 for supplies; professional service usually requires 1–2 hours and costs $100–$300. Risks, warranties, and labor affect value.
| Service Type | Typical Time/Cost |
|---|---|
| DIY small tank | 1–2 hrs / $0–$30 |
| DIY large tank | 2–3 hrs / $20–$50 |
| Professional | 1–2 hrs / $100–$300 |
| Emergency call | 1 hr / $150–$400 |
Water disposal and local regulations
After comparing time and cost trade-offs between DIY and professional services, attention turns to how to handle the flushed tank water: disposal practices, local regulations, and environmental impacts can affect both cost and time estimates.
Professionals may collect and haul wastewater; DIYers should verify municipal rules, avoid storm drains, and consider sediment disposal fees or permits.
Compliance reduces fines and cleanup time.
Energy savings projection after flushing
Estimate energy savings by comparing pre- and post-flush performance metrics—reduction in recovery time, lower standby heat loss from removed sediment, and improved heat transfer efficiency—to calculate likely decreases in kWh consumption and operating costs.
Project annual savings by multiplying reduced kWh by local electricity rates, factor in labor and downtime costs, and quantify CO2 reductions using regional emission factors to assess payback period and environmental benefit.
Quick Checklist: Flushing Electric Water Heater
Begin by cutting power to the electric water heater at the circuit breaker to eliminate any risk of shock; this single step makes all subsequent flushing tasks safe to perform.
A concise checklist follows to guarantee an efficient, confident flush that protects equipment and restores performance.
- Relieve pressure, drain a few gallons, watch for sediment.
- Flush until clear, close valves.
- Restore power, inspect for leaks.
Conclusion
Like a river kept free of stones so its current runs true, a well-maintained electric water heater flows efficiently when cleared of sediment. Routine flushing, timely inspections, and simple care act as steady hands removing pebbles from the streambed; each small effort preserves warmth, prolongs life, and spares waste. By tending the heater with calm regularity and respect, households guarantee reliable hot water and avoid the slow clogging that silences comfort.