
How to Build a Wheelchair Accessible Shower: Step-by-Step Guide for Safety and Comfort
To build a wheelchair-accessible shower that ensures safety and comfort, focus on features like zero-threshold entry, sturdy fixtures, and safe circulation. Start by checking local codes and regulations. Install a curbless pan with the proper slope and waterproofing, along with load-rated grab bars, a handheld showerhead, and thermostatic controls at accessible heights. Include seats and non-slip surfaces to aid transfers and promote independence, while ensuring there’s enough clear turning space and durable finishes for improved usability. Securing professional permits and inspections will ensure compliance. Follow the step-by-step guidance and layout examples provided to implement these essential features effectively.
Overview of Building a Wheelchair-Accessible Shower
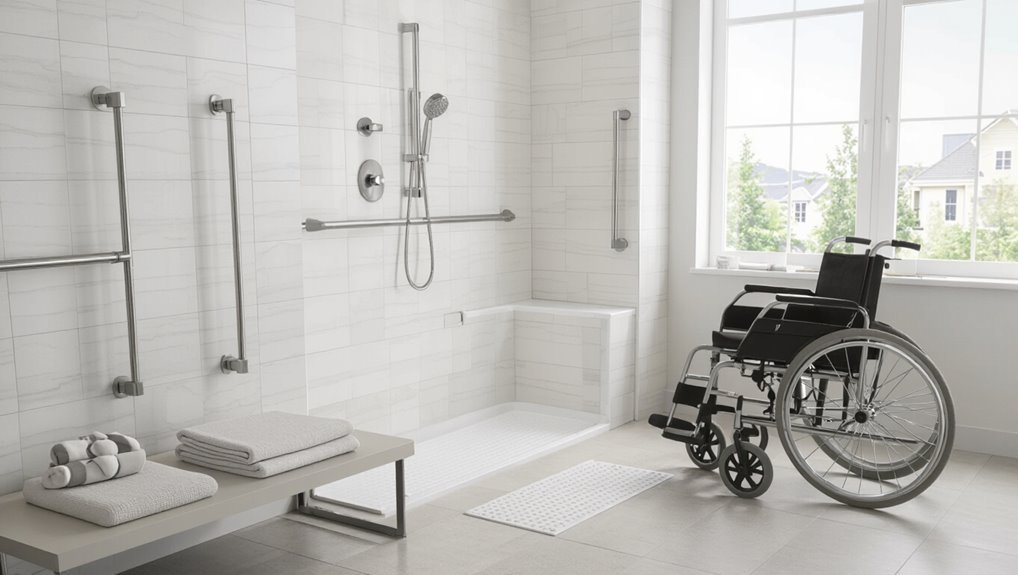
A wheelchair-accessible shower benefits people with mobility impairments, aging adults, and caregivers by reducing transfer difficulty and fall risk.
The primary goals are safety, independence, accessibility, and comfort, achieved through features like level-entry floors, grab bars, adequate space, and appropriate fixtures.
A clear plan of site assessment, design choices, permit approvals, construction, and final testing typically unfolds over several weeks to a few months depending on scope.
Who benefits and common use cases
Many people benefit from a wheelchair-accessible shower, including individuals with permanent mobility impairments, those recovering from surgery or injury, older adults with balance or strength limitations, and caregivers who assist with daily hygiene.
Architects, therapists, and contractors consult guides on how to build a wheelchair accessible shower for homes, clinics, assisted living, and temporary rehabilitation spaces to improve usability and routine care.
Key goals: safety, independence, accessibility, and comfort
Building on who benefits and where these showers are used, the primary goals when designing a wheelchair-accessible shower are to maximize safety, promote independence, guarantee accessibility, and provide comfort.
Design focuses include slip-resistant surfaces, adequate grab bars, clear turning space, reachable controls, low-threshold or roll-in entries, adaptable seating, proper drainage, and accessible storage, all coordinated to support daily use with dignity and minimal assistance.
Summary of steps and timeline
Begin with a clear plan that outlines walk-through demolition, rough plumbing adjustments, waterproofing and substrate work, fixture and seating installation, finishing surfaces, and final inspections.
A typical timeline spans 2–4 weeks: permit and prep, 2–4 days demolition and plumbing, 3–5 days waterproofing and substrates, 2–4 days fixtures and seating, 2–4 days tiling and finishes, then inspections and adjustments.
Legal, Code, and Accessibility Requirements
Before starting construction, the project must reference applicable building codes and ADA guidelines to confirm legal compliance.
It should also account for local permitting procedures and an inspection checklist to avoid costly revisions.
Key measurable requirements—minimum clearances, door widths, and turning radii—must be planned and documented to assure true accessibility.
Relevant building codes and ADA guidelines to consider
When planning a wheelchair-accessible shower, designers and homeowners must reference applicable local codes alongside the Americans with Disabilities Act (ADA) Standards to guarantee legal compliance and safe usability.
Key considerations include clear floor space, turning radius, threshold heights, grab bar placement and load requirements, shower seat dimensions, accessible controls and fixtures, slip-resistant surfaces, and proper drainage.
Verify 2010 ADA Standards and local amendments.
Local permitting and inspection checklist
A concise local permitting and inspection checklist helps guarantee a wheelchair-accessible shower meets legal, code, and safety requirements from planning through final approval.
Include required permits, approved plans, contractor licensing, accessibility compliance references, plumbing and electrical sign-offs, waterproofing inspection, grab bar and fixture anchorage verification, finished elevation and drainage confirmation, and final occupancy or completion certificates.
Maintain copies for records and future resale.
Minimum clearances, door widths, and turning radii
Compliance with minimum clearances, door widths, and turning radii guarantees a wheelchair-accessible shower is usable, safe, and legally defensible. The designer must follow ADA and local codes: clear floor space, 32–36-inch doorways, and 60-inch turning circles or equivalent T-turns. Proper dimensions ascertain maneuverability, transfer space, and inspection approval.
| Element | Minimum | Purpose |
|---|---|---|
| Door width | 32–36 in | Entry access |
| Turning radius | 60 in | Maneuverability |
| Clear floor space | 30×48 in | Transfer/function |
Planning and Design Considerations
Selecting the ideal location balances proximity to bedrooms, plumbing access, and available turning space.
The choice between a wet room, roll-in, or transfer shower influences required slope, drainage, waterproofing, and floor materials to meet anti-slip and safety needs.
Recommended shower sizes and layouts vary by mobility level, so plans should match clearance, transfer space, and maneuvering requirements.
Choosing the right location in the home
Where in the home will best meet the daily needs of the person using a wheelchair?
Location selection prioritizes proximity to bedrooms and main living areas, level floor access, and sufficient turning space outside the shower.
Consider plumbing and ventilation feasibility, emergency egress, and caregiver access.
Choose a site minimizing corridor obstacles and steps, enabling straightforward transfers and integration with existing bathroom layout and utilities.
Wet room vs. roll-in shower vs. transfer shower: pros and cons
Once a suitable location is chosen, the planning phase turns to the type of bathing area: wet room, roll-in shower, or transfer shower. Each offers trade-offs: wet rooms maximize space and access, roll-ins prioritize seamless entry, transfer showers enable seated transfers. Choices depend on mobility, bathroom size, and caregiver needs.
| Type | Advantage | Limitation |
|---|---|---|
| Wet room | Spacious | Higher cost |
| Roll-in | Seamless entry | Requires clear floor area |
| Transfer | Safer seated transfers | Needs transfer space |
Slope, drainage, and waterproofing basics
Proper slope, reliable drainage, and continuous waterproofing form the foundation of a safe, durable wheelchair-accessible shower.
Designers specify a gentle gradient (typically 1/4 inch per foot) directing water to linear or point drains sized for expected flow.
Waterproof membranes must be continuous from floor to lower wall, with sealed penetrations and curb changes.
Inspectability and maintenance access guarantee long-term performance and prevent leaks.
Flooring material and anti-slip requirements
A key decision in planning a wheelchair-accessible shower is selecting flooring that balances durability, water resistance, and slip resistance while remaining smooth enough for wheels and transfers.
Recommended materials include textured porcelain, slip-rated vinyl, and certain pebble tiles with minimal grout gaps.
Surfaces should meet ADA slip-resistance guidelines (COF ≥ 0.6 wet), be low-maintenance, and compatible with grab bars and transfers.
Shower size and layout recommendations for different mobility needs
After selecting appropriate flooring and slip-resistant finishes, attention turns to overall shower dimensions and layout to accommodate varying mobility needs.
Recommended clear floor space: at least 60 inches diameter for wheelchair turning, or 36 by 60 inches for transfer showers.
Provide a 36-inch-wide entry, bench placement for lateral or forward transfers, grab bar locations, and unobstructed approach paths tailored to individual mobility and equipment.
Accessibility Fixtures and Hardware
Selection of appropriate fixtures and hardware is essential for safe, independent shower use, from curbless bases and low thresholds to securely mounted grab bars with specified weight ratings.
Practical choices include fold-down or fixed seats, handheld showerheads on slide bars for adjustable reach, and lever-operated faucets with thermostatic valves.
All controls and accessories should be positioned at reachable heights and arranged to minimize transfers and strain.
Accessible shower bases and curbless thresholds
Accessible shower bases and curbless thresholds form the foundation of a truly accessible bathing area, enabling seamless roll-in access for wheelchairs and reducing trip hazards for people with limited mobility.
Durable, slip-resistant bases with integrated gentle slopes guarantee proper drainage without standing water. Options include preformed pans or custom-tiled floors with linear drains.
Proper waterproofing, threshold radii, and floor changes prevent leaks and facilitate safe transfers.
Grab bars: placement, types, and weight ratings
Once a curbless, properly graded floor is in place, secure grab bars provide the reliable points of contact that make entering, maneuvering, and exiting the shower safer for wheelchair users and caregivers.
Bars should be wall-mounted into studs or blocking, placed at transfer and support heights, resist 250–500 lb loads, and include straight, angled, and vertical options for varied grips.
- Mounting locations
- Height guidelines
- Load ratings
- Bar types
Shower seats and benches: fold-down vs. fixed
A sturdy shower seat or bench provides a reliable resting surface that reduces transfer difficulty and supports caregiver assistance.
Choosing between fold-down and fixed styles hinges on space, user needs, and installation constraints. Fold-down seats save space, require strong wall anchoring, and suit intermittent use.
Fixed benches offer greater load capacity, storage underneath, and stability for frequent transfers but need permanent floor or wall support.
Handheld showerheads, slide bars, and controls placement
Several key fixtures—the handheld showerhead, slide bar, and control placement—determine how independently and safely a person can bathe.
Position the handheld within easy reach from seated and standing positions, mount a secure adjustable slide bar for height and angle, and place controls within clear sightline and reachable range without twisting.
Use easy-grip designs and corrosion-resistant materials for longevity and safety.
Faucets and controls: lever handles, thermostatic valves, and accessible heights
Place faucets and controls so they are operable from seated and standing positions without tight grasping or twisting.
Install lever or paddle handles, reachable at 34–48 inches above the shower floor.
Use thermostatic mixing valves to prevent scalding and maintain temperature.
Position controls near entry and beside transfer zones for easy access.
Guarantee clear floor space and compliant mounting for independent operation.
Door options: open roll-in, hinged, and sliding
How should entry be configured to balance accessibility, privacy, and water containment?
Choices include open roll-in for unobstructed access and easy transfers, hinged doors for full privacy but require clear swing space, and sliding doors that save clearance while containing water.
Selection depends on available maneuvering area, threshold design, user transfer needs, and sealing to prevent leaks without creating tripping hazards.
Step-by-Step Construction and Installation Process
The step-by-step construction and installation process begins with preparing the space, including demolition, structural checks, and ensuring plumbing access.
Next come installing a proper subfloor, establishing the correct slope, applying a waterproofing membrane, setting and pressure-testing the drain, and constructing either a prefabricated base or a curbless pan.
Finally, durable, slip-resistant tile, flooring, and grout are installed to finish the accessible shower.
Preparing the space: demolition, structural checks, and plumbing access
Begin by clearing the work area and removing existing fixtures, tile, and drywall back to the studs to expose plumbing and framing; this creates an accurate baseline for measurements and reveals any hidden damage.
Inspect joists, headers, and substructure for rot or deficiency. Verify load paths and consult an engineer if needed.
Locate and cap or reroute plumbing, ensuring accessible shutoffs and sufficient drain and water supply access.
Installing proper subfloor, slope, and waterproofing membrane
With wall framing and plumbing exposed and any damaged structure repaired, attention shifts to creating a stable, correctly pitched floor assembly that directs water to the drain and resists long-term moisture.
Subfloor panels are installed over joists, then a pre-sloped mortar bed or manufactured shower board establishes 1/4″ per foot slope.
A continuous waterproofing membrane seals junctions, laps walls, and integrates with curb and wall backer.
Setting the drain and testing for leaks
Set the drain assembly into the pre-sloped bed, verify flange alignment with the finished flooring plane, and secure the connection to the waste line according to manufacturer torque and sealant specifications.
Compress mortar evenly, confirm drain level, and install test plugs.
Flood the shower to the recommended depth, monitor for pressure loss or visible seepage at joints and membrane penetrations, then repair any leaks before proceeding.
Installing the shower base or building a curbless pan
Install the shower base or construct the curbless pan by following a disciplined sequence: verify the pre-sloped mortar bed is level toward the drain, dry-fit the pan or base to confirm alignment with walls and drain flange, then apply the appropriate thin-set, mortar, or bonding adhesive evenly under the unit to prevent voids.
Secure fasteners as recommended, check for proper slope, and confirm waterproof membrane continuity at edges and drain.
Tiling, flooring, and grout choices for durability and slip resistance
Although slip resistance and long-term durability govern material selection, aesthetic and maintenance needs also influence tile, flooring, and grout choices for an accessible shower.
Porcelain or textured ceramic tiles with a high COF are preferred; small-format tiles improve traction and slope conformity.
Epoxy or urethane grout resists staining and mold.
Verify waterproof membranes beneath tiles and use beveled changes to reduce trip hazards.
Mounting grab bars, seats, and accessories to structural supports
With flooring and grout secured, attention shifts to anchoring the hardware that provides user stability and comfort.
Install grab bars and fold-down seats into reinforced studs or blocking, using stainless fasteners and proper torque.
Verify mounting plates are flush and waterproofed.
Position accessories—soap dishes, showerhead brackets—within reach.
Test load-bearing capacity and operation before final sealing and cosmetic finishes.
Installing plumbing fixtures, valves, and handheld shower system
Begin by laying out the plumbing sequence and confirming rough-in dimensions so valves, drains, and the handheld shower line align with the previously set blocking and finished wall surfaces.
Install pressure-balanced valve at accessible height, secure piping, and slope drain for proper flow.
Mount handheld shower outlet and bracket, connect flexible hose, test for leaks and proper water temperature control before closing walls.
Final inspections, caulking, and commissioning the shower
Inspect the completed assembly systematically to confirm all components meet code, manufacturer, and accessibility requirements: verify valve operation and pressure balance, check that the curb or curbless threshold and floor slope direct water to the drain, and guarantee grab bars, seat, and handheld bracket are securely anchored at specified heights.
Perform water tests for leaks, apply silicone caulk to joints, restore finishes, document results, and train users.
Safety and Comfort Enhancements
The section addresses practical safety and comfort upgrades that improve usability for people with sensory or mobility limitations.
It covers appropriate lighting, high-contrast mirrors and surfaces for low-vision users, heated floors and anti-scald controls, reachable storage like niches and shelves, and emergency call systems with pull cords.
Recommendations prioritize clear sightlines, temperature safety, convenient storage access, and rapid assistance.
Lighting, mirrors, and visual contrast for low vision users
Enhancing lighting, mirrors, and visual contrast greatly improves safety and independence for low-vision users in a wheelchair-accessible shower.
Bright, glare-controlled overhead and task lighting reduce shadows; adjustable, tilt mirrors mounted at seated height aid grooming.
High-contrast edges on fixtures, grab bars, thresholds, and non-slip flooring patterns clarify boundaries.
Tactile indicators and color-coded controls further support orientation and safe, efficient use.
Heated floors and anti-scald protections
Several practical comfort and safety measures, including heated floors and anti-scald devices, markedly reduce risk and increase independence in wheelchair-accessible showers.
Radiant floor heating prevents cold shock and reduces slipping from sudden temperature changes.
Thermostatic mixing valves and pressure-balancing valves maintain stable water temperatures, while clearly labeled controls and routine maintenance prevent scalding.
Installations should follow codes and be performed by qualified professionals.
Storage solutions within reach: niches, shelves, and baskets
When placed at reachable heights and within clear sightlines, built-in niches, adjustable shelves, and secure baskets make shower essentials accessible without awkward twisting or transfers.
Design prioritizes reachable depths, slip-resistant materials, and rounded edges to reduce strain and hazards. Placement complements seating and transfer zones, keeping items visible and operable.
- Recessed niches at seated height
- Adjustable corner shelving
- Locking baskets for bottles
- Magnetic soap holders
Emergency call systems and pull cords
Emergency call systems and pull cords provide a critical lifeline in a wheelchair-accessible shower, enabling users to summon help quickly in case of slips, medical events, or equipment failures.
Install waterproof, reachable alarms and cords at seated and standing heights, linking to home systems or monitoring services.
Test regularly, use battery backup, label controls clearly, and guarantee cords are non-entangling and compliant with accessibility codes.
Cost Estimates and Budgeting
Typical cost ranges for a wheelchair accessible shower vary widely between DIY projects and professional installations, with DIY often saving on labor but potentially increasing risk or time.
A clear budget should itemize demolition, plumbing, fixtures, labor, and permits to reveal where most expenses occur.
Cost-saving strategies—such as selecting affordable but compliant fixtures, obtaining multiple quotes, and limiting structural changes—can reduce expense without compromising safety.
Typical cost ranges for DIY vs. professional installation
Many projects fall into two broad cost tiers: lower-range DIY conversions and higher-range professional installations.
DIY efforts typically cost substantially less, covering materials, basic accessibility fixtures, and tools, but require time and skill.
Professional installations carry higher upfront costs due to contractor fees, expertise, and warranties, yet reduce risk, guarantee code compliance, and often expedite completion for homeowners seeking reliability.
Cost breakdown: demolition, plumbing, fixtures, labor, and permits
A clear cost breakdown for a wheelchair-accessible shower separates expenses into demolition, plumbing, fixtures, labor, and permits so homeowners can allocate funds and compare DIY versus professional options. Typical line items: demolition (tear-out, disposal), plumbing (drain, slope, fixtures), permits and inspections, labor hours, and contingency.
| Item | Estimated Range | Emotional Impact |
|---|---|---|
| Demolition | $200–$1,000 | relief |
| Plumbing | $500–$3,000 | anxiety |
| Fixtures/permits | $300–$2,500 | reassurance |
Ways to reduce costs without compromising safety
Prioritize value-driven choices that lower expenditure while maintaining code compliance and user safety.
Select durable, mid-range fixtures; repurpose existing plumbing layout to limit rerouting; obtain multiple contractor quotes and negotiate fixed bids; schedule phased work to spread costs; purchase accessible accessories in sales or as package deals; confirm permit requirements to avoid fines; train DIY-capable owners for noncritical tasks under professional guidance.
Hiring Professionals and Project Management
Deciding when to engage a contractor, plumber, and occupational therapist helps guarantee structural, plumbing, and accessibility needs are addressed at the right stages.
Essential contractor questions and a verification checklist—licenses, insurance, references, and past accessible-bathroom projects—clarify qualifications and scope.
Clear timeline expectations and coordination among trades reduce delays and keep the project on schedule.
When to hire a contractor, plumber, and occupational therapist
When accessibility needs intersect with structural, plumbing, or mobility concerns, bring in the appropriate professionals early to avoid costly rework and code violations.
Hire a licensed contractor for structural modifications and permits, a certified plumber for drainage, waterproofing, and trapless systems, and an occupational therapist to assess user needs, transfer methods, and fixture placement.
Coordinate timelines and documented plans before work begins.
Questions to ask contractors and verification checklist
How should homeowners vet contractors and confirm project readiness before work begins?
Homeowners should request licenses, insurance, references, and detailed bids.
Verify scope, ADA-compliant materials, and warranty terms. Confirm permits and subcontractor qualifications. Use a checklist to track documentation and approvals.
- License and insurance copies
- Itemized written estimate
- Permit and inspection confirmations
- References and portfolio review
Timeline expectations and coordinating trades
A clear project timeline and coordinated trade schedule set realistic expectations and minimize delays for a wheelchair-accessible shower retrofit.
The timeline should map demolition, plumbing, waterproofing, tiling, electrical, and finishing, include lead times and inspections, and assign responsibilities.
Buffer days for unforeseen issues, confirm contractor availability, sequence trades to avoid overlap, and communicate milestones and change orders in writing to keep the project on track.
Common Problems and How to Avoid Them
Common failures in accessible shower projects often stem from design choices that reduce usability, such as incorrect clearances, door swings, or fixture placement.
Waterproofing and drainage mistakes can lead to leaks and mold unless proper membranes, slopes, and drainage components are installed and tested.
Inadequate structural backing or improper mounting of grab bars and seats compromises safety and must be prevented with correct framing and fasteners.
Accessibility mistakes that reduce usability
Overlooking small design details often turns an otherwise accessible shower into one that remains difficult or unsafe to use.
Common mistakes include placing controls out of reach, insufficient grab bar placement, inadequate turning space, slippery surfaces, and narrow entryways.
Ignoring user needs, faulty hardware heights, and poor seat design all reduce independence.
Prioritize measurements, ergonomics, and user testing to avoid these usability failures.
Waterproofing and drainage failures and remediation
Many usability failures trace back to moisture mismanagement: leaks, standing water, and poor drainage quickly negate mobility and safety gains.
Common causes include inadequate waterproof membranes, improper slope, clogged drains, and failed seals.
Remediation requires full membrane replacement, correct floor pitch (1/4″ per foot toward drain), reliable linear drains, accessible cleanouts, and routine inspections to prevent mold and slipping hazards.
Structural or mounting errors for grab bars and seats
Guarantee secure anchoring when installing grab bars and shower seats, because failures in structural support are a leading cause of injury and functional loss.
Use solid blocking, stainless hardware, and load-rated fixtures.
Verify mounting into studs or reinforced backer boards, follow manufacturer torque and spacing, and test installations with weight before use.
Document locations for future inspections and avoid adhesive-only methods.
Maintenance and Long-Term Care
Regular routine cleaning and prompt mold prevention keep surfaces safe and prolong finishes.
Periodic inspections of grab bars, seats, and seals identify wear or loosened fasteners before failures occur.
As mobility needs evolve, upgrading components and hardware guarantees continued accessibility and safety.
Routine cleaning and mold prevention
Maintain a consistent cleaning schedule and targeted mold-prevention measures to preserve safety, hygiene, and slip resistance in a wheelchair-accessible shower.
Use mild, nonabrasive cleaners and diluted bleach or vinegar solutions where appropriate; rinse thoroughly.
Guarantee rapid drying with ventilation or dehumidifiers.
Clean grout and drains regularly, remove soap scum, and treat porous surfaces with mold-resistant sealant.
Keep cleaning tools accessible and documented.
Inspecting grab bars, seats, and seals for wear
Inspectors should routinely examine grab bars, shower seats, and perimeter seals for signs of loosening, corrosion, cracks, or material degradation that could compromise safety or watertightness.
Check mounting hardware tightness, welds or fasteners, seat hinges and attachment points, and sealant continuity.
Replace or repair failing elements promptly to prevent accidents and water intrusion, and document inspections with dates, findings, and corrective actions.
Upgrading components as needs change
As needs, abilities, or living arrangements evolve, owners should plan for targeted upgrades to shower components that preserve safety, independence, and comfort.
Assess mobility, transfer methods, and caregiver support to prioritize changes: higher-capacity grab bars, bariatric or fold-down seats, curbless adaptations, anti-scald valves, handheld showerheads with longer hoses, and non-slip surfaces.
Schedule professional evaluations and modular replacements to minimize disruption.
Real-Life Examples and Layout Inspirations
The section presents sample dimensions and layouts for small, medium, and large bathrooms to show practical space planning.
It then outlines before-and-after scenarios for common remodels to illustrate typical construction steps and outcomes.
Finally, it compares accessibility features prioritized for different user needs so readers can match design choices to individual requirements.
Sample dimensions and layouts for small, medium, and large bathrooms
When planning accessible showers for different bathroom sizes, designers often rely on proven dimensions and layouts that balance maneuvering space, fixture placement, and safety features.
Examples include compact roll-in layouts, standard 60″ turning spaces, and expanded wet-room arrangements.
Typical recommendations:
- Small: 36″×60″ roll-in with fold-down seat
- Medium: 60″×80″ with 5′ turning radius
- Large: wet room 6’×8’+
- Universal: clear 30″×48″ transfer space
Before-and-after scenario outlines for common remodels
One clear way to illustrate accessible shower remodels is through concise before-and-after scenario outlines that focus on constraints, interventions, and outcomes. Examples show space limits, fixture relocation, and safety gains.
| Before | After |
|---|---|
| Narrow doorway, tub | Roll-in shower, curb removed |
| Tight clearance | Reoriented fixtures, clear maneuvering |
| Poor lighting | Task lighting, non-slip flooring |
Accessibility features prioritized by different user needs
Following the before-and-after outlines, practical examples show how different mobility, sensory, and cognitive needs reshape priorities in accessible shower design.
A power wheelchair user might prioritize zero-threshold entry, wide maneuvering space, and reinforced grab bar locations.
Low-vision users benefit from high-contrast surfaces and tactile cues.
Individuals with memory or processing differences require simple layouts, clear sightlines, and intuitive controls for safety and independence.
Quick Checklist for a Wheelchair-Accessible Shower Installation
A compact checklist helps confirm all critical elements are addressed before beginning a wheelchair-accessible shower installation.
It outlines measurements, drainage, safety fixtures, and compliance needs so installers verify essentials quickly.
Use the list to validate site readiness, material selection, and required permits before work starts.
- Confirm clear floor space and doorway width
- Guarantee zero-threshold entry and proper slope
- Install grab bars and non-slip flooring
- Verify shower seat, hand-held shower, and controls
Conclusion
With careful planning and attention to code, comfort, and durability, a wheelchair-accessible shower transforms safety into everyday independence. Following proven design principles and choosing the right fixtures keeps surprises to a minimum and prevents costly rework. Routine maintenance preserves function and dignity over the long haul. When executed thoughtfully, the project becomes a win-win — a step in the right direction that balances accessibility, style, and peace of mind for users and caregivers alike.
