
How to Remove Rust From Inside Drain Pipes: Safe, Step-By-Step Methods and Prevention
To effectively remove rust from inside drain pipes, start by shutting off the water supply and wearing gloves and goggles for safety. For accessible P-traps, detach them, clean with a brush, and soak in a solution of vinegar, baking soda, or citric acid before rinsing and reassembling. For longer pipe runs, use pipe brushes, a plumbing snake, or consider professional hydro-jetting. Additionally, think about replacing pipes with corrosion-resistant materials to prevent future rust. Regular maintenance and monitoring for leaks or changes in water taste can help avoid recurrence. The following steps provide detailed methods and preventive tips for managing rust in your drain pipes.
How to Tell if Rust Is Forming Inside Drain Pipes
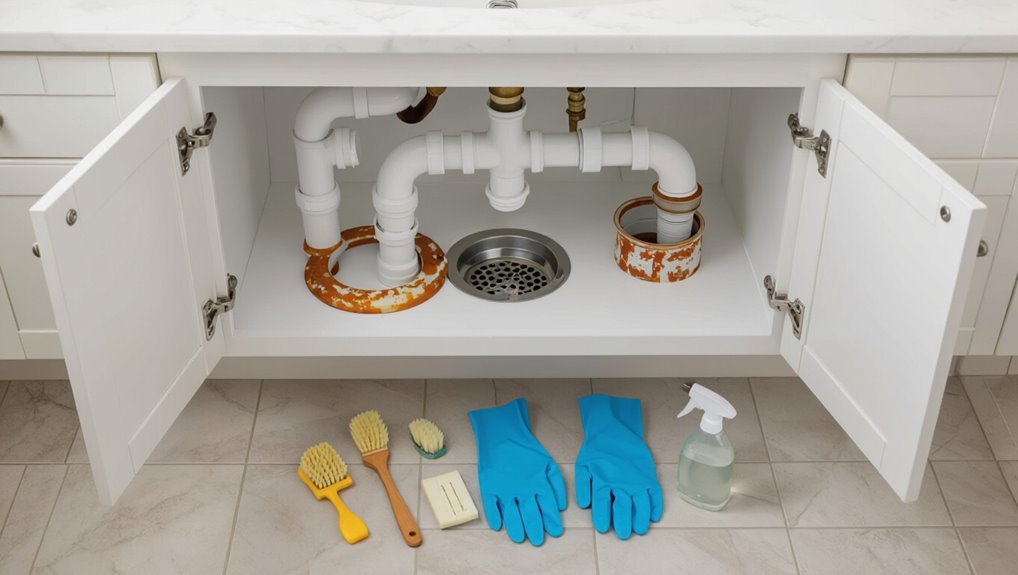
Visible orange-brown stains around sinks, tubs, and floor drains, along with flaky residue, often indicate rust formation.
Changes in water color, metallic taste, reduced flow, or persistent clogs can signal that rust is affecting water quality and pipe function.
Distinguishing surface staining from internal corrosion requires noting whether staining returns after cleaning and whether problems persist throughout the system rather than at a single fixture.
Common signs to look for at sinks, tubs, and floor drains
How can a homeowner tell if rust is forming inside drain pipes?
Visible reddish-brown stains around sinks, tubs, or floor drains, persistent discoloration after cleaning, metallic or musty odors, and flaky residue near grates suggest corrosion.
Slow draining accompanied by rust-colored residue in traps or on plumbing fixtures also signals onset.
These signs prompt investigation into how to remove rust from inside drain pipes.
How rust affects water quality and flow
When rust develops inside drain pipes, it can both degrade water quality and impede flow: corroded iron releases reddish-brown particles and dissolved iron that stain fixtures, discolor water, and can impart a metallic taste or unpleasant odor.
Meanwhile, roughened pipe interiors and flaking scale reduce effective diameter and promote clogs, slowing drainage and increasing pressure on joints and fittings.
Evidence includes sediment, reduced flow, staining, and odor.
When to suspect internal pipe corrosion vs surface staining
What clues indicate that rust is developing inside a drain pipe rather than just staining its surface? Persistent reddish-brown water, recurring flakes after cleaning, metallic taste or odor, reduced flow despite clear external fittings, visible pitting at accessible joints, and accelerated staining downstream suggest internal corrosion. Temporary discoloration from surface buildup usually clears with scrubbing or flushing and lacks structural signs or ongoing debris release.
Immediate Safety Precautions Before Cleaning Drain Pipes
Before beginning any rust-removal work, the homeowner should don appropriate PPE and guarantee adequate ventilation to limit exposure to dust and chemical fumes.
Water should be shut off and the affected fixtures isolated to prevent leaks and accidental flow during cleaning.
If corrosion is extensive, pipes are inaccessible, or structural concerns exist, a professional plumber should be contacted.
Personal protective equipment (PPE) and ventilation
Personal protective equipment and adequate ventilation are essential initial precautions because rust removal often involves abrasives, chemical cleaners, and airborne dust that can irritate skin, eyes, and lungs.
Operators should wear chemical-resistant gloves, safety goggles, a respirator rated for particulates and fumes, and protective clothing.
Guarantee cross-ventilation or use an exhaust fan to remove vapors and dust before and during cleaning.
Turning off water and isolating affected fixtures
Shut the water supply to the affected fixture and isolate it from the system to prevent accidental flow while cleaning; this minimizes pressure in the pipes and reduces the risk of leaks, splashes, or chemical backflow.
Close individual shutoff valves, drain residual water by opening taps, and plug or cap nearby fixtures.
Verify isolation by checking zero flow and relieving remaining pressure before starting work.
When to call a professional plumber
After isolation and pressure relief are confirmed, determine whether conditions require a professional plumber rather than DIY cleaning.
Call a professional if:
- pipes are corroded, leaking, or inaccessible;
- rust recurs rapidly;
- lead, galvanized, or old cast-iron systems are involved;
- specialized tools (camera inspection, pipe replacement) are needed;
- the homeowner lacks confidence in safely completing repairs.
Prioritize expertise for complex risks.
Tools and Materials Needed for Safe Rust Removal
The following section lists the practical supplies and equipment required to remove rust from drain pipes safely.
It covers common household remedies (vinegar, baking soda, citric acid), commercial descalers and rust removers, and mechanical tools such as a plumbing snake, wire brush, pipe brush, and P-trap wrench.
It also highlights necessary protective gear and proper disposal items to manage waste and chemicals.
Household supplies (vinegar, baking soda, citric acid)
Several common household acids and abrasives—white vinegar, baking soda, and powdered citric acid—provide safe, effective options for loosening light-to-moderate rust on drain pipes when used correctly.
Vinegar dissolves rust with soak time; baking soda forms a mild abrasive paste for scrubbing; citric acid offers faster chemical action.
Rinse thoroughly, ventilate the area, wear gloves, and avoid mixing chemicals.
Commercial descalers and rust removers to consider
Many homeowners opt for commercial descalers and rust removers when household methods prove insufficient, because these products contain stronger acids or chelating agents formulated to dissolve heavy rust and mineral buildup quickly.
Recommended options include phosphoric- or sulfamic-acid cleaners, citric-based industrial formulations, and EDTA or gluconate chelators.
Choose corrosion-safe labels for plumbing, follow dilution and ventilation instructions, and wear chemical-resistant gloves and eye protection.
Mechanical tools (plumbing snake, wire brush, pipe brush, P-trap wrench)
Start by assembling basic mechanical tools that physically dislodge rust and scale from drain lines: a plumbing snake for breaking up clogs and scraping inner walls, a stiff wire brush or pipe brush sized to the pipe diameter for manual scrubbing, and a P-trap wrench to remove and reinstall trap fittings without damaging threads.
Use appropriate brush rotation, gentle force, and incremental inspection to avoid pipe damage.
Protective and disposal items
A small set of protective and disposal items is essential to perform rust removal from drain pipes safely and responsibly.
Gloves, chemical-resistant goggles, and a mask protect skin, eyes, and lungs.
Disposable rags, plastic bags, and sealable containers collect rust debris and contaminated cleaners.
A small puncture-proof bin or labeled waste bag guarantees proper disposal.
Local hazardous-waste rules should be followed.
Step-by-Step: Removing Rust from Accessible Drain Traps and Fixtures
The author outlines a clear procedure for removing and inspecting the P-trap, emphasizing safe disconnection and containment of wastewater.
Manual scrubbing of visible rust inside the trap and tailpiece is recommended, followed by mild treatments with vinegar and baking soda for light deposits or citric acid/commercial rust remover for tougher corrosion, applied according to safety instructions.
The process concludes with thorough rinsing, neutralizing any residual chemicals, and careful reassembly and leak testing.
How to remove and inspect the P-trap safely
Before loosening any fittings, the homeowner should shut off the water supply and place a bucket beneath the P-trap to catch residual water. This precaution reduces spills and exposure to rusty debris while preparing for safe removal and inspection.
Using adjustable pliers, loosen slip nuts, lower the trap straight down, inspect seals and interior for corrosion, and note damaged parts for replacement before reassembly.
Manual cleaning of visible rust inside trap and tailpiece
Begin by removing loose debris and surface grime with a dry brush or cloth to expose the rusted areas inside the trap and tailpiece.
Then assess the extent of corrosion to determine whether manual cleaning or part replacement is required.
Use a brass or nylon brush, steel wool sparingly on sturdy metal, and a scraper for flaking rust.
Rinse, dry, and inspect for pitting before reassembly.
Using vinegar and baking soda for mild rust deposits
For mild rust deposits inside accessible traps and fixtures, a simple chemical approach using white vinegar and baking soda loosens corrosion without harsh chemicals.
Empty water, apply baking soda to rusted surfaces, then pour white vinegar slowly to create fizz.
Let sit 15–30 minutes, scrub with a brush, rinse thoroughly, and dry.
Repeat once if needed; guarantee good ventilation and avoid metal soaking overnight.
Applying citric acid or commercial rust remover safely
One reliable option for more stubborn rust is to use a citric acid solution or a commercial rust remover formulated for plumbing, applied with care to accessible traps and fixtures.
The technician should wear gloves and eye protection, follow manufacturer dilution and contact-time instructions, test on a small area, apply with a brush or cloth, avoid prolonged exposure to fittings, and ventilate the area.
Rinsing, neutralizing chemicals, and reassembling the trap
After the citric acid or rust remover has loosened deposits and been wiped away, the technician should thoroughly rinse all treated parts to remove residual chemical and loosened rust particles.
Next, apply a mild alkaline neutralizer or baking soda solution, rinse again, dry components completely, inspect seals and threads, replace deteriorated washers, reassemble the trap hand-tight, then test for leaks and proper drainage.
Step-by-Step: Treating Rust Inside Inaccessible or Long Run Drain Pipes
For long or hard-to-reach runs, professionals consider a range of internal treatments tailored to the scale and pipe material, including flushing with acid-safe solutions and applying enzyme or chemical descalers to target iron deposits.
Mechanical agitation with snakes and specialized pipe brushes is often combined with or followed by hydro-jetting for heavy rust scale, with hydro-jetting described for its ability to shear and flush accumulated rust.
Each method carries specific risks and precautions—chemical compatibility, pressure limits, and disposal of residues—that determine the safest, most effective approach.
Flushing methods using acid-safe solutions
Begin by gathering acid-safe flushing agents—commercial rust removers labeled for plumbing, diluted muriatic acid alternatives, or citric-acid solutions—along with neutralizing agents, protective gear, and fittings to isolate the run.
Follow manufacturer dilution and contact-time instructions, introduce solution from upstream, allow dwell time, then flush thoroughly with copious water.
Neutralize residual acid, test pH, and inspect downstream for staining or damage before restoring normal flow.
Mechanical agitation with plumbing snakes and pipe brushes
Chemical flushing can loosen and dissolve much rust, but mechanical agitation is often required to remove scale and flakes from long or hard-to-reach runs.
Operators insert a flexible plumbing snake or rotating brush, advance slowly, and apply backward strokes to dislodge deposits. Use diameter-appropriate brushes, protective eyewear, and catch debris downstream.
Withdraw and flush repeatedly until water runs clear.
Enzyme and descaler treatments for iron buildup
When mechanical agitation cannot reach long or convoluted runs, enzyme-based cleaners and commercial descalers offer a practical alternative for breaking down iron oxide and associated organic deposits inside drain pipes.
Select products labeled for iron or mineral scale, follow dilution and contact-time instructions, flush thoroughly after treatment, and repeat as needed.
Monitor compatibility with pipe materials and avoid mixing chemicals.
When to use hydro-jetting and how it removes rust scale
How can hydro-jetting be applied to rust-clogged sections that are inaccessible to brushes and hand tools?
Hydro-jetting uses high-pressure water streams to scour rust scale and dislodge deposits along long runs and blind bends.
It is selected when mechanical access is impossible, chemical treatments are insufficient, and lines require rapid, complete removal of adherent iron buildup before restoration or lining procedures.
Risks and precautions for internal pipe treatments
Several precautions must be considered before initiating internal pipe treatments for rust in inaccessible or long-run drains.
Technicians should assess structural integrity, pressure limits, and material compatibility; isolate affected sections; and use appropriate PPE.
Chemical neutralization, mechanical cleaning, or hydro-jetting require containment to prevent contamination and downstream damage.
Emergency shutoff plans and post-treatment inspections verify effectiveness and detect leaks or residual corrosion.
Methods to Prevent Rust Reoccurrence in Drain Pipes
Preventing rust from returning requires attention to materials, water quality, and routine care.
Selecting corrosion-resistant pipes or fittings, treating water to reduce corrosivity (filtration, softening, pH adjustment), and keeping a simple maintenance schedule for drains and traps all reduce risk.
Habit changes such as drying exposed fittings and avoiding harsh corrosive chemicals further minimize future rust formation.
Choosing corrosion-resistant materials for repairs and replacements
Choosing corrosion-resistant materials is a primary step when repairing or replacing rusted drain pipes, because selecting the right metal or alternative can greatly extend service life and reduce maintenance.
Use stainless steel, copper, CPVC, or PEX where compatible; consider protective linings, epoxy coatings, and sacrificial anodes for metal sections.
Match material to fluid, temperature, pressure, and local code requirements.
Water treatment options to reduce corrosivity (filtration, softeners, pH adjustment)
A combination of water treatment techniques—mechanical filtration, ion-exchange softening, and pH adjustment—can considerably lower the corrosivity of water that flows through drain pipes and as a result reduce the likelihood of rust formation.
Filters remove abrasive particles; softeners replace calcium and magnesium with sodium or potassium, reducing scale-related corrosion; pH correction stabilizes water chemistry.
Properly sized systems minimize pipe degradation and extend service life.
Routine maintenance schedule for drains and traps
Following water-treatment measures to lower corrosivity, a regular maintenance schedule keeps drains and traps free from the residues and mechanical wear that encourage rust reformation.
- Inspect traps monthly for deposits and tight seals.
- Flush lines quarterly with noncorrosive cleaners or enzymatic solutions.
- Replace damaged seals and corroded sections promptly.
- Document maintenance, findings, and corrective actions to track recurring issues.
Simple habits to minimize rust formation (drying, avoiding corrosive chemicals)
Many simple habits greatly reduce rust risk in drain pipes by limiting moisture and chemical exposure.
Regularly drying visible fixtures, running hot water briefly after use, and ensuring adequate ventilation prevent standing moisture.
Avoid pouring bleach, strong acids, or salts down drains; use mild enzymatic cleaners instead.
Inspect seals and replace corroded fittings promptly.
Adopt these practices to minimize reoccurrence and extend pipe life.
Comparing Common Rust Removal Options
A concise comparison of common rust removal options highlights their effectiveness, safety, cost, and suitability for different pipe materials. The summary table below guides recommended choices for cast iron, galvanized steel, copper, and PVC. Readers can use this as a quick reference when selecting an appropriate method for a given pipe type.
| Option | Best use / notes |
|---|---|
| Mechanical (wire brush, sanding) | Effective on cast iron and steel; risk of surface damage on thin metals |
| Chemical rust removers (acid-based) | Fast but hazardous; suitable for cast iron and galvanized with caution |
| Chelating agents (oxalic acid, citric) | Safer for copper and painted surfaces; slower action |
| Electrolytic removal | Precise and clean for small metal parts; impractical for in-place pipes |
| Protective coatings / inhibitors | Best for long-term prevention across materials; not a removal method alone |
Effectiveness, safety, cost, and suitability by pipe material
Different rust-removal methods vary widely in effectiveness, safety, cost, and compatibility with pipe materials, so choosing the right approach requires matching the technique to the metal and the extent of corrosion.
Abrasive mechanical cleaning is effective but may damage thin metals. Chemical rust removers work fast yet need ventilation and rinsing.
Electrochemical methods are gentle but costly. DIY household acids are cheap but risk corrosion and fumes.
Recommended choices for cast iron, galvanized steel, copper, and PVC
Select the rust-removal method based on pipe material and corrosion severity to balance effectiveness, safety, and long-term durability.
For cast iron: mechanical scrubbing, wire brush, and rust converter plus protective coating.
Galvanized steel: gentle abrasion, phosphoric acid treatments, re-galvanize or replace if pitting.
Copper: mild acid rinses and polishing.
PVC: no rust—clean with detergents; replace metal fittings if corroded.
Signs Rust Damage Is Too Advanced and Requires Replacement
Visible structural failure such as persistent leaks, flaking metal, or collapsed sections signals rust has progressed beyond repair and may require pipe replacement.
Left unchecked, advanced corrosion raises contamination and health risks and can cause repeated water damage and costly secondary repairs.
When replacement is indicated, homeowners should weigh material choices—such as PVC, copper, or stainless steel—and expect variable costs depending on scope and access.
Structural and leak indicators in old pipes
Evaluating structural integrity and leak patterns is essential when determining whether rusted drain pipes can be salvaged or must be replaced.
Visible perforations, flaking metal, collapsed sections, and recurring pinhole leaks indicate irreversible weakening. Persistent joint separation, widening cracks, and bulging or soft spots under pressure show loss of load-bearing capacity.
When multiple indicators coexist, replacement is recommended over repair.
Health risks and long-term consequences of neglected corrosion
Neglect of corrosion in drain pipes carries mounting health and structural consequences that often outpace cosmetic concerns.
Advanced rust fosters bacterial biofilms, discoloration, metallic odors, and reduced water quality, risking gastrointestinal illness and allergic reactions.
Internally weakened pipes collapse or leak, promoting mold, rot, and structural decay.
Visible pitting, persistent contamination, and recurring clogs signal damage beyond repair, necessitating replacement.
Replacement options and estimated costs
When rust damage progresses beyond surface corrosion—manifesting as deep pitting, recurrent leaks, severe thinning, or widespread contamination—replacement rather than repair is typically required; homeowners and property managers should weigh options such as spot replacement of affected sections, full pipe relining, partial repiping of specific runs, or complete system repiping, each with differing material choices (PVC, copper, PEX, galvanized steel removal) and cost implications.
Estimates: spot $100–$600, relining $500–$3,000, partial repipe $800–$4,000, full repipe $3,000–$15,000 depending on labor, access, and local rates.
Troubleshooting and Common Mistakes to Avoid
The section outlines common troubleshooting steps and mistakes to prevent further damage when addressing rust in drain pipes.
It warns that mixing cleaning chemicals can create toxic reactions and emphasizes protecting pipe coatings and seals from harsh abrasives or acids.
Guidance is offered on recognizing when cleaning increases discoloration or causes leaks and when to stop and consult a professional.
Why mixing chemicals can be dangerous
How can combining common household cleaners turn a simple rust-removal task into a hazardous situation?
Mixing acids, bleaches, or ammonia can produce toxic gases (chlorine, chloramine) or violent reactions. Fumes can injure lungs, cause chemical burns, or corrode fixtures.
Always read labels, use one product at a time, ventilate, wear protection, and never assume compatibility between cleaners.
Avoiding damage to pipe coatings and seals
Protecting pipe coatings and seals requires choosing rust-removal methods that target corrosion without degrading protective layers or soft gaskets.
Use pH-neutral cleaners and nonabrasive tools; avoid wire brushes or harsh acids on coated sections.
Rinse thoroughly and inspect seals after treatment.
Test cleaners on a small area first and replace compromised gaskets promptly to maintain long-term integrity and prevent leaks.
What to do if cleaning worsens discoloration or leaks
If cleaning darkens stains or reveals leaks, stop further treatment immediately to prevent additional damage.
The individual should document the condition, dry the area, and avoid chemical mixing. Temporary containment (towels, drip pans) minimizes spread.
Contact a qualified plumber for inspection and repair; corrosion may indicate weakened pipe walls or failing seals.
Preserve removed fittings for assessment and warranty claims.
Checklist: Safe DIY Rust Removal Workflow
A concise checklist guides safe DIY rust removal from drain pipes, starting with a pre-cleaning inspection and ending with post-cleaning follow-up.
Key items include personal protective equipment, stepwise treatment actions, and verification of repairs.
A suggested numeric checklist for reference:
- Inspect for leaks, structural damage, and access points.
- Don PPE, isolate the area, and follow step-by-step rust treatment.
- Rinse, neutralize residues, and verify corrosion removal.
- Schedule periodic inspections and apply protective coating as needed.
Pre-cleaning inspection checklist
Before any cleaning begins, the inspector should verify key safety and condition factors to guarantee the rust-removal task can proceed without unexpected hazards.
Confirm water supply shutoff, electrical isolation for nearby fixtures, adequate ventilation, and stable access.
Inspect pipe material, extent of rust, visible leaks, and nearby corrosion-sensitive components.
Note required personal protective equipment and confirm emergency shutoff locations.
Step-by-step safety and treatment checklist
Begin by establishing a controlled workspace and confirming that all pre-cleaning inspection items have been addressed. This checklist guides the user through safety checks, personal protective equipment, containment measures, and sequential treatment steps to remove rust from drain pipes without causing damage or injury.
Verify ventilation, don gloves, eye protection, and mask. Isolate water and power. Contain runoff.
Mechanically remove loose rust, apply appropriate rust remover, rinse, neutralize, and dry before reassembly.
Post-cleaning inspection and follow-up maintenance
Once the visible rust and chemical residues have been removed, the technician should perform a systematic post-cleaning inspection to confirm pipe integrity, proper sealing, and absence of contaminants.
This includes checking joints and fittings for leaks, verifying that protective coatings or inhibitors were applied correctly, and ensuring ventilation and drainage are functioning.
Document findings, tighten or replace faulty components, schedule periodic inspections, and note recommended corrosion-prevention intervals.
Resources and When to Hire a Professional
When rust persists or structural damage is suspected, homeowners should prepare a list of questions for prospective plumbers about experience, warranties, and cost breakdowns.
They should verify licenses and certifications and ask whether services like hydro-jetting or pipe relining are recommended.
Expected timelines for inspection and remediation—typically same-day to several days depending on scope—should be confirmed before hiring.
Questions to ask a plumber before hiring
How much should a homeowner know before calling a plumber? A concise checklist helps: describe symptoms, recent work, pipe material, and any attempted fixes.
Ask about estimates, warranty, timeline, disposal of removed sections, and liability insurance.
Request references and written scope.
Confirm access needs and cleanup responsibility.
Clarify emergency fees and payment terms before hiring.
Certifications and services to look for (hydro-jetting, relining)
Several specific certifications and services indicate a plumbing provider is equipped to handle rusted drain pipes safely and effectively.
Look for licensed plumbers with OSHA and state plumbing board credentials, NASSCO certification for pipe assessment, and factory training in hydro-jetting and trenchless relining.
Providers should offer CCTV inspections, written estimates, safety protocols, and insurance coverage for property and environmental protection.
Estimated timelines for professional remediation
A typical professional remediation for rusted drain pipes ranges from a single afternoon for localized repairs to several days for extensive replacement or trenchless relining, depending on pipe length, access difficulty, and severity of corrosion.
Inspecting, quoting, and scheduling may add days; emergency calls accelerate response.
Post-work testing and cleanup usually finish within a day, while permits or complex routing extend timelines.
Conclusion
Even minor rust inside drain pipes need not signal disaster: with basic safety, the right tools and patient, targeted steps, many homeowners can restore flow and stall further corrosion. If someone fears complex plumbing, imagine a cloudy glass becoming clear again as rust flakes and stains flush away—small, manageable actions yield visible progress. However, when pipes leak, crumble, or odor persists, replace them promptly; professional help then prevents bigger damage.
