How to Defrost a Tankless Water Heater Quickly and Safely: Step-by-Step Guide
To quickly and safely defrost a tankless water heater, start by identifying signs of freezing, such as low or no hot water, frost on pipes, unusual noises, or error codes. Here’s a step-by-step guide:
- Isolate Utilities: Turn off power, gas, and water supply.
- Wear Protective Gear: Use gloves and goggles for safety.
- Open Service Ports: Access the necessary components for thawing.
- Apply Controlled Heat: Use a heat gun or hairdryer on exposed pipes and the heat-exchanger housing to gently thaw them.
- Thaw Valves: Ensure all valves are thawed and operational.
- Drain and Flush: Connect hoses to drain any remaining water and flush the lines to remove debris.
- Restore Utilities: Turn on power, gas, and water supply gradually.
- Test for Leaks: Check all connections while slowly restoring hot water.
Finally, follow insulation and maintenance steps to prevent future freezing. This comprehensive approach will ensure your tankless water heater is back to normal operation.
What a frozen tankless water heater looks like and why it freezes
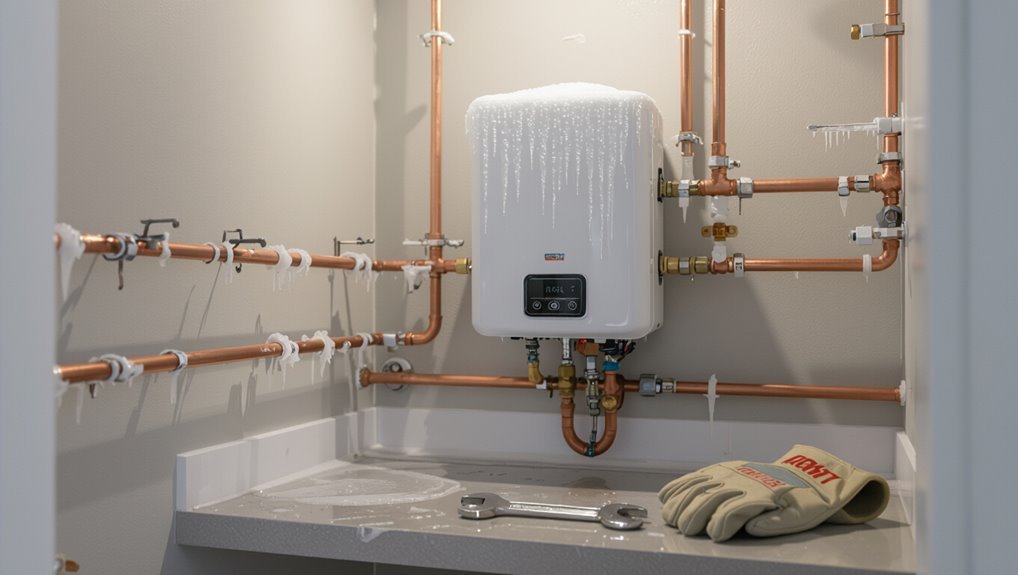
A frozen tankless unit often displays reduced or no hot water flow, erratic temperature output, and visible frost or ice on external pipes and the housing.
Ice expansion can crack heat exchangers, rupture fittings, and damage electronic controls, leading to costly repairs.
Units exposed to subfreezing temperatures, poorly insulated or improperly installed piping, and outdoor or unheated locations are at highest risk of freezing.
Common signs that your tankless unit is frozen
Detecting a frozen tankless water heater often starts with sudden performance changes: reduced or no hot water flow, intermittent heating cycles, or unusual noises from the unit as ice restricts water pathways and strains internal components.
Additional signs include visible frost on pipes, error codes or warning lights, pressure drops, and unusually cold outlet temperature.
Owners seeking how to defrost a tankless water heater should act promptly.
How freezing damages internal components
Freezing compromises a tankless water heater by expanding ice within narrow passages and around delicate components, cracking heat exchangers, rupturing valves, and distorting sensors and flow meters.
Ice blocks inlet and outlet lines, separates seals, and deforms plastic housings.
Mineral-laden ice scours heat-exchange surfaces, reducing efficiency.
Electrical connectors and control boards may suffer moisture ingress and intermittent failures when thawed.
Environmental and installation factors that increase freeze risk
Several environmental and installation factors raise the likelihood of a tankless water heater freezing by exposing its plumbing and components to prolonged low temperatures or preventing heat dissipation.
Uninsulated pipes, exterior or poorly ventilated mounting, north-facing exposure, attic or crawlspace locations, and inadequate clearance from cold drafts create cold pockets.
Low ambient temperatures combined with intermittent use and absent freeze protection amplify freeze risk.
Immediate safety precautions before attempting to defrost
Before any defrosting is attempted, the heater must be isolated by cutting power, shutting the gas supply, and closing water valves in that specific order to minimize hazards.
The operator should wear insulated gloves and eye protection and clear the workspace of combustibles and trip risks.
If power or gas isolation is unclear, corrosion or visible damage exists, or the homeowner is uncomfortable with the steps, a qualified technician should be contacted instead.
Turn-off and isolation steps (power, gas, water) with sequence
Shut off all energy sources and isolate plumbing before attempting any defrosting to prevent electrical shock, gas leaks, or water damage.
First, switch off electrical power at the breaker and confirm with a tester.
Next, close the gas supply valve and verify no odor or pressure.
Finally, shut cold and hot water isolation valves; drain residual water via service ports before proceeding.
Protective gear and safe workspace setup
A clear, well-lit workspace and appropriate personal protective equipment (PPE) are essential to reduce risks when defrosting a tankless water heater.
Wear insulated gloves, safety goggles, and non-slip footwear.
Guarantee adequate ventilation and clear obstructions to allow fast access and egress.
Place absorbent pads or a drip tray to manage water, and keep a flashlight and first-aid kit nearby for immediate response.
When to call a professional instead of DIY
With protective gear and a clear workspace in place, the decision to call a professional hinges on immediate safety considerations and the heater’s condition.
Call a licensed technician if gas leaks, electrical faults, persistent freezing, visible damage, or inability to access valves occur.
Also consult professionals when unsure about internal diagnostics, lack of proper tools, or local code requirements to prevent hazards and voided warranties.
Quick-response defrosting methods (fastest and safest)
The section outlines fast, safe options for thawing a tankless water heater, including controlled warm water application and cautious use of a hair dryer or heat gun.
It also covers portable space heater placement with proper ventilation, the use of trace heating tape or a lamp for gradual thawing, and steps to verify internal thawing.
Finally, it explains how to restore operation once components are confirmed thawed.
Method 1 Controlled warm water application
Begin by applying a steady stream of warm (not hot) water to the exposed piping and heat exchanger access points, directing flow long enough to raise metal temperatures and melt ice without shocking components.
Continuously monitor fittings for leaks, avoid pressurizing insulated joints, and collect runoff.
Proceed until ice clears, then inspect for damage, restore normal operation gradually, and confirm proper flow and temperature stability.
Method 2 Using a hair dryer or heat gun safely
If controlled warm-water application is slow or impractical, a targeted external heat source can speed thawing safely.
Operators should keep a hair dryer or heat gun moving, maintain at least 6–8 inches distance, avoid direct contact with seals or wiring, and use low-to-medium settings.
Power must remain dry; glove protection and a fire extinguisher nearby are recommended.
Monitor progress continuously.
Method 3 Portable space heater placement and ventilation
Several portable electric space heaters can deliver rapid, controlled warmth for thawing a frozen tankless water heater when used with proper placement and ventilation.
Position heaters 3–6 feet away, directing heat toward frozen piping and unit exterior while avoiding direct contact.
Ascertain room ventilation to prevent overheating, monitor temperature, keep combustible materials clear, and never leave heaters unattended during defrosting to maintain safety.
Method 4 Trace heating tape and lamp for gradual thawing
Apply self-regulating trace heating tape along frozen pipes and wrap a low-wattage work lamp near the unit to provide steady, controlled warmth that melts ice without thermal shock.
Secure tape per manufacturer, insulate with foam or tape, and position the lamp to avoid direct contact or overheating.
Monitor temperatures and electrical connections; guarantee GFCI protection and never leave the setup unattended until thawing is complete.
How to check for internal thawing and restore operation
Confirm internal thawing before restoring power to avoid damage or safety hazards.
Inspect inlet and outlet fittings, heat exchanger exterior, and condensate drain for liquid flow.
Gently feel pipes for consistent warmth; use a moisture meter or infrared thermometer if available.
Once all components show thawed temperatures and no leaks, restore power and monitor startup for normal combustion, flow, and error codes.
Step-by-step full defrosting procedure for owners (detailed workflow)
The following procedure outlines a complete, ordered workflow for owners to defrost a tankless water heater, covering preparation, shutdown, thawing, flushing, and restart.
It specifies required tools and materials, the correct isolation and drain sequence, and targeted thawing steps for inlet/outlet pipes, the heat exchanger, and valves.
Final steps include flushing and air purging, then controlled restart with flow, temperature, and leak verification.
Preparation: tools, materials, and checklist
One clear checklist helps guarantee a safe, efficient defrost: necessary tools, replacement parts, protective gear, and pre-shutdown steps are gathered and verified before any work begins.
Required items include adjustable wrench, screwdrivers, hose, bucket, pipe insulation, spare valves, approved antifreeze, gloves, eye protection, and a flashlight.
Confirm manuals, warranty limits, and emergency contacts before proceeding.
Shut-down, isolation, and drain sequence
With tools and safety gear staged, attention shifts to powering down and isolating the unit to prevent damage or injury.
The technician turns off power and gas, closes inlet and outlet valves, opens pressure-relief and service ports, and connects garden hoses to drain lines.
Slowly open drains to purge water, monitor flow for debris, then cap ports and verify isolation before proceeding to thawing.
Thawing sequence by component (inlet/outlet pipes, heat exchanger, valves)
Several clear steps guide the thawing sequence by component, starting with external inlet and outlet pipes, moving to the heat exchanger, and finishing with valves and fittings.
Begin warming exposed pipes with safe heat sources, then apply gentle heat to the exchanger housing while monitoring temperature.
Progress to thawing isolation and pressure relief valves, exercising them gently to restore mobility, and inspect seals for damage.
Flushing and purging air after thaw
Begin by preparing the system for flushing: shut off power and gas, close the cold-water inlet and hot-water outlet isolation valves, and attach a garden hose to the unit’s drain or service port and another to a bucket or drain for the pump return if using a pump loop.
Open low-point drains, run a flushing pump or use mains pressure to circulate water, expel air until clear flow without sputtering, then close drains and remove hoses.
Safe restart and verification tests (flow, temperature, leak checks)
Restore power and gas only after verifying the heater and plumbing are fully drained, rehosed, and all service valves are securely returned to their normal positions.
Then run a low-flow test, gradually increasing to normal demand while monitoring inlet/outlet temperatures and pressure.
Inspect all fittings for leaks, check combustion and venting for proper operation, and confirm consistent hot-water delivery under typical load.
Troubleshooting during and after thawing
After thawing, the technician should follow a clear checklist to diagnose no-hot-water conditions, starting with power and gas supply, error codes, and flow sensors.
Any unusual noises, visible leaks, or reduced output warrant immediate inspection of the heat exchanger, inlet/outlet piping, and internal valves.
If components show cracking, severe corrosion, or persistent failure despite repairs, freezing may have caused irreversible damage and replacement should be considered.
No hot water after thaw diagnostic steps
Check basic system indicators first: confirm power is on, the gas or fuel supply is open, and the unit’s error codes or status lights are noted.
Verify inlet and outlet valves are open, restore water supply, and purge trapped air by opening taps.
Inspect external reset or circuit breakers, confirm flow sensor activation, and consult the manual for specific error code remedies before contacting a qualified technician.
Suspicious noises, leaks, or reduced performance what to inspect
Listen for irregular sounds, watch for drips, and note any drop in output as indicators that additional inspection is needed during and after thawing.
Check inlet/outlet connections, pressure relief valve, condensate lines, and visible fittings for leaks.
Monitor burner operation, pilot or ignition sequences, and error codes.
Reduced flow may indicate blockage or damaged heat exchanger requiring professional assessment.
When freezing has caused permanent damage
Assessment begins with clear signs: cracked heat exchangers, split pipe fittings, bulging tanks or visible metal fractures indicate freezing has inflicted structural damage that likely cannot be repaired in the field.
Technicians should document damage, isolate the unit, shut off utilities, and recommend replacement. Salvageable components may be recovered, but warranty, safety, and cost considerations typically favor full replacement over patch repairs.
Preventive measures to avoid future freezing
Preventive steps reduce the risk of repeat freezing and prolong tankless heater life.
Recommendations include insulating exposed pipes, selecting proper placement and clearance for outdoor units, and adding freeze-protection accessories such as heat tape, insulation blankets, or trace heaters.
When replacing or buying, consider models with built-in automatic freeze protection and controls to minimize future risk.
Proper insulation and pipe protection strategies
A thorough insulation and pipe-protection strategy greatly reduces the risk of future freezing for tankless water heater systems.
It focuses on sealing gaps, insulating exposed piping, and adding heat sources where needed. Regular inspection guarantees integrity and early repair.
- Use closed-cell foam or foam pipe sleeves sized to fit.
- Apply weatherproof sealant at entry points.
- Install low-wattage heat tape with thermostat control.
Recommended placement and clearance for external units
When positioning an external tankless unit, prioritize locations that minimize exposure to wind-driven cold, standing water, and direct drafts from vents or gaps.
Siting the unit on a sheltered wall facing south or within a recessed alcove reduces freeze risk while maintaining service access.
Maintain clearances per manufacturer: keep adequate airflow, avoid obstructing intake/exhaust, provide three-sided access for service, and elevate unit above potential water pooling.
Installing freeze protection accessories (heat tape, insulation blankets, trace heaters)
Placement choices reduce exposure to freezing conditions, but additional freeze-protection accessories provide active defense where siting alone is insufficient.
Install approved self-regulating heat tape on exposed inlet/outlet pipes, secure with manufacturer recommendations, and cover with weatherproof insulation blankets.
For long runs, consider electric trace heating with thermostat control.
Confirm all installations follow local codes, use GFCI protection, and verify clearances for safe operation.
Automatic freeze protection features to consider when buying
Several key automatic freeze-protection features merit consideration before purchasing a tankless water heater: built-in freeze sensors that initiate internal heating elements, automatic recirculation or periodic drain cycles to prevent stagnant cold water, integrated pipe and inlet/outlet heating, and programmable thermostats with low-temperature cutoffs.
Buyers should prioritize verified sensor reliability, energy-efficient heaters, configurable recirculation schedules, and accessible diagnostics to guarantee winter resilience and minimal maintenance.
Maintenance routine and seasonal checklist
A concise maintenance routine and seasonal checklist helps guarantee reliable operation and reduces freeze risk.
It should include a winter-prep checklist, routine tasks with recommended inspection frequencies, and clear guidance on when to call a professional.
Proper scheduling of homeowner checks and annual or biennial professional service preserves performance and warranty coverage.
Winter prep checklist for tankless water heaters
Cold weather demands specific care for tankless water heaters to prevent freeze damage and maintain efficiency. A concise winter prep checklist helps minimize risk and downtime.
- Insulate exposed pipes and valves; secure external unit covers.
- Drain or bypass unused outdoor lines; verify heat tape operation.
- Confirm power source stability and set safe low-temperature settings; keep access clear for emergency thawing.
Regular maintenance tasks and inspection frequency
After winterization steps are completed, routine maintenance and scheduled inspections keep a tankless water heater operating reliably and efficiently year-round.
Monthly checks: inspect vents, condensate lines, and visible piping for leaks or ice.
Every 6–12 months: flush scale, clean inlet filter, and test pressure relief and shutdown functions.
Document findings and address minor issues promptly to prevent freeze-related damage.
When to schedule professional servicing
Schedule professional servicing at least once annually, with additional visits timed around seasonal changes and any signs of reduced performance.
A technician should inspect heat exchangers, sensors, and condensate lines before winter and after extreme cold.
Arrange prompt service when fluctuations, error codes, odd noises, or lower flow occur.
Keep service records and follow manufacturer-recommended intervals to preserve efficiency and warranty.
Cost, time, and tool comparison of defrosting options
A brief comparison of defrosting approaches highlights estimated costs, time requirements, and necessary tools to help choose between DIY and professional thawing. The table below summarizes typical expenses, duration, and key pros and cons for each method to clarify trade-offs. Readers can use this compact overview to select the safest and most cost-effective option for their situation.
| Method | Estimated Cost | Typical Time / Pros & Cons |
|---|---|---|
| DIY heat lamp / hair dryer | Low ($0–$50) | Short (1–3 hrs); cheap but risk of uneven thawing or damage if done improperly |
| Hot water flush / hose | Low–Moderate ($10–$100) | Moderate (1–4 hrs); effective but requires access and care to avoid scalding or pressure issues |
| Professional service | Moderate–High ($100–$400+) | Fast (1–2 hrs onsite); safer, guarantees work but costs more and may require appointment |
Estimated costs and time for DIY vs professional thawing
Several basic factors determine whether DIY thawing or hiring a pro is faster and cheaper: freeze severity, accessibility of frozen piping, required tools, and local labor rates.
DIY typically costs $20–$200 (heat lamps, heat tape, hoses) and takes 1–6 hours.
Professional service ranges $150–$600+, often 1–3 hours plus travel, diagnostics, and warranty-backed repairs.
Pros and cons summary of each defrosting method
Compare common defrosting methods—warm water, heat guns, heat tape, portable heaters, and professional thawing—by weighing cost, time, required tools, effectiveness, and risk.
Warm water: low cost, quick, minimal tools, moderate risk to electronics.
Heat guns: fast, moderate cost, skill required, burn risk.
Heat tape: affordable, slow, permanent solution, lower risk.
Portable heaters: versatile, moderate speed, electrical risk.
Professional: expensive, fastest, safest warranty.
Real-world scenarios and quick-response plans
The guide presents three common situations and the fastest safe responses for each: an outdoor unit frozen in a cold snap, an indoor unit with a frozen supply line, and repeated freezing that requires long-term fixes.
For the outdoor case, it outlines immediate warming and isolation steps to restore flow safely.
For indoor or recurrent incidents, it lists emergency measures and remediation options to prevent recurrence.
Scenario A: Outdoor unit frozen during cold snap fastest safe action plan
Act quickly to restore function while prioritizing safety and minimizing damage: shut off the gas or electrical supply, close the incoming water valve, and open a nearby hot water tap to relieve pressure.
Inspect exterior lines and insulation, apply gentle heat with a hair dryer or heat tape, clear ice from vents, monitor for leaks, and restart slowly.
Call a professional if damage or persistent freezing occurs.
Scenario B: Indoor unit with frozen supply line emergency steps
Where outdoor units may freeze from exposure, indoor units present a different set of immediate hazards when the incoming supply line freezes: trapped pressure can rupture fittings, internal sensors may be damaged by ice, and standing water can flood mechanical compartments as it thaws.
Shut main water, power off unit, relieve pressure via isolation valves, apply gentle heat to the frozen section, monitor for leaks, then slowly restore service.
Scenario C: Repeated freezing long-term remediation plan
Many households facing repeated freezes require a structured remediation plan that blends immediate countermeasures with durable upgrades.
The plan prioritizes insulation, heat tape with thermostat control, relocating exposed lines, and adding setback-safe space heaters.
Schedule annual inspections, upgrade to frost-resistant piping, and install a freeze alarm.
Establish emergency shutoff procedures and a contractor relationship for rapid winter response.
Safety warnings and legal considerations
Improper thawing can create electrical shock, gas leak, or scalding hazards that require immediate attention.
DIY thawing may void manufacturer warranties and conflict with local electrical or plumbing codes.
Gas-fired units often trigger regulatory inspection or licensed-servicer requirements before they can be returned to service.
Risks of improper thawing (electrical, gas, scalding)
Negligence during thawing can create multiple hazards: electrical shock or short circuits from water contacting wiring, gas leaks and fire risks when frozen burners or lines are forced to operate, and scalding from sudden, unregulated hot-water surges.
Improper methods can damage sensors, valves, and insulation, increasing leak or ignition probability.
Professional assessment is advised if any wiring, gas fittings, or controls show compromise.
Warranty and code implications of DIY repairs
Following the safety concerns about electrical, gas, and scalding hazards, attention must turn to how DIY thawing can affect warranties and legal compliance.
DIY interventions may void manufacturer warranties, leaving owners responsible for repairs. Local building codes and insurance policies can also restrict amateur work.
When in doubt, consult warranty terms and a licensed technician to preserve coverage and guarantee repairs meet applicable standards.
Regulatory or inspection requirements for gas-fired units
Because gas-fired tankless water heaters involve fuel lines, burners, and venting that can affect public safety, many jurisdictions require specific inspections, permits, or certified technicians for installation, repairs, and substantial service work.
Owners should verify local codes, obtain required permits, and hire licensed gas fitters for defrosting-related interventions.
Documentation and inspection reports may be legally required and preserve warranty validity.
Conclusion
Like a frost-locked heartbeat finally stirred, the thawed tankless water heater returns life to a cold home—its pipes sighing as ice relinquishes grip. Owners, armed with knowledge and caution, become guardians against repeat freezes, weaving routines that keep warmth flowing. Quick, safe responses and steady maintenance transform a fragile emergency into manageable care. With vigilance and simple tools, the risk shrinks, and comfort, once paused, flows on quietly renewed.