How to Remove an RV Toilet Flange: Step-by-Step Guide for DIY Repairs
To remove an RV toilet flange, start by shutting off the water supply and emptying the tanks. Document the existing setup for reference. Next, lift the toilet straight up, disconnect the supply line, and unfasten the mounting bolts while removing the old gasket. Score any adhesive, apply penetrating lubricant to corroded bolts, and remove screws or drill out rivets as needed. Carefully pry or cut the bonded flange, inspect and repair the subfloor, then test-fit the new flange. Finally, follow the reinstall steps for a complete guide.
What an RV Toilet Flange Is and Why You Might Need to Remove It
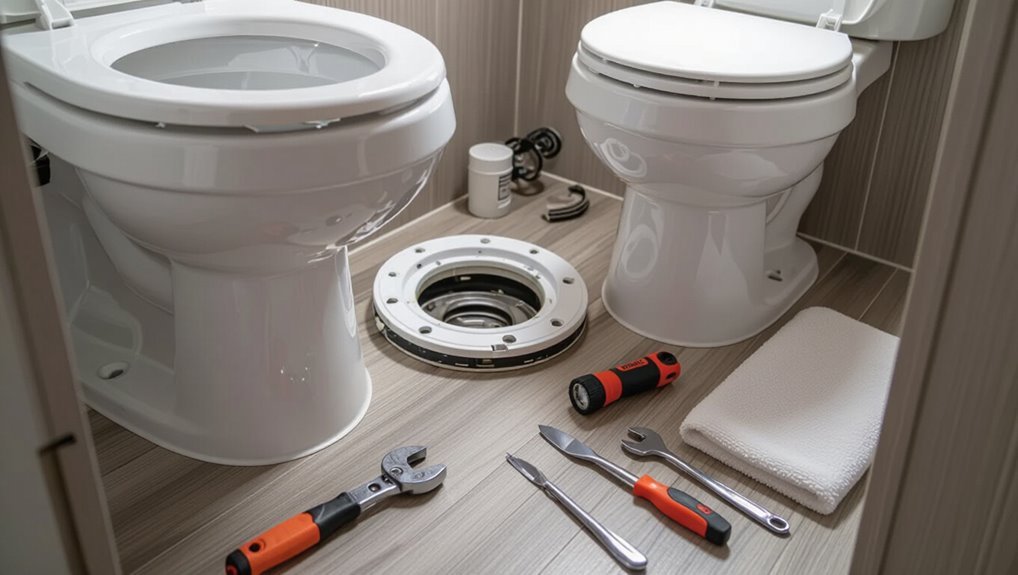
An RV toilet flange is the fitting that secures the toilet to the floor and connects it to the waste outlet.
It typically consists of a base, gasket or seal, and mounting hardware.
Removal is commonly required to replace a worn gasket, repair or replace a cracked or corroded flange, fix leaks, or upgrade to a different flange type.
Understanding these components and reasons helps clarify which removal steps and replacement parts will be needed.
Purpose and components of an RV toilet flange
A toilet flange in an RV is the mounting interface that secures the toilet to the floor and provides a sealed passage to the waste outlet.
It consists of a flange ring, a gasket or wax ring, mounting bolts or screws, and often a clamping mechanism or adapter to match the RV’s pipe size.
Its purpose is rigid mounting, sealing, and alignment; components enable inspection, repair, and how to remove RV toilet flange procedures.
Common reasons for removal (repair, replacement, leaks, upgrades)
With the flange’s role and parts understood, owners often remove it for a handful of practical reasons: repairing corroded or broken mounting hardware, replacing a degraded gasket or wax seal that causes leaks, upgrading to a better-fitting adapter for a different toilet model, or reconfiguring the waste outlet when installing new flooring or modifying the plumbing layout.
Additional causes include odor issues, flange cracks, or alignment corrections.
Tools and Materials Required
The section lists the basic hand tools needed—wrenches, screwdrivers, a pry bar and a utility knife—to remove the old flange.
It also identifies replacement parts and materials such as new flange options, gaskets, sealant and mounting bolts.
Safety items and prep supplies like gloves, eye protection, towels and a bucket are recommended for a clean, secure job.
Essential tools (wrenches, screwdrivers, pry bar, utility knife)
Gather the right tools before beginning to remove an RV toilet flange to guarantee the job proceeds safely and efficiently.
A set of adjustable and box wrenches fits various bolt sizes. Phillips and flathead screwdrivers remove screws and trim. A pry bar gently lifts the flange and seal. A sharp utility knife slices old sealant and caulk for clean removal.
Replacement parts and materials (new flange types, gaskets, sealant, bolts)
Several specific replacement parts and materials are essential when removing and replacing an RV toilet flange: a compatible new flange (plastic, bronze, or stainless steel depending on trailer floor type and waste connection), a matching rubber gasket or wax ring designed for RV toilets, corrosion-resistant bolts and washers, and a marine-grade sealant or plumbers’ putty to guarantee a watertight connection.
Additionally, replacement flange adapters, backing plates, and stainless fasteners.
Safety equipment and preparation materials (gloves, eye protection, towels, bucket)
Personal protective equipment and basic containment supplies protect both the technician and the RV interior during flange removal.
Wear nitrile or heavy-duty gloves and safety glasses. Use absorbent towels and disposable rags for spills.
Place a bucket beneath the flange to catch residual water and debris. A small hand broom and dustpan ease cleanup.
Keep a trash bag and disinfectant nearby for final sanitation.
Pre-Removal Preparations
Before beginning work, the operator should shut off the RV water supply, empty and secure the black and gray tanks, and isolate any electrical circuits that serve nearby components.
Attention should be paid to ventilation and airflow while cleaning and sanitizing the area to reduce odors and contamination.
Photographs and brief notes of the toilet flange, hose routing, and fastener locations should be recorded to guarantee accurate reassembly.
How to shut off water and empty holding tanks
Shut off the RV’s freshwater supply at the main valve and confirm the pump is disabled to prevent accidental flow during work.
Drain residual water from lines by opening nearest faucets.
Empty black and gray tanks at a designated dump station, flush tanks using built-in rinse or external hose.
Close tank valves, secure caps, and verify no leaks before removing the toilet.
Disconnecting power and ventilation considerations
Isolate electrical power to the toilet area by switching off the RV’s relevant breaker and, if present, unplugging any dedicated 12V or 120V fixtures to prevent accidental activation during removal.
Disconnect battery feeds if the toilet has a direct connection.
Note ventilation: turn off fans, seal roof vent openings temporarily to avoid debris entry, and guarantee any powered vent controls remain isolated until reassembly.
Cleaning and sanitizing the area before starting
Begin by clearing the immediate work area of loose items and storing personal effects elsewhere to prevent contamination.
Wear gloves, eye protection, and a mask.
Remove surface debris with a disposable cloth, then apply an appropriate RV-safe disinfectant to seals and surrounding flooring.
Allow recommended dwell time, scrub stubborn residue, and dry the area thoroughly before proceeding to flange removal.
How to document the setup for reassembly (photos, notes)
Why document the current setup? Photograph the toilet, flange, bolt positions, seal orientation, and hose connections from multiple angles.
Label photos with numbers and brief notes. Sketch a simple diagram marking part locations and hardware sizes.
Record any damaged components and measurements. Store images and notes together for reference during reassembly to guarantee correct alignment and proper sealing.
Step-by-Step Removal Process
The removal proceeds in clear, ordered actions to safely separate the toilet assembly from the RV’s subfloor.
Key tasks include bowl removal, disconnecting water and fasteners, clearing old gasket material, and detaching the flange hardware.
Typical tools and steps are summarized below for quick reference:
- Remove the toilet bowl from the flange
- Detach water supply line and mounting bolts
- Inspect and remove old gasket or sealant
- Unfasten flange from the subfloor and cut away damaged pieces if necessary
Step 1 Remove the toilet bowl from the flange
Disconnect power and water, then drain the bowl to prevent spills or damage during removal.
The technician loosens any skirt clips or retaining ring, then lifts the toilet straight up to clear the flange, avoiding twisting that could harm seals.
Support the bowl’s weight, slide it away, and set it on a protected surface.
Inspect the flange area for debris and sealant.
Step 2 Detach water supply line and mounting bolts
Proceed to isolate the water supply and fasteners before attempting flange removal.
Turn off the RV’s water valve, flush residual water from the tank, and place a towel under the connection.
Use an adjustable wrench to loosen the supply nut, then remove mounting bolts securing the toilet base.
Keep hardware organized and note bolt locations for reinstallation.
Confirm no remaining pressure.
Step 3 Inspect and remove old gasket or sealant
Begin by visually inspecting the flange area for remnants of the old gasket or sealant, noting material type (rubber, wax, or caulk) and the extent of adhesion.
Use a plastic scraper, putty knife, and solvent appropriate to the material to loosen residue.
Remove debris, vacuum or wipe the surface, and confirm a clean, dry flange perimeter ready for the next removal step.
Step 4 Unfasten flange from the subfloor (screws, rivets, or adhesive)
Lift the flange edge slightly to locate fastening points and determine whether screws, rivets, or adhesive are securing it to the subfloor.
If screws are present, remove them with the appropriate screwdriver or bit.
For rivets, drill centers out cautiously.
When adhesive bonds the flange, score around the perimeter and pry gently, applying penetrating solvent as needed to soften the glue before levering the flange free.
Step 5 Cut and remove damaged flange pieces if necessary
If the flange does not come free after removing fasteners or shows visible breaks, damaged sections should be cut away to allow a clean removal and access to the seal area.
Use a reciprocating saw or oscillating tool with a metal/plastic blade, cutting small segments to avoid subfloor damage.
Remove shards, scrape remaining adhesive, and vacuum debris before proceeding to the next step.
Step 6 Clean the subfloor and inspect for damage
Clear the work area and examine the exposed subfloor closely for rot, soft spots, cracks, or adhesive residue that could prevent a proper new seal.
Remove debris, old wax or sealant, and loose fasteners. Use a screwdriver or probe to test solidity.
Note and mark damaged areas needing repair or replacement, photograph for reference, and guarantee the surface is dry and clean before proceeding.
Step 7 Prepare flange area for new installation
Prepare the flange area by ensuring a flat, clean, and structurally sound surface for the new installation.
Remove debris, old sealant, and loose fasteners; sand or plane high spots and fill low areas with epoxy or marine-grade filler.
Verify subfloor rigidity, cure repairs fully, and dry the area.
Mark flange alignment, test-fit the new flange, and confirm bolt locations before final installation.
How to Handle Common Removal Challenges
Common removal problems often require specific techniques and tools to avoid further damage. Corroded bolts, glued or epoxy-bonded flanges, tight quarters in compact bathrooms, and compromised subflooring each present distinct challenges that will be addressed with practical solutions.
The following guidance outlines safe extraction methods, temporary fixes, and when to replace or reinforce underlying structures.
Dealing with corroded or seized bolts
Tackle seized or corroded bolts methodically: assess rust extent, apply penetrating lubricant, and let it soak before attempting loosening.
Use proper socket or box wrench to avoid rounding heads. Tap bolts gently with a hammer to break corrosion.
If still stuck, apply heat carefully or use an impact driver.
Replace damaged bolts and treat flange area with rust inhibitor before reassembly.
Removing glued or epoxy-bonded flanges
Removing a glued or epoxy-bonded RV toilet flange requires patience and the right combination of mechanical and chemical tactics to avoid damaging the floor or waste lines.
Begin by scoring the adhesive with a utility knife, apply a compatible solvent or epoxy remover per directions, and allow dwell time.
Use a pry bar with protective blocks and heat to soften adhesive; work slowly to lift the flange without cracking substrate.
Working around limited space in small RV bathrooms
Although cramped quarters complicate access and tool maneuvering, careful planning and the right compact tools let a technician remove an RV toilet flange without damaging surrounding finishes.
The technician measures clearances, removes obstructing fittings, uses stubby ratchets, flexible sockets, and mini pry bars, protects surfaces with cloth, and works in stages.
Patience and proper lighting prevent mistakes and guarantee controlled flange extraction.
What to do if the subfloor is rotted or compromised
When inspection reveals soft, crumbling subfloor beneath the RV toilet flange, the technician should stop and assess the extent of rot before proceeding.
Remove affected flooring, expose joists, and evaluate structural integrity. Replace with marine-grade plywood or composite, ensuring sealing and proper fastening.
If damage extends to framing, consult a professional.
Reinstall flange on a solid, level substrate with appropriate sealant and hardware.
Inspecting and Repairing the Subfloor
After the flange is removed, the subfloor should be examined for rot, soft spots, water stains, and structural weakness to determine the extent of damage.
The guide will distinguish quick temporary patches from permanent repairs and explain when a full section replacement is required.
Recommended materials and methods for reinforcing or replacing affected subfloor sections will be outlined, including plywood choices, fasteners, sealants, and best-practice fastening patterns.
How to assess subfloor condition after flange removal
Begin by clearing all debris and drying the area to reveal the true condition of the subfloor beneath the removed flange.
Examine for rot, soft spots, delamination, and fastener corrosion. Probe with a screwdriver, measure moisture with a meter, and inspect adjacent plywood layers and framing.
Document damage extent, note load-bearing concerns, and photograph areas for repair planning or professional consultation.
Temporary vs permanent subfloor repairs
Differentiate temporary from permanent subfloor repairs by matching the fix to the extent of damage and the expected lifespan of the RV.
Temporary repairs patch rot, stabilize weak areas, and buy time using short-term materials when replacement isn’t immediate.
Permanent repairs replace compromised sections, restore structural integrity, and use durable methods suited for long-term occupancy and resale value.
Choose accordingly.
Materials and methods for reinforcing or replacing subfloor sections
A range of materials and methods is available for reinforcing or replacing RV subfloor sections, chosen according to the extent of rot, underlying framing condition, and planned service life.
Common options include marine-grade plywood patches, exterior-grade OSB, composite plank, and fiberglass-bonded panels.
Methods: remove compromised material, sister or replace joists, fit sealed patches with waterproof adhesive and mechanical fasteners, then resin or seal joints.
Choosing and Installing a Replacement Flange
The next step covers selecting an appropriate replacement flange, including common materials like plastic and stainless steel and universal options.
It also explains how to confirm flange size and bolt pattern to match the toilet.
Then, it provides a clear, step-by-step procedure for installing and sealing the flange.
Finally, it outlines reinstalling the toilet and reconnecting the plumbing to guarantee a watertight, secure fit.
Types of RV toilet flanges and materials (plastic, stainless, universal)
Flange selection hinges on material, fit, and vehicle use: plastic flanges are lightweight and corrosion-resistant but less durable under heavy torque; stainless steel offers superior strength and longevity at higher cost.
Universal or adjustable flanges aim to bridge varying pipe sizes and mounting patterns for easier replacement. Choice balances budget, expected load, and exposure to moisture; installation complexity varies by design.
Matching flange size and bolt pattern to your toilet
One essential step in replacing an RV toilet flange is confirming that the flange’s inner diameter and bolt-hole pattern align precisely with the toilet’s outlet and mounting studs.
Measure the toilet outlet diameter, count and space bolt holes, and compare with flange specs.
Verify stud height and bolt slot alignment.
Choose a flange offering matching dimensions and compatible material to guarantee secure, leak-free connection.
Step-by-step flange installation and sealing
After confirming size and bolt alignment, proceed to select a replacement flange that matches material preferences and mounting style.
Then prepare the area by shutting off water, emptying the bowl, and removing old sealant and debris.
Position flange, align bolt holes, apply appropriate marine-grade sealant or gasket, secure with screws or bolts, guarantee level seating, trim excess sealant, and allow curing before proceeding.
Reinstalling the toilet and reconnecting plumbing
Carefully lower the toilet onto the newly installed flange, aligning the closet bolts with the base slots to guarantee a true fit.
Tighten nuts evenly to compress the wax ring or seal without cracking the porcelain.
Reconnect water supply, check for correct hose and valve seating, then open supply and test for leaks.
Secure seat and trim bolts, confirm stable, leak-free operation.
Testing and Final Checks
The technician conducts a wet test and visual inspection to confirm there are no leaks and the wax or gasket seal is intact.
Toilet alignment and mounting bolts are checked for even contact and torque to guarantee a stable, wobble-free installation.
Surfaces and tools are sanitized and odor-control measures are applied before the RV is returned to service.
How to test for leaks and proper seal
Begin by inspecting the flange installation and surrounding fittings visually.
Then run a controlled water test to confirm there are no leaks and the seal holds under typical use conditions.
Pour water slowly around the flange base, check beneath for seepage, and monitor any joint movement.
Observe for odors, dampness, or drips over several minutes.
Tighten or re-seal if leakage appears.
Verifying toilet alignment and secure mounting
Make certain the toilet sits squarely over the flange and that mounting bolts align with the base holes before finalizing the seal.
Tighten bolts evenly, alternating sides to prevent cracking. Confirm no rocking or gaps exist by applying moderate pressure around the bowl.
Recheck bolt torque after a short trial flush. Inspect the flange connection and surrounding fasteners for stability and proper seating.
Post-repair sanitation and odor control
Run a series of practical checks to guarantee sanitation and control odors after reinstallation.
Inspect seals for leaks, wipe surfaces with a disinfectant, and flush several times using RV-safe cleaner.
Verify venting and trap integrity to prevent odors.
Replace any contaminated caulk or gaskets.
Leave the compartment open to air out briefly, then recheck for residual smells before regular use.
Cost, Time Estimate, and When to Call a Professional
A basic RV toilet flange removal typically takes one to three hours and requires only common tools plus a replacement flange and seal, totaling roughly $20–$75 in materials for DIYers.
More complex repairs, hidden corrosion, or damaged plumbing can increase labor and parts costs considerably and may extend the job beyond a single day.
Professional help from an RV technician or plumber is advised when leaks persist, flange mounting surfaces are badly corroded, or the job requires cutting or replacing surrounding plumbing.
Typical DIY time and material cost breakdown
Estimate time and cost before starting so the job stays on schedule and within budget. Typical DIY removal takes 1–3 hours; materials cost $15–60 (flange, seal, fasteners, basic tools). Complex repairs add time and parts.
| Item | Typical cost/time |
|---|---|
| Flange | $10–30 |
| Seal | $5–15 |
| Fasteners | $0–5 |
| Tools | $0–20 |
| Time | 1–3 hours |
Signs this job needs a professional plumber or RV technician
After reviewing typical DIY time and material costs, it’s helpful to recognize when the scope or risk of removing an RV toilet flange exceeds homeowner capability.
Call a professional if corrosion, broken bolts inside the flange, flange bonded to damaged floor, persistent leaks, sewer odor, or inaccessible mounting requires structural repairs.
Expect higher labor and parts costs; professionals estimate several hours to a day depending on damage.
Maintenance Tips to Prevent Future Flange Issues
Preventive care reduces the chance of flange damage and costly repairs.
Routine checks, careful use, and the right materials keep seals intact and fasteners secure.
Key items to cover include:
- Scheduled inspections and cleanings
- Avoiding flushes that cause clogs or stress on the flange
- Choosing compatible sealants and durable gaskets
- Tightening and replacing hardware as needed
Routine inspections and cleaning schedule
Because flange problems often begin unnoticed, a simple, regular inspection and cleaning routine can stop minor issues from becoming major repairs.
Inspect flange, bolts, seal, and surrounding floor monthly for cracks, corrosion, or odor. Clean residue and mineral buildup with RV-safe cleaners and a soft brush.
Tighten loose hardware and document findings. Schedule deeper checks seasonally or before long trips.
Proper use to avoid clogs and stress on flange
With regular inspections and cleaning established, attention should turn to everyday toilet use habits that reduce clogs and minimize stress on the flange.
Users should avoid flushing bulky wipes, feminine products, or excessive paper; limit bowl paper per flush; instruct occupants on gentle flushing and proper waste disposal; reduce weight and leaning on the toilet; and address slow drains immediately to prevent pressure and flange damage.
Best sealants and gaskets for longevity
Several key sealants and gasket materials consistently outlast others in RV toilet flange applications: silicone RTV for flexible waterproofing, butyl rubber gaskets for vibration resistance, and marine-grade neoprene for compressive durability.
Use non-acidic, mildew-resistant silicone; apply thin, even beads. Replace gaskets during flange service; torque bolts to spec.
Inspect annually for compression set, cracking, or adhesive failure and replace as needed.
Troubleshooting Common Post-Repair Problems
After repairs, the article notes several issues that may still appear: persistent leaks where the flange meets the stool or plumbing, loose bolts causing a wobbly toilet, and lingering odors or detectable sewer gas.
Each problem has distinct diagnostic steps and corrective actions to isolate the cause.
The following section outlines quick checks and fixes to resolve these common post-repair problems.
Persistent leaks after resealing
If leaks persist after resealing an RV toilet flange, the issue often stems from one of a few overlooked causes: a damaged or warped flange, compressed or deteriorated seal material, uneven mounting surface, or improperly torqued bolts.
Inspect flange integrity, replace damaged or warped parts, and fit a new gasket rated for RV use.
Confirm mounting surface is flat and tighten bolts to manufacturer torque.
Loose toilet bolts or wobbling
Check the toilet mounting bolts and surrounding flange when wobbling occurs, since loose or uneven fasteners are the most common cause of movement.
Inspect bolt nuts, washers, and any degraded closet flange; tighten evenly, replace stripped hardware, and add new rubber or neoprene gaskets as needed.
If flange cracks or mounting holes are damaged, install a repair ring or replace the flange to restore secure seating.
Odors or sewer gas detection and fixes
Detecting persistent odors or a sewer-gas smell after reinstalling an RV toilet signals a compromised seal, venting issue, or trap problem that requires prompt diagnosis.
Inspect wax/rubber flange seal, tighten or replace as needed.
Check vent pipe for blockages and guarantee vents above roof are clear.
Verify water trap integrity and test with soapy water for leaks.
Replace faulty components immediately.
Useful Resources and Replacement Part References
For post-repair follow-up, a concise set of references helps locate compatible RV flanges, replacement parts, and trustworthy guidance.
The following quick list points to common purchase and learning sources that technicians and DIYers consult:
- RV supply stores and online retailers specializing in marine/vehicle plumbing
- OEM and aftermarket replacement part catalogs with part numbers
- Manufacturer service manuals and step-by-step repair videos
- Community forums and social groups for real-world tips and troubleshooting
Where to buy RV-specific flanges and parts
Where can RV owners find specialized toilet flanges and compatible replacement parts?
RV parts retailers, marine supply stores, and specialty plumbing shops stock RV-specific flanges, seals, and mounting kits.
Online marketplaces (RV parts sites, manufacturer storefronts) provide OEM and aftermarket options.
Local RV dealerships and service centers can order or recommend correct pieces.
Verify model compatibility and return policies before purchasing.
Helpful manuals, videos, and community forums
Many RV owners rely on a mix of manufacturer manuals, step-by-step videos, and community forums to identify the correct procedures and parts for toilet flange removal and replacement.
Manufacturer guides provide torque specs and part numbers; video walkthroughs demonstrate tool techniques and tricky access.
Forum threads and RV clubs help troubleshoot model-specific issues and locate aftermarket parts, often linking suppliers and installation tips for faster repairs.
Conclusion
The reader is left with quiet satisfaction: a once-stubborn RV toilet flange, stubborn and immobile, now removed with calm precision. Practical tools and careful steps transformed frustration into accomplishment; the ordinary workbench contrasts with the unexpected pride in a small, clean repair. Though simple parts and patient effort solved this task, the guide also reminds that complexity can return—so keep supplies ready, and call a pro when certainty gives way to doubt.