How to Hide Septic Tank Risers: 12 Attractive and Practical Ideas
Homeowners can effectively hide septic tank risers while ensuring easy access and maintaining yard aesthetics. Practical solutions include faux-rock lids, removable raised planters, decorative gravel hatches, and lattice or trellis screens with hinged panels. When planning, measure the risers, check local regulations, and ensure there’s enough clearance for pumping. Opt for durable, weatherproof materials, and always mark access points for technicians. This guide will provide step-by-step methods, cost estimates, and safety tips to help you achieve a discreet and attractive yard.
Why Hide Septic Tank Risers and When It’s Appropriate
Concealing septic tank risers can improve a yard’s appearance, reduce trip hazards, and help maintain property value.
Before covering or disguising risers, one must confirm local regulations and guarantee routine maintenance and emergency access are not impeded.
Properly locating risers and access points with a probe or site map is essential to any concealment plan.
Benefits of Concealing Risers (appearance, safety, property value)
Hiding septic tank risers improves a yard’s visual cohesion, reduces trip hazards, and can enhance perceived property value.
Thoughtful concealment answers homeowner questions about how to hide septic tank risers while maintaining access.
Well-chosen screens, plantings, or decorative covers soften utility appearance, prevent accidents, and create a cleaner curb appeal that may positively influence marketability without sacrificing function.
Legal and maintenance considerations before hiding risers
Although homeowners often prioritize aesthetics, they must first consider legal requirements and maintenance access when deciding to hide septic tank risers.
Regulations, permits, and local codes may dictate allowed coverings and setback distances.
Any concealment should permit unobstructed access for inspections, pumping, and emergency repairs.
Liability, warranty, and insurance implications must be reviewed before implementing permanent screening solutions.
How to locate risers and access points safely
Before any screening or landscaping is considered, the exact positions of septic risers and access points must be identified and marked so future work does not obstruct service.
A professional uses system diagrams, probing tools, and camera inspection when needed; homeowners consult records and utility locators.
Markings should be durable and visible, and access kept clear for inspection, pumping, and emergency repairs.
Planning and Preparation Before Hiding Risers
Before concealing septic tank risers, one should measure riser dimensions, note materials, and confirm required clearances to maintain safe access.
The plan must also account for unobstructed access for pumping and inspections, list necessary tools and materials, and include a realistic budget estimate.
Finally, considerations about complexity and local codes determine whether a professional is needed or a homeowner can complete the work safely.
Assessing riser dimensions, materials, and clearance requirements
Accurate measurements and a clear inventory of riser materials are essential steps in planning any concealment project.
The installer documents riser diameter, height above grade, lid type, and material—plastic, PVC, concrete, or metal. Required clearances for maintenance zones, surrounding landscaping, and potential surface weight loads are noted.
This data guides selection of compatible screens, planter boxes, or decorative covers without compromising durability.
Determining required access for pumping and inspections
Determine the minimum clearances and unobstructed path that technicians will need to remove lids, lift riser covers, and operate pumping equipment.
Identify required access width, vertical clearance, and stable ground for trucks and hoses.
Note turning radii and temporary removal of obstacles.
Account for inspection camera insertion and safe, level footing.
Confirm local service practices and any seasonal limitations to access.
Tools, materials, and budget estimates
A concise list of essential tools, materials, and estimated costs helps homeowners plan the riser-hiding project and avoid surprises during installation.
Recommended tools: shovel, saw, drill, level, measuring tape, gloves.
Materials: soil or mulch, edging, decorative cover, weatherproof sealant, fasteners, landscape fabric.
Typical budget ranges from $50 for simple covers to $400+ for custom enclosures; always include contingency.
When to hire a professional vs. DIY
After listing tools, materials, and estimated costs, homeowners should next weigh whether to tackle the riser-hiding job themselves or hire a professional.
Factors include skill level, time availability, safety risks, and local code requirements.
DIY suits simple screens, lightweight landscaping, or prefabricated covers.
Hire a pro for heavy lifting, structural modifications, permits, precise grading, or when access could compromise septic function.
12 Attractive and Practical Ways to Hide Septic Tank Risers
A selection of attractive, functional covers can conceal septic risers while preserving necessary access for maintenance.
Practical options range from natural-looking rock and mulch installations to purpose-built faux stones and discreet screens that include hinged or removable panels.
The following examples illustrate simple, serviceable approaches that balance aesthetics and accessibility:
- Decorative rock or gravel cover with removable access
- Raised planter box with removable lid for access
- Heavy-duty landscape fabric and mulch bed with hidden hatch
Decorative rock or gravel cover with removable access
Several inches of decorative rock or pea gravel can create an unobtrusive, low-maintenance cover for septic tank risers while preserving easy access for maintenance.
Stones are placed over a breathable fabric to suppress weeds and prevent sinking.
A discreet removable marker or lightweight ring allows technicians to lift rock locally without disturbing the entire area, maintaining aesthetics and functionality.
Raised planter box with removable lid for access
Moving from a low-profile gravel cover, a raised planter box offers both visual appeal and straightforward access to septic risers.
Constructed with a removable lid or hinged panel, it conceals risers while allowing maintenance. Durable, rot-resistant materials and a shallow planting depth prevent root intrusion.
Lightweight pots or modular inserts simplify seasonal planting and quick lid removal for inspections or service without heavy lifting.
Heavy-duty landscape fabric and mulch bed with hidden hatch
While blending durability with low maintenance, a heavy-duty landscape fabric topped with a mulch bed and a discreet hatch provides an effective way to conceal septic risers without impeding access.
The fabric prevents weed growth and stabilizes mulch; the hatch, flush with surrounding material, allows service access.
Choose rot-resistant mulch, secure fabric edges, and mark the hatch location subtly for technicians.
Faux rock septic cover (precast or molded) with camouflaged opening
Install a faux rock septic cover to conceal risers with a natural-looking, durable solution that still permits service access.
Precast or molded covers mimic stone, resisting weather and UV while remaining lightweight.
Choose a model with a discreet, camouflaged opening that aligns with riser lids for easy maintenance.
Secure the cover to prevent shifting and match color/texture to surrounding landscape for seamless concealment.
Lattice or trellis screen with hinged access panel
After considering a faux rock cover to blend with natural surroundings, a lattice or trellis screen offers a more architectural option that combines aesthetics and function.
A lightweight framed panel conceals risers while a hinged access section aligns with riser openings for routine maintenance.
Materials may be wood, composite, or metal; finishes should resist moisture and allow airflow, preventing odor buildup without obstructing service.
Evergreen shrub or ornamental grass planting with maintenance gap
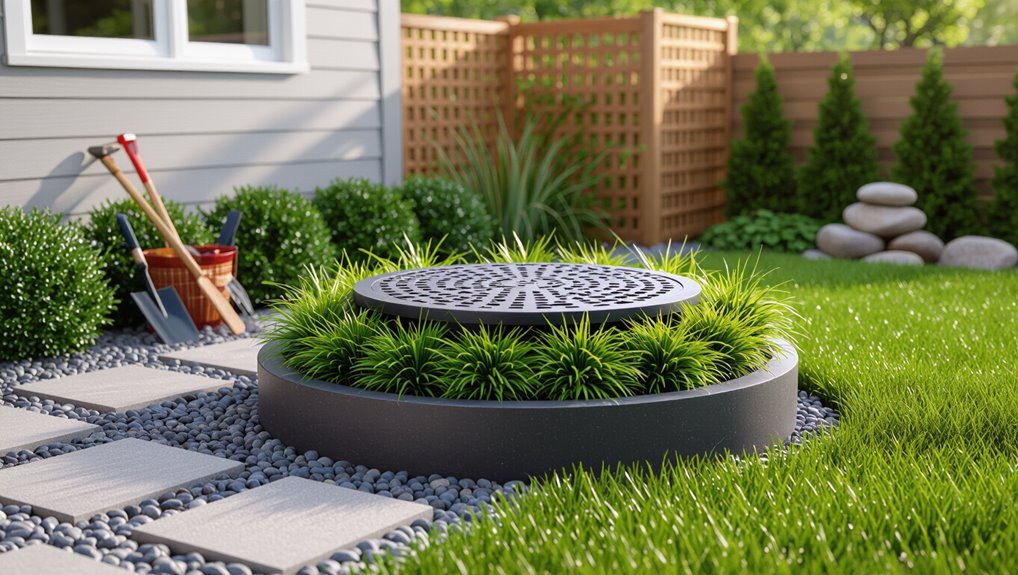
Evergreen shrubs or clumps of ornamental grasses provide year‑round screening that softens the landscape while keeping septic risers discrete.
Plant specimens with shallow roots, leaving a 12–18 inch maintenance gap for access and ventilation. Choose low-maintenance varieties tolerant of local soil and moisture.
Mulch and periodic trimming maintain visibility lines and serviceability without compromising aesthetics or tank access.
Timber or composite deck panel with lift-out section
Where planting leaves a visible gap or access is needed more frequently, a timber or composite deck panel with a removable lift‑out section offers a neat, durable alternative for concealing septic risers.
Panels sit flush with surrounding decking or lawn, secured with discreet fasteners. The removable module provides unobstructed, safe access for inspection and pumping while matching landscape aesthetics and resisting rot or warping.
Concrete or brick planter ring with removable cap
Construct a low concrete or brick planter ring with a removable cap to conceal a septic riser while providing a planted focal point.
Build the ring to allow easy cap removal for service access, use durable materials and breathable soil, and choose shallow-rooted, low-maintenance plants.
Guarantee the cap fits flush and is labeled subtly to prevent accidental obstruction during maintenance.
Outdoor storage bench or small cabinet with service access
Moving from a planted ring to a more functional cover, an outdoor storage bench or small cabinet offers both concealment and utility for a septic riser.
Constructed with hinged or removable panels, it provides easy service access while matching yard style. Weatherproof materials and ventilation prevent moisture buildup; locks or discreet fasteners guarantee safety.
Size should allow service tool clearance without dominating the landscape.
Low decorative fence or border with gated access
Why not conceal a septic riser with a low decorative fence or border that includes a discreet gate for access?
A short fence of wood, metal, or stone complements landscaping while screening the riser. The gate provides straightforward maintenance access and can be latched or camouflaged.
Choose materials resistant to moisture and rot, and position the enclosure to avoid obstructing service equipment or drainage paths.
Solar light feature or birdbath base concealing riser cap
Hide a septic riser cap with a decorative solar light or birdbath base to blend utility with curb appeal while keeping access simple; these features sit directly over the riser, masking it without permanent alteration.
Choose lightweight, removable designs with wide bases for stability. Verify the cover allows quick removal for maintenance, resists weathering, and complements surrounding landscaping without obstructing mowing or inspection.
Artificial turf mound or berm with hidden hatch
One effective option is to build a low mound or berm covered with artificial turf that conceals the septic riser while providing a neat, maintenance-free appearance.
A discreet hatch integrated into the slope allows easy access for service crews. The turf blends with lawn areas, resists weather, and hides utilities without planting.
Guarantee the hatch seals securely, matches turf color, and remains unobstructed for inspection and pumping.
Step-by-Step Installation Guidance for Each Hiding Method
The section presents clear, sequential instructions for preparing the riser and surrounding soil before any concealment is added.
It then covers installing removable covers with secure hatch seals, and outlines planting and landscaping approaches that preserve service access.
Finally, it addresses weatherproofing and pest-proofing measures for each type of hidden access point.
Preparing the riser and surrounding soil
Begin by clearing and leveling the area around each riser to secure safe access and consistent results.
Inspect riser tops and surrounding soil for damage, roots, or debris. Trim roots, compact loose soil, and add clean fill where needed to raise low spots.
Ascertain a slight slope away from the riser to prevent pooling. Mark utilities and maintain 12–18 inches clearance for ventilation.
Installing removable covers and securing hatch seals
With the area leveled and soil trimmed, attention shifts to selecting and installing removable covers and hatch seals that blend with landscaping while preserving access and airtightness.
Choose durable, UV-resistant lids sized to the riser. Fit gasketed seals, torque clamps, and weatherstrips per manufacturer specs.
Test removal ease, reseal integrity, and slope drainage. Label beneath cover for maintenance crews.
Planting and landscaping techniques that allow access
Several practical planting and landscaping approaches let homeowners conceal septic risers while preserving unobstructed access for inspection and service.
Plan a removable planting bed: edge a shallow frame, use lightweight soil, and place potted ornamentals over the riser.
Install a hinged lattice screen or low trellis anchored with removable pins.
Maintain a clear 12–18 inch radius, label riser location, and avoid deep roots.
Weatherproofing and pest-proofing hidden access points
When hiding septic riser access points, ensuring they remain weatherproof and pest-proof is essential to preserve function and safety. The following step-by-step guidance addresses sealing, screening, and maintenance measures tailored to common hiding methods (potted covers, removable frames, lattice screens, and low trellises).
Use silicone seals around lids, install mesh screens under covers, elevate pots on drainage pads, secure removable frames with latches, and inspect seasonally for gaps, rot, or burrowing.
Materials, Tools, and Cost Comparison
A brief comparison of materials, tools, and costs helps clarify trade-offs between durable and temporary hiding options for septic risers. The table below summarizes typical choices, estimated price ranges, and labor time for common methods.
| Method | Typical cost / time |
|---|---|
| Durable (stone, wood box) | $200–$1,200; 2–6 hours |
| Temporary (potted plants, lightweight screens) | $20–$150; 0.5–2 hours |
Durable vs. temporary materials: pros and cons
Choosing between durable and temporary materials for concealing septic tank risers requires balancing longevity, maintenance access, aesthetics, and budget.
Durable options (stone, metal, rot-resistant wood) offer lasting protection and refined appearance but are heavier, costlier, and harder to remove.
Temporary choices (planters, lattice, lightweight screens) are affordable, easy to relocate for servicing, and versatile but less weatherproof and shorter-lived.
Estimated cost ranges and labor time for each method
Estimated costs and labor time vary widely by method, with simple temporary covers typically under $50 and DIY installation taking 15–45 minutes.
Durable solutions like stone or metal enclosures can run $300–$1,500 or more and require several hours to a full day (or professional installation).
Garden screens, plants, and wooden lids usually cost $20–$200 and take 30–180 minutes.
Contractor-built hides cost more and need scheduling.
Safety, Maintenance, and Access Best Practices
The article recommends clearly marking concealed risers with unobtrusive surface indicators or GPS coordinates so service technicians can locate them quickly.
It outlines a concise inspection checklist and typical pumping intervals based on household size and system type.
It also warns against common hazards—encroaching roots, parking heavy vehicles above the drain field, and introducing harmful chemicals—that can damage system components.
How to mark hidden risers for future service technicians
Several simple, durable markers can confirm hidden septic risers are quickly located by future service technicians without compromising landscape aesthetics.
Use discreet surface markers such as flat garden stones, painted pavers, or low-profile metal tags set flush with grass.
Record GPS coordinates and note marker type in property files.
Guarantee markers resist weathering, remain unobtrusive, and align with local codes for safe, efficient access.
Routine inspection checklist and pumping intervals
Routine inspections and timely pumping preserve system function and reduce health risks.
A concise checklist includes visual lid and riser condition, surface pooling, odour, drainfield sogginess, and water usage patterns.
Recommend septic tank inspection every 1–3 years and pumping every 3–5 years, adjusted for household size and tank capacity.
Document findings, dates, and contractor recommendations for future service access.
Avoiding common hazards (roots, heavy vehicles, chemical exposure)
Avoiding common hazards around septic tank risers protects system integrity and public safety.
Vegetation management prevents root intrusion; deep-rooted trees should be planted far from risers.
Install durable markers and barriers to deter heavy vehicles and equipment that can crush lids or compact soil.
Store and apply chemicals responsibly; household solvents and pesticides must never enter the drainfield to avoid system disruption and contamination.
Problems to Watch For and How to Fix Them
Common issues include obstructed access or stuck covers, which should be diagnosed by checking fasteners, clearing debris, and confirming riser alignment.
Water pooling and erosion around risers require grading, installing swales or French drains, and restoring protective ground cover.
Plant root invasion is addressed by choosing shallow-rooted, non-invasive species and removing or replacing plants that threaten seals.
Obstructed access or stuck covers diagnostic steps
Begin by visually inspecting the area around each riser for signs of soil settlement, plant overgrowth, debris, or surface damage that could obstruct access or bind covers.
Note any sunken or mounded soil, roots encroaching on the riser collar, and accumulated mulch or gravel.
Test cover mobility gently, clear visible obstructions, lubricate nonporous seals, and document tightness or corrosion for professional service if resistance persists.
Water pooling, erosion, and drainage solutions
When water pools near septic risers, it accelerates soil erosion and can undermine riser seals and surrounding backfill. This increases the risk of exposure, root intrusion, and system failure.
Address grading to shed runoff, install French drains or dry wells, add gravel zones for percolation, and use splash blocks or permeable pavers.
Repair eroded soil, compact backfill, and monitor after storms to guarantee drainage effectiveness.
Plant root invasion and acceptable plant choices
Plant roots can penetrate septic riser seals, joints, and shallow drainfield lines, causing blockages, leaks, and expensive repairs if left unchecked.
Recommended plantings avoid deep-rooted trees and aggressive shrubs; opt for shallow-rooted grasses, ornamental perennials, and container plantings near risers.
Regular inspections, root barriers, and maintaining mulch beds prevent intrusion.
Prompt removal of volunteer roots minimizes damage and preserves system function.
Design Inspiration and Real-World Examples
The section contrasts small-yard solutions with large-landscape approaches, highlighting scale-appropriate tactics for concealing risers.
It offers photo ideas and layout suggestions that illustrate plant choices, screening structures, and hardscape options.
Readers are invited to compare real-world examples to determine which strategies fit their site and maintenance preferences.
Small-yard solutions vs. large-landscape approaches
Space constraints and scale dictate markedly different strategies for hiding septic tank risers: in compact yards, discreet solutions prioritize minimal disturbance and multifunctional elements, while expansive landscapes can integrate risers into larger design features that celebrate rather than conceal utility.
Small yards favor low-profile covers, planter boxes, and removable panels; large properties use rock gardens, terraced beds, faux boulders, or built-in seating to incorporate risers.
Photo ideas and layout suggestions

Several photo-driven layout ideas illustrate how risers can be disguised without compromising access: a narrow yard may feature a low cedar planter box with a hinged lid aligned to pathway pavers.
Meanwhile, a larger property can place risers behind a curved stone bench within a pollinator bed so they read as part of the seating edge.
Captions note scale, materials, hinge placement, and seasonal planting for concealment.
Final Checklist Before Finishing Your Landscaping
Before completing the landscaping, a concise checklist verifies compliance, accessibility, and durability of any septic riser concealments.
It prompts confirmation that local codes are met, risers remain serviceable, and materials will withstand expected conditions.
Finally, clear sign-off steps are outlined for both homeowners and contractors to document approval and responsibility.
Compliance, accessibility, and durability checklist
When preparing to conceal septic tank risers within the final landscaping, a concise compliance, accessibility, and durability checklist verifies the installation meets regulations, remains serviceable, and withstands wear.
It covers required clearances, riser and lid specifications, surface load limits, and materials chosen for long-term exposure.
Verify local codes, confirm unobstructed access, confirm load-bearing capacity, use UV- and corrosion-resistant components, and document measurements.
Sign-off steps for homeowners and contractors
After confirming code compliance, unobstructed access, and material durability, the final sign-off verifies that riser installations are ready to be concealed within landscaping.
A concise checklist documents inspection results, required permits, and contractor confirmations. Homeowners receive maintenance instructions and access markers. Contractors provide as-built photos and warranties.
Both parties acknowledge responsibility for future access, scheduling, and any corrective actions before completing topsoil and plantings.
Conclusion
Concealing septic risers can transform a yard, but caution lingers beneath the surface. After planning, choosing materials, and installing one of the twelve strategies, homeowners may feel relief—yet a small, persistent question remains: will access and safety stay intact when needed most? By following maintenance guidelines and leaving discreet access points, the landscape can appear seamless. Still, vigilance is essential; neglect reveals itself quietly, sometimes with costly consequences.