How to Hide a Water Heater: Clever DIY Ideas to Improve Your Basement or Garage Aesthetics
Concealing a water heater in your basement or garage is a straightforward way to enhance aesthetics while maintaining accessibility. You can use decorative screens, curtains, or shelving that allow for airflow and easy access. For a more permanent solution, consider framed closets with louvered doors, faux cabinets, or partial walls made from moisture-resistant materials. Creative options like shiplap wraps, sliding barn doors, or pegboard storage not only hide the heater but also add style and functionality. Ensure safety by keeping vents clear, maintaining visible pressure-relief piping, and allowing for maintenance access. Read on for practical plans, materials lists, and tips that comply with safety codes.
Why Concealing a Water Heater Can Improve Your Space
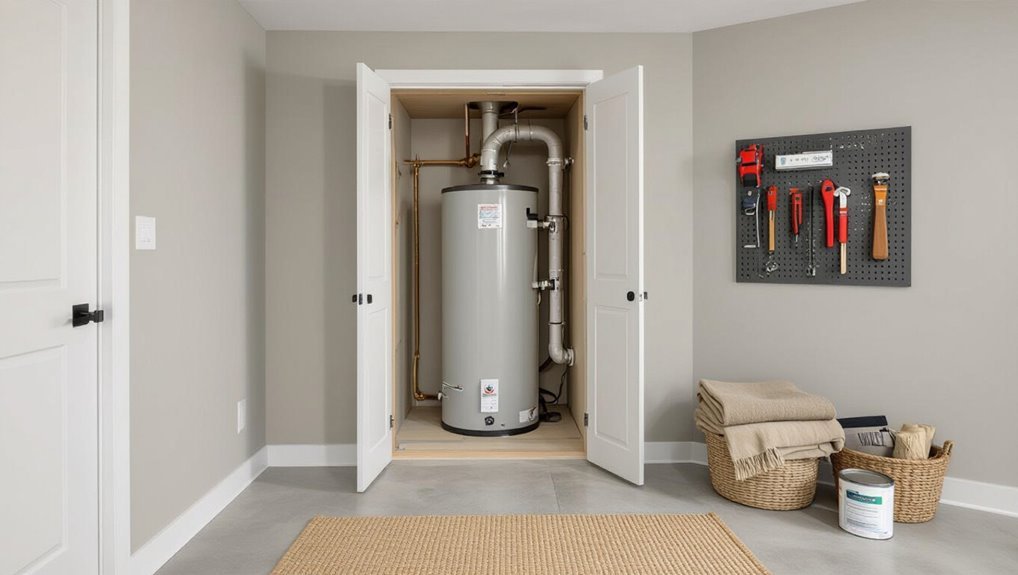
Concealing a water heater can greatly improve the look of basements and garages by hiding bulky equipment and creating a cleaner, more organized appearance.
At the same time, the decision to hide plumbing and controls must account for safety, accessibility, and local code requirements to guarantee vents, shutoffs, and combustion clearances remain unobstructed.
There are circumstances—such as frequent maintenance, inspections, or specific code mandates—when leaving the unit exposed is the safer, more practical choice.
Visual and aesthetic benefits for basements and garages
When tucked out of sight behind a simple enclosure, a water heater transforms from an eyesore into a discreet element of a finished basement or garage. This allows walls, storage, and décor to read as cohesive rather than interrupted by industrial equipment.
Concealing it improves visual flow, boosts perceived room value, and enables coordinated finishes. Practical tutorials on how to hide a water heater make tasteful results attainable for DIYers.
Safety, accessibility, and code considerations
Hiding a water heater can improve a room’s appearance, but attention to safety, accessibility, and building codes determines whether an enclosure truly enhances the space.
Enclosures must allow ventilation, combustion air, clearances, and proper venting for gas units. Access for emergency shutoff, visible pressure relief piping, and compliance with local codes prevents hazards and fines.
Consult codes and professionals before enclosing equipment.
When not to hide a water heater (maintenance and inspection needs)
Avoid enclosing a heater when routine access for maintenance, inspection, or emergency service would be impeded; technicians and homeowners need unobstructed space to read gauges, test valves, drain the tank, or replace components without removing permanent panels or dismantling trim.
Concealment should never block combustion air, shutoff valves, T&P relief, or access required by code. Leave reachable clearances and removable access panels where needed.
Quick Solutions to Immediately Improve Appearance
Several unobtrusive options can instantly improve the look of a water heater.
Decorative screens or room dividers create a tidy visual barrier, while freestanding curtains or fabric wraps offer a flexible, low-cost cover.
Adding simple shelving or storage units masks the unit and provides practical organization.
Decorative screens and room dividers
Place a decorative screen or room divider around a water heater to create an immediate visual barrier that requires minimal alteration to the unit or surrounding space.
Panels add style, conceal clutter, and remain removable. Choose ventilated or slatted designs to preserve airflow and access.
Consider materials resistant to moisture and heat.
- Slatted wood
- Metal lattice
- Folding PVC
Freestanding curtains and fabric wraps
Drape a freestanding curtain or fabric wrap around a water heater to quickly soften its appearance without permanent alterations. It conceals bulky plumbing while allowing access and airflow, and adds texture or color to the space.
- Choose flame-retardant, breathable fabric.
- Use a tension rod or removable frame for easy removal.
- Secure with clips to permit maintenance access.
Simple shelving and storage units to disguise the unit
When fitted around a water heater, simple shelving and storage units transform an eyesore into functional space by concealing plumbing while adding usable surfaces.
Modular shelving frames, open cabinets, or slatted panels provide airflow and access. Choose moisture-resistant materials and adjustable shelves for tools, cleaning supplies, and baskets.
- Maximize vertical space
- Guarantee service access
- Use durable finishes
Built-in and Semi-Permanent Enclosure Options
Built-in and semi-permanent options offer a more finished look and can be tailored to utility requirements.
The discussion will cover how to frame a closet with a louvered door, materials and measurements for faux or utility cabinets, and the advantages and drawbacks of partial walls or partitions in open basements.
Practical steps and sizing guidance will help readers choose the right approach for their space.
Framed closet enclosure with louvered door step-by-step
Begin by framing a simple closet enclosure around the water heater that provides access, ventilation, and a finished look without altering permanent plumbing or electrical systems.
Measure and build a plywood or stud frame, leave service clearance, install a louvered door for airflow, add removable panels or hinges for maintenance, seal gaps, and finish with paint or trim to match the space while preserving safety and code clearances.
Faux cabinet or utility cabinet installation materials and measurements
Several compact materials and precise measurements are required to construct a faux or utility cabinet enclosure that looks finished yet remains serviceable.
Typical materials include 3/4″ plywood or MDF, 1×2 battens, hinges, magnetic catches, and heat-resistant sealant.
Measure clearances for the heater, piping, and ventilation: maintain manufacturer service access (usually 18–24″ front clearance) and allow 1–2″ panel setback for airflow.
Partial wall or partition build for open basements pros and cons
After outlining cabinet-style enclosures, attention turns to partial walls and partitions as alternative ways to screen a water heater in an open basement.
Partial walls offer improved visual separation, customizable height, and easier access than full rooms. Downsides include reduced sound dampening, potential code or clearance issues, and slightly higher construction skill.
They balance aesthetics with serviceability when planned to allow inspection and ventilation.
Creative DIY Cover Ideas to Match Your Decor
Homeowners can transform a water heater into a subtle design element using shiplap, beadboard, or tailored paneling wraps that echo existing trim.
For a rustic or farmhouse vibe, sliding barn doors or pocket doors provide easy access while maintaining style.
Decorative screens, printed artwork panels, or murals offer flexible, removable options that integrate the appliance into the room’s decor.
Shiplap, beadboard, and paneling wraps
Shiplap, beadboard, and decorative paneling wraps offer a straightforward way to transform a utilitarian water heater into a cohesive part of the room’s design; their interlocking boards and thin profiles create clean lines that mask bulk without sacrificing access.
Panels attach to a lightweight frame, allow removable panels for maintenance, and can be painted or stained to match trim, blending utility with polished, budget-friendly style.
Sliding barn doors or pocket doors for a rustic look
Moving from simple panel wraps to a more functional statement, sliding barn doors and pocket doors offer a way to conceal a water heater while adding rustic character and saving floor space.
They permit easy access for maintenance, accommodate venting and clearance requirements, and can be built from reclaimed wood or finished to match existing trim.
Proper hardware and weatherstripping guarantee durability and minimal noise.
Decorative screens, screens with artwork, and mural panels
A few well-placed decorative screens, art-adorned panels, or a single mural can transform an unsightly water heater into a deliberate design element that complements the room.
Lightweight folding screens, hinged frames with removable art, or painted mural panels allow access and ventilation while matching décor.
Consider:
- Weather-resistant materials
- Removable fastenings for servicing
- Coordinated color and texture choices
Space-Saving and Functional Solutions
The discussion shifts to space-saving, functional options that conceal a water heater while adding utility.
Suggestions include built-in shelving around the unit, overhead cabinets and pegboards to use vertical space, and converting the area into a multi-purpose laundry or utility closet.
Each approach balances access and serviceability with hidden storage and organized workspaces.
Combining storage with concealment: built-in shelving around the heater
Several homeowners find that framing the water heater with built-in shelving transforms an otherwise awkward utility nook into efficient storage while keeping the unit unobtrusive.
Custom shelves can surround the tank at safe clearances, using open cubbies for supplies and closed cabinets for a cleaner look.
Materials resist moisture and allow easy access for maintenance, blending functionality with a streamlined aesthetic.
Utilizing vertical space: overhead cabinets and pegboards
Maximizing vertical space above a water heater with overhead cabinets and pegboards creates practical storage without encroaching on floor area.
Install shallow, ventilated cabinets for seasonal items and labeled bins; use a pegboard for tools, hoses, and small parts for easy access.
Maintain clearances for service, secure mounts to studs, and choose moisture-resistant materials to prevent warping and corrosion.
Multi-purpose enclosures: laundry or utility closet conversions
Moving from overhead storage options, homeowners can convert the area around a water heater into a multi-purpose laundry or utility closet that conceals the appliance while adding function.
Shelving, a stackable washer-dryer, and retractable drying racks optimize space.
Ventilation, access panels, and heat-resistant materials guarantee safety and serviceability.
Aesthetic doors or sliding panels maintain a tidy, cohesive basement or garage appearance.
Materials, Tools, and Cost Estimates
This section outlines recommended materials by project type, a basic tool list for DIY enclosures, and expected budget ranges.
It separates simple, mid-range, and high-end options so readers can match finishes and features to cost.
Practical tool and material suggestions accompany ballpark estimates to help plan time and expense.
Recommended materials by project type
For each concealment project—whether a simple skirt, a custom cabinet, or a closet conversion—selecting materials and tools that match the scale, budget, and skill level guarantees a safe, durable result; the following sections list recommended materials, necessary tools, and cost estimates tailored to small DIY upgrades, mid-range built-ins, and professional installations.
| Project | Materials |
|---|---|
| Small | Plywood, trim |
| Mid | MDF, hinges |
| Pro | Fire-rated drywall |
| Extras | Insulation, vents |
Basic tool list for DIY enclosures
A concise basic tool list helps guarantee DIY enclosures for water heaters are safe, accurate, and cost-effective; it prioritizes common hand tools, a few power tools, and safety gear appropriate to the project’s scale.
Essential items include measuring, cutting, fastening, and protective equipment; estimated costs vary by quality.
- Tape measure, level, utility knife
- Circular saw, drill, jigsaw
- Gloves, goggles, respirator
Budget ranges: low, mid, and high-end options
Budget tiers clarify trade-offs between cost, durability, and appearance when enclosing a water heater:
low-end options rely on basic plywood, stock trim, and minimal tools for a functional cover;
mid-range approaches add moisture-resistant materials, better finishes, and a few upgraded tools;
high-end builds use custom cabinetry, solid-core doors, specialty ventilation components, and professional-grade tools or labor.
Costs: low $50–200, mid $300–900, high $1,200+.
Step-by-Step Guide for Building a Simple Water Heater Closet
The following section outlines a practical sequence for creating a simple water heater closet, starting with accurate measurements to guarantee required clearances and ventilation.
It then covers framing, door or access-panel installation, and the placement of vents and insulation with attention to fire-safety codes.
The guide concludes with recommended finishing touches such as paint, trim, and hardware to blend the enclosure with surrounding spaces.
Measuring and planning: clearances and ventilation requirements
Several critical measurements determine where a water heater closet can be installed: unit dimensions, required clearances for service and safety, and ventilation pathways for combustion or exhaust air.
Measure manufacturer clearances front, sides, rear, and top; allow service access and future replacement.
Confirm local code for combustion air, venting termination, and combustion-air openings.
Plan ducting, grills, and accessible shutoffs accordingly.
Framing and structural steps
Framing a water heater closet begins with laying out a plumb, square footprint that accommodates the unit’s dimensions, required clearances, and future service access.
Construct a pressure-treated bottom plate if on concrete, install studs at 16-inch centers, add a top plate and blocking for support, and frame openings for ventilation ducts and piping chases.
Confirm anchoring to floor and ceiling joists.
Door installation and access panels
With the structural shell in place and openings for ventilation and piping confirmed, attention turns to installing the door and any access panels that will allow safe service and inspection.
Install a sturdy, code-compliant door on hinges, ensuring clearances for plumbing and service tools.
Fit removable access panels where valves or controls sit, secure with tamper-resistant fasteners, and verify smooth operation and unobstructed access.
Ventilation, insulation, and fire-safety considerations
Because ventilation, insulation, and fire protection directly affect safety and code compliance, this stage focuses on guaranteeing adequate air flow, minimizing heat loss, and providing required fire barriers around the water heater.
Install manufacturer-recommended clearances, ventilation louvers or ducts sized for combustion and relief air, wrap pipes with insulation, add an approved fire-rated drywall barrier, and verify combustion appliance zones and vents meet local code and inspector requirements.
Final finishing: paint, trim, and hardware
Once the mechanical and safety work is complete, the final finishing phase focuses on paint, trim, and hardware that both conceal the unit and allow access for maintenance.
Select moisture-resistant paint, coordinate trim to match surrounding millwork, and install discreet hinges and latch hardware.
Include removable panels or a keyed access door for service, label shutoffs, and seal gaps to prevent drafts while preserving ventilation.
Safety, Code Compliance, and Maintenance Access
The section addresses safety, code compliance, and maintenance access for concealed water heaters, focusing on required clearances and inspection access points.
It outlines ventilation and combustion-air needs for gas units and the use of fire-resistant materials or thermal barriers.
It also covers practical design choices that provide straightforward access for repairs and future replacements.
Required clearances and inspection access points
Proper clearance around a water heater guarantees safe operation, compliance with building codes, and straightforward maintenance access.
Required clearances vary by model and local code but typically include service access front clearance, side and top working space, and unobstructed access panels.
Removable enclosures, labeled access doors, and clear floor space for drainage and inspection facilitate routine servicing and official inspections.
Ventilation and combustion-air requirements for gas heaters
Ventilation-and-combustion air balance is critical for gas water heaters to prevent incomplete combustion, carbon monoxide production, and flame rollout.
Adequate fresh-air supply and exhaust pathways must meet appliance specifications and local code. Enclosures require permanently open vents or dedicated ducts sized per manufacturer and code.
Mechanical drafting, sealed combustion appliances, and routine testing guarantee safe operation while preserving concealment and maintenance access.
Fire-resistant materials and thermal barriers
When a water heater is concealed, fire-resistant materials and thermal barriers must isolate the appliance from combustible finishes and limit heat transfer to surrounding structures.
Installations should use materials and clearances specified by the manufacturer and adopted codes to guarantee both fire safety and service access.
Suitable options include cement board, mineral wool insulation, gypsum enclosure panels, and listed fire-rated wraps or blankets applied per instructions.
How to design easy access for repairs and replacements
Although often tucked away for aesthetics, a concealed water heater must be installed with clear, code-compliant access provisions that allow safe servicing, inspection, and full replacement without dismantling surrounding finishes.
This includes providing an access panel or door sized to manufacturer and code requirements, maintaining required clearances around controls and combustion components, and labeling shutoffs and electrical disconnections for quick identification.
Design removable panels, hinged doors, and unobstructed pathways for technicians.
Common Mistakes to Avoid
Common pitfalls include obstructing vents or access panels, placing combustible materials too close to the heater, and overlooking local building codes and permit requirements.
Such errors can create safety hazards, impede maintenance, and lead to fines or required rework.
Careful planning and adherence to regulations prevent these issues.
Blocking vents or access panels
Blocking vents or access panels is a hazardous oversight that compromises appliance performance and safety.
Covering or narrowing vent openings reduces combustion air, triggers inefficient operation, and elevates carbon monoxide risk.
Obstructing access panels prevents maintenance, inspections, and emergency shutoff.
Proper concealment preserves clearances, maintains removable panels, and uses removable or louvered covers to guarantee ventilation and technician access.
Using combustible materials too close to the heater
Keep combustible materials well away from the water heater, as storing boxes, paint cans, cleaning supplies, or wood nearby creates a serious fire hazard and can violate clearance requirements.
Proper spacing and noncombustible enclosures reduce ignition risk. Regularly inspect the area, remove flammable items, and use approved barriers or shelving that maintain required clearances to protect safety and prevent insurance or inspection issues.
Ignoring local building codes and permits
Regulatory oversight matters: ignoring local building codes and permit requirements when concealing a water heater can lead to failed inspections, fines, voided warranties, or unsafe installations.
Homeowners should verify clearance, ventilation, combustion air, seismic strapping, and access rules before modifying enclosures.
Consulting local authorities or a licensed contractor guarantees compliance, prevents costly corrections, and protects safety and insurance coverage.
Design Inspiration and Real-World Examples
The article presents compact basement makeovers that conceal water heaters without sacrificing storage or access.
It also highlights garage transformations that incorporate utility elements into clean, functional layouts.
Before-and-after scenarios with clear budgeting notes illustrate cost-effective approaches and expected outcomes.
Small basement makeovers featuring hidden heaters
How can a compact basement transform into a polished living area while concealing a bulky water heater?
Practical makeovers use discrete enclosures, multifunctional cabinetry, and visual continuity to mask equipment without sacrificing access.
Consider these approaches:
- Built-in closet with ventilated door.
- Bench seating with removable panel.
- Slim utility cabinet matching wall finish.
Garage transformations that integrate utility elements
One approach blends function and form by tucking water heaters and other utilities into tailored garage layouts that read as intentional design rather than afterthoughts.
Examples show enclosed utility closets with ventilated doors, integrated shelving that masks tanks, and coordinated finishes matching workbench cabinetry.
Lighting and durable materials maintain practicality while elevating aesthetics, turning necessary equipment into a cohesive element of garage design.
Before-and-after scenarios with budgeting notes
Several garage remodels illustrate practical methods for concealing water heaters while keeping costs transparent:
Compact enclosure builds ranged from budget-friendly DIY screens at $150–$400 to contractor-installed ventilated closets between $800–$2,500.
Full custom cabinetry integrations with shelving, finishes, and lighting ran $2,500–$6,000.
Before-and-after photos show space reclaimed, improved flow, and maintenance access preserved, with ROI tied to materials, labor, and resale appeal.
Maintenance Checklist for Concealed Water Heaters
A concise maintenance checklist helps guarantee concealed water heaters remain safe and efficient.
It should outline routine inspection items and schedules, steps to take before winter or after heavy use, and clear indicators for when to call a professional.
Regular adherence to the checklist reduces risks and extends the unit’s lifespan.
Routine inspection items and schedule
Establish a simple, regular inspection routine that targets the concealed water heater’s pressure-relief valve, drain valve, access panel seals, combustion or electrical connections, surrounding clearances, and evidence of leaks or corrosion.
Perform visual checks monthly, operate the relief valve and test drainage annually, inspect electrical/venting connections semiannually, and document findings.
Promptly address anomalies and schedule professional service when needed.
What to check before winter or after heavy use
Before winter or after periods of heavy use, the concealed water heater should be inspected with a focused checklist to prevent freeze damage, efficiency loss, and safety hazards.
Check insulation and jacket integrity, verify TPR valve operation, drain and flush sediment, inspect for leaks and corrosion, test pilot/ignition and thermostats, guarantee ventilation and combustion clearance, and confirm pressure and temperature settings.
When to call a professional
After completing the checklist items—insulation, TPR valve, flushing, leak inspection, combustion clearance, and controls—some conditions still warrant professional attention.
Persistent leaks, gas odors, pilot or ignition failures, noisy or irregular operation, significant corrosion, or repeated pressure problems require a licensed plumber or HVAC technician.
For venting, gas line work, or complex repairs, contact certified professionals to guarantee safety, code compliance, and warranty protection.
Resources and Further Reading
Local building department websites and permit offices are the primary sources for code requirements and permit guidance.
Recommended products and reputable suppliers are listed for reference, with links to common manufacturers and specialty retailers.
Contacting licensed professionals—plumbers, electricians, or builders—is advised for site-specific advice and installation.
Where to find local code information and permit guidance
Where can one verify code requirements and permit procedures for concealing a water heater?
Local building department websites, municipal code offices, or county permitting centers provide official regulations and application steps.
Consult plumbing inspectors, certified contractors, or local utility providers for interpretations.
State building codes and online municipal portals often host downloadable guides; confirm with the authority having jurisdiction before starting any enclosure or relocation project.
Recommended products and suppliers
A concise list of recommended products and reputable suppliers helps homeowners and contractors source materials for concealing a water heater efficiently and code-compliantly.
Trusted retailers and manufacturers offer cabinets, insulation blankets, drip pans, and venting components. Suggested sources include big-box stores, specialty plumbing suppliers, and online marketplaces.
- Cabinets and enclosures
- Insulation and safety accessories
- Venting and connection components
Professional trades to consult (plumber, electrician, builder)
After selecting appropriate cabinets, insulation, and venting components, homeowners should consult qualified trades to verify compatibility, safety, and code compliance.
A licensed plumber confirms pipe connections, pressure relief, and drainage.
An electrician guarantees proper circuits, bonding, and clearances.
A builder or contractor assesses structural modifications, mounting, and access.
Coordinating permits and inspections prevents hazards and costly rework.
Conclusion
In short, concealing a water heater transforms a clumsy appliance into a stealthy design genius, almost as if the tank had enrolled in interior design school. With simple covers, built-ins, or creative camouflage, basements and garages stop resembling utilitarian caverns and start auditioning for show homes. When done thoughtfully—balancing access, safety, and style—the once-eyesore becomes a quiet hero of the room, performing practical duties while pretending to be décor royalty.