How to Remove a Set Screw From a Shower Handle: Step-By-Step Fix for Stuck Handles
To remove a stuck shower handle set screw, first shut off the water supply and protect surrounding surfaces. Wear safety gear for protection. Apply penetrating oil to the screw and let it soak for a few minutes. Then, use the appropriately sized hex key or screwdriver to apply steady pressure and back the screw out. If the screw is stubborn or rounded, try tapping it gently to break corrosion, applying heat, or using a rubber band or locking pliers for better grip. If all else fails, drill a pilot hole and use a screw extractor. Follow these steps for effective removal and prevention tips to avoid future issues.
How to Remove a Set Screw from a Shower Handle: Quick Summary
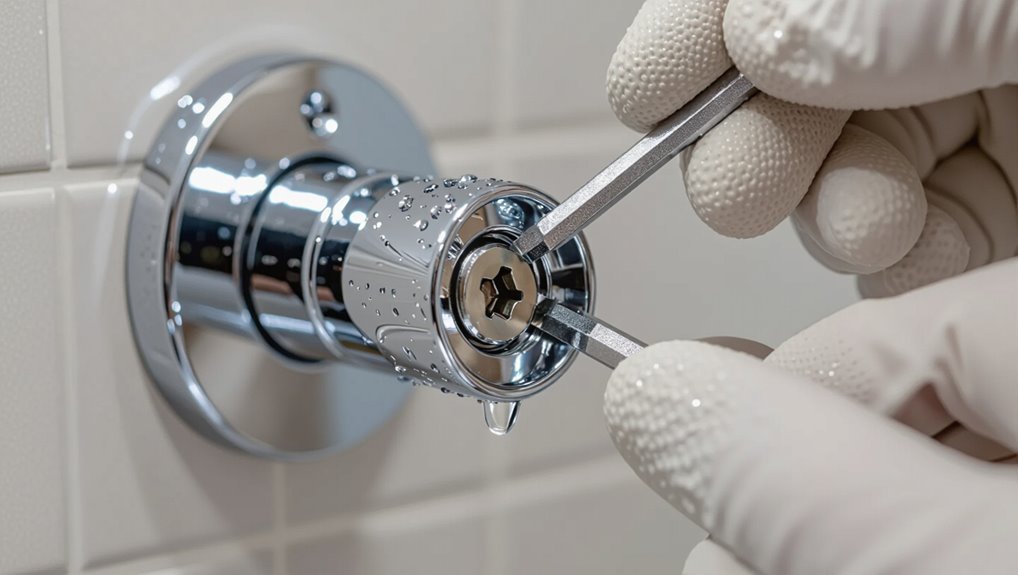
A concise approach recommends applying penetrating oil and using an appropriately sized hex or flat-tip screwdriver to free a stuck set screw.
Essential tools and materials include penetrating oil, a hex key or screwdriver set, penetrating heat source or rubber strap for extra grip, and safety gloves.
The following section outlines step-by-step techniques and safety tips.
One-line solution for stuck set screws
Start by applying penetrating oil to the screw, let it soak, then use the appropriately sized hex key or screwdriver with steady pressure to back the screw out;
if it remains stuck, heat the surrounding metal briefly with a soldering iron or use a screw extractor as a last resort.
The guide succinctly explains how to remove set screw from shower handle in one clear line.
Tools and materials you’ll need
After applying penetrating oil and attempting removal with the correct hex key or screwdriver, gather the tools and materials needed to complete the job efficiently and avoid damage.
The technician selects compact, quality items to minimize slipping and protect finishes.
- Hex keys and screwdrivers (various sizes)
- Penetrating oil and lubricant
- Rubber mallet and small punch
- Safety glasses and rag
Understand the Parts and Types of Shower Handles
A brief overview of common shower handle styles—lever, knob, and crossover—helps identify typical set screw locations, often on the underside or behind a decorative cap.
Set screws vary by drive head (hex, flat, Phillips, Torx) and size, which dictates the tool required for removal.
Material and finish—such as brass, stainless steel, or chrome plating—can influence corrosion, grip, and whether extra care or penetrating oil is needed.
Common handle styles and where set screws are located
Shower handles come in several common styles—sleeve, lever, cross, and knob—each with set screws placed in characteristic spots that determine how the handle is removed.
Sleeve handles often hide screws under escutcheons or trim. Levers typically have screws at the base or underside. Cross and knob styles usually feature screws behind decorative caps, inside the hub, or accessed from the back of the handle.
Types of set screws and drive heads (hex, flat, Phillips, Torx)
Handles that hide set screws under escutcheons or behind decorative caps often use a small range of fasteners, and recognizing the type of set screw and its drive head guides the correct removal tool and technique.
Common types include hex (Allen) set screws, slotted (flat) heads, Phillips cross heads, and Torx/star drives.
Match driver size, apply firm pressure, and avoid cam-out to prevent damage.
Materials and finishes that affect removal (brass, stainless, chrome)
Because different base metals and surface finishes respond to corrosion, wear, and tooling stresses in distinct ways, identifying whether a set screw and handle components are brass, stainless steel, or chrome-plated informs removal technique.
Brass screws corrode and deform easily, needing gentle torque and penetrating lubricant.
Stainless resists corrosion but galling risks; use correct drivers.
Chrome plating masks substrate and chips; avoid excessive force to prevent cosmetic damage.
Safety and Preparation Before You Begin
Before beginning, the water supply should be shut off and the tub or shower protected with towels or a drop cloth to catch tools and prevent damage.
Appropriate safety gear—gloves and eye protection—and a clean, well-lit workspace should be arranged.
The handle’s orientation and any trim placement should be photographed or marked to guarantee correct reassembly.
Turning off water and protecting the tub/shower
Shut off the water supply to the shower at the nearest shutoff valve or, if none is available, at the house main to prevent accidental flow while working; then open the faucet to relieve residual pressure.
Cover the tub or shower base with towels and a drop cloth to catch falling parts and protect surfaces.
Place a bucket nearby for small hardware and fluids.
Safety gear and workspace setup
Safety gear and a well-organized workspace minimize injury and prevent damage when removing a shower handle set screw.
Wear safety glasses, gloves, and non-slip shoes. Lay down towels or a drop cloth to protect surfaces. Use a magnetic tray for screws and small parts.
Verify good lighting and stable footing. Keep tools within reach and a bucket nearby for loose debris.
How to document handle orientation for reassembly
With protective gear in place and the work area prepared, the technician should mark the handle’s position to guarantee correct reassembly.
Photograph the handle from multiple angles, note clockwise or counterclockwise alignment relative to trim, and draw a simple orientation diagram on paper or phone.
Label any index marks, splines, or set screw locations.
Store images and notes with removed parts for reference.
Step-by-Step Removal Process for Accessible Set Screws
The technician first locates the accessible set screw and clears any escutcheon or trim obscuring access.
Next, the correct driver bit is selected and firmly seated to prevent stripping while applying steady, controlled torque.
Once the screw loosens, the handle is removed with attention to supporting and protecting surrounding trim.
Locate and access the set screw
Begin by visually inspecting the handle for a small hex, slotted, or recessed head—common locations include the inner face near the base, under a decorative cap, or along the side where the handle meets the stem.
Remove any trim cap with a flat tool, clean debris, illuminate the area, and gently rotate the handle to expose the screw.
Verify clear sight and unobstructed access before proceeding.
Correct bit selection and how to seat the driver
After the set screw is exposed and the area cleared, select a driver bit that exactly matches the screw head—hex bits for Allen screws, flat or Phillips for slotted or cross heads—ensuring no rounded edges or play.
Inspect bit condition, choose proper length for clearance, seat the bit fully into the screw recess, align perpendicular to the screw surface, and confirm firm, wobble-free engagement before turning.
Techniques for applying steady torque
Apply steady torque gradually and deliberately to prevent stripping or sudden release; maintain firm axial pressure so the driver stays seated.
Use slow, consistent rotation, increasing force incrementally if resistance persists.
Pause to assess progress and back off slightly to clear debris.
If using a cheater bar or pliers, apply controlled, even force to avoid jerks.
Re-evaluate bit fit before continuing.
Removing the handle without damaging trim
With steady torque maintained and the driver properly seated, attention shifts to removing the handle while preserving surrounding trim.
The handle is gently rocked and pulled straight outward, avoiding lateral force that could pry escutcheon or finish. If snug, a padded puller or two flat plastic wedges distributed evenly prevents scratching.
Inspect trim for loosened set screw fragments and clean debris before reinstallation.
Techniques for Removing Stuck or Stripped Set Screws
When a set screw is seized or its head is rounded, a range of mechanical and chemical techniques can restore access.
Recommended steps include applying penetrating oil with appropriate wait times, using controlled heat to expand and loosen the joint, and employing screw extractors or easy-out tools for rounded heads.
If those methods fail, options such as locking pliers, vise grips, or cutting a notch with a hacksaw provide last-resort removal strategies.
Applying penetrating oil and wait times
Spray a liberal coating of penetrating oil directly onto the set screw and the surrounding threads, allowing the solvent to seep into rusted or corroded interfaces; this reduces friction and helps break the bond without forcing the fastener.
Wait at least 10–15 minutes, reapply if needed, then attempt gentle back-and-forth turns.
Longer soak (several hours or overnight) improves penetration for stubborn corrosion.
Using heat safely to loosen seized screws
If penetrating oil and patient soaking fail to free the set screw, controlled heat can expand metal and break corrosion bonds so the fastener turns more easily.
Use a heat gun or small propane torch at low setting, warming the surrounding metal evenly. Protect nearby finishes with heat-resistant cloth and remove any plastic.
Allow cooling intervals, wear gloves and eye protection to prevent burns or damage.
How to extract a rounded or stripped head screw
Extracting a rounded or stripped set screw requires methodical choices and the right tools to avoid further damage to the handle or fastener.
Begin by improving grip: clean debris, apply penetrating oil, and tap to break corrosion.
Try a hardened flat-head screwdriver, rubber band for traction, or locking pliers gripping the screw head.
Work slowly, alternating direction and reapplying lubricant as needed.
Using screw extractors and easy-out tools
When grip-improvement methods fail to free a rounded or seized set screw, a screw extractor (often called an easy-out) offers a reliable mechanical solution.
Select correct extractor size, drill a centered pilot hole, insert extractor with gentle counterclockwise torque, and remove slowly to avoid breaking. Consider hardened extractors and reverse-thread types for stubborn metal.
- Choose matching extractor
- Drill pilot hole
- Apply steady countertorque
- Remove cautiously
When to use locking pliers, vise grips, or hacksaw notch
Apply locking pliers, vise grips, or a hacksaw notch when the set screw’s head is too rounded or stripped for standard drivers and extractor methods are impractical or unavailable.
Use pliers for exposed screw heads, vise grips when more torque and grip are needed, and a shallow hacksaw notch to create bite for pliers or a flathead.
Proceed slowly to avoid damaging the handle or valve.
Alternative Approaches When the Screw Is Inaccessible
When the set screw cannot be reached through the handle, removing the escutcheon or trim may reveal the fastener or clear obstructions.
If wall access is required, opening an access panel or using behind‑wall access options can allow direct work on the valve or screw.
In some cases, replacing the entire handle assembly is a simpler and more reliable solution than attempting to extract an inaccessible screw.
Removing escutcheon or trim to gain access
If the set screw remains inaccessible behind decorative trim, remove the escutcheon or surrounding trim plate to expose the valve stem and screw access points. This typically involves loosening visible screws, prying off retaining clips, or cutting through caulk and adhesive seals while protecting finished surfaces with a putty knife or painter’s tape.
Work methodically, note fastener types, store parts safely, and avoid bending or cracking brittle trim during removal.
Access panels and behind-wall access options
Once the escutcheon and trim have been removed but the set screw remains unreachable, accessing the valve from behind the wall becomes the practical next step.
Locate an existing access panel or create one in an adjacent room or closet wall. Use a stud finder, cut neatly between studs, and remove drywall to expose the valve.
Restore with an access panel or patch and repaint.
Replacing the handle assembly instead of extracting the screw
Consider replacing the entire handle assembly as a practical alternative when the set screw cannot be reached.
The homeowner evaluates compatibility, noting valve type, trim finish, and mounting style.
Power and water are shut off, escutcheon removed, and the old handle and trim pulled away.
A matching replacement is installed following manufacturer instructions, restoring function without risky extraction attempts.
Preventing Damage to Handle, Valve, and Finish
Careful technique preserves the handle’s finish and prevents damage to the valve beneath.
Use protective covers, padded supports, and proper tools to shield fragile trim and distribute force evenly.
If the screw resists or visible damage begins, stop work and consult a professional to avoid costly repairs.
Tips to avoid marring finishes while working
Protect finishes by preparing the workspace and using protective tools: cover nearby surfaces with soft cloths or painter’s tape, slip a thin rubber or wood shim between tools and metal, and choose non-marring pliers or strap wrenches when loosening parts.
Work slowly, use correct bit sizes to avoid cam-out, avoid excessive leverage, and clean metal shavings promptly to prevent scratches or corrosion.
How to support and protect fragile trim pieces
Several simple supports and protective steps preserve delicate trim and internal valve components during handle removal.
Use padded clamps or soft-jawed pliers to steady trim without scratching. Lay a microfiber towel over exposed finishes and the tub.
Brace the valve cartridge with a block to prevent torsion. Keep small parts in a labeled container.
Avoid levering directly on decorative surfaces to prevent nicks and alignment shifts.
When to stop and call a professional
If supportive padding, soft-jawed clamps, and gentle bracing still fail to keep the trim and cartridge stable, it is time to contemplate professional help.
A licensed plumber or experienced repair technician prevents costly cosmetic scratches, stripped set screws, and valve damage.
Call a pro when corrosion, recessed fasteners, seized cartridges, or risk to finishes exceed household tools, ensuring safe extraction and warranty-safe repairs.
Reassembly and Testing After Screw Removal
Threads should be cleaned of debris and lightly coated with an appropriate anti-seize or threadlocker before reassembly.
Set screws must be seated properly and torqued to the manufacturer’s specification to avoid loosening or damage.
Once the handle is aligned, the valve should be cycled to confirm smooth operation and inspected for leaks.
Cleaning threads and applying anti-seize or threadlocker
After the screw and handle are removed, inspect and clean the stem and surrounding threads to remove old debris, corrosion, and lubricant residue.
Use a small brush, solvent, and compressed air to guarantee threads are dry and free.
Apply a thin coat of anti-seize on exposed metal to prevent future galling, or use a medium-strength threadlocker on the screw for vibration resistance.
Correct torque and seating for reinstalling set screws
With cleaned, lubricated, or treated threads, attention turns to proper torque and seating when reinstalling the set screw to confirm reliable operation and avoid damage.
The screw should be hand-started, then tightened with a torque-limited driver or controlled feel to manufacturer specs—typically low torque.
Ascertain the screw seats squarely against the stem or flat, not on trim. Avoid over-tightening to prevent stripping or distortion.
Aligning the handle and testing function and leak check
Align the handle so the indicator or flats on the splined stem line up with the corresponding features inside the handle, then slide it fully onto the cartridge until it seats flush against the escutcheon.
Tighten the set screw to specified torque.
Operate the valve through full range, check for smooth motion, proper stops and alignment, then inspect for leaks at the escutcheon, spout and connections while pressurized.
Common Problems and How to Fix Them
Common post-reassembly issues include a wobbling handle, a broken set screw stuck in the valve stem, and visible corrosion or damage to the valve stem.
Recommended fixes range from tightening or shimming the handle, to extracting a snapped screw with an easy-out or drilling it out.
If the valve stem is corroded or damaged, replacement following manufacturer guidelines is advised.
Handle wobble after reassembly and corrective steps
After reassembly, a loose or wobbling shower handle often indicates an issue with the set screw fit, internal splines, or mounting hardware; diagnosing the source quickly prevents further wear and restores smooth operation.
Inspect set screw seating and tighten to spec, verify spline alignment, and guarantee mounting plate and retaining clip are secure.
Replace stripped screws or worn splines and test for firm, play-free movement.
Broken screw left in valve stem repair options
A broken set screw lodged in the valve stem requires prompt, methodical action to prevent further damage to the stem or cartridge and to restore reliable handle function.
Options include extracting the fragment with a precision pick or small reverse-threaded screw extractor, drilling carefully with appropriate bits, or removing the valve cartridge for access.
If extraction risks damage, consult a professional plumber for safe removal.
Corrosion or damage to valve stem replacement guidelines
Once a stuck or broken set screw is removed, inspection often reveals corrosion, pitting, or physical wear on the valve stem that undermines seals and smooth operation.
Replacement guidelines recommend matching stem type and manufacturer, sourcing OEM or compatible aftermarket parts, measuring dimensions precisely, and replacing worn seals and cartridges simultaneously.
Test for leaks and smooth motion before reassembling trim and handle.
Recommended Tools and Parts to Keep on Hand
A compact kit of tools and spare parts reduces downtime when a set screw problem arises. Recommended items cover basic hand tools, specialty extraction and plumbing aids, and common replacement components to guarantee a quick repair.
Suggested essentials include:
- Phillips and flathead screwdrivers, hex keys, and needle-nose pliers
- Set screw extractors, screw grabbers, and a small magnet or pickup tool
- Replacement set screws in common sizes and a universal handle repair kit
- Adjustable wrench and plumber’s grease for reassembly
Essential hand tools
Essential hand tools streamline the process of removing a set screw from a shower handle and prevent common delays or damage.
A small set of hex (Allen) keys, flat and Phillips screwdrivers in multiple sizes, needle-nose pliers, adjustable wrench, pocket knife or utility blade, and a magnetic tray for fasteners suffice.
A soft cloth protects finishes. Keep spare screws and lubricant accessible.
Specialty extraction and plumbing tools
Prepare a small kit of specialty extraction and plumbing tools to handle seized set screws, damaged fasteners, and stubborn trim without resorting to emergency parts runs.
Include:
- screw extractors
- a micro‑easy out set
- precision screwdrivers
- needle‑nose and locking pliers
- mini rotary tool with cutting and grinding bits
- hex and Torx bit set
- penetrating lubricant
- a small magnet pickup.
Store in a labeled pouch.
Replacement set screws and handle kits
Several small replacement set screws and a couple of universal handle kits should be kept on hand to address common shower-handle failures quickly.
Stock stainless and brass screws in common sizes (M3–M5, #6–#10) plus an Allen key set.
Include a universal handle kit with adapter sleeves, grub screws, and decorative caps.
Store parts labeled for fast selection during repairs.
Comparative Guide: DIY vs Hiring a Plumber
A brief comparison outlines how time, cost, risk, and required skills differ between a DIY approach and hiring a plumber. The table below summarizes key trade-offs and a short decision checklist to decide when to call a professional. Readers can use these points to match their situation to the most appropriate choice.
| Factor / Question | DIY vs Plumber |
|---|---|
| Time | DIY may take longer; plumber is faster |
| Cost | Lower parts cost DIY; higher labor cost for plumber |
| Risk | DIY carries higher damage/risk; plumber reduces risk |
| Skill required | Basic tools/skill for DIY; plumber brings expertise |
| Decision checklist | If unsure, lack tools, high risk, or warranty issues, hire a pro |
Time, cost, risk, and skill comparison
When weighing whether to remove a shower handle set screw personally or hire a plumber, the decision hinges on four measurable factors—time, cost, risk, and skill—each of which shifts the balance between DIY convenience and professional reliability.
DIY saves money and can be quick for simple jobs but raises risk from damage and requires tools and competence.
Professionals cost more but minimize damage and guarantee correct repair.
Decision checklist for when to hire a pro
Having weighed time, cost, risk, and skill, homeowners can use a concise checklist to decide whether to hire a plumber or proceed as a DIYer.
Checklist:
- handle visibly corroded or stripped;
- set screw inaccessible or broken;
- leak present;
- unfamiliar with cartridge/valve removal;
- lacking proper tools;
- limited time;
- warranty concerns;
- preference for guaranteed repair.
If any apply, hire a professional.
Useful Maintenance Tips to Prevent Future Seizure
A routine of periodic inspection and light lubrication can keep set screws and valve stems moving freely and prevent future seizure.
Recommended products include silicone-based greases for internal components and thin corrosion inhibitors or protective waxes for exposed metal finishes and threads.
Choosing formulations rated safe for plumbing fixtures and applying them sparingly extends component life without harming seals or finishes.
Regular lubrication and inspection routine
Establishing a simple, seasonal routine of inspection and lubrication keeps set screws and shower-handle mechanisms moving freely and prevents mineral buildup and corrosion from seizing parts.
Inspect for looseness, visible corrosion, and mineral deposits; tighten loose screws.
Apply a small amount of compatible lubricant to moving contacts and threads, wipe excess, and operate the handle through its range.
Repeat every three to six months.
Best products to protect metal finishes and threads
With a routine of inspection and light lubrication in place, attention can shift to products that protect metal finishes and thread integrity to prevent future seizure.
Use corrosion inhibitors (silicone-based sprays or thin film protectants), anti-seize compounds for stainless and brass threads, and clear protective wax or microcrystalline coatings for visible finishes.
Apply sparingly, follow manufacturer compatibility, and reapply annually or after heavy use.
Conclusion
A final check finds the handle loose, and the set screw gone—the coincidence of patience and the right tool. One step led to the next, one careful twist unseated corrosion, and the problem yielded. If a screw resists, the same calm will point to a different technique or a pro’s help. Routine care will keep parts moving; the small act of maintenance prevents another stubborn, unexpected struggle in the future.