How to Replace a P-Trap: Step-by-Step DIY Guide for Kitchen & Bathroom Plumbing
To replace a P-trap in your kitchen or bathroom, start by measuring the tailpiece and trap arm. Drain the existing trap into a bucket, then loosen the slip nuts to remove it. Next, dry-fit the new trap with the appropriate washers, hand-tighten the nuts, and ensure it’s set at the correct pitch. Finally, test for leaks and proper drainage. Always use compatible materials and wear safety gear. For detailed removal tips, troubleshooting, and maintenance advice, continue reading.
What a P-Trap Is and Why It Matters in Kitchen & Bathroom Plumbing
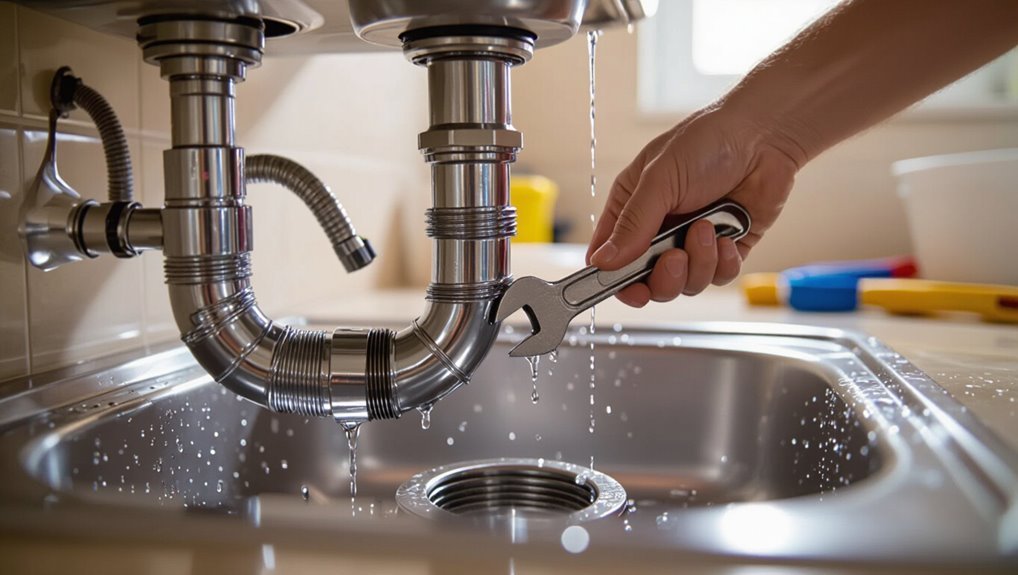
A P-trap is the curved section of pipe beneath sinks that holds a small amount of water to block sewer gases from entering the room.
It is commonly made from PVC, ABS, brass, or chrome-plated materials and appears in P- or S-shaped profiles depending on installation.
Definition and function of a P-trap
Plumbing fixtures rely on a P-trap—a curved section of pipe beneath sinks and tubs—to form a water seal between the fixture and the sewer.
It prevents sewer gases entering living spaces, catches debris to reduce clogs, and provides an accessible point for maintenance.
Understanding its role is essential for how to replace a P-trap safely and restore proper drainage and odor control.
Typical materials and shapes used in sinks
Materials for sink drains range from metal alloys like chrome-plated brass and stainless steel to plastics such as PVC and ABS, each chosen for durability, cost, and corrosion resistance.
Shapes vary: straight tailpieces, S-traps, P-traps, bottle traps and tubular bends; sizes and inlet orientations differ for kitchen versus bathroom sinks.
Choice affects fit, maintenance access, and aesthetic finish.
How a P-trap prevents sewer gas and clogs
Following the overview of common sink drain materials and shapes, attention turns to the P-trap’s role in everyday plumbing.
The P-trap holds a water seal that blocks sewer gases from entering living spaces while allowing wastewater to pass. Its curved profile also captures debris, reducing downstream clogs.
Periodic cleaning prevents buildup and preserves the seal’s function, protecting health and maintaining drainage performance.
Signs You Need to Replace a P-Trap
Visible leaks, corrosion, or cracks in the P-trap are clear indicators that replacement is needed.
Persistent odors or slow drainage after snaking, along with repeated clogs or misaligned fittings, suggest the trap no longer functions properly.
Additionally, local code requirements, renovation projects, or fixture upgrades can necessitate installing a new P-trap.
Visible leaks, corrosion, or cracks
When water drips from the joint, a steady bead forms along a seam, or small flakes of metal appear, these are clear indicators that the P-trap is compromised and should be examined immediately.
Visible wetness, greenish or whitish corrosion, hairline cracks in plastic traps, or pitted metal necessitate replacement to prevent leaks and potential water damage; document location and severity before removal.
Persistent odors or slow drainage after snaking
Persistent foul odors or continued slow drainage after using a plumbing snake often indicate that the P-trap is obstructed, damaged, or improperly sealed and may require replacement.
Remaining smell or sluggish flow suggests trapped organic buildup, hair, or mineral deposits within the trap body or a degraded seal allowing sewer gas escape.
Replacement restores proper water seal and reliable flow when cleaning fails.
Repeated clogs or misaligned fittings
If recurring blockages or poorly aligned fittings follow attempts to clear odors or slow drainage, the P-trap itself may be failing.
Repeated clogs indicate internal corrosion, buildup, or distortion reducing flow. Misaligned nuts, threads, or compressed seals cause leaks and prevent proper cleaning.
Replacement restores proper alignment, reliable sealant surfaces, and unobstructed flow, resolving chronic blockages and connection issues.
Local code, renovation, or fixture upgrade reasons
Because building codes, remodeling plans, and fixture upgrades often introduce new dimensional or material requirements, replacing a P-trap becomes necessary to confirm compliance, proper fit, and reliable performance.
Homeowners and contractors must inspect trap alignment, drain height, and approved materials when installing new sinks or fixtures.
Upgrading confirms leak-free connections, prevents code violations, and accommodates modern trap primers or low-flow plumbing fixtures reliably.
Tools, Materials, and Prep Checklist
Before starting the replacement, the necessary tools—adjustable wrenches, a bucket, gloves, and a flashlight—should be gathered along with common replacement parts such as PVC, ABS, brass, or a slip-joint trap.
Optional supplies like thread seal tape, plumber’s putty, and a replacement tailpiece can simplify the job or address unexpected issues.
Safety and workspace prep require shutting off valves, clearing the area under the sink, and using appropriate PPE.
Required tools (wrenches, bucket, gloves, flashlight)
A small set of basic tools and protective gear makes replacing a P-trap straightforward: an adjustable wrench or two for tightening slip nuts, a bucket to catch water, gloves to protect hands from grime and chemicals, and a flashlight to illuminate the cramped, often dark space beneath the sink.
Additional helpful items include rags for cleanup, a small mirror for visibility, and safety glasses.
Common replacement parts (PVC, ABS, brass, slip-joint trap)
Several common P-trap materials and configurations cover most residential needs: PVC and ABS plastic for cost-effective, corrosion-resistant installs; brass for durability and high-heat tolerance; and slip-joint traps for easy removal and maintenance.
Matching pipe diameter, thread type, and trap arm length guarantees fit. Choose compatible fittings and replacement nuts/washers; prefer readily available parts for future maintenance and code compliance.
Optional supplies (thread seal tape, plumber’s putty, replacement tailpiece)
Gather optional supplies that smooth installation and prevent leaks: thread seal tape for threaded connections, plumber’s putty for watertight seals around strainers, and a replacement tailpiece if the existing one is corroded, cracked, or the wrong length.
Keep a small roll of tape, a pea-sized amount of putty, and a correctly sized tailpiece on hand to avoid delays during trap replacement.
Safety and workspace prep (shutoff valves, clear under-sink space, PPE)
Before beginning work, shut off the sink’s water supply at the appropriate valves.
Clear the cabinet area of stored items, and don basic personal protective equipment—gloves and safety glasses—to reduce injury and contamination risks.
Confirm valves fully close, place a bucket and towels to catch water, remove loose debris, guarantee adequate lighting, and keep necessary tools within reach.
Ventilate if using chemicals.
Measuring and Selecting the Correct Replacement P-Trap
The next step covers how to measure trap arm length, inlet/outlet diameters, and height to guarantee a proper fit with the sink tailpiece and drain line.
It also compares material choices (PVC, ABS, chrome-plated brass) and checks compatibility with the existing drain and any trap primer.
Finally, guidance is given on when to replace related parts (tailpiece, trap adapter, extension) and a concise buying checklist for the correct size and style.
How to measure trap arm length, inlet/outlet diameter, and height
When preparing to replace a P-trap, accurate measurements of the trap arm length, inlet/outlet diameters, and vertical height guarantee a proper fit and leak-free connection.
Measure trap arm from wall drain center to trap outlet.
Measure inlet diameter at tailpiece and outlet at wall spud with calipers or tape.
Measure vertical height from trap outlet center to underside of sink.
Material choices and compatibility with existing drain and trap primer
Select a P‑trap material that matches the existing drain and any trap primer to guarantee chemical compatibility, correct thread/connective types, and thermal tolerance.
Inspect drain metal (brass, chrome, galvanized) or plastic (PVC, ABS) and choose matching material or approved coupling fittings.
Verify solvent cement or thread sealant compatibility, primer requirements, and local code approvals to prevent leaks, corrosion, or voided warranties.
When to replace related parts (tailpiece, trap adapter, extension)
Although a P‑trap replacement can sometimes proceed using only the existing parts, a careful inspection of the tailpiece, trap adapter, and any extension is essential to guarantee proper fit and function.
Worn threads, corrosion, wrong lengths, or mismatched materials often necessitate replacing those components along with the trap to prevent leaks, misalignment, or code violations.
Replace if cracked, bent, heavily corroded, stripped, or nonstandard.
Buying checklist for correct size and style
A clear measurement and material checklist prevents buying the wrong P‑trap: record the tailpiece diameter (commonly 1-1/4″ or 1-1/2″), the distance from the wall outlet to the trap inlet, the vertical drop from the sink to the trap centerline, and note the existing connection type (slip-joint, thread, or compression) plus pipe material (PVC, ABS, brass, chrome-plated).
- Match diameter and connection type
- Verify inlet offset and reach
- Choose compatible material and finish
- Confirm trap seal height and slip-joint nut size
Step-by-Step: Removing the Old P-Trap
Before any disassembly, the water supply is shut off and a bucket is placed beneath the trap to catch runoff.
The slip nuts are then loosened so the trap can drain, with corroded or stuck connections addressed using penetrating oil and proper tools to avoid damage.
Finally, the surrounding pipes and the trap seal are inspected for cracks, corrosion, or wear that would require repair or replacement.
Turn off water and place a bucket under the trap
Shut off the sink’s water supply and slide a bucket beneath the P‑trap to catch residual water and debris.
Verify both hot and cold supply valves are fully closed.
Wipe the surrounding area to prevent slips.
Position the bucket to catch drips from joints and the tailpiece.
Keep a flashlight and rag nearby to manage spills and inspect for corrosion before proceeding.
Loosening slip nuts and draining the trap
With the bucket and rag in place beneath the trap, the technician loosens the slip nuts that connect the curved P‑trap to the tailpiece and wall drain.
He turns each nut counterclockwise by hand or with channel locks, supporting the trap to prevent sudden drops.
As seals break, wastewater and trapped debris drain into the bucket; remaining residue is wiped away before full removal.
Removing stubborn or corroded connections safely
If a slip nut refuses to budge or metal fittings show heavy corrosion, the technician proceeds methodically to avoid damage or injury.
They apply penetrating oil, wait, then use correct-size wrenches with controlled force.
For seized joints, gentle heat softens corrosion; for plastic, avoid heat and try strap wrenches.
Cut and remove irreparably corroded sections, protecting surrounding surfaces and wearing eye protection.
Inspecting surrounding pipes and trap seal for damage
Before discarding the old P-trap, the technician carefully inspects the adjoining tailpiece, trap arm, and the trap seal for cracks, corrosion, misalignment, or buildup that could compromise a new installation.
Any damaged or warped sections are noted; minor mineral deposits are cleaned.
Worn slip nuts, degraded washers, or loose fittings prompt replacement to guarantee a proper seal and prevent future leaks or odors.
Step-by-Step: Installing the New P-Trap
The installer first dry-fits the new trap pieces to confirm alignment with the tailpiece and wall drain.
Slip nuts and washers are hand-tightened while the trap arm is adjusted in length and angle to achieve the correct pitch.
Once aligned, the fittings are tightened, seals checked, and the trap reattached to the wall drain.
Dry-fit components to confirm alignment
Dry-fitting the P-trap components verifies that pipe lengths, slip nuts, and washer positions align correctly before final assembly.
The installer assembles tailpiece, trap bend, and trap arm without tightening, checks inlet/outlet orientation, guarantees proper slope toward the drain, and confirms clearance from cabinet or fixtures.
Adjustments are made by trimming pipes or repositioning fittings until alignment is precise and leak-ready.
Assembling and hand-tightening slip nuts and washers
Begin by positioning the washer inside the slip nut with its tapered side facing the pipe. Then slide the nut onto the tailpiece so the washer seats against the pipe end.
Align trap components, insert tailpiece into trap inlet, and hand-thread slip nuts onto threads. Tighten evenly until snug; avoid tools to prevent cracking.
Check for washer distortion and proper seating before final adjustments.
Adjusting trap arm length and angle for proper pitch
After the slip nuts and washers are hand-tightened and confirmed to seat properly, attention shifts to sizing and angling the trap arm so waste flows toward the wall drain with a slight downward pitch.
The installer measures required length, trims pipe squarely, deburrs edges, and dry-fits components. Small adjustments set a 1/4″ to 1/2″ drop per foot, ensuring smooth flow and alignment before final steps.
Final tightening, sealing tips, and reattaching to wall drain
With the trap arm positioned and fittings hand-tightened, the installer proceeds to final tightening and sealing, working methodically from the trap inlet out toward the wall drain to maintain alignment and pitch.
Using a wrench, each nut is snugged—avoiding over-torque—then slip joints receive fresh compression rings or plumber’s tape where applicable.
Finally, the trap is seated into the wall drain and secured.
Testing the New Installation
Once assembled, the new P-trap should be tested for leaks by running water and wiping joint areas with a paper towel to reveal moisture.
Observers should confirm that water drains quickly and that fixtures do not gurgle, which can indicate venting problems.
If slow drainage persists despite a sound trap, investigation should shift to downstream clogs, vent obstructions, or line slope issues.
Leak test procedure with water and paper towel
Run water through the drain and inspect every joint for moisture using a paper towel: press the towel gently against slip nuts, trap body seams, and the tailpiece connection while someone else taps the faucet on and off to vary flow.
Check for steady drips, staining, or wetness after several minutes.
Tighten loose fittings incrementally, wipe dry, then recheck to confirm seals are holding.
Checking for proper drainage and venting issues
Begin testing the new installation by verifying that water drains freely and that fixtures vent properly to prevent slow drainage or gurgling.
Run multiple fills and rapid flushes, observing flow speed and trap seal. Listen for air noise and watch for sputtering or bubbles. Confirm adjacent fixtures remain unaffected.
Recheck joints for leaks after load testing and guarantee proper slope and unobstructed vent paths.
How to detect slow-drain causes unrelated to trap
If drainage remains sluggish after confirming a properly installed P-trap, the technician should isolate other common causes before assuming a trap issue.
Inspect venting for blockages or crushed vents, check downstream lines with a snake for hair, grease, or scale, test flow with water and dye to reveal slow sections, and verify municipal line backups or partial clogs using adjacent fixtures.
Common Problems During Replacement and How to Fix Them
Common issues that arise during P-trap replacement include cross-threaded slip nuts and worn or torn washers, misaligned trap arms causing incorrect slope, and persistent leaks at the wall connection.
Technicians should also watch for chemical residue, biofilm, or hard-water buildup that can prevent seals from seating properly.
Each problem requires a specific remedy—replacing damaged hardware, realigning and re-sloping the trap arm, thoroughly cleaning buildup, and retesting for leaks.
Cross-threaded slip nuts and damaged washers
Cross-threaded slip nuts and torn or hardened washers are frequent obstacles when replacing a P-trap, often causing leaks or preventing a proper seal.
The installer should inspect threads, replace rounded nuts, and discard deformed washers. Clean mating surfaces, use compatible replacement washers, and hand-start threads before tightening with a wrench.
If threads are damaged, replace the fitting or use a repair coupling to guarantee a leak-free joint.
Misaligned trap arm and poor slope
Align the trap arm carefully to maintain the required slope and prevent standing water or sewer gas issues.
Inspect alignment from tailpiece to wall stub, ensuring a 1/4 inch per foot downward pitch.
Trim or reposition the trap arm and use appropriate elbows or extension pieces to achieve proper angle.
Recheck with water flow for steady drainage and no pooling.
Persistent leaks at the wall connection
After confirming the trap arm slope and seating, attention shifts to the wall connection where persistent leaks often occur; this joint experiences movement, misalignment, and seal failure more than most fittings.
Inspect the adapter, washer and nut for cracks or deformation.
Re-seat or replace worn components, guarantee proper alignment, hand-tighten then torque slightly, and apply thread sealant or a new gasket to restore a watertight seal.
Chemical residue, biofilm, or hard-water buildup
Though often overlooked during a P‑trap replacement, chemical residue, biofilm, and mineral scale can compromise seals, clog passages, and hide damage. Inspectors should visually and tactically assess for slimy films, crusted deposits, or colored residues on the trap, tailpiece, and adapter.
Remove buildup with mechanical scraping, vinegar or CLR for mineral scale, and a diluted bleach soak for biofilm; rinse thoroughly and replace damaged components.
When to Call a Professional Plumber
If recurring clogs, gurgling drains, or slow venting persist after replacing a P-trap, a professional should assess for larger drain or venting issues.
Permitting requirements, local code compliance, or work involving cast iron, copper, or other complex materials often necessitate a licensed plumber.
Homeowners should also weigh the cost and time savings of hiring help when the job exceeds their tools, skills, or schedule.
Signs of larger drain or venting issues
Several clear signs indicate that a clogged P-trap may be part of a broader drain or venting problem that requires a professional plumber.
Persistent slow drains in multiple fixtures, gurgling noises, foul sewer odors, recurring backups after snaking, and bubbles in toilet bowls signal mainline blockage or vent failure.
Visible sewage, repeated repairs, or structural settling also warrant immediate professional assessment to prevent health hazards and damage.
Permitting, code compliance, and complex materials
When work involves changes that affect a building’s plumbing system beyond a simple parts swap, homeowners should verify local permitting and code requirements and consider hiring a licensed plumber.
Licensed professionals guarantee code-compliant materials, proper trap arm lengths, venting, and connections.
Complex materials (cast iron, ABS changes, or lead solder) and multi-unit or structural alterations typically require permits and experienced installers to avoid violations and hazards.
Cost and time considerations for hiring help
Although many P-trap replacements are straightforward, homeowners should weigh the cost and time savings of DIY work against hiring a professional.
A plumber reduces risk, guarantees code compliance, and may finish faster; labor and call fees increase total cost.
Consider complexity, downtime, warranty, and safety when deciding.
- Time vs. labor cost
- Skill and risk
- Permit/code needs
- Warranty and liability
Maintenance Tips to Extend P-Trap Life
Routine maintenance can considerably extend a P-trap’s service life by emphasizing regular cleaning and safe unclogging methods.
Distinct preventative measures for kitchens (grease traps, strainers) versus bathrooms (hair catches, limited chemical use) help prevent buildup.
Seasonal checks to inspect seals and replace worn components catch developing issues before leaks or failures occur.
Regular cleaning and safe unclogging methods
Because debris and mineral buildup gradually reduce flow and increase odor, regular cleaning and safe unclogging of a P-trap prevent most minor plumbing failures and extend the trap’s service life.
Inspect periodically, remove and wash the trap with a brush and mild detergent, clear hair and grease manually, and flush with hot water.
Use enzyme cleaners; avoid harsh chemicals that damage pipes.
Preventative measures for kitchens vs. bathrooms
After regular cleaning and safe unclogging practices, attention should turn to location-specific upkeep: kitchens and bathrooms present different risks and consequently require different preventative measures to extend a P-trap’s service life.
Kitchens need grease traps, strainers, and routine hot-water/biodegradable enzyme treatments to limit buildup.
Bathrooms benefit from hair traps, minimal chemical use, and periodic inspection for soap scum and residue that accelerate corrosion.
Seasonal checks and replacing worn components
Seasonal checks—performed at least twice a year, preferably in spring and fall—help catch wear before leaks or odors develop.
Inspect joints, slip nuts, washers, and trap seals for corrosion, cracks, or deformation. Clean debris and test for slow drainage.
Replace deteriorated washers and gaskets, tighten fittings, and swap the entire P-trap if corrosion or persistent leaks remain.
Record dates and actions for reference.
Quick Reference: Typical Replacement Time, Difficulty, and Cost
When replacing a P-trap, most homeowners can expect the job to take 20–60 minutes for a sink with accessible fittings and no unexpected issues; plumbers typically complete the same work in 10–30 minutes. Difficulty ranges from easy to moderate; parts cost $10–$40, labor adds $50–$150 if hired.
| Task | Time | Typical Cost |
|---|---|---|
| DIY simple | 20–60 min | $10–$40 |
| DIY with complications | 60–120 min | $20–$60 |
| Professional | 10–30 min | $60–$190 |
Conclusion
In conclusion, replacing a P-trap restores function, prevents odors, and averts leaks when signs of corrosion, clogs, or damage appear. With proper measurement, tools, and attention to slip-joint connections, most DIYers can complete the swap in under an hour; however, persistent leaks, complex drain runs, or sewer-line issues warrant a pro. When following the guide, one should proceed cautiously and remember that an ounce of prevention saves a pound of cure.