How to Use a PEX Crimp Tool: Step-by-Step Guide for Secure Plumbing Connections
To securely connect PEX tubing to a barb fitting, use a PEX crimp tool to compress a copper or stainless ring, creating a watertight seal. Begin by cutting and deburring the tubing, then slide the ring over it. Fully seat the fitting and position the ring 1/8–1/4 inch from the end before compressing it with a steady squeeze. After crimping, check the connection with a go/no-go gauge and conduct a pressure test. Ensuring proper tool calibration, using the correct rings, and performing regular inspections will help prevent leaks. Follow the additional steps and tips for a successful installation.
What a PEX Crimp Tool Is and When to Use It
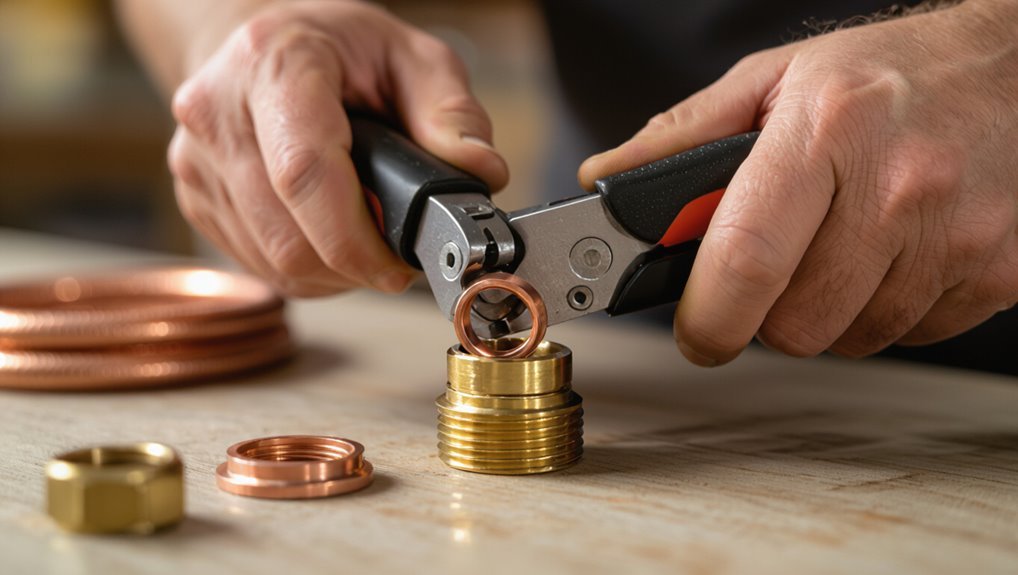
A PEX crimp tool is a hand tool used to compress metal rings or bands around PEX tubing and compatible fittings to create a watertight joint.
It is one of several PEX joining methods—alongside clamp, expansion, and push-fit systems—and is suitable for copper crimp rings and specific brass or poly fittings designed for crimping.
Proper selection of fittings, awareness of material compatibility, and use of basic PPE (gloves and eye protection) are essential when using a crimp tool.
Definition and purpose of a PEX crimp tool
PEX crimp tools are handheld devices designed to secure copper or stainless-steel rings around PEX tubing and fittings, creating a watertight mechanical seal.
They compress crimp rings uniformly, ensuring reliable joints and preventing leaks.
Professionals and DIYers consult guides on how to use pex crimp tool for proper technique, calibration, and maintenance.
The tool’s purpose is consistent, efficient, and durable PEX connections.
Types of PEX joining systems (crimp, clamp/crimp, expansion, push-fit)
When selecting a joining method for flexible tubing, installers consider four common systems—crimp, clamp (also called cinch), expansion, and push-fit—each offering distinct tools, fittings, and skill requirements. Each system balances speed, reusability, tool cost, and reliability; choice depends on access, permanence, and installer experience.
| System | Tool | Best for |
|---|---|---|
| Crimp | Crimp tool | Permanent, affordable |
| Clamp | Cinch tool | Thin-walled PEX |
Materials and fittings compatible with crimp tools
Crimp systems connect cross-linked polyethylene tubing to fittings by compressing copper or stainless-steel rings around the pipe, creating a durable, leak-resistant joint.
Compatible fittings include brass or polymer PEX barb fittings, elbow and tee assemblies, and manifolds designed for crimp rings.
Copper and stainless steel rings suit 1/2″–1″ PEX sizes; verify manufacturer compatibility and use correct ring type for reliable connections.
Safety considerations and required PPE
After selecting compatible fittings and rings, attention turns to safe operation and appropriate personal protective equipment.
Users should wear safety glasses, cut-resistant gloves, and hearing protection when working in confined spaces or with loud tools.
Inspect the crimp tool for damage, secure workpieces, and keep fingers clear of moving parts.
Confirm proper lighting, ventilation, and adherence to local codes and manufacturer instructions.
Tools and Materials Needed Before You Start
Before beginning a PEX crimping project, a clear list of essential tools and materials should be assembled, including a crimp tool, pipe cutter, and go/no-go gauge.
The correct crimp rings and compatible fittings must be chosen to match the system type and application.
Finally, select PEX tubing of the proper diameter and verify the crimp tool die matches that tubing size for reliable connections.
Essential tools list
A concise set of tools is required to make reliable PEX connections: a PEX crimp tool compatible with the chosen ring system (copper crimp or cinch), appropriate-size crimp rings or cinch clamps, a tubing cutter that produces square cuts, a go/no-go gauge for verifying crimp integrity, a deburring tool or reamer, and safety equipment such as gloves and eye protection.
- Crimp tool and rings
- Tubing cutter
- Gauge and deburring tool
- PPE and workspace lighting
Choosing the correct crimp rings and fittings for your project
With tools and PPE staged, attention turns to selecting the correct crimp rings and fittings for the specific PEX system and pipe size in use.
Match ring material (copper or stainless) and style (crimp or clamp) to manufacturer specifications.
Choose compatible fittings—barbed or insert—with approved materials and pressure ratings.
Confirm certification marks and purchase extra rings for testing and spares.
How to select the right PEX tubing size and crimp tool die
Selecting the correct PEX tubing size and matching crimp tool die is essential for leak-free joints and code compliance.
Measure tubing OD and confirm fitting type (barbed/stem).
Choose die calibrated for tubing diameter and ring style (copper cinch vs. stainless crimp).
Verify tool compatibility with manufacturer specifications and local plumbing codes.
Test on scrap tubing before final connections.
Preparing PEX Tubing and Fittings for a Crimp Connection
Before crimping, the installer measures and cuts PEX tubing squarely to the required length and removes any burrs for a clean end.
The tubing end is inspected for damage and the fitting is pushed in to the proper insertion depth with correct alignment.
A visible mark on the tubing is made to confirm the crimp ring sits fully over the fitting during assembly.
Measuring and cutting PEX tubing cleanly
Accurately measuring and cutting PEX tubing guarantees a secure, leak-free crimp connection and prevents wasted material.
The installer measures twice, accounts for fitting insertion depth, and marks the tube squarely. A quality PEX tubing cutter produces a straight, smooth cut without crushing.
Cuts are made perpendicular to the tube axis, held steady, and executed in one clean motion to maintain proper fit and alignment.
Deburring and inspecting the tubing end
Remove any burrs and inspect the cut end to guarantee a smooth, square face that will seat fully against the fitting.
Use a deburring tool or knife to remove rough edges and inner lip.
Verify the outer diameter is undamaged, the wall is uniform, and no contaminants remain.
Reject or recut tubing with distortion, kinks, or uneven cuts before crimping.
Proper insertion depth and alignment of fittings
Insert the PEX tubing fully onto the fitting until the tubing’s end seats against the fitting shoulder or marked insertion depth, ensuring the crimp ring sits evenly over the fitting barb or bead.
Verify tubing is straight and not twisted, with the fitting centered in the ring.
Maintain consistent alignment and equal ring coverage to prevent gaps, leaks, or compromised crimps during compression.
Marking tubing to verify ring position
After the tubing is fully seated and the crimp ring is evenly positioned, a technician should mark the tubing to confirm ring placement before compression.
Using a fine-tip permanent marker, place a single radial line on the tubing that overlaps the ring edge and another on the fitting shoulder.
These reference marks allow quick post-crimp inspection for slippage and guarantee consistent, reliable connections.
Step-by-Step Crimping Procedure
The technician first aligns the PEX fitting and crimp ring, confirming the ring sits evenly over the barb and the tubing is fully seated.
The crimp tool is then set to the correct die and pressure before a single, steady squeeze compresses the ring to specification.
After crimping, the connection is checked with a go/no-go gauge and any failed rings are re-crimped or replaced.
Positioning the crimp ring and fitting
A single clean crimp ring should be slid onto the PEX tubing, leaving enough exposed pipe for the fitting to seat fully. The fitting is then pushed straight into the tube until the shoulder contacts the end, ensuring proper alignment before crimping.
The ring is positioned approximately 1/8–1/4 inch from the tubing end over the fitting barb, centered and square to prevent leaks.
Setting up the crimp tool and die for correct pressure
Begin by verifying that the crimp tool and interchangeable die match the specific PEX size and fitting type to guarantee proper compression.
Inspect dies for wear, damage, or contamination. Securely install the correct die set per manufacturer instructions, ensuring alignment and full engagement.
Adjust the tool’s calibration or tension setting if provided, and confirm operation with a single test crimp on scrap material before proceeding.
Executing a correct crimp with consistent pressure
Position the prepared PEX tubing and fitting into the die, ensuring the fitting shoulder sits flush against the tubing and the crimp ring is centered over the barb; maintain a steady, perpendicular grip and actuate the tool in a single, continuous motion to achieve an even compression.
Release the handle smoothly, inspect the ring for uniform deformation, and repeat methodically on subsequent fittings for consistent results.
Verifying crimp integrity with a go/no-go gauge
After completing the crimp, slide the go/no-go gauge over the crimped ring to confirm proper compression: the “go” end should pass over the ring without force while the “no-go” end must not.
Inspect the ring visually for uniform deformation and tubing seating. Test multiple crimps on the run, marking any failures for corrective action and documenting gauge pass rates for quality control.
Re-crimping or replacing rings if necessary
If a crimp fails the go/no-go gauge or shows uneven deformation, the installer should assess whether re-crimping is possible or the ring must be replaced.
If the ring is damaged, cut it off, inspect the tubing and fitting for nicking, slide on a new copper or stainless ring, position correctly, and crimp anew.
Retest with the gauge and pressure-check the joint.
Common Problems and How to Fix Them
Common problems with PEX crimp connections include under-crimps, over-crimps, misaligned fittings, and damaged tubing that can lead to leaks.
The article outlines how to identify each issue, diagnose leak sources, and apply corrective steps or determine when a connection should be repaired versus replaced.
Practical tips for re-crimping, replacing fittings, and preventing recurrence are provided.
Identifying under-crimps and over-crimps
Recognizing under-crimps and over-crimps is essential for reliable PEX connections because each defect compromises seal integrity in different ways.
An under-crimp shows a loose, incompletely compressed ring with visible gap and easily movable tubing; an over-crimp displays flattened or pierced tubing and distorted ring.
Inspect crimps visually and by feel; compare to manufacturer’s dimensional standards to classify the fault.
Diagnosing leaks and corrective steps
Begin by tracing the source of any moisture to determine whether the leak originates at the crimp, the fitting, the tubing, or an unrelated joint.
If the crimp leaks, cut off the ring, inspect tube insertion depth, replace with a new ring and crimp per specifications.
If the fitting fails, replace it and pressure-test the system.
Recheck all repaired connections for weeps.
Dealing with misaligned fittings or damaged tubing
Addressing misaligned fittings or damaged tubing requires careful assessment and corrective action to prevent leaks or system failure.
The technician inspects alignment, straightens tubing gently, trims damaged ends squarely, and repositions fittings.
If crimps are uneven, they are cut out and re-crimped with proper rings and tool calibration.
Excessive damage prompts replacement of the affected tubing section and reinstallation following manufacturer tolerances.
When to replace vs. repair a crimp connection
When a PEX crimp shows signs of leakage, deformation, or repeated failure, the technician must decide whether repair or full replacement is warranted based on the extent of damage, location, and likelihood of future problems.
Minor leaks or single compromised rings can be cut back and re-crimped if tubing and fitting are undamaged; systemic failures, corrosion, or inaccessible joints require full replacement for reliability.
Testing and Inspecting Completed Connections
The installer should follow established pressure testing procedures, using recommended pressures to verify system integrity.
Each connection must also receive a visual and tactile inspection checklist—checking crimp ring alignment, bite depth, and the absence of leaks.
Results should be documented and approved connections clearly marked for future reference.
Pressure testing procedures and recommended pressures
Begin pressure testing by isolating the newly installed PEX circuit, evacuating air, and applying a controlled test pressure with an appropriate gauge and pump to verify leak-free joints.
Maintain test pressure—commonly 50 psi for domestic cold systems, 100–150 psi for commercial or hot lines—typically for 15–30 minutes.
Monitor gauges for drop, document results, and relieve pressure slowly before restoring service.
Visual and tactile inspection checklist
A concise visual and tactile inspection guarantees each crimped connection meets mechanical and sealing standards before pressure is applied.
The inspector confirms correct ring position, uniform crimp deformation, absence of tool marks or gaps, and secure fitting feel.
Any suspect joint is reworked or replaced prior to testing to prevent leaks or failures.
- Check ring placement
- Verify uniform crimp
- Inspect surface integrity
- Confirm tactile firmness
Documenting tests and marking approved connections
After pressure testing and visual inspection confirm integrity, each approved PEX crimp should be clearly documented and physically marked to guarantee traceability and prevent inadvertent rework.
Records must note location, installer, date, test pressure and duration, and any corrective actions. Approved crimps receive permanent tags or stamped rings.
Retain documentation for warranty and code compliance; use consistent labeling and photo evidence where practical.
Best Practices for Durable, Code-Compliant Installations
For durable, code-compliant PEX work, installers must follow manufacturer instructions and local plumbing codes at every step.
Proper storage and periodic maintenance of crimp tools and rings, plus compact techniques for tight spaces and behind-wall runs, reduce failures.
Where complexity, concealed work, or code familiarity is required, professional installation is recommended over DIY.
Following manufacturer instructions and local plumbing codes
When installers adhere to manufacturer instructions and local plumbing codes, they confirm PEX crimp connections perform as designed and remain compliant with inspection requirements.
Technicians must follow specified crimp tool settings, ring types, acceptable fittings, and testing procedures. Documenting materials, installation steps, and pressure-test results confirms traceability.
Compliance minimizes leaks, passes inspections, and maintains warranty coverage while promoting long-term system reliability.
Storing and maintaining crimp tools and rings
Proper storage and routine maintenance of crimp tools and rings preserve tool accuracy, guarantee consistent crimps, and prevent contamination that could compromise joint integrity.
Store tools dry, in protective cases, away from corrosive chemicals and extreme temperatures.
Inspect jaws and calibration marks before use, clean debris, lightly lubricate pivot points, replace worn rings, and follow manufacturer calibration schedules to maintain code-compliant, durable installations.
Tips for working in tight spaces and behind walls
Maintaining tools and fittings in ready condition sets the stage for efficient work in confined locations; tight spaces and behind-wall runs demand deliberate planning and adapted techniques to preserve joint quality and meet code.
Use compact crimpers or swivel heads, pre-measure and mark tubing, employ flashlight or inspection camera, secure fittings with supports, guarantee clear access for inspection, and test all joints before closing walls.
Recommendations for professional vs. DIY projects
Distinguish clearly between professional and DIY PEX crimping projects by matching scope, complexity, and local code requirements to the installer’s skill level and tools.
For simple repairs or small runs, competent DIYers with proper tools, fittings, and code knowledge may proceed.
Complex systems, multi-family buildings, concealed plumbing, or permit-required work should involve licensed professionals to guarantee durability, inspection approval, and liability coverage.
Troubleshooting Tools and Replacement Parts
A list of essential spare parts—such as replacement jaws, springs, and O-rings—and guidance on when to replace them helps prevent job delays.
Portable diagnostic tools like ring gauges, calipers, and leak detectors enable quick field repairs and verification of crimps.
Recommendations for sourcing quality fittings from accredited suppliers round out a practical troubleshooting and replacement strategy.
Essential spare parts and when to replace them
Keep a small kit of PEX crimp tool essentials on hand: spare stainless steel rings, replacement jaws, a calibration gauge, and a ratcheting pawl spring.
Inspect jaws for wear after frequent use; replace if deformed. Rings are single-use.
Calibrate monthly or after drops. Replace the pawl spring when ratchet skips.
- Spare rings
- Replacement jaws
- Calibration gauge
- Pawl spring
Portable diagnostic tools for field repairs
Field technicians rely on a compact set of diagnostic tools to identify PEX crimping failures and perform reliable repairs on site.
Included are calipers for ring compression checks, go/no-go gauges, insulated multimeters for continuity and leak-detection circuits, portable pressure testers, handheld thermal cameras to locate cold joints, and battery-powered crimpers for emergency replacement.
Organized kits speed troubleshooting and minimize downtime.
Sourcing quality fittings and accredited suppliers
When sourcing PEX fittings and replacement parts, technicians should prioritize components from accredited suppliers whose products meet ASTM, NSF, and manufacturer-specific standards to guarantee compatibility and long-term performance.
Verify certifications, material compatibility, and warranty terms. Prefer reputable brands and local stocking distributors to reduce lead time.
Inspect batches on receipt and document supplier traceability.
- Verify certifications
- Check compatibility
- Prefer reputable brands
- Document traceability
Comparison of Crimp vs. Alternative PEX Connection Methods
The article compares crimp connections with clamp/crimp, expansion, and push-fit systems, outlining key pros and cons for each.
It evaluates cost, installation speed, and long-term reliability across typical residential and light commercial projects.
The goal is to help readers choose the most appropriate method based on budget, time constraints, and performance expectations.
Pros and cons of crimp vs. clamp/crimp, expansion, and push-fit
Although each PEX connection method secures tubing effectively, they differ markedly in installation speed, required tools, repairability, and long-term reliability. The crimp method is simple and durable; clamp/crimp offers similar strength with different tooling; expansion provides leak-resistant joints but needs skill; push-fit is fastest yet bulkier and pricier.
| Method | Strength | Trade-off |
|---|---|---|
| Crimp | Durable | Requires crimp tool |
| Expansion | Leak-resistant | Skilled technique |
| Push-fit | Fast | Bulkier, costlier |
Cost, speed, and reliability comparison for typical projects
For most residential jobs, cost, speed, and reliability hinge on project scale and installer skill: crimp systems offer low material cost and rapid installation with modest training.
Clamp/crimp provides similar durability with slightly higher tool expense.
Expansion fittings yield very reliable joints but slow the job and demand operator expertise.
Push-fit excels for quick repairs despite higher per-fitting cost and bulk.
Crimp suits large runs; clamps fit mixed materials; expansion maximizes long-term integrity; push-fit minimizes downtime.
Advanced Tips and Time-Saving Techniques
Experienced installers often use batch crimping to speed multi-run installations and maintain consistent connections.
They adopt ergonomic grips, tool rests, and periodic breaks to reduce fatigue during long jobs.
Seasonal factors like working in cold temperatures or avoiding prolonged UV exposure to PEX are planned for to preserve tool performance and tubing integrity.
Batch crimping strategies for multi-run installations
Organize workpieces and tools before beginning a multi-run PEX installation to maximize efficiency and consistency during batch crimping.
Group fittings by size and type, stage lengths and clips, and verify ring counts.
Use jigs or guides to align connections, perform progressive quality checks after every set, and document torque or crimp settings.
Maintain dry, clear workspace to prevent contamination and rework.
Ergonomic techniques to reduce fatigue
Rotate tasks and adopt neutral wrist positions to minimize repetitive strain during extended PEX crimping sessions.
Practitioners should alternate hands, use shorter grips, and position work at elbow height to reduce shoulder load.
Incorporating brief microbreaks, stretching forearms and fingers, and selecting lightweight or ratcheting crimp tools lowers cumulative fatigue, improving accuracy and sustaining productivity throughout multi-run installations.
Seasonal and environmental considerations (cold weather, UV exposure)
Plan for temperature and sun exposure when scheduling and staging PEX crimping work, since cold temperatures stiffen tubing and decrease tool and seal flexibility while prolonged UV exposure degrades PEX and fittings.
Work in temperate conditions when possible, warm tubing indoors before joining, use lubricants rated for low temperatures, shield exposed runs from sunlight, and store fittings in dark, dry containers to preserve integrity.
Quick Reference: Crimping Checklist for Each Connection
A concise checklist helps guarantee every PEX crimp connection meets pressure, alignment, and seal standards before testing.
The technician reviews fittings, ring position, tool calibration, and tubing insertion depth. Visual and tactile inspection confirms crimp uniformity.
Record keeping notes date, installer, and test result.
- Verify fitting type and ring placement
- Confirm insertion depth
- Check crimp tool calibration
- Inspect uniform crimp and pressure test
Conclusion
A final note underscores the value of mastering PEX crimping: studies show improper fittings cause up to 25% of residential plumbing failures, a startling reminder that small mistakes can lead to costly, disruptive leaks. The guide’s clear steps and tips aim to reduce that risk, empowering homeowners and professionals to create durable, watertight joints. With attention to technique and the right tools, PEX crimping becomes a reliable skill that protects homes and peace of mind.