How to Flush a Noritz Tankless Water Heater Step-by-Step (Easy DIY Guide)
To flush a Noritz tankless water heater, follow these steps to remove mineral scale and sediment, restoring efficiency and preventing overheating.
- Shut Off Power and Gas: Ensure the unit is completely powered down.
- Isolate Inlet/Outlet Valves: Close the valves to prevent water flow during the process.
- Attach Service Hoses and Pump: Connect service hoses to the unit and set up a submersible pump.
- Circulate Descaler or Vinegar: Use a manufacturer-recommended descaler or vinegar and let it circulate for 45–60 minutes.
- Flush with Clean Water: After the descaling process, flush the system with clean water until the discharge is clear.
- Restore Water Supply: Open the valves to resume water flow.
- Purge Air: Release any trapped air in the system.
- Reapply Power and Gas: Turn the power and gas back on, checking for leaks and errors.
Follow these detailed steps to effectively flush your Noritz tankless water heater.
What flushing a Noritz tankless water heater does and why it matters
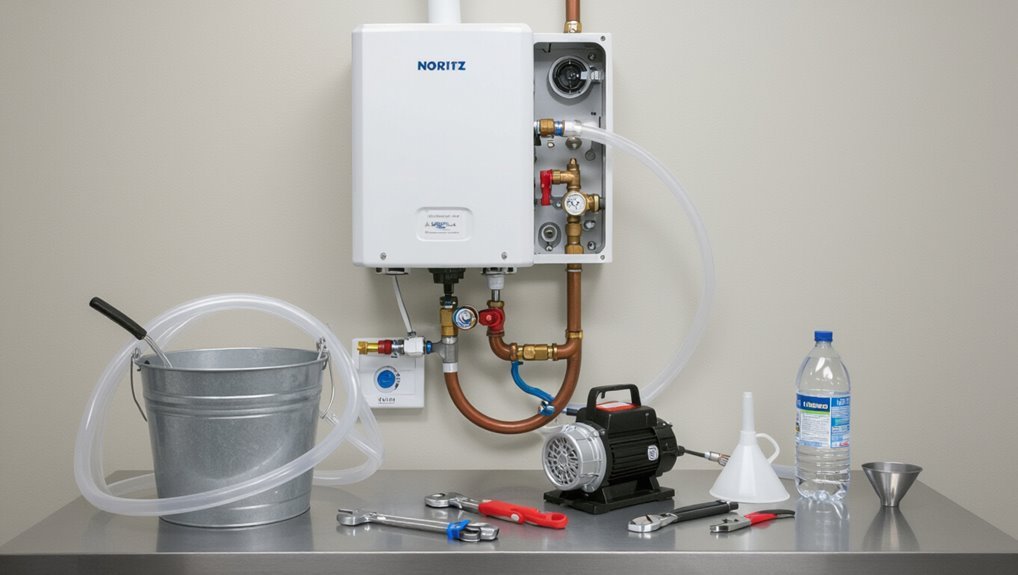
Flushing a Noritz tankless water heater removes mineral scale and sediment that reduce heat transfer, lower efficiency, and accelerate component wear.
Common signs the unit needs flushing include reduced flow, fluctuating water temperature, and error codes related to overheating or flow sensors.
Flush frequency should match water hardness—annually in soft water, every 6–12 months in moderate hardness, and as often as every 3–6 months in very hard water.
How scale and sediment affect performance and lifespan
Scale and mineral-laden water deposits build up inside heat exchangers and flow channels, reducing heat transfer efficiency and restricting water flow.
Over time, this forces the unit to run longer and hotter, increasing wear on components and the risk of premature failure.
Accumulated scale and sediment raise operating temperatures, reduce fuel efficiency, increase cycling, and shorten component life—prompting routine maintenance like how to flush noritz tankless water heater.
Signs your Noritz unit needs flushing
Because mineral buildup gradually impairs heat transfer and restricts flow, a Noritz tankless water heater will exhibit specific, measurable signs that indicate it needs flushing.
Symptoms include reduced hot water flow, fluctuating outlet temperatures, longer recovery times, frequent error codes related to overheating or flow sensors, and unusual noises from the heat exchanger.
Detecting these early prevents efficiency loss and component damage.
Recommended flushing frequency for different water hardness levels
How often a Noritz tankless water heater should be descaled depends primarily on the mineral content of the incoming water: soft water typically requires annual maintenance, moderately hard water benefits from flushing every six months, and very hard water or well water may need quarterly attention to prevent rapid scale buildup and preserve heat-transfer efficiency.
Adjust frequency for heavy use, verify hardness with a test kit, and follow manufacturer guidelines.
Tools, materials, and safety precautions needed
The section lists the specific tools and replacement parts required for a proper flush, plus recommended cleaning solutions and safe vinegar alternatives.
It also outlines necessary personal protective equipment and clear electrical/gas shutdown steps to prevent injury.
Guidance is provided on signs that a professional technician should be called instead of attempting DIY.
Required tools and parts
A clear checklist helps guarantee a smooth and safe flush of a Noritz tankless water heater: basic tools include two 3/4-inch ball valves or dedicated service valves, two lengths of 3/4-inch garden hose, a submersible pump (or access to a hose bib), a bucket or bucket substitute, and a suitable descaling solution (manufacturer-recommended or a diluted vinegar solution).
- Adjustable wrench
- Needle-nose pliers
- Protective gloves and safety glasses
Recommended cleaning solutions and vinegar alternatives
Recommended cleaning solutions for a Noritz tankless water heater include manufacturer-approved descalers and food-grade acids, while vinegar-based or citric-acid mixes serve as practical alternatives for moderate scale.
Users should choose products labeled safe for heating systems and follow concentration guidelines to avoid component damage.
- Use diluted white vinegar (3–6% acetic) or food-grade citric acid.
- Prefer commercial descalers per Noritz recommendations.
- Avoid bleach, muriatic acid, and oils that can harm seals and sensors.
Personal protective equipment and electrical/gas safety steps
Personal protective equipment and strict electrical/gas safety procedures are essential before servicing a Noritz tankless water heater.
Wear chemical-resistant gloves, safety goggles, and long sleeves. Use insulated tools and a non-sparking wrench for gas lines.
Shut off power at the breaker and close gas supply; verify with a multimeter and gas detector.
Confirm good ventilation and have a fire extinguisher nearby.
When to call a professional instead of DIY
When should a homeowner stop a DIY flush and call a professional: when tools, materials, or safety risks exceed their skill level.
Complex gas line work, electrical diagnostics, inaccessible condensate or pressure relief issues, corroded fittings, or persistent leaks warrant a licensed technician.
Professionals have specialized tools, replacement parts, and certifications to guarantee code compliance, safe ignition, and warranty protection—avoid DIY beyond basic flushing.
Preparing the Noritz unit for flushing
Before beginning the service, the technician guarantees power and gas to the Noritz unit are turned off and the cold-water feed is shut and isolated.
Service valves and hoses are attached to the inlet and outlet ports according to the manufacturer’s orientation, with the pump placed and primed so flow will circulate through the heat exchanger.
These preparatory steps prevent backflow, protect components, and allow the flushing pump to operate correctly.
Turning off power and gas supply safely
Several simple steps guarantee the Noritz tankless water heater can be serviced safely: cut electrical power at the dedicated breaker and shut the gas supply valve to the unit.
Confirm power is off with a noncontact tester.
Close the gas valve fully and verify no gas odor.
Wait several minutes for pilot or residual gas to dissipate before proceeding.
Shutting off the cold-water supply and isolating the unit
With power and gas confirmed off, attention shifts to the water lines: the cold-water supply must be shut and the unit isolated to prevent flow during flushing.
Close the main cold shutoff feeding the heater, then close the heater’s isolation valve(s).
Open a nearby cold faucet to relieve pressure and verify flow stoppage.
Confirm isolation visually and by feeling reduced inlet pressure.
Attaching service valves and hoses correctly
Begin by installing the service valves: attach a closed ball- or isolation-valve assembly to both the cold-water inlet and the hot-water outlet according to Noritz’s orientation markings, ensuring threaded fittings are clean and sealant or tape is applied to male threads only.
Connect the flush hoses: secure inlet and outlet hoses to the corresponding valve ports, tighten hand-tight plus quarter-turn, and check for straight, kink-free routing.
Positioning the pump and pump priming tips
Position the flush pump close to the service valves so hoses run straight with minimal bends, reducing strain and air pockets during circulation.
Confirm pump sits on stable, level surface and use short, kink-free hoses.
Pre-fill hoses and pump with descaling solution to prime; clamp connections.
Start pump slowly, watch for steady flow and no air bubbles.
Stop and reseal any leaks before full flush.
Step-by-step flushing procedure for Noritz models
The following section outlines the complete flushing workflow for Noritz tankless heaters, from setup through restoration.
It covers bypassing the unit and connecting a pump, circulating vinegar or descaler for the manufacturer-recommended interval, and flushing until the outflow runs clear.
Finally, it explains refilling, purging air, and returning the system to normal service.
Overview of the full flushing workflow
Flushes proceed in a fixed sequence that isolates the unit, circulates cleaner through the heat exchanger, rinses residual chemicals, and returns the system to normal operation.
The workflow outlines preparation, chemical circulation, and verification. Technicians confirm isolation, run a pump with descaler, thoroughly rinse, then restore supply and test for leaks and proper ignition.
- Prepare and isolate
- Circulate descaler
- Rinse and verify
Step 1 Bypass the water heater and connect the pump
Begin by shutting off the cold and hot water supply valves to isolate the Noritz unit.
Then open a nearby faucet to relieve pressure.
Engage the heater’s bypass valves so inlet and outlet bypass paths are active.
Attach hoses to the cold and hot service ports, securing with clamps.
Then connect to a dedicated pump and a bucket.
Verify connections for leaks before starting circulation.
Step 2 Circulate vinegar or descaling solution for the recommended time
With the bypass open and the pump and hoses secured, circulation of the descaling solution can start.
The recommended concentration and duration from Noritz (typically 45–60 minutes with household vinegar or manufacturer descaler) should be followed.
Maintain pump flow, monitor for leaks, and avoid running the unit.
After the timed circulation, turn off the pump and prepare for the next flushing stage.
Step 3 Flush with clean water until clear
Open the cold-side bypass valve and restart the circulation pump briefly to purge the descaling solution.
Then switch the inlet hose to a fresh-water source and run the pump until the discharge water runs clear and free of particulates or vinegar odor.
Monitor clarity, flush for several minutes, and inspect hoses and valves for residual debris.
Repeat until effluent is consistently transparent and odorless.
Step 4 Refill, purge air, and restore normal supply
Restore the system by shutting off the pump, closing both bypass valves, and reconnecting the potable water supply to the heater inlet;
then slowly reopen the cold and hot service valves to allow water into the unit while observing for steady, air-free flow at a nearby faucet.
Monitor inlet and outlet connections for leaks, bleed trapped air via service valves until flow is smooth,
then fully open isolation valves to resume normal supply.
Step 5 Reconnect power and gas and test hot water operation
After confirming the system is filled, free of air, and leak-free, proceed to reapply electrical and gas services to the Noritz unit.
Restore power at the breaker and reopen the gas valve slowly. Inspect for any smells or irregular noises.
Run multiple fixtures to verify consistent hot water and stable temperature.
Monitor for leaks and error codes; document results and retest if necessary.
Model-specific notes and variations
Noritz residential units vary in valve layout, bypass access, and filter placement, all of which influence flushing technique.
Outdoor models require weatherproofing and different isolation procedures compared with indoor units.
Electronic control panels may display model-specific error codes and locking functions that should be referenced before and after flushing.
Common Noritz residential unit differences that affect flushing
Several Noritz residential tankless models share core components but vary in plumbing connections, drain/flush ports, isolation valve placement, and control panel layouts—differences that directly affect the flushing procedure.
Technicians should note inlet/outlet orientation, presence or absence of dedicated flush ports, integrated condensate/drain paths, valve types (ball, gate, check), and control-lock features; these determine required adapters, sequence, and safety checks.
Steps for outdoor vs. indoor Noritz models
For outdoor and indoor Noritz tankless models, the flushing sequence is fundamentally the same but differs in access, component placement, and required adapters: outdoor units typically offer easier access to drain/flush ports and may have weatherproof valve assemblies.
In contrast, indoor units often require condensate management, closer clearances, and sometimes additional access panels or fittings.
Technicians should adjust hose routing, valve connections, and winterization steps per installation.
Electronic control panel considerations and error codes to watch
One key consideration is the unit’s electronic control panel, which governs diagnostics, service modes, and displays error codes that guide flushing and maintenance procedures.
Users should consult the model-specific manual for code definitions (e.g., scale, flow, ignition faults). Some panels disable pump or bypass functions during errors; others allow manual service mode entry.
Record codes and reset only after corrective actions.
Troubleshooting common problems during flushing
When flushing a Noritz tankless water heater, technicians commonly encounter issues such as pump failure or low circulation, persistent cloudy or discolored discharge, flushing-triggered error codes, and minor leaks at service connections.
Each problem has straightforward diagnostic steps—checking pump priming and hoses, inspecting water clarity and repeating the flush if needed, referencing model-specific error-code procedures, and tightening or replacing seals.
Addressing these points promptly reduces downtime and prevents damage.
Pump not circulating or low flow issues
Check the circulation pump and flow path if the flushing solution fails to move or shows weak flow.
Inspect pump power, connections, and impeller for blockages or seized bearings.
Verify isolation valves, hoses, and filter screens are open and clear.
Confirm proper pump orientation and sufficient head pressure.
Replace a faulty pump or clogged components before repeating the flush to restore adequate circulation.
Persistent cloudy or discolored water after flushing
Although flushing typically clears mineral sediments and deposits, persistent cloudy or discolored water afterward indicates remaining scale, rust, or disturbed deposits in the unit or plumbing that require targeted troubleshooting.
Inspect inlet and outlet filters, trap aerators, and downstream piping for loosened sediment or corrosion.
Repeat flushing with descaler if scale persists, and consider replacing heavily corroded sections or installing a sediment filter.
Error codes triggered by flushing and how to clear them
Flushing a Noritz tankless water heater can sometimes trigger error codes as sensors detect abnormal flow, temperature, or air in the system; identifying the specific code and its meaning is the first step to resolving the issue.
Consult the manual for code definitions, clear temporary codes by cycling power, purge air and restore proper flow, then verify normal operation.
Contact support if persistent.
Leak detection and sealing tips
Inspect all fittings and connections for leaks before, during, and after the flushing process to catch seepage early.
If moisture appears, isolate the source: tighten compression nuts, replace worn washers, or reseat hose clamps.
Use thread sealant or PTFE tape on pipe threads, avoiding overwrap.
After repairs, run a low-pressure rinse and recheck joints.
Record any recurrent leaks for professional service.
Maintenance checklist after flushing
After flushing, the technician should inspect filters, inlet screens, and the pressure relief valve for debris or wear.
They should also verify venting and combustion components are secure and free of obstructions.
Finally, the service date should be logged and the next service reminder scheduled.
Inspecting filters, inlet screens, and pressure relief valve
Once the descaling cycle is complete, the technician or homeowner should verify the condition of all inlet filters, screens, and the temperature and pressure relief (T&P) valve to guarantee the system operates safely and efficiently.
Remove and rinse debris from screens, replace damaged filters, test T&P valve by lifting its lever to confirm proper discharge and reseal, and document findings and any replacements.
Verifying venting and combustion components
With internal components confirmed clean and functional, attention turns to the venting and combustion systems to guarantee safe operation and proper exhaust.
The technician visually inspects vent pipes, seals, and terminations for corrosion, blockage, or loose fittings.
Combustion air intakes, flame sensor, and burner assembly are checked for soot, secure connections, and correct draft.
Corrective action is documented.
Logging service date and setting next service reminder
- The technician records the flush date, notes parts replaced, and logs water hardness and flow observations for future reference. A clear reminder schedule is set.
- Record: date, model, serial, technician initials
- Notes: issues found, parts replaced, water conditions
- Reminder: calendar alert 12 months (or manufacturer interval) with service checklist attached
Cost, time, and frequency considerations
The section compares estimated time and expense for a DIY flush versus hiring a professional, noting typical parts, pump rental, or labor costs.
It also explains how hard water, mineral content, and household hot water usage affect recommended service intervals.
Practical examples and quick guidelines will help readers decide which option fits their budget and schedule.
Estimated time and cost for DIY vs. professional service
Although homeowners can often perform a basic Noritz tankless water heater flush themselves, time, cost, and long-term maintenance needs determine whether DIY or hiring a professional is more appropriate. DIY: 1–2 hours, $10–40 (supplies). Pro: 0.5–1.5 hours onsite, $100–250. Consider skill, warranty, and complexity.
| Option | Time | Typical Cost |
|---|---|---|
| DIY | 1–2 hrs | $10–40 |
| Professional | 0.5–1.5 hrs | $100–250 |
How water quality and usage change service intervals
Because mineral content and household demand directly affect scale buildup and component wear, water quality and usage patterns are the primary factors that determine how often a Noritz tankless water heater needs service.
Hard water, high flow rates, frequent hot-water cycles, or large households shorten intervals, raising flushing frequency, parts replacement, and labor costs.
Soft water and low usage extend service intervals, reducing time and expense.
Tips to prevent scale buildup between flushes
Preventive measures can reduce the frequency of descaling and protect a Noritz tankless heater from mineral buildup.
Consider whole-house or point-of-use water softening, regular seasonal inspections, and simple user habits such as running a flush after hard-water exposure.
If recurring scale persists despite mitigation, comparing the cost of repeated descaling to replacement can determine the more economical option.
Water softening and point-of-use options
Several practical options exist to reduce mineral buildup between flushes, including whole-house water softeners, magnetic or electronic conditioners at the point of entry, and under-sink or inline point-of-use filters for hard-water-prone fixtures.
Whole-house ion-exchange systems prevent scale throughout plumbing; conditioned water minimizes heater deposits.
Point-of-use filters protect high-use outlets.
Selection balances installation cost, maintenance frequency, and local water hardness levels.
Seasonal checks and user habits that extend unit life
Schedule seasonal inspections and adopt simple daily habits to keep a Noritz tankless water heater operating efficiently and minimize scale between professional flushes.
Inspect inlet filters, vents, and visible piping quarterly. Monitor performance for reduced flow or temperature drift. Encourage occupants to use low‑flow fixtures and flush rarely used taps monthly.
- Check sediment screens
- Track error codes
- Use short, regular hot water runs
When replacement is more cost-effective than repeated descaling
While regular inspections and modest user habits can slow mineral accumulation, there are circumstances where replacing components or the entire Noritz unit is more economical than repeatedly descaling.
Consider frequent heavy scaling, persistent efficiency loss, recurring leaks, or costly service calls.
Replace worn heat exchangers, inlet filters, or the unit when lifecycle cost, warranty status, and safety risks outweigh ongoing maintenance expenses.
Useful resources and references
The article points readers to Noritz’s official website and model-specific manuals for precise flushing procedures and error-code guidance.
It also identifies reputable parts suppliers and local pump rental options for necessary equipment.
Finally, it summarizes key warranty considerations and the documentation required to preserve coverage after maintenance.
Where to find Noritz manuals and model-specific instructions
Where can owners locate authoritative Noritz manuals and model-specific instructions for flushing and maintenance? Owners should consult official and model-specific sources to guarantee correct procedures and safety.
- Noritz official website: product pages and downloadable manuals by model number.
- Manufacturer customer support: email, phone, and live chat for clarification.
- Authorized dealers and certified service technicians: model-specific PDFs and printed guides.
Recommended parts suppliers and pump rentals
After locating the correct model information from Noritz and confirming any manufacturer instructions, owners can assemble the parts and equipment needed for a proper flush.
Reliable sources include OEM Noritz parts, plumbing supply houses, and pump rental agencies.
Suggested vendors and options:
- Noritz parts via authorized dealers for gaskets and valves
- Local plumbing supply for hoses and fittings
- Tool rental shops for a compact sump pump or dedicated flush pump
Relevant warranty considerations and documentation requirements
Warranty coverage depends on adherence to Noritz’s maintenance guidelines and proper documentation of service; owners should verify terms specific to their model, since neglect or noncompliant servicing can void parts or labor provisions.
Retain receipts, service logs, and photos from flushes. Use certified technicians when required. Submit documentation promptly for claims.
Confirm warranty duration, transferability, and excluded conditions before DIY work.
Conclusion
Regular flushing preserves a Noritz tankless water heater’s efficiency and longevity. For example, a homeowner in Phoenix reduced burner cycling and restored 10% efficiency after a yearly vinegar flush removed heavy mineral buildup. Following the outlined tools, safety steps, and model notes prevents damage and maintains warranty coverage. Consistent maintenance, timely filter checks, and simple descaling between professional services help avoid costly repairs and guarantee reliable hot water performance.