How to Remove a Pop-Up Drain: Step-by-Step Fix for Kitchen or Bathroom Sinks
To remove a pop-up drain from your kitchen or bathroom sink, start by shutting off the water supply. Gather a bucket and towels to catch any spills, then disconnect the P-trap to access the tailpiece. From above, lift the stopper and detach the pivot rod and linkage beneath the sink. Loosen the drain nut and carefully lift the drain body out, cleaning away any old putty. If you encounter a stuck drain, follow additional steps for replacements, reassembly, and leak testing to ensure everything is secure.
Quick overview What a pop-up drain is and why you might remove it
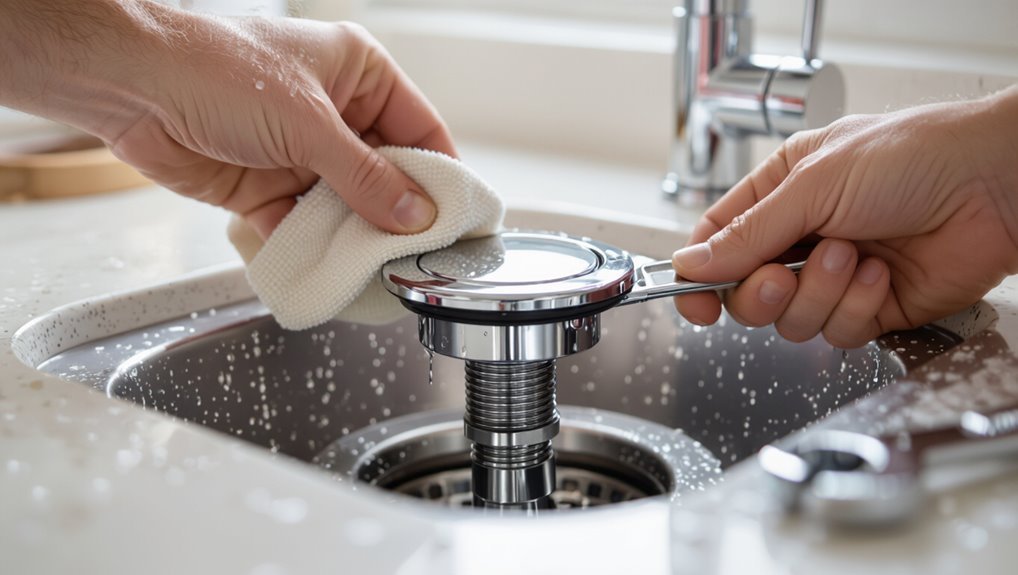
A pop-up drain is a sink assembly with a movable stopper operated by a lever and linkage that opens and closes to retain or release water.
Homeowners commonly remove pop-up drains to repair leaks or broken linkages, to clean out heavy buildup, or to replace and upgrade fixtures for improved function or appearance.
The following steps explain how to disconnect and remove the assembly safely.
How pop-up drains work in sinks
Pop-up drains are sink assemblies that open and close via a hinged stopper connected to a lift rod and linkage beneath the sink. This allows users to retain or release water without removing the stopper manually.
The stopper motion transmits through a pivot rod and clevis to the lift rod; seals and a threaded tailpiece maintain a watertight path.
Instructions often explain how to remove a pop up drain.
Common reasons to remove a pop-up drain (repair, replace, clean, upgrade)
Several common situations prompt removal of a pop-up drain: persistent leaks, slow or blocked drainage, damaged or corroded parts, persistent mineral buildup, or simply an aesthetic or functional upgrade.
Homeowners remove pop-up assemblies to access clogged traps, replace worn seals and linkages, restore smooth operation, or swap finishes and styles.
Routine cleaning prevents odor and prolongs component life.
Tools and materials you’ll need before starting
Before beginning the removal, gather essential tools such as an adjustable wrench, plumber’s pliers, bucket, and plumber’s putty knife.
Include optional items like penetrating oil, a basin wrench, spare gaskets, and replacement parts for stubborn or corroded fittings.
Wear safety gear (gloves, eye protection) and clear and protect the workspace to prevent water damage and guarantee easy access.
Essential tools list
A compact set of hand tools and basic materials will make removing a sink pop-up drain faster and prevent damage to plumbing finishes.
Essential items cover disassembly, protection, and cleanup. Prepare the following:
- Adjustable wrench
- Channel-lock pliers
- Slip-joint pliers
- Screwdrivers (flat and Phillips)
- Bucket and rags
Optional tools and supplies for difficult ports
Tackle stubborn or hard-to-reach pop-up drains with a few specialty tools and supplies that make extraction safer and more efficient.
Recommended extras include items for seized or tight fittings and awkward access.
- Basin wrench
- Strap wrench
- Faucet handle puller
- Penetrating oil
- Flexible drain key
Safety gear and workspace preparation
After listing specialty tools for stubborn fittings, attention turns to safety gear and workspace setup to protect both the person and the fixtures.
Protective gloves, safety glasses, and knee pads reduce injury risk. Lay down drop cloths or towels to catch parts and prevent scratches.
Gather a bucket, rags, adjustable wrench, pliers, and flashlight within reach. Ascertain adequate ventilation and good lighting.
Preparing the sink and plumbing for removal
Before beginning work, the water supply should be shut off and the area protected to prevent damage.
Towels and a bucket are placed beneath the sink to catch water and debris and minimize spills.
The P-trap and tailpiece are then disconnected so the drain assembly can be removed.
Turning off water and protecting the area
Shut off the water supply and clear the surrounding area to prevent spills and protect finishes: locate the sink’s shutoff valves under the cabinet (or the home’s main if none exist), close them fully, then open the faucet to relieve pressure and drain remaining water.
Confirm zero flow at the faucet, note valve condition, and wear gloves and eye protection before proceeding with drain disassembly.
Placing towels, buckets, and avoiding spills
With the water off and fixtures drained, prepare the work area to contain any residual or accidental spills: lay absorbent towels or rags inside the cabinet and across the countertop, and position a shallow bucket or pan beneath the trap and pop-up linkage to catch water and debris.
Seal nearby items in plastic, fold extra towels for padding, and keep a flashlight and disposable gloves handy for quick cleanup.
Disconnecting the P-trap and drain tailpiece
Carefully place the bucket beneath the sink drain and then loosen the slip nuts on the P-trap and the tailpiece using channel-lock pliers or a pipe wrench; this will allow any trapped water to empty into the catchment and expose the compressed fittings for removal.
Once drained, fully unscrew nuts, detach the curved trap, and slide the tailpiece free.
Inspect washers and clean mating surfaces before proceeding.
Step-by-step removal of a pop-up drain (single basin)
The procedure begins by removing the sink stopper assembly from above to expose the linkage.
From beneath the basin, the pivot rod and connecting linkage are detached before the drain nut is unscrewed and the drain body lifted out.
Finally, the sink drain opening and flange are cleaned to prepare for inspection or a new installation.
Removing the sink stopper assembly from above
Begin by positioning oneself behind the sink and lifting the lift rod to its highest point to expose the stopper assembly; this provides clear access to the pivot rod and retaining nut located beneath the tailpiece.
Grip the stopper head, twist gently to break any seal, then lift straight up while guiding the tailpiece through the drain opening.
Inspect and clean the stopper before further disassembly.
Detaching the pivot rod and linkage from below
Positioned beneath the sink, the technician locates the pivot rod where it connects to the drain tailpiece and the horizontal linkage that runs to the lift rod. These components must be disconnected before the drain can be removed.
They loosen the retaining nut on the tailpiece, slide out the pivot rod, detach the clip securing the horizontal linkage, and withdraw linkage from the lift rod connection.
Unscrewing the drain nut and removing the drain body
With the linkage cleared, attention turns to the drain nut beneath the sink: using a basin wrench or adjustable wrench, the technician loosens the large locknut securing the drain body to the tailpiece, taking care to hold the drain assembly above to prevent twisting the sink or scratching the finish.
Once loosened, the nut and any fiber or rubber gasket are removed, and the drain body is pushed upward and withdrawn through the sink.
Cleaning the sink drain opening and flange
After the drain body is lifted free, the technician inspects the exposed sink opening and flange area for old putty, mineral deposits, and debris.
Using a plastic scraper and soft brush, they remove dried plumber’s putty, scale, and grime.
Remaining residue is wiped with a cloth dampened with vinegar or mild cleaner, then rinsed and dried to guarantee a clean, even sealing surface.
Step-by-step removal for double sinks and integrated pop-up assemblies
For double sinks and integrated pop-up assemblies, attention shifts to the shared linkage and crossbar systems that connect both drains.
The procedure typically requires loosening or removing the crossbar and disconnecting the linkage before extracting individual stems.
For two-stem or center-set pop-up assemblies, each stem and its retaining hardware must be removed methodically to avoid misalignment or damage.
Handling shared linkage and crossbar systems
Begin by identifying the linkage configuration beneath the double sink: determine whether the two pop-up drains share a single lift rod and horizontal crossbar or use independent assemblies connected by a coupling.
For shared systems, support the crossbar, detach retaining clips, and unhook pivot rods simultaneously. Label parts and work symmetrically.
For coupled independents, disconnect the coupling, then remove each assembly separately.
Removing two-stem or center-set pop-up assemblies
When addressing two-stem or center-set pop-up assemblies, start by confirming whether the sink uses the shared crossbar linkage described earlier or independent stems joined by a coupling, since that determines which fasteners to support before loosening.
For shared linkage, support the crossbar, unclip pivot rods, then remove retaining nuts.
For independent stems, loosen coupling, detach stems, and extract each pop-up assembly separately.
Dealing with stuck, corroded, or hard-to-remove drains
When a pop-up drain is seized by rust or buildup, the guide recommends applying a penetrating oil and allowing adequate soak time to loosen connections.
If locknuts remain immobile, careful use of penetrating sprays, adjustable wrenches, or impact techniques can break corrosion without damaging fittings.
For extreme cases, moderate heat, cutting tools, or the assistance of a professional plumber should be considered to avoid further harm.
Applying penetrating oil and wait times
Apply a penetrating oil to the drain assembly and surrounding threads to loosen corrosion and break down mineral deposits; a liberal coating guarantees the solvent reaches tight crevices where metal has seized.
Allow 15–30 minutes for initial penetration, then reapply if needed and wait longer—up to several hours for severe buildup.
Wipe excess before attempting removal to prevent slipping and contamination.
Techniques for loosening rusted locknuts
After allowing penetrating oil time to work and wiping away excess, attention turns to the locknut that secures the pop-up drain. Corroded nuts often require mechanical methods in addition to chemical loosening.
Techniques include careful leverage, tap-and-shock to break corrosion, using strap or adjustable wrenches, protecting finishes with cloth, and working incrementally to avoid damage.
- Use a firm, steady grip
- Tap threads lightly
- Apply controlled leverage
- Cushion metal surfaces
- Loosen gradually
When to use heat, cutting tools, or professional help
Assess escalation carefully: heat, cutting, and calling a professional each carry risks and should be chosen only when safer mechanical methods fail or when the drain’s condition (severe corrosion, stripped fittings, or brittle materials) makes further hand tools ineffective.
Apply heat cautiously to soften corrosion on metal parts; avoid plastics and finishes. Use cutting tools only to remove irreparably seized components.
Call a pro if access, damage risk, or plumbing complexity is high.
Replacing or reinstalling a new drain
Selecting an appropriately sized replacement pop-up drain and compatible finish is the first step to a successful reinstall.
The process then moves through installing the flange, gasket, and drain body, reassembling the linkage and stopper, and finally reconnecting the P-trap.
A careful leak test and functional check of the stopper guarantee the new assembly operates correctly.
Choosing the correct replacement pop-up drain
When choosing a replacement pop-up drain, the homeowner should match the drain type, size, and connection style to the existing sink and plumbing to secure compatibility.
Additionally, verify finish and material for corrosion resistance and aesthetic match.
Confirm tailpiece diameter and thread type, overflow alignment if present, and whether a lift rod or push-button mechanism is required to guarantee proper function without altering existing water lines or hardware.
Installing new flange, gasket, and drain body step-by-step
Gather the tools and materials—new flange, rubber gasket or plumber’s putty, drain body, and slip nut—before beginning the installation to guarantee a smooth, uninterrupted process.
Apply plumber’s putty or place the rubber gasket under the flange, insert flange into sink hole, align drain body beneath, thread slip nut onto tailpiece, hand-tighten then secure with wrench, wipe excess sealant, and inspect for proper fit.
Reassembling linkage and testing stopper action
Reconnect the pop-up linkage by inserting the lift rod into the flange and aligning the pivot rod with the tailpiece clevis.
Then secure the pivot rod with its retaining nut and reconnect the spring clip to hold the clevis at the proper height.
Operate the lift rod several times, adjust clevis pin position for full open/close travel, tighten fasteners, and confirm smooth, wobble-free stopper action.
Reconnecting P-trap and leak-testing
With the pop-up linkage adjusted and operating smoothly, attention shifts to reattaching the P-trap and verifying the new or reinstalled drain is watertight.
Hand-tighten slip nuts, align trap inlet and tailpiece, then snug with a wrench without over-tightening.
Run water, inspect joints for drips, and feel for moisture.
Retighten if needed and check again until no leaks appear.
Common problems and how to fix them
Common post-removal issues include leaks at the flange or tailpiece, which are diagnosed by inspecting gaskets, slip nuts, and sealant. These issues are fixed by tightening or replacing seals.
Malfunctioning stoppers that do not seal typically require linkage or plunger adjustments to correct alignment and travel.
Persistent slow drainage after reinstall often points to residual clogs or venting problems. This is addressed by clearing blockages or checking the vent stack.
Leaks at flange or tailpiece diagnostics and fixes
Inspect the flange and tailpiece first when water appears beneath a sink, since these points are the most frequent leak sources after pop-up removal.
Evaluate gasket condition, tighten connections, and check for cracks.
Common remedies include:
- Replace worn rubber gasket
- Reseal flange with plumber’s putty
- Tighten tailpiece nut
- Replace corroded tailpiece
- Clean debris from seal interfaces
Stopper not sealing adjustments to linkage and plunger
Adjusting the linkage and plunger is the usual remedy when a pop-up stopper fails to form a watertight seal: misaligned pivot rods, worn clevis pins, or an improperly set plunger height prevent the stopper from fully seating.
Inspect pivot rod alignment, replace corroded clevis pins, and fine-tune plunger height via the pivot strap or set screw.
Test repeatedly, ensuring the stopper closes flush and holds water.
Slow drainage after reinstall clearing clogs and vent issues
After reinstalling a pop-up drain, homeowners may still encounter slow drainage caused by partial clogs or venting problems that restrict water flow.
Inspect and remove debris from the tailpiece, P-trap, and trap arm; flush with hot water or a plumbing snake.
Check roof vents for obstructions or listen for gurgling that indicates vent issues; call a pro if vents must be cleared.
Tips to prevent future issues with pop-up drains
Regular maintenance and periodic cleaning help keep pop-up drains operating smoothly and prevent buildup that can cause clogs.
Choosing durable materials and corrosion-resistant finishes extends lifespan and reduces the need for repairs.
If recurring problems persist despite upkeep, replacement with a different drain type may be the most reliable solution.
Maintenance routine and cleaning tips
Establishing a simple maintenance routine prevents most pop-up drain problems before they start.
Periodic checks, gentle cleaning, and quick fixes extend drain life and avoid clogs.
Recommended actions include:
- Remove and clear stopper monthly
- Flush with hot water weekly
- Use mild, non-corrosive cleaner
- Inspect linkage and seals quarterly
- Tighten fittings as needed and replace worn parts
Best materials and finishes to resist corrosion
Materials and finishes play a central role in preventing corrosion of pop-up drains by determining how well components resist moisture, chemicals, and mechanical wear.
Stainless steel (304 or 316) and solid brass resist rust and leaching. Protective coatings like nickel, chrome, or PVD add durability.
Avoid zinc alloys in wet environments. Choose matched finish and quality seals to minimize galvanic corrosion and prolong service life.
When to upgrade to a different drain type
Corrosion-resistant materials and matched finishes extend a pop-up drain’s service life, but there comes a point when component design or installation limits ongoing reliability.
Consider replacing when persistent leaks, recurrent clogs, stripped linkage, or warped seats recur despite repairs.
Switch to a grid, basket, or flip drain if simpler mechanics, improved seal reliability, or easier maintenance will reduce downtime and future costs.
Estimated time, difficulty, and cost
Estimated time and difficulty for removing a pop-up drain vary: a straightforward DIY removal typically takes 30–60 minutes, while a full replacement or stubborn corrosion can take 1–2 hours and may require more skill.
Parts for a basic replacement commonly cost $10–$50, while specialty assemblies run higher.
Professional service, including labor, generally ranges from $100–$250 depending on region and complexity.
Time breakdown for DIY removal vs. replacement
A clear comparison of time, difficulty, and cost helps determine whether a DIY removal or a full replacement of a pop-up drain is the better choice.
DIY removal typically takes 30–90 minutes for a competent homeowner, low difficulty with basic tools, and minimal expense.
Full replacement can take 1–3 hours, requires intermediate skills, and involves higher parts and potential labor considerations.
Typical cost range for parts and professional service
Costs for parts and professional service vary widely depending on drain type, materials, and labor rates. Typical parts cost ranges from $10–$75; gasket kits and replacements are inexpensive, specialty finishes cost more. Labor for a plumber usually runs $75–$200 per hour; total service often totals $100–$400 depending on complexity and travel.
| Item | Typical Cost |
|---|---|
| Basic parts | $10–$35 |
| Premium parts | $40–$75 |
| Labor per hour | $75–$200 |
| Typical service | $100–$400 |
Troubleshooting checklist before calling a plumber
Before calling a plumber, the reader should run a few quick diagnostics—check for visible blockages, test the pop-up mechanism, and note whether the problem is slow drainage, a leak, or a mechanical failure.
They should also record relevant details such as the sink type, age of the fixture, any recent work, and whether multiple drains are affected.
Providing these observations will help a professional diagnose and quote more quickly.
Quick diagnostic steps to identify cause
Start by observing how the pop-up drain behaves during normal use and noting any unusual sounds, slow drainage, leaking, or difficulty operating the stopper.
Check for visible blockages, test water flow with and without the stopper, inspect the pivot rod and linkage under the sink for looseness or corrosion, and feel for leaks around seals.
Record simple findings to guide next steps.
Information to provide to a professional for faster service
What details will help the technician diagnose the pop-up drain issue more quickly? Provide concise facts for faster service, including location, symptoms, timeline, prior repairs, and access constraints.
- Sink type (bathroom/kitchen, pedestal/undermount)
- Exact symptom (stuck, leaking, slow drain)
- When problem began
- Any DIY attempts
- Clear access or cabinet obstructions
Conclusion
To sum up, the guide equips a homeowner to remove a pop-up drain confidently, minimizing leaks and restoring proper flow. Significantly, clogged pop-up assemblies account for about 60% of common sink drain complaints, making this simple repair a high-impact DIY task. With basic tools, clear steps for single or double sinks, and troubleshooting tips, the average person can save time and money while preventing future issues through routine cleaning and proper installation checks.