How Does a Shower Drain Work? Simple Explanation of Parts, Flow & Common Problems
A shower drain works by collecting used water through a strainer, directing it through a flange and drain body into a tailpiece, and then into a P-trap. The P-trap holds a water seal that prevents sewer gases from entering your home. Water flows through the trap arm into the main waste line, with venting in place to avoid air locks. Common issues include clogs from hair and soap, mineral buildup, leaks at flanges, and dry traps that can cause odors. For practical solutions, diagnosis steps, and upgrade options, read on.
How a Shower Drain Works Simple Overview
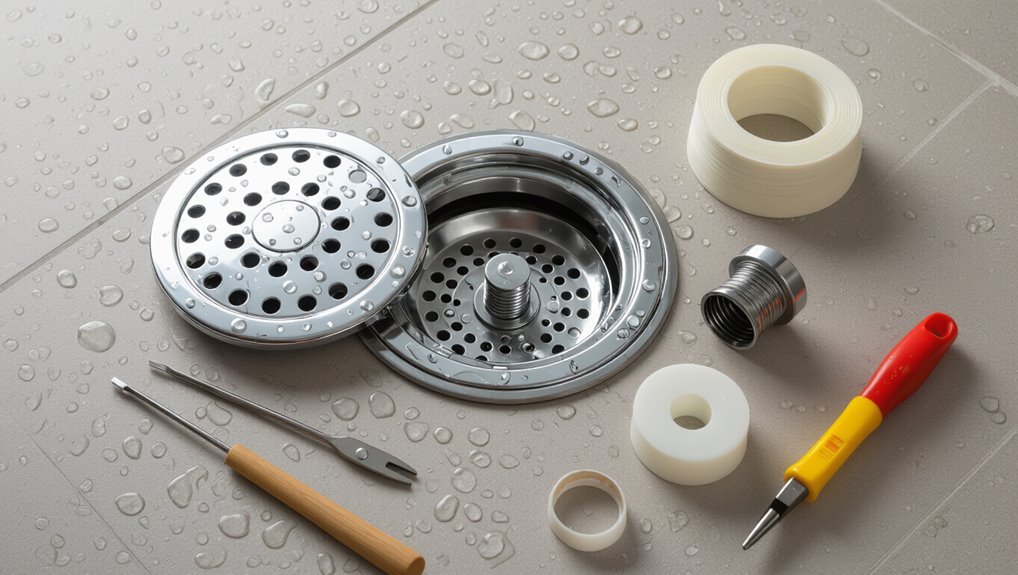
A shower drain collects and directs used water away from the shower area to prevent pooling.
Water flows from the shower pan into the drain opening, passes through the trap that holds a water seal, and continues through the home’s waste pipes toward the sewer or septic system.
This simple path relies on gravity and proper pipe connections to maintain steady drainage.
What a shower drain does in one sentence
Directs wastewater away from the shower floor into the home’s plumbing system, preventing standing water and allowing safe disposal of used water.
Essentially, a shower drain collects and channels graywater, traps debris to reduce clogs, and maintains a water seal to block sewer gases.
This concise description answers how does a shower drain work by summarizing its primary function.
Basic flow of water from shower to sewer
Water flows from the shower floor into the drain opening, passes through a strainer or grate, and drops into the trap where a small pool of water seals the home from sewer gases.
From the trap, wastewater continues via horizontal drainpipe to a vertical stack, then into the building’s sewer line.
Venting prevents siphoning; cleanouts allow maintenance access.
Key Parts of a Shower Drain and Their Functions
A shower drain consists of several distinct components that work together to channel water away and prevent odors or blockages.
The cover or strainer keeps debris out while the flange and clamping assembly secure the drain to the shower pan and waterproofing.
Below these sit the drain body and tailpiece, which feed into the P-trap—the curved trap that holds water to block sewer gas—and then the trap arm and waste line carry effluent to the building drain system.
Shower drain cover/strainer
The shower drain cover, often called a strainer or grate, sits flush with the shower floor and serves as the visible barrier between the user and the drain assembly below.
It prevents large debris, hair, and objects from entering the pipe, allows water to pass freely, and facilitates cleaning access.
Materials, slot patterns, and fastenings affect durability, flow rate, and clog propensity.
Drain flange and clamping assembly
Beyond the visible grate, the drain flange and clamping assembly form the mechanical connection between the shower floor and the plumbing below, securing the waterproofing layer and guiding wastewater into the trap.
The flange provides a stable rim bonded to the membrane; the clamping ring compresses and seals the waterproofing and tile, preventing leaks and maintaining alignment for the drain cover while resisting movement and corrosion.
Shower drain body and tailpiece
Central to the shower’s drainage system, the drain body houses internal components and directs water into the plumbing while the tailpiece provides the straight connection down to the trap.
The drain body secures the flange, supports strainers and clogs access, and channels flow.
The tailpiece, typically metal or PVC, aligns the outlet, seals with fittings, and resists corrosion and leaks.
P-trap (shape, purpose, and location)
Following the tailpiece, the plumbing bends into the P-trap, a U-shaped section of pipe that holds a small water seal.
The P-trap’s curvature prevents sewer gases from entering the bathroom while capturing debris that might cause clogs.
Typically located directly beneath the shower drain within the access panel or floor cavity, it also provides a convenient point for cleaning and inspection.
Trap arm and waste line
The trap arm links the P-trap to the home’s larger waste line, carrying wastewater horizontally from the trap to the vertical stack, while the waste line conveys that flow away toward the sewer or septic system.
Proper slope, secure joints, and correct length prevent standing water and sewer gas escape.
Access points and cleanouts allow maintenance and removal of obstructions without disturbing fixtures.
Venting and vent stack connection
While the trap arm and waste line move wastewater away from the shower, venting provides the pressure balance that keeps that flow smooth and prevents siphonage of the P-trap.
The vent stack connects the fixture to roof ventilation, admitting air to equalize pressure and allowing sewer gases to escape above the dwelling.
Proper slope, unobstructed vents and correct connection height guarantee reliable operation.
Shower pan, liner, and weep holes
A properly constructed shower pan channels water toward the drain while protecting the subfloor; beneath it, a waterproof liner forms the primary barrier and directs any seepage into the drain assembly through small perforations called weep holes.
Weep holes prevent pooled moisture under the pan by allowing collected water to exit into the drain, maintaining flow and preventing rot, mold, and structural deterioration over time.
Sealants, gaskets, and waterproofing components
Sealants, gaskets, and other waterproofing components form the critical interface between a shower’s tiled surface and its drain, preventing leaks and directing stray water into the plumbing system.
Properly seated rubber gaskets, compression rings, and bead-applied sealants guarantee a watertight joint at the flange and drain body. They accommodate movement, resist degradation, and simplify maintenance by isolating fixtures from the surrounding membrane.
Optional: hair catcher, pop-up drain, and tub-shower diverters
Several ancillary drain components serve specialized roles: hair catchers trap debris before it enters the trap, pop-up drains provide an integrated stopper mechanism for holding water, and tub-shower diverters route flow between showerhead and tub spout.
These optional parts simplify maintenance, control water retention, and direct flow. Proper selection and installation reduce clogs, leaks, and user inconvenience while preserving drainage performance.
Step-by-Step Water Flow Through the Drain
Water from the shower flows across the surface into the strainer, then down through the drain body and tailpiece into the P-trap, which retains a water seal to block sewer gases.
From the trap, the stream continues through the trap arm into the main waste line.
A vent connected to the drain system prevents pressure imbalances, enabling steady, unrestricted flow.
From shower surface into the strainer
As the shower is used, runoff moves across the sloped surface toward the drain opening. Gravity gives the flow direction while the finished surface and tile grout channel it into the drain recess.
Water then approaches the strainer, spreading over its perforated cover. The strainer captures hair and debris, reducing clog risk, while allowing continuous flow into the recessed drain area for onward passage.
Through the drain body into the tailpiece
Flowing through the strainer, the runoff descends into the drain body where internal channels and baffles guide it toward the tailpiece. The drain body collects and funnels the water while managing pressure changes to maintain steady discharge.
Debris settles or is trapped by screens, reducing flow but preventing downstream clogs. The tailpiece provides a smooth, sealed passage onward and interfaces with the trap connection.
Into the P-trap and how the trap retains water
1. Water flows from the tailpiece into the P-trap’s curved section, filling its lowest bend. The trap retains a permanent water seal that blocks sewer gases while permitting discharge.
Velocity causes a siphon effect only if improperly vented; normally, gravity and trap geometry maintain the seal.
Debris may collect in the bend, reducing capacity and prompting cleaning to restore proper retention.
Flow through the trap arm to the main waste line
After the P-trap holds its water seal, wastewater continues outward through the trap arm—a short, sloped pipe connecting the trap to the building’s horizontal waste line.
Gravity drives flow along the trap arm, carrying effluent and small solids downstream. Proper slope prevents standing water and blockages.
The trap arm’s alignment and diameter must meet code to guarantee unobstructed passage toward the main waste stack.
Role of the vent in maintaining smooth flow
Because air must replace displaced water to prevent siphoning and slow drainage, the vent provides a path for air to enter the drain system and equalize pressure as wastewater moves toward the main stack.
It prevents trap seal loss, reduces gurgling and slow flow, and allows uninterrupted gravity drainage.
Blocked or undersized vents cause backups, odors, and inefficient drainage performance.
Common Shower Drain Problems and Why They Happen
Common shower drain problems arise from a few predictable causes: hair and soap scum build up into clogs, minerals accumulate in pipes, and seals or joints can fail.
These issues present as slow drainage or complete stoppage, gurgling and siphoning noises, foul odors from dry or damaged traps, and leaks at the flange, joints, or beneath the shower pan.
Understanding each symptom helps identify whether the cause is a blockage, venting problem, trap failure, or a structural leak.
Clogs (hair, soap scum, mineral buildup)
Clogs form when hair, soap scum, and mineral deposits accumulate in the drain pathway, restricting water flow and creating blockages.
These materials bind together, adhere to pipe walls and strainers, and trap additional debris. Over time buildup reduces diameter, increases resistance, and can cause odors or localized pooling.
Mineral-rich water accelerates scaling, while repeated shedding of hair and residue sustains obstruction growth.
Slow drainage vs. complete stoppage
Many showers exhibit either slow drainage or a complete stoppage, distinct problems that arise from different degrees and locations of obstruction.
Slow drainage results when partial blockages—hair, soap residue, narrow trap buildup—reduce flow.
Complete stoppage occurs when debris fully blocks the trap or drain line, or when a removed vent or collapsed pipe isolates the section.
Different fixes match cause.
Gurgling noises and siphoning issues
Occasional gurgling from a shower drain signals air movement tied to improper venting or sudden pressure changes in the trap.
Air pockets form when venting is blocked or when rapid drainage creates negative pressure, pulling water partially from the trap (siphoning).
Intermittent gurgles warn of developing vent or plumbing-flow issues.
Diagnosis targets vent obstructions, blocked branch lines, or faulty trap seals to restore balanced airflow.
Foul odors from dry or failing traps
Dry or failing traps allow sewer gas and odors to reach the bathroom when their water seals are lost or compromised.
Traps can dry from infrequent use, evaporation, or leaks, and biodegradable buildup or damaged seals reduce effectiveness.
Odors may indicate venting problems or negative pressure siphoning the trap.
Regular flushing, adding water, and inspecting trap integrity prevent recurring smells and identify needed repairs.
Leaks at flange, joints, or beneath the shower pan
While trapped sewer gas and odors signal problems above the drain seal, leaks at the flange, joints, or beneath the shower pan reveal failures in the physical plumbing assembly that allow water to escape into surrounding structure.
Causes include cracked or corroded flanges, loose or degraded joint compounds, improper pan installation, missing or damaged gaskets, and deteriorated sealants.
Detection requires inspection and targeted repairs.
Mold, mildew, and water damage from failed waterproofing
When waterproofing around a shower drain fails, moisture migrates into the substrate and framing, creating conditions that promote mold, mildew, and progressive water damage.
Invisible leaks beneath tiles or a shower pan often go unnoticed until staining, softening of materials, or a musty odor appears.
Untreated moisture supports microbial growth, weakens structural elements, fosters tile delamination, and increases repair costs.
Prompt detection and proper membrane replacement prevent escalation.
Diagnosing Drain Issues What to Check First
A basic diagnosis begins with a visual check of the strainer and cover for debris or damage.
Smell and sound cues can help distinguish clogs from venting or seal failures, while a simple P-trap water-seal test will reveal seal loss.
If those checks are inconclusive, the venting and nearby fixtures should be inspected next, followed by an examination of the shower pan and liner for leaks.
Visual inspection of strainer and cover
The strainer and cover are the most visible parts of a shower drain and therefore the first components to inspect for common problems.
Examine for hair clogs, soap buildup, mineral deposits, corrosion, and loose or missing screws. Note cracks, warping, or improper seating that allow debris through.
Remove the cover to check the immediate basket; document observations before cleaning or further disassembly.
Smell and sound cues to identify problem type
How can a shower’s odor or unusual noises reveal the source of a drainage problem? Distinct smells—rot, sewage, or chemical—hint organic buildup, sewer backup, or trapped cleaners.
Gurgling, bubbling, or siphoning sounds indicate trapped air, partial blockage, or venting issues.
Continuous dripping or metallic clanks may signal loose components or failing valves.
Note timing, intensity, and persistence for accurate diagnosis.
Testing the P-trap (water seal check)
Symptoms like persistent sewer odor or intermittent gurgling often point away from surface issues and toward the P-trap, the U-shaped pipe that maintains a water seal to block sewer gas.
To test it, pour water into the drain, observe whether the seal holds, check for slow refill or air bubbles, and inspect for visible leaks or trapped debris that reduces trap depth.
Checking vent function and nearby fixtures
Check the vent system and nearby fixtures next, since blocked or poorly functioning vents and overloaded adjacent drains commonly cause slow drainage, gurgling, and sewer odors.
Inspect roof vents for debris; listen for intermittent gurgling when fixtures run.
Test other nearby drains (sink, tub) for similar symptoms.
Affected multiple fixtures suggests vent blockage or main branch restriction rather than a local shower fault.
When to inspect the shower pan and liner
If nearby vents and fixtures appear clear but problems persist, the shower pan and liner should be evaluated next.
Inspect for soft spots, sagging, odors, or visible water stains indicating leaks.
Remove threshold or access panels to check liner integrity, seams, and connections to the drain.
Prioritize timely repair when deterioration or ponding is detected to prevent structural damage and mold growth.
DIY Fixes and Maintenance for Common Problems
The section outlines practical DIY methods for clearing and maintaining shower drains, starting with safe techniques for removing hair and debris and proper plunger use.
It then covers manual tools such as drain snakes and zip picks, and compares enzyme-based cleaners with harsher chemical alternatives.
Finally, it addresses simple part replacements and resealing tasks like worn gaskets, seals, and flange caulk.
Safe methods to remove hair and debris
Remove hair and debris promptly using hand tools and gentle techniques to prevent clogs and protect plumbing.
A routine, careful approach reduces buildup and avoids damage.
Recommended actions:
- Use gloved fingers or a clip-style drain pick to extract visible hair.
- Employ a flexible drain snake for deeper tangles, rotating slowly.
- Rinse with hot water and mild enzyme cleaner to clear residues.
Using a plunger effectively on a shower drain
After extracting visible hair and rinsing residues, attention can turn to using a plunger to dislodge more stubborn blockages.
The person guarantees a tight seal over the drain, adds enough water to cover the cup, and pumps vigorously with controlled strokes.
After several attempts, the plunger is lifted to test flow.
Repeat if necessary; avoid excessive force that could damage fittings.
Manual removal with a drain snake or zip tool
For persistent clogs that resist plunging, a drain snake or zip tool provides targeted manual removal by reaching into the trap to extract hair and debris.
The technician or homeowner feeds the flexible tool, twists to snag material, then withdraws slowly, repeating until flow returns.
Care avoids scratching finishes and pushing blockages deeper; small tools suit pop-up and lever drains.
Enzyme cleaners vs. chemical drain cleaners
When manual tools fail to clear hair and grime from a shower trap, many homeowners consider chemical solutions; choosing between enzyme-based and caustic drain cleaners affects effectiveness, safety, and plumbing longevity.
Enzyme cleaners digest organic buildup slowly, are pipe- and septic-safe, and suit maintenance.
Caustic or acidic cleaners act fast on clogs but can corrode metal, damage seals, and pose health hazards; use sparingly.
Replacing worn gaskets, seals, and flange caulk
Inspecting and replacing worn gaskets, seals, and flange caulk is a straightforward DIY task that prevents leaks and water damage around shower drains.
Remove trim and drain flange, clean surfaces, and inspect rubber gaskets and O-rings for cracks.
Replace degraded parts with correct-size replacements, apply silicone caulk around the flange, cure fully, and test for watertightness to guarantee a durable seal.
Routine maintenance checklist to prevent clogs
Establish a simple routine to keep shower drains flowing and prevent clogs before they form.
Regular checks reduce buildup and costly repairs. Follow a concise maintenance checklist:
- Remove visible hair and debris weekly; use a drain screen.
- Flush with hot water and a mild cleaner monthly.
- Inspect and tighten fittings; replace worn seals annually.
When to Call a Professional Plumber
Persistent backups, foul odors that resist cleaning, visible leaks, or recurring slow drainage typically signal the need for a professional repair.
A plumber will inspect traps, drain lines, seals, and vents, perform diagnostic tests, and repair or replace damaged components.
Typical costs and timeframes vary by problem—simple clog removal may take an hour and cost modestly, while pipe replacement can require a day or more and higher expense.
Signs that indicate a professional repair is needed
Several clear symptoms indicate when a shower drain problem exceeds routine DIY fixes and requires a professional plumber.
Persistent slow drainage after multiple attempts, recurring clogs, sewage odors, water backing up into other fixtures, visible pipe leaks, sudden major leaks, or structural water damage to floors or ceilings signal the need for expert diagnosis and repair to prevent escalation, health hazards, and costly secondary damage.
What a plumber will inspect and repair
When the signs described above appear, a licensed plumber will perform a focused inspection to identify the root cause and recommend repairs.
They will check the drain cover, strainer, trap and P-trap for blockages, inspect drainpipe slope and joints for leaks, assess venting and sewer connection, test water flow, and evaluate corrosion or tree-root intrusion.
Necessary repairs or component replacements are then proposed.
Typical costs and timeframes for common repairs
Repair costs and timeframes for shower-drain issues vary widely depending on the problem’s severity and location, ranging from quick, low-cost fixes to more involved, expensive work. Typical examples: unclogging ($75–$200, 30–90 minutes), seal replacement ($150–$400, 1–3 hours), drain replacement or pipe repair ($300–$1,500+, multiple hours to a day).
| Repair Type | Typical Range |
|---|---|
| Clog | $75–$200 |
| Seal/Trap | $150–$400 |
| Pipe/Drain | $300–$1,500+ |
Upgrades and Replacements to Improve Drain Performance
Homeowners often improve shower drainage by replacing or upgrading key components.
Common options include installing a higher-quality hair-catching strainer, switching to low-maintenance trap designs, or converting to a linear drain or curbless shower for better flow.
Complementary work—such as improved waterproofing and optimizing the shower pan slope—further enhances long-term performance.
Upgrading to a quality hair-catching strainer
Installing a quality hair-catching strainer is one of the simplest and most effective upgrades to prevent clogs and reduce maintenance.
A durable strainer captures hair and debris before they enter the trap, minimizing blockages and foul odors. Options include stainless steel baskets and silicone screens with easy removal for cleaning.
Proper fit and regular emptying guarantee peak performance and longer drain life.
Installing low-maintenance trap designs
Consider replacing traditional P-traps with low-maintenance alternatives—such as waterless traps, cartridge traps, or accessible trap-and-strainer assemblies—to reduce clogs and simplify cleaning.
These designs minimize standing water, trap hair efficiently, and allow tool-free removal for inspection. Durable materials and sealed mechanisms resist odors and leaks.
Selection should match local plumbing codes and flow requirements; professional installation guarantees proper venting and reliable operation.
Converting to a linear drain or curbless shower
After evaluating trap options, attention often shifts to whole-shower upgrades like converting to a linear drain or creating a curbless shower to improve drainage, accessibility, and aesthetic flow.
Linear drains allow single-slope floors and faster sheet flow toward a discreet channel.
Curbless designs remove thresholds for barrier-free access but require careful floor slope, threshold sealing, and compatible drain capacity to prevent overflow.
Waterproofing upgrades and improving shower pan drainage
Upgrade priorities shift to the shower pan and waterproofing when persistent slow drainage or water staining signal underlying failures.
Replacing damaged liners, installing bonded waterproof membranes, and re-sloping the pan toward the drain restore proper flow.
Upgrading to integrated drains, clamping rings, or secondary drains prevents backups.
Professional inspection guarantees membrane integrity, correct slope, and durable connections to protect subfloor and prolong drain performance.
Materials, Standards, and Codes to Know
Common shower drain materials include PVC and ABS plastics for residential work and brass or stainless steel for durability in visible or commercial installations.
Proper function requires correct slope, venting, and trap depths to prevent backups and sewer gas entry.
Installers and homeowners should follow local plumbing codes and inspection requirements, verifying materials and installation details with inspectors before finalizing work.
Common drain materials (PVC, ABS, brass, stainless steel)
A handful of materials—PVC, ABS, brass, and stainless steel—dominate shower drain construction due to their differing balances of cost, corrosion resistance, and mechanical strength.
PVC and ABS are lightweight, economical, and chemically resistant but can degrade under UV and heat.
Brass offers durability and solderability; stainless steel provides superior corrosion resistance and aesthetic finish, with higher initial cost and long service life.
Typical slope, venting, and trap requirements
Materials influence installation choices, and those choices intersect directly with slope, venting, and trap requirements dictated by plumbing standards.
Proper slope (typically 1/4″ per foot for horizontal shower drains) guarantees gravity flow and prevents standing water.
Adequate venting prevents siphoning of traps, maintaining the water seal.
Traps must be correctly sized and accessible for cleaning, conforming to material-specific installation practices.
Local code considerations and inspection tips
Why does local code matter when selecting drain materials and detailing traps?
Local codes set approved materials, trap configurations, venting minimums, slope, and backflow prevention. Inspectors verify compliance during rough-in and final inspections.
Consult municipal plumbing codes, the IPC or UPC references, and manufacturer instructions.
Keep permits, installation records, and test results accessible to expedite inspections and avoid costly rework.
Quick Reference: Preventive Tips and Best Habits
A concise checklist helps prevent common shower drain problems and guide quick action when they occur. Consider these essentials:
- Weekly and monthly maintenance tasks
- What not to put down the shower drain
- Fast fixes for emergencies (overflow or major clog)
The following section expands on each item with practical, easy-to-follow steps.
Weekly and monthly maintenance tasks
Several simple checks performed weekly and monthly can prevent most shower drain problems before they start.
Weekly: remove visible hair from the strainer, run hot water to clear light buildup, and test for slow drainage.
Monthly: lift the drain cover to inspect and remove trapped debris, flush with a baking soda-vinegar rinse or commercial safe cleaner, and check for leaks beneath the shower base.
What not to put down the shower drain
Because shower drains are designed for water and small, soluble residues, users should avoid disposing of materials that cause clogs, corrosion, or foul odors.
Common offenders include hair, greasy soaps and oils, thick conditioners, paper products, large food particles, cotton swabs, and medication or chemical wastes, all of which can accumulate, trap debris, or damage pipes over time.
Additionally, avoid heavy solids, paint, and grout.
Fast fixes for emergencies (overflow or major clog)
Act quickly when a shower begins to overflow or a major clog stops drainage: shut off the water at the shower valve or main supply if possible, remove standing water with a bucket or cup to prevent flooding, and clear the visible drain cover and trap of hair and debris.
Use a plunger, hand snake, or enzymatic cleaner; call a plumber if DIY attempts fail or odors persist.
Conclusion
A simple fixture channels daily torrents and quiet rinses alike: a grate, trap, strainer, pipe and vent working together to vanish water and hold back odors. When orderly parts meet hair, soap and time, flow becomes problem—slow, noisy, smelly. Routine checks and small fixes restore calm; sometimes a professional replaces aged components. The ordinary shower drain consequently balances unseen engineering and mundane neglect, revealing how minor care preserves seamless utility and prevents sudden disruption.