How to Reset RV Hot Water Heater Tank Quickly and Safely (Step-by-Step Guide)
To reset your RV hot water heater tank quickly and safely, follow these essential steps: First, turn off shore power and the inverter, close the propane valve, and relieve tank pressure by opening a hot tap. Identify whether your unit is electric or gas/electric, then remove the access panel. Ensure the power is off before pressing the reset button, and check the fuses and pilot light. Once everything is inspected, restore power and test for heat. Always wear protective gear and check for any leaks. For additional guidance, continue with our detailed step-by-step procedures, troubleshooting tips, and maintenance advice.
How to Reset an RV Hot Water Heater Tank Quickly and Safely
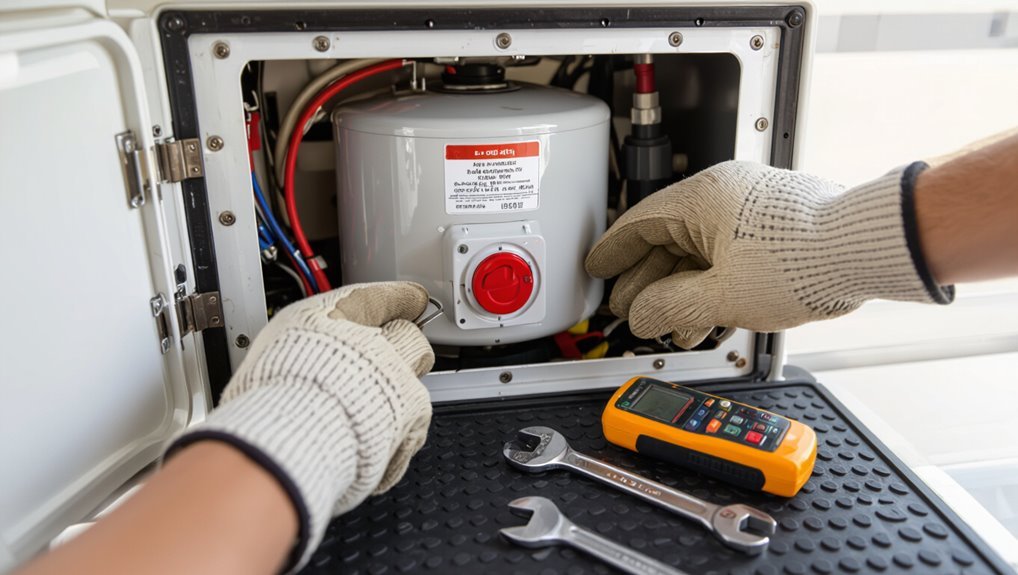
A reset may be required when the RV water heater trips its thermostat, shows no heat, or after maintenance to clear faults.
Before attempting a reset, a brief safety checklist should be followed: turn off power sources, close the propane supply, and confirm the tank is cool and depressurized.
Following these steps reduces risk and guarantees a faster, safer reset procedure.
When and why you might need to reset the RV hot water heater
When cold water continues flowing from the taps despite the heater running, or the unit fails to ignite after a power surge or propane interruption, resetting the RV hot water heater becomes necessary.
Typical triggers include pilot outage, tripped reset button, thermostat fault, or control board glitch.
Learning how to reset rv hot water heater tank helps restore hot water quickly and prevents prolonged downtime while diagnosing faults.
Quick safety checklist before touching the heater
Before any physical contact with the RV hot water heater, the operator should cut power, shut off propane, and confirm the unit and surrounding area are cool and dry.
Verify water supply valves are closed and relieve tank pressure by opening a hot tap.
Wear gloves and eye protection, inspect for leaks, gas smell, or corrosion, and keep a fire extinguisher nearby.
Identify Your RV Water Heater Type and Reset Location
The article distinguishes between tankless and tank-style RV water heaters and notes that reset procedures can differ between them.
It explains where reset buttons are typically located on electric-only units versus combined gas/electric models.
It also describes how to determine whether the reset is accessible on the exterior control panel or hidden inside the heater housing.
Common RV water heater types (tankless vs. tank-style)
Identifying the type of RV water heater is the first practical step toward locating its reset control and understanding reset procedures.
Tankless units heat on demand, are compact, and lack large tanks.
Tank-style models store heated water and include thermostats and sacrificial anodes.
Knowing which type prevents mistakes and speeds troubleshooting.
- Relief
- Confidence
- Urgency
- Assurance
Locating the reset button on electric and gas/electric models
Knowing the heater type guides where to look for controls and reset features, since tank-style and combo gas/electric units have different access points.
For electric-only models, the red reset button typically sits on the thermostat housing behind an exterior access panel.
For gas/electric combos, the reset may be on the electric element assembly inside the same panel or near the control panel alongside the burner access.
How to tell if the reset is internal or requires panel access
How can an RV owner determine whether a water heater’s reset switch is reachable from an exterior access panel or tucked inside the unit itself?
Inspect the owner’s manual or model label for panel vs. internal reset notation.
Visually check exterior access doors for a visible red button or wiring conduit.
If documentation is unclear, remove the access panel carefully; internal resets sit near the thermostat/element assembly, often behind insulation.
Tools and Materials You May Need
A concise list of basic tools and safety gear helps guarantee the reset can be performed safely and efficiently.
Common items include screwdrivers, pliers, a multimeter, gloves, and eye protection.
It is also wise to have replacement parts on hand—spare fuses, access panel screws, and a compatible anode rod—so minor repairs can be completed immediately.
Basic tools and safety gear
Proper preparation starts with assembling the right tools and safety gear: basic hand tools (screwdrivers, adjustable wrench, pliers), a multimeter or voltage tester, a non-contact thermometer, and a flashlight.
Protective gear—gloves, safety glasses, and closed-toe shoes—reduces injury risk. A fire extinguisher and first-aid kit add security. Comfortable lighting and a stable work surface improve focus.
- Reassurance
- Confidence
- Calm
- Control
Replacement parts to have on hand (fuses, access panels, anode rod)
Stocking a small selection of replacement parts prevents delays and simplifies repairs when an RV hot water heater fails.
Essential spares include spare fuses matching the unit’s rating, a couple of replacement access panels or fasteners, and a compatible anode rod to combat corrosion.
Carrying basic seals, screws, and a heating element gasket can further reduce downtime and avoid stranded repairs on the road.
Step-by-Step Reset Procedure for Electric RV Water Heaters
Before beginning, power to the RV should be cut—shore power and inverter—then the water supply turned off and pressure relieved.
The procedure continues with removing the heater control panel cover to access and press the reset button correctly.
After resetting, the thermostat, high-limit switch, and thermal fuse should be inspected to verify proper function.
Power off: turning off shore power and inverter safely
Shut down all electrical sources to the RV before touching the water heater’s controls: disconnect shore power at the pedestal and turn off the inverter at its breaker or dedicated switch.
Confirm power loss using the RV’s main breaker panel and an indicator light or multimeter. Lock or tag breakers if available.
Wait a few minutes for capacitors to discharge before proceeding with the reset.
Turn off water supply and relieve pressure
Turn off the RV’s fresh-water supply at the main valve and at any external inlet to prevent new water from entering the system; then open a hot faucet and a nearby cold faucet to relieve pressure and allow trapped water to drain.
Confirm low pressure by slowly lifting the pressure relief valve slightly until a small stream escapes, then reseat it.
Close faucets when draining finishes.
Access the heater control panel and remove cover
Locate the water heater control panel on the RV’s exterior or inside an access compartment and remove any screws or clips securing its cover to expose the switches and wiring.
Once open, inspect for corrosion, loose connections, burned components, and rodent damage.
Wear insulated gloves, use a flashlight, and keep tools nearby.
Do not touch exposed terminals until power is confirmed off.
Locate and press the reset button correctly
Begin by identifying the heater’s high-limit or reset button—typically a small, recessed red or black push-button on or near the thermostat assembly behind the control panel.
Confirm power is off and wait five minutes for capacitors to discharge.
Press the button firmly with a nonmetallic tool until it clicks.
Restore power, observe for normal pilot or heating operation, and note any immediate faults.
Check thermostat, high-limit switch, and thermal fuse after reset
After resetting the unit, inspect the thermostat, high-limit switch, and any thermal fuse to verify they are functioning and properly seated. These components determine whether power is allowed to the heating element and will prevent restart if they remain tripped or open.
Visually confirm connections, test for continuity with a multimeter, and replace any defective device. Record component positions for future reference.
Restore power and test for proper heating
Reapply power to the water heater at the breaker or shorepower panel, then switch the unit’s thermostatic control back to the desired setting.
Observe indicator lights and listen for element operation. Allow 20–30 minutes before checking outlet temperature with a thermometer or by running hot water.
Confirm steady heating, no unusual noises, and absence of leaks.
If issues persist, isolate power and inspect components or seek professional service.
Step-by-Step Reset Procedure for Gas/Electric Combination Heaters
For combination gas/electric RV water heaters, the reset routine begins with shutting off propane, electrical power, and the pilot.
Then, relieving system pressure and draining water if required. The technician then gains access to the reset controls and pilot assembly to follow the specific reset sequence and relight the pilot when necessary.
Before restoring service, seals, vents, and combustion components are inspected and confirmed secure.
Turn off propane, power, and pilot light
Begin by shutting off the propane supply, disconnecting shore or generator power, and extinguishing the pilot light to eliminate all fuel and electrical sources before servicing the gas/electric water heater.
Verify switches and breakers are off, close the gas valve, and wait several minutes for residual gas to dissipate.
Use a non-sparking tool if adjustments are needed and confirm zero power with a tester.
Relieve water pressure and drain as needed
Relieve remaining pressure in the tank and drain water as necessary to prevent scalding and to allow safe access to internal components.
Open a hot tap inside and a pressure-relief valve slowly to vent.
Attach a hose to the drain valve and direct water to a safe drain.
Drain until flow slows and pressure gauges read zero before proceeding with repairs.
Access reset controls and pilot assembly
Locate the heater’s access panel and control housing to reach the reset button and pilot assembly; turning off power and gas at the respective breakers and valves is prerequisite before removing the panel.
Remove screws, lift panel, and inspect for corrosion, loose wiring, or debris.
Note reset switch location, pilot access, thermocouple connections, and any visible gas line fittings for continuity before reassembly.
Reset sequence for gas/electric models and relight pilot if required
With the access panel removed and controls inspected, proceed to the reset sequence for gas/electric combination heaters and relight the pilot if required.
Turn power and gas off, wait five minutes, then set gas control to pilot and ignite per manufacturer instructions.
Restore gas, verify pilot flame steady, reset electric breaker or thermostat, and confirm unit enters normal heating mode before closing panel.
Recheck seals, vents, and combustion components before restarting
Before powering the unit back on, inspect all seals, vents, and combustion components to verify they are intact, clear, and correctly fitted.
Check for cracks, corrosion, loose fittings, obstructions, or nesting. Confirm vent pipe alignment, gasket condition, and burner area cleanliness.
Guarantee flue and fresh-air inlets are unobstructed.
Replace damaged parts and tighten connections before restoring gas or electrical power.
Troubleshooting If Reset Doesn’t Work
If a reset does not restore hot water, the next step is to methodically check electrical components such as breakers, fuses, and wiring for faults.
Mechanical causes—failed thermostats, heating elements, a depleted anode rod—and gas-specific issues like a blown pilot, faulty thermocouple, or stuck gas valve should be inspected.
If basic checks do not identify or safely resolve the problem, a qualified RV technician should be contacted.
Diagnosing electrical issues: breakers, fuses, wiring
Once a manual reset fails, electrical troubleshooting becomes the next logical step: verify the RV’s breaker and fuse status, inspect wiring for obvious damage or loose terminals, and confirm voltage at the heater’s supply.
If breakers trip or fuses blow repeatedly, suspect short or overload. Check connections, grounds, and corrosion; use a multimeter.
- Anxiety at dead water
- Relief on finding a loose wire
- Frustration with recurring trips
- Satisfaction after restoring power
Common mechanical failures: thermostats, heating elements, anode rod
Troubleshooting shifts from electrical checks to mechanical inspection when a manual reset and power verification fail; the most common culprits are a faulty thermostat, a burned-out heating element, or a heavily corroded anode rod.
Inspect thermostats for continuity and correct temperature settings, test elements with an ohmmeter, and examine the anode for severe corrosion.
Replace defective parts and retest for proper heating and safety.
Gas-specific problems: pilot light, thermocouple, gas valve
When electrical causes and mechanical inspections fail to restore hot water, attention shifts to gas-specific components: the pilot light, thermocouple, and gas valve.
Verify pilot is lit and clean; relight per manufacturer if safe.
Inspect thermocouple for wear or misalignment; replace if it won’t signal the valve.
Check the gas valve for leaks, proper operation, and secure connections before further testing.
When to call a professional technician
How long an owner should attempt DIY fixes before calling a technician depends on safety risk and symptom persistence: if the reset fails, gas odors are present, pilot issues persist, electrical faults recur, or internal components appear damaged, a licensed RV appliance technician should be contacted to diagnose and repair the heater.
Prompt professional service prevents fire, carbon monoxide, or further equipment damage and preserves warranty.
Preventive Maintenance to Avoid Future Resets
A regular inspection schedule, including winterization steps, helps prevent the common causes of resets before they occur.
Routine flushing to remove sediment, periodic testing and replacement of the sacrificial anode and heating elements, and keeping vents, burners, and flues clean all extend heater life and reduce failures.
Implementing these preventive tasks minimizes the need for future resets and unexpected cold showers.
Regular inspection schedule and winterization tips
Regular inspections at predictable intervals help detect leaks, corrosion, and thermostat or element wear before they cause a cold shower or a reset.
A seasonal checklist reduces surprises: document dates, test burners/electrics, and inspect seals.
Winterize by draining, adding non-toxic antifreeze where specified, and insulating exposed lines to prevent freezing and costly damage.
- Relief: avoid ruined trips
- Confidence: reliable hot water
- Security: prevent burst pipes
- Pride: maintained RV readiness
Flushing the tank to remove sediment
Flush the water heater tank periodically to remove mineral buildup and sediment that reduce heating efficiency and trigger premature element or burner failure.
Draining and flushing extends tank life: shut off power and water, attach a hose to the drain valve, open pressure relief and drain until clear, briefly flush with fresh water, close valves, refill and restore power.
Perform annually or as needed.
Testing and replacing sacrificial anode and heating elements
After flushing the tank to remove sediment, attention should turn to the sacrificial anode and heating elements, components that protect the tank and provide heat.
Inspect the anode for heavy corrosion; replace if steel core is exposed.
Test electric elements with a multimeter for continuity and proper resistance; replace burned or shorted elements.
Reassemble seals and test for leaks before restoring power or fuel.
Keeping vents, burners, and flues clean
Inspect vents, burners, and flues periodically to prevent soot buildup, obstructions, and corrosion that can reduce combustion efficiency or create carbon monoxide risks.
Regularly clear debris, spider webs, and soot with a soft brush and vacuum; replace damaged seals or screens.
Verify proper flame color and draft; schedule professional inspection annually.
Clean components extend heater life, improve efficiency, and reduce reset frequency.
Safety Warnings and Best Practices
Before attempting any reset, the technician should follow strict precautions to prevent electrical shock and scalding, including isolating power and confirming water temperature controls.
Propane systems and combustion components must be handled with gas shutoff, ventilation checks, and leak detection procedures to avoid fire or asphyxiation risks.
All resets, repairs, and part replacements should be documented with dates, actions taken, and serial numbers for future troubleshooting and warranty purposes.
Electrical shock and scald prevention measures
Cut power at the shore or battery connection and confirm the RV’s water heater is electrically isolated before any service; this prevents shock from live components while accessing wiring, thermostats, or heating elements.
Drain and cool the tank fully before touching plumbing. Use insulated tools and PPE. Verify no residual voltage with a tester.
- Fear of burns avoided
- Relief from safer repairs
- Confidence restored
- Calm, controlled action
Safe handling of propane and combustion components
Handle propane and combustion components with caution: make certain gas is shut off at the cylinder or supply line, work in a well-ventilated area, and keep open flames and sparks away while servicing burners, valves, and fittings.
Use leak detection solution on connections, inspect hoses and seals for damage, replace faulty parts, and never smell-test.
Consider a trained technician for complex gas system issues.
Documentation: recording resets, repairs, and part replacements
After completing propane or combustion work, technicians should document every heater reset, repair, and part replacement in a centralized log.
Entries must include date, technician name, vehicle identification, work performed, serial numbers of replaced parts, reason for action, and parts sourced.
Photographic evidence and copies of receipts should be attached.
Maintain records for warranty, safety audits, and future troubleshooting.
Review periodically.
Quick Reference Checklists
The article introduces two compact checklists designed for quick use: a five-step reset checklist for emergencies and a pre-trip heater inspection checklist.
Each checklist is formatted for rapid scanning and follows the safety precautions outlined earlier. Users are encouraged to keep printed or digital copies accessible for fast reference.
Fast 5-step reset checklist for emergencies
Consults a concise five-step checklist to reset an RV hot water heater quickly during an emergency, focusing on safety and restoring basic function:
- power off,
- gas/propane secure,
- wait five minutes,
- press reset,
- verify pilot/ignition.
- Heart-sinking silence, then relief when power clicks back.
- Tense hands loosen as pilot lights.
- Quick breath as warm flow returns.
- Quiet confidence replacing panic.
Pre-trip heater inspection checklist
Following the emergency reset checklist, a pre-trip heater inspection checklist guarantees the water heater will perform reliably over a journey.
The technician inspects connections, tests the thermostat and pressure relief valve, checks for leaks, and verifies power and propane supply. A concise walk-through prevents roadside failures and stress.
- Tighten fittings to stop anxiety
- Confirm warmth to restore comfort
- Replace faulty seals to avoid dread
- Secure power to guarantee peace
Conclusion
In conclusion, the guide emphasizes restoring an RV hot water heater with calm precision, like a conductor guiding an orchestra back into harmony. It urges identification of heater type, use of basic tools, and following distinct electric or gas/electric reset steps while observing safety protocols. If problems persist, troubleshooting and preventive maintenance are recommended. Adherence to checklists and warnings helps guarantee quick, safe resets and reduces the likelihood of future interruptions.