How to Remove a Faucet Cartridge: Step-by-Step Guide for Any Tap
To remove a faucet cartridge, start by shutting off the water supply and draining the lines. This process is essential for fixing leaks, stiffness, or poor pressure in your tap. First, protect your surfaces, then remove the handle and trim to access the cartridge. Unclip or unscrew the retaining nut, and gently pull the cartridge straight out—use a puller if it’s stubborn. After removal, inspect the seals, clean any mineral deposits, replace O-rings, and lubricate before reseating. Follow these steps for reinstallation, testing, and troubleshooting to ensure proper faucet function.
What a Faucet Cartridge Is and Why You Might Remove It
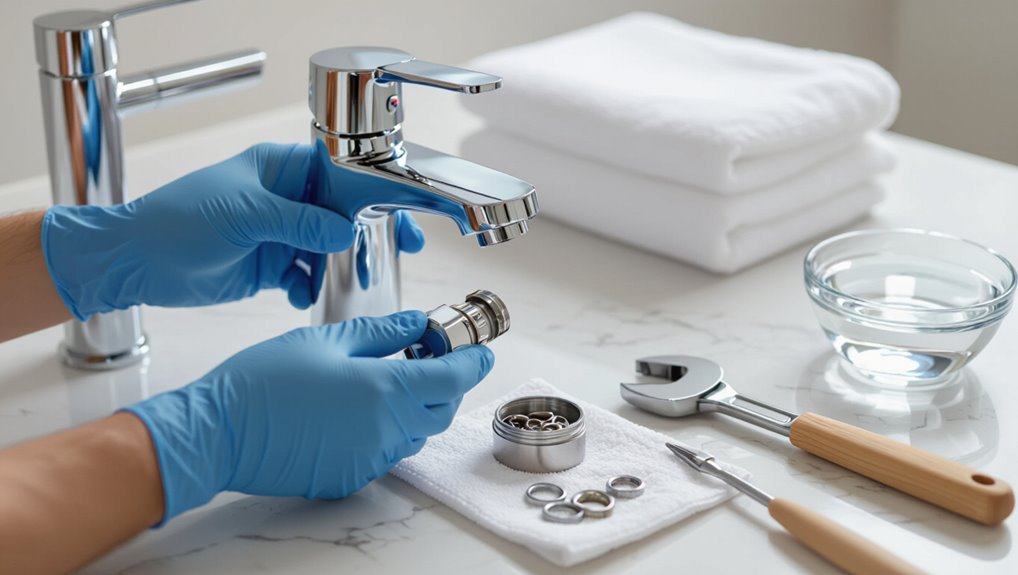
A faucet cartridge is the internal valve component that controls water flow and temperature, with designs varying between ball, ceramic disc, and compression-style taps.
Common reasons for removal include persistent leaks, stiff or erratic handle movement, and reduced water pressure indicating wear or mineral buildup.
Typical tools and materials for the task are an adjustable wrench or pliers, screwdriver set, replacement cartridge, plumber’s grease, and a towel or bucket to catch residual water.
Purpose and function of cartridges in different tap types
Because the cartridge sits at the core of a faucet’s control assembly, it directly governs water flow and temperature by regulating internal pathways and seals.
In single-handle, ceramic or ball cartridges blend hot and cold; in dual-handle, separate cartridges isolate supply lines.
Cartridge design affects performance, repairability and instructions for how to remove cartridge from faucet across brands and models.
Common signs a cartridge needs removal or replacement
Knowing how a cartridge controls flow and temperature helps identify when it is failing: persistent dripping, difficulty moving the handle, uneven or fluctuating water temperature, reduced flow despite open valves, and visible mineral buildup or leaks at the spout or base are common signs that the cartridge requires removal or replacement.
Other indicators include noisy operation, sudden loss of hot or cold control, and corrosion near fittings.
Tools and materials you’ll likely need
Several essential tools and a few common materials make cartridge removal straightforward and prevent damage during the process.
A compact kit guarantees safe disassembly, protection of finishes, and easy reassembly. Typical needs include a variety of grips, fastener tools, and seal replacements to match the faucet type.
- Adjustable wrench
- Phillips and flat screwdrivers
- Needle-nose pliers
- Cartridge puller or strap wrench
- Replacement O-rings and plumber’s grease
Identify Your Faucet Type Before You Start
Before beginning cartridge removal, the reader should determine the faucet type, since single‑handle models may use ball, cartridge, or ceramic‑disk mechanisms while double‑handle faucets can have stem or cartridge systems.
Specialty fixtures such as pull‑down, wall‑mounted, and thermostatic valves require different access and parts.
Locating a model number or manufacturer guidance will simplify identifying the correct cartridge and procedures.
Single-handle faucets: ball, cartridge, ceramic-disk differences
Single-handle faucets come in three common designs—ball, cartridge, and ceramic-disk—and each uses a different internal mechanism that affects disassembly, replacement parts, and likely failure modes.
Ball faucets have a rounded housing with multiple seals and springs. Cartridge units use a removable vertical cartridge. Ceramic-disk models employ two smooth disks for sealing.
Identifying the type guides tools, parts, and repair steps.
Double-handle faucets: stem vs. cartridge systems
While the prior section covered single-handle designs, double-handle faucets require a different identification step because they commonly use either traditional stem (compression) assemblies or modern cartridge-style stems.
The technician inspects handle removal, visible retaining nuts, and spindle shape: stems have threaded bodies and seat-and-washer interfaces, cartridges are plug-like with seals.
Correct identification determines parts, tools, and removal sequence for each side.
Specialty faucets: pull-down, wall-mounted, and thermostatic valves
Specialty faucets—pull-down kitchen sprayers, wall-mounted fixtures, and thermostatic valves—require distinct inspection steps because their mounting, water lines, and internal assemblies differ from standard deck-mounted cartridges.
Pull-down units often conceal cartridges within the spray head or hose assembly.
Wall-mounted faucets need access panels and careful support removal.
Thermostatic valves include temperature cartridges and mixed-flow components requiring isolation and staged disassembly.
How to find model numbers and manufacturer guidance
How can a homeowner be sure they have the right parts and instructions before disassembling a faucet?
They should locate model numbers on escutcheons, underside of spouts, or mounting plates. Photograph markings and consult manufacturer websites or customer support for diagrams and replacement parts.
Verify measurements against part listings before ordering.
- Worn logo on base
- Stamped serial under spout
- Paper manual page
- Online parts diagram
- Photo of valve body
Safety and Preparation Steps
Before starting, the water supply should be shut off and remaining water drained from the lines to prevent spills.
Surfaces and fixtures must be protected with towels or masking to avoid scratches and water damage.
Parts should be labeled and photos taken during disassembly to guarantee correct reassembly.
Shutting off water supply and draining lines
Locate and shut off the water supply to the faucet—either the individual shutoff valves under the sink or the home’s main shutoff—to prevent flow while working.
Open the faucet to relieve residual pressure and drain hot and cold lines.
Place a bucket beneath the drain and use towels to catch spills.
Confirm valves are fully closed before disassembling the faucet.
Protecting finishes and surrounding areas
The installer should cover nearby surfaces and fixtures to prevent scratches, dents, and water damage: lay down a towel or rubber mat around the sink, apply painter’s tape to protect adjacent countertops and hardware, and place a drip tray or small bucket under the work area to catch runoff.
Remove loose items, shield exposed finishes with soft cloths, and wear gloves to avoid fingerprints and marring.
Labeling parts and taking photos for reassembly
Once nearby surfaces are protected and tools staged, attention turns to documenting and labeling components to guarantee accurate reassembly.
The technician photographs each step, tags parts with numbered tape, stores screws in labeled containers, sketches orientation of cartridges and seals, and logs sequence notes.
Visual records prevent guesswork and speed reassembly, ensuring seals and handles return to original positions.
- close-up of cartridge orientation
- numbered screw tray
- labeled O-rings and seals
- handle alignment sketch
- wide shot of disassembled faucet
Step-by-Step Cartridge Removal for Single-Handle Faucets
The procedure begins by removing the handle and loosening the set screw to gain access to the cartridge.
Next, the decorative cap and retaining clip or nut are removed so the cartridge can be pulled straight out without forcing the housing.
Finally, the cartridge and internal components are inspected for wear or debris before repair or replacement.
Remove handle and access set screw
Begin by shutting off the water supply and confirming the faucet is dry to prevent leaks and slipping while working.
Then, locate the handle’s access point—often under a decorative cap or set into the handle base.
Pry or unscrew that cover, expose the set screw, and use the appropriate Allen or Phillips driver to loosen it.
Pull the handle straight off to expose the cartridge.
Take off decorative cap and retaining clip or nut
Remove the decorative cap covering the cartridge bore to expose the retaining clip or nut, using a flat screwdriver or gentle prying tool to avoid scratching finishes.
Once exposed, identify whether a C-clip, U-clip, or threaded retaining nut secures the cartridge.
Use needle-nose pliers for clips or an adjustable wrench for nuts, applying steady, controlled force to avoid bending or stripping components.
Extract the cartridge without damaging housing
Carefully lift the cartridge straight out of the faucet body, keeping hands steady and aligned with the bore to prevent scraping the interior surfaces.
Use even upward pressure; avoid tilting or twisting. If resistance occurs, check for remaining fasteners and gently work a plastic pry tool around the base to loosen buildup.
Set the cartridge on a soft cloth to protect seals and housing.
Inspect cartridge and internal components
With the cartridge out, visually and tactilely inspect it and the faucet bore for wear, mineral buildup, and damaged seals.
Check O-rings, rubber seats, and retaining clips for cracks, distortion, or stiffness.
Note scoring, pitting, or corrosion on metal surfaces.
Clean deposits with vinegar or a soft brush.
Decide whether cleaning, O-ring replacement, or full cartridge replacement is required.
Step-by-Step Cartridge Removal for Double-Handle Faucets
For double-handle faucets, removal begins with taking off the handles and escutcheons to expose the valve assemblies.
The bonnet or retaining nut is then unscrewed so the cartridge or stem assembly can be pulled straight out.
Note that compression-style valves differ—two-piece stems and seat components may need separate removal and inspection.
Remove handles and escutcheons
Before removing the cartridge, the handles and escutcheons must be taken off to expose the retaining nuts and valve stems; this requires first disabling the water supply and then locating and removing any decorative caps or set screws on each handle.
Once exposed, lift or pry off handles gently, then unscrew or slide escutcheons away from the deck.
Keep small parts organized and note orientation for reassembly.
Unscrew valve bonnet or retaining nut
Locate the valve bonnet or retaining nut that secures the cartridge in each valve body; it is typically threaded around the valve stem and may be hexagonal or round.
Use an appropriately sized wrench or socket to turn counterclockwise, holding the valve body steady.
Apply penetrating oil if corroded, tap gently to loosen, and back the nut off until exposed enough for cartridge access.
Pull out cartridge or stem assembly
Grasp the cartridge or stem assembly with steady pressure and pull it straight out from the valve body, keeping the motion aligned with the bore to avoid bending or damaging internal parts.
If resistance occurs, rock gently back and forth while applying steady outward force.
Inspect seals, O-rings and cam surfaces as the unit clears the valve, noting orientation for correct reinstallation.
Differences for compression-style valves
Compression-style valves differ from cartridge designs in that they use a screw-driven stem and separate rubber or neoprene washers to stop water flow.
Removing Stuck or Corroded Cartridges
When a cartridge is seized by mineral buildup or corrosion, addressing the deposits first improves the chance of a clean removal.
Technicians commonly apply penetrating oil or a silicone-based lubricant and may use controlled heat to break corrosion bonds, taking care to protect surrounding finishes and seals.
If manual methods fail, a cartridge puller or other specialty tool can be employed to extract the cartridge without damaging the valve body.
Techniques to loosen mineral deposits and corrosion
Tap and apply targeted penetrating oil to break down mineral buildup and seize from corroded faucet cartridges.
After dwell time, gently rock the cartridge back and forth with pliers protected by cloth, using controlled force.
Flush with vinegar or citric solution to dissolve deposits, then tap fittings lightly to dislodge crumbs.
Repeat cycles of soak and mechanical movement until the cartridge comes free.
Using lubricant, penetrating oil, and gentle heat safely
Apply a targeted combination of lubricant, penetrating oil, and gentle heat to free a stuck or corroded faucet cartridge while minimizing risk to surrounding finishes and seals.
Protect finishes with tape and rags, apply penetrating oil sparingly to seals, wait per product instructions, then use a low‑heat source briefly to expand metal.
Reapply lubricant, work cartridge back and forth, and avoid excessive force.
When to use a cartridge puller or specialized tools
Recognize the need for a cartridge puller when repeated manual attempts, lubricants, and gentle heat fail to budge a cartridge or when corrosion, mineral buildup, or seized retaining clips make removal unpredictable.
Use purpose-built pullers, universal extractors, or clip-removal pliers to apply even, axial force. Choose sizes matching the cartridge, protect visible surfaces with tape, and proceed incrementally to avoid sudden breaks.
Avoiding damage to valve body or finish
Proceed cautiously when tackling a stuck or corroded cartridge to protect the valve body and surrounding finish.
Apply penetrating oil, allow dwell time, and use gentle back-and-forth motions with appropriate tools. Protect visible surfaces with cloth or tape.
Avoid excessive force, heat, or chisel-like tools. If corrosion resists, consult a plumber to prevent stripping threads, cracking metal, or damaging decorative finishes.
Inspecting, Cleaning, and Deciding on Replacement
The removed cartridge should be carefully inspected for worn O-rings, damaged seals, and pitting or grooves on the valve seat that can cause leaks.
Mineral buildup and debris can often be loosened with a soft brush and vinegar solution, but stubborn corrosion may require replacement.
If seals are intact and the cartridge cleans up well, a reinstall is reasonable; otherwise, match a new cartridge to the original model and specs before replacing.
How to check O-rings, seals, and valve seat condition
Inspect O-rings, seals, and the valve seat closely for wear, mineral buildup, cracks, or flattening that can cause leaks or poor performance.
Remove seals gently, compare against replacements for size and hardness.
Look for pitting or grooves on the valve seat and replace if damaged.
Replace any deformed O-rings or brittle seals.
Document parts and order matched replacements before reassembly.
Cleaning tips for mineral buildup and debris
Begin by evaluating mineral deposits and trapped debris visually and by touch to determine cleaning intensity and whether replacement is necessary.
Use white vinegar or a mild descaler to soak ceramic or metal parts for 15–30 minutes, then scrub with a soft brush.
Rinse thoroughly, clear internal passages with compressed air or water, dry, lubricate O-rings, and reassemble.
When to replace the cartridge vs. continue cleaning
While examining a faucet cartridge for serviceability, assess wear, corrosion, and performance against baseline expectations:
If seals remain pliable, moving parts operate smoothly, and leaks cease after descaling, cleaning suffices.
Replace the cartridge when cracks, scored surfaces, persistent leaks, stiff or sticking action, or degraded seals persist despite cleaning.
Prioritize replacement for recurrent failures or compromised water quality.
Matching replacement cartridges to the original
How can one guarantee a replacement cartridge fits and functions like the original? Inspect markings, measure length and diameter, note inlet/outlet orientation, compare valve type, and photograph assembly.
Match manufacturer part numbers or compatible listings. Clean mating surfaces and test operation before final assembly.
- stamped model number on cartridge
- ruler against cartridge body
- inlet port alignment
- O-ring position
- cartridge profile silhouette
Reassembly Steps After Cartridge Removal or Replacement
After cleaning or replacing the cartridge, seals should be lightly lubricated and the cartridge seated correctly to guarantee proper alignment.
Retaining clips or nuts are then reinstalled and handles replaced in the original order before restoring the water supply.
Once pressurized, the assembly is checked for leaks and any final adjustments made for smooth operation.
Lubricating seals and reinstalling cartridge correctly
Prepare the cartridge and valve body for reassembly by inspecting and lubricating all seals and contact surfaces to guarantee a proper fit and leak-free operation.
Apply a thin, even coating of plumber’s silicone grease to O-rings and rubber seals, avoiding petroleum-based products.
Align the cartridge with reference marks or tabs, seat it straight into the valve, and confirm smooth movement before proceeding.
Replacing retaining clips, nuts, and handles in order
Begin reassembly by securing the cartridge with its retaining hardware in the reverse order of removal: insert the retaining clip or C-clip into its groove, tighten any retaining nuts to the manufacturer’s specified torque, and then reinstall the handle and decorative trim.
Confirm clips sit fully, nuts are snug but not over-torqued, and handles align with valve stems before tightening set screws.
Restoring water supply and testing for leaks
With the cartridge secured and the handle reinstalled, attention shifts to restoring the water supply and checking for leaks.
Slowly reopen shutoff valves, then open the faucet to purge air and debris.
Inspect supply connections, bonnet, and base for drips while under light pressure.
Tighten fittings if seepage appears, then retest at full pressure.
Confirm dry surroundings before finishing.
Final adjustments for smooth operation
Reinstall the handle and trim, then operate the faucet through its full range to verify smooth movement and correct alignment.
Tighten fasteners incrementally to prevent binding, and adjust shims or packing if necessary.
Confirm hot/cold orientation and that stops return to closed positions.
Recheck for minor leaks, smooth temperature response, and consistent spray pattern before finalizing trim and cleaning the assembly.
Troubleshooting Common Problems After Reinstallation
After reinstallation, the most common issues include leaks at the handle or spout, persistent drips or temperature control problems, and no water flow or low pressure.
The article outlines quick checks and fixes for seal alignment, cartridge seating, and aerator or supply line blockages.
Each problem is paired with clear diagnostic steps and simple remedies to restore proper faucet function.
Leaks around handle or spout and how to fix them
Leaks around the handle or spout often indicate an improperly seated cartridge, worn seals, or loose fittings and should be diagnosed before assuming the cartridge itself is defective.
Inspect mounting nuts, retighten screws, and verify cartridge alignment. Replace O-rings or seat seals if cracked.
Check for debris in ports. Reassemble and test at normal pressure; leaks should stop or narrow, guiding next steps.
Persistent drips or temperature control issues
Once handle or spout seepage has been addressed, persistent drips or erratic temperature control can indicate remaining issues with the cartridge seating, internal seals, or the home’s water supply conditions.
Inspect cartridge alignment and retighten retaining nuts to manufacturer torque. Replace worn O-rings or seals, flush lines to remove debris, and verify diverter components.
If temperature balance fails, consider cartridge replacement or anti-scald valve adjustment.
No water flow or low pressure diagnosis
If water fails to flow or pressure is weak following cartridge reinstallation, the technician should systematically check both the faucet assembly and the supply system to isolate the cause.
Inspect inlet screens and aerator for debris, verify shutoff valves fully open, confirm supply lines and fittings are not kinked or blocked, test upstream pressure, and guarantee cartridge alignment and O-rings allow proper flow.
Tips to Extend Cartridge Life and Prevent Future Problems
A regular maintenance schedule with simple DIY checks can catch leaks and wear before they damage the cartridge.
Installing water treatment or a softener reduces mineral buildup that shortens cartridge life.
Persistent issues or complex repairs should prompt contacting a professional plumber.
Regular maintenance schedule and simple DIY checks
Establishing a simple, regular maintenance schedule helps prolong faucet cartridge life and prevents common failures. Homeowners should perform quick visual inspections, test handle operation, and check for leaks or mineral buildup every three to six months.
Simple DIY checks catch issues early and save time.
- Inspect for drips at base and spout
- Move handle through full range
- Feel for stiffness or grinding
- Wipe away visible scale
- Tighten loose fittings gently
Water treatment options to reduce mineral buildup
Why does mineral buildup shorten cartridge life and how can water treatment help?
Hard water deposits abrade seals, restrict flow, and cause sticking.
Installing point-of-use softeners, whole-house water conditioners, or resin-based ion exchangers reduces calcium and magnesium.
Periodic use of cartridge-safe descalers and inline sediment filters further prevent grit and scale.
These measures prolong cartridge function, reduce repairs, and maintain consistent faucet performance.
When to call a professional plumber
After addressing water treatment and routine descaling to limit mineral damage, homeowners should recognize situations where a professional plumber is the better option.
Call a plumber for persistent leaks, seized or corroded cartridges, unusual noises, low water pressure, or when replacement requires special tools or valve work.
Professionals guarantee correct parts, prevent damage, and verify system integrity to extend cartridge life and avoid recurring problems.
Quick Reference: Tools, Parts, and Cost Estimates
A concise list of essential tools, common replacement parts, and typical cost ranges helps plan any faucet cartridge replacement: A brief checklist guides preparation, avoids surprises, and estimates expenses for DIY or pro service.
| Tools | Parts | Cost |
|---|---|---|
| Adjustable wrench | Cartridge | $10–$60 |
| Screwdrivers | O-rings | $2–$10 |
| Pliers | Seats/springs | $5–$30 |
Conclusion
Careful consideration completes the cartridge chore: calmly check connections, confidently consult compatible components, and conscientiously confirm correct craftsmanship to curb costly complications. Skilled shoppers should source spare seals and sturdy spares, scheduling sensible service when simple solutions stall. Regular rinsing, routine reviews, and respectful replacement reduce recurring risks. Ultimately, meticulous maintenance makes malfunction moments manageable, maintaining smooth stream supply and minimizing messy, maddening malfunctions for many months and multiple uses.