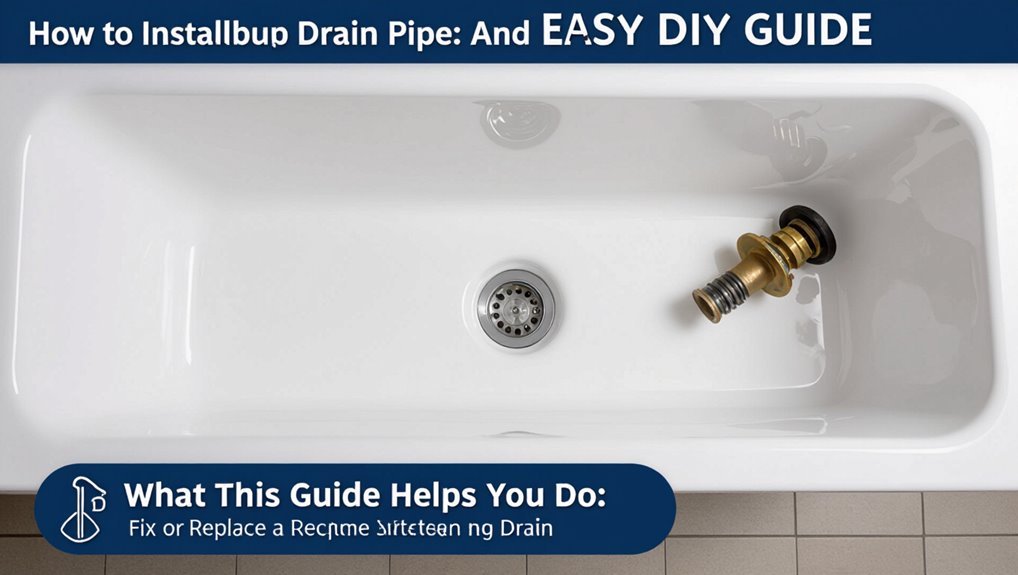
How to Install Bathtub Drain Pipe: Easy DIY Guide & Tools Needed
To install a bathtub drain pipe, you’ll need to replace the drain flange, tailpiece, and P-trap while ensuring proper sealing. Here’s a key takeaway guide for a straightforward DIY installation:
- Shut Off Water: Ensure the water supply is turned off.
- Prepare the Area: Protect the workspace to avoid damage.
- Remove the Old Parts: Take out the corroded flange and cleanly trim the tailpiece as necessary.
- Assemble New Components: Install the new drain flange, tailpiece, and P-trap, ensuring to use slip-nut washers.
- Seal Joints: Secure threaded or solvent-weld joints according to the materials used.
- Align and Support: Make sure the assembly has the correct slope for drainage and is properly supported.
- Test for Leaks: Fill the tub to check for any leaks before finishing up.
Follow these steps for a successful installation, and continue reading for detailed guidance and troubleshooting tips.
What This Guide Helps You Do: Fix or Replace a Bathtub Drain
This guide explains how to diagnose common bathtub drain problems and carry out repairs or full replacements, covering tools, materials, safety precautions, and step‑by‑step procedures for removing old drains, installing new trap assemblies, and testing for leaks.
It outlines identifying clogs, corroded fittings, worn gaskets, and damaged strainers, then selecting appropriate replacement parts and tools: pliers, drain keys, pipe wrenches, sealant, and new traps.
Safety measures include shutting off water, ventilating the area, and using eye protection.
Clear stepwise tasks help users disassemble, clean, replace components, reassemble connections, and perform functional leak and flow tests.
Do You Need to Replace or Install a New Bathtub Drain Pipe?
Assessment of the existing drain determines whether a replacement is necessary, such as persistent leaks, corrosion, or incompatible fittings.
If replacement is required, considerations include matching pipe size and material, access to the trap and tailpiece, and whether surrounding tile or fixtures must be removed.
Proper planning of parts, tools, and sequence minimizes surprises during installation.
When Replacement Is Needed
When a tub begins to drain slowly, leaks are visible beneath the cabinet, or foul odors persist despite cleaning, a homeowner should consider whether the existing drain assembly must be replaced rather than merely repaired.
Replacement is warranted when corrosion, extensive pitting, cracked or warped components, or failed seals are evident; repeated clogs resolved only temporarily; or multiple repairs have failed. Visible corrosion at the overflow, loose or stripped threads, and persistent leaks at joints indicate compromised integrity.
If the trap weir, tailpiece, or flange shows damage or the drain’s material is incompatible with current plumbing, full replacement is advisable.
New Installation Considerations
For homeowners planning a new tub or deciding whether to replace an existing drain, evaluating installation needs begins with matching the drain type, material, and dimensions to the fixture and local plumbing layout. The decision hinges on compatibility, condition of surrounding piping, and local code requirements.
New installations allow upgrading to modern finishes, better trap designs, and easier access for maintenance. Consider existing waste line alignment, floor framing for overflow assemblies, and whether a tub-shower requires a shared drain.
Obtain required permits and plan for venting and slope to prevent leaks or slow drainage.
- Confirm drain size and flange type
- Check framing and access
- Verify code and venting requirements
Quick Safety Checklist Before You Start
Why check tools and surroundings before touching the drain? A brief safety checklist reduces risk and prevents delays.
Verify water supply and shutoff valves are off and drain is free of standing water.
Make certain electrical sources or bathroom outlets are protected from moisture.
Confirm adequate lighting and stable footing; place non-slip footwear and a bath mat.
Wear gloves and eye protection to avoid contamination and splashes.
Inspect the work area for sharp edges, loose tiles, or exposed plumbing.
Keep a phone nearby for emergencies.
Document any preexisting damage to avoid liability later.
Tools You Must Have for a Bathtub Drain Job
Equipped with a concise set of tools, a technician can complete most bathtub drain jobs efficiently and safely.
Essential hand tools, a sealant applicator, and a basin wrench enable removal, adjustment, and secure fitting without unnecessary complexity.
A flashlight and inspection mirror help verify alignment and clearances; gloves protect grip and skin.
Proper sizing and condition of wrenches and pliers reduce risk of damaging fittings.
Utility knife and plumber’s putty knife are useful for cleaning old sealant.
Mechanical aids beyond these are rarely required for standard replacement or repair tasks.
- Adjustable wrench, basin wrench, pliers
- Sealant gun, plumber’s putty knife, utility knife
- Flashlight, inspection mirror, gloves
Bathtub Drain Parts and Materials Checklist
When preparing to replace or repair a bathtub drain, assembling the correct parts and materials before beginning preserves time and prevents mid-job delays.
Required components include a new drain assembly (strainer, flange, and tailpiece), plumber’s putty or silicone sealant, rubber gasket and washer, and appropriate threaded adapters or slip-joint fittings.
Add a P-trap or trap adapter if replacement is needed, plus PVC or ABS pipe and couplings sized to existing waste lines.
Necessary consumables: Teflon tape, pipe primer and cement (for plastic), and corrosion-resistant screws.
Keep a small selection of replacement O-rings and a spare drain stopper.
Measure the Tub and Waste Outlet for Fit
After gathering the listed parts, the next step is to measure the bathtub and waste outlet to confirm compatibility with the new drain assembly. The technician records tub wall thickness, distance from tub rim to center of waste, and the outlet diameter. Measurements determine adapter length and any extension shank requirement. Note any obstructions under the tub and existing flange type. Verify straight-line access for the tailpiece and trap connection to prevent stress or misalignment. Accurate measurements reduce fittings and rework.
- Measure outlet diameter and flange opening
- Measure rim-to-center distance
- Check under-tub clearance and alignment
Choose the Right Bathtub Drain Assembly
How should the technician select a bathtub drain assembly that fits both the tub and the plumbing layout? The technician evaluates drain diameter, flange style, stopper type, material compatibility, and access for maintenance. Match measurements previously taken and confirm tailpiece length and thread type. Prioritize assemblies with clear installation guides and necessary gaskets. Consider finish to match fixtures but avoid materials discussion reserved for the next section. Verify included mounting hardware and check for adjustable components to accommodate offsets.
| Feature | Purpose |
|---|---|
| Diameter | Ensures seal with waste outlet |
| Stopper type | User preference and function |
| Flange style | Tub deck fit |
| Adjustability | Alignment with plumbing |
When to Use PVC, ABS, or Metal Drain Pipe
In considering drain pipe material, the technician balances code requirements, solvent- or threaded-joining methods, and the installation environment to select PVC, ABS, or metal.
PVC is common for interior, cold-water drains where codes permit; it’s lightweight, solvent-welded, chemically resistant, and economical.
ABS suits colder climates and some local codes, offering impact resistance and easy fitting.
Metal (usually chrome-plated brass or stainless steel) is used where exposed trim, durability, heat resistance, or threaded connections are required, and where mechanical strength matters.
Choice depends on code, visibility, solvent or thread compatibility, and expected mechanical or thermal stresses.
- PVC: economical, solvent-welded, chemical resistance
- ABS: impact-resistant, cold-tolerant, code-dependent
- Metal: visible trim, threaded joins, durable
Shut Off Water and Prep the Work Area Safely
With the material chosen and fittings ready, the next step is to shut off the water and prepare the workspace to prevent spills and protect surfaces. The plumber or DIYer locates and closes the bathtub supply valves or the main shutoff, then opens faucets to drain lines. Protective coverings (drop cloths, plastic) shield floors and fixtures. Gather towels, a bucket, and tools within reach. Check lighting and ventilation. Confirm water is off before loosening any connections.
| Item | Purpose | Location |
|---|---|---|
| Bucket | Catch water | Under drain |
| Towels | Absorb spills | Nearby |
| Drop cloth | Protect floor | Entire area |
Stop Debris: Remove Old Drain Flange Correctly
Begin by removing the old drain flange carefully to prevent debris from falling into the trap or pipes.
Work methodically: loosen visible screws, cut through old plumber’s putty or sealant with a thin putty knife, and lift the flange straight up to avoid dislodging residue.
Collect loosened material and wipe the opening immediately.
Use a magnet or soft brush for metallic shavings and a small vacuum for remaining grit, keeping particles out of the drain.
Once removed, inspect the flange seat for corrosion and smoothness before proceeding with new installation.
- Loosen screws, cut sealant, lift flange
- Remove and vacuum debris
- Inspect flange seat for damage
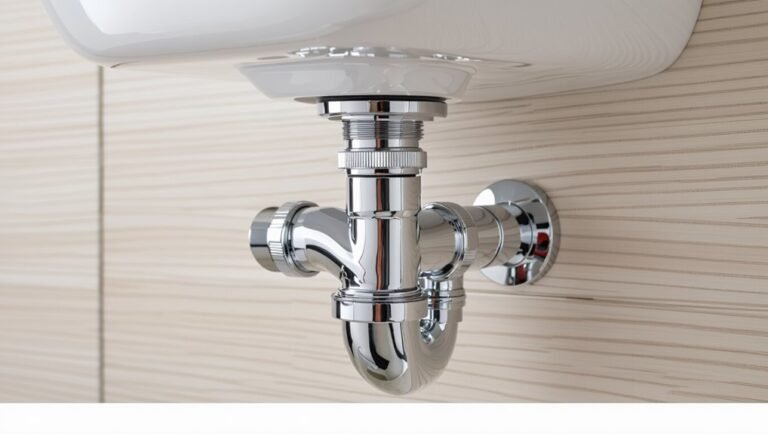
Inspect and Clear the Existing P‑Trap and Waste Line
The technician inspects the P‑trap for cracks, corrosion, and proper seals before proceeding.
If the trap shows damage or persistent leaks, it is replaced to guarantee a reliable seal.
Next, the waste line is checked for blockages and cleared with a snake or appropriate cleaner to restore full drainage.
Inspect P‑Trap Condition
Inspect the P‑trap visually and by hand to determine its condition and any obvious obstructions. The inspector notes corrosion, cracks, joint leaks, and alignment with inlet and outlet. Tightness of slip nuts and presence of mineral buildup are checked. Soft spots or deformities signal replacement. Any odor indicates trapped debris but not procedure for clearing. Photograph damage, measure pipe sizes, and note material type (PVC, ABS, metal) for correct replacement parts. Record findings before removal to guarantee correct reassembly or purchase.
- Corrosion, cracks, or hairline fractures
- Loose joints or misalignment
- Mineral buildup and soft spots
Clear Clogged Waste Line
To clear a clogged waste line, the technician examines and services the P‑trap and adjoining waste piping to locate and remove blockages while preserving existing seals and fittings.
The process begins by isolating the drain and placing a bucket under the trap. Slip nuts are loosened; the trap is inspected for hair, soap scum, and debris. A plumbing snake or auger clears deeper obstructions; a hand auger avoids damaging plastic fittings. Flush tests confirm flow; threads and washers are inspected and replaced if brittle.
Reassembly uses plumber’s grease on seals, and a final leak check validates the repair.
Install a New Bathtub Drain Flange (Step‑by‑Step)
When preparing to fit a new bathtub drain flange, gather the flange, plumber’s putty or silicone, appropriate wrench, and a clean rag; confirm the drain opening is free of old sealant and debris so the new flange seats evenly.
The installer places sealant around the flange lip, aligns the flange with the drain body, and threads it down by hand before tightening with a wrench.
Excess sealant is wiped away.
The drain plug mechanism is reinstalled and function tested for smooth operation and no wobble.
Final checks make certain proper alignment and secure connection.
- Align flange squarely
- Tighten progressively
- Remove excess sealant
Seal the Flange: Plumber’s Putty vs. Silicone
The choice between plumber’s putty and silicone affects durability and ease of future maintenance.
Plumber’s putty offers quick shaping and easy removal for repairs, while silicone provides a flexible, long‑lasting waterproof seal that resists mold.
The following comparison outlines typical performance, installation tips, and when each material is preferable.
Plumber’s Putty Benefits
Plumber’s putty provides a flexible, water-tight seal between a bathtub flange and the drain body, making it a reliable choice for many installers who value ease of use and removability. It conforms to irregular surfaces, creates an immediate seal without clamping, and can be removed cleanly for repairs or replacement.
It also resists compression set under normal bathroom conditions, maintaining seal integrity around the flange.
- Conforms to uneven surfaces for quick installation
- Easily removed for maintenance without damaging fixtures
- Maintains seal under typical bath temperature and pressure conditions
Silicone Sealant Advantages
While plumber’s putty offers easy removal and conformity, many installers prefer silicone sealant for its long-term waterproofing and flexibility. Silicone bonds to metal and porcelain, resists mold, and tolerates temperature and movement, making it suitable for tub flanges. It cures to a durable bead that maintains a seal despite minor settling or vibration. Clean surfaces and use appropriate caulk guns for consistent application. Removal is harder than putty but infrequent. Consider silicone where longevity and moisture resistance matter; reserve putty for temporary or easily accessible joints.
| Property | Silicone Advantage |
|---|---|
| Waterproofing | Excellent |
| Flexibility | High |
| Durability | Long-lasting |
| Mold resistance | Strong |
Assemble Tailpiece and Slip‑Nut Connections
Before connecting the drain body to the trap, assemble the tailpiece and slip‑nut fittings on the bench to check fit and orientation. The installer verifies threads, seat faces, and gasket alignment.
Slip nuts and washers are slid onto the tailpiece in the correct order: nut, washer, then tailpiece end. Thread engagement should be hand-tightened initially to avoid cross-threading.
Inspect for burrs or distortions that prevent a seal. Confirm the tailpiece length allows proper alignment without forcing fittings.
Final tightening is deferred until installed in place to permit final alignment and leak testing after connection.
- Verify parts and orientation
- Install nut then washer
- Hand-tighten, inspect fit
Connect the Tub Tailpiece to the P‑Trap
With the tailpiece preassembled and aligned, the installer positions it over the trap inlet and brings the P‑trap up to the tailpiece so the slip washers and nuts can be seated without binding.
The trap arm and tailpiece faces are checked for clean, flat contact. A new neoprene or rubber slip washer is slipped onto the tailpiece, oriented correctly, then the slip nut is threaded hand‑tight.
The trap is held square while the nut is tightened further with a wrench, avoiding overtightening. After assembly, the joint is inspected for gaps and the tub drain is filled briefly to verify there are no leaks at the connection.
Set the Correct Slope for Horizontal Drain Runs
Establish a consistent downward slope of 1/4 inch per foot for every horizontal drain run to guarantee adequate gravity flow and prevent standing water. The installer measures run length, marks elevation change, and supports piping to maintain slope. Leveling tools verify consistency; minor adjustments prevent sagging. Avoid reverse pitch and soft supports that allow long‑term droop. Document measurements before final fastening to simplify future maintenance.
- Use a torpedo level or optical level to check slope at intervals.
- Place hangers or strapping every 3–4 feet and near joints to hold grade.
- Recheck slope after insulation or ceiling work to ensure stability.
Cut and Join PVC/ABS Drain Pipe Correctly
Attention to clean cuts and correct solvent joining guarantees leak-free PVC/ABS drain runs.
Technicians should square pipe ends, remove burrs, and dry-fit components before applying primer and solvent cement per manufacturer instructions.
Proper alignment and sufficient cure time complete a durable, watertight connection.
Cutting Pipe Cleanly
Cutting PVC or ABS drain pipe cleanly requires steady hands, the right tools, and careful measurement to guarantee a snug, leak-free joint.
The installer marks the cut with a permanent marker, measures twice, and clamps the pipe to prevent rotation. A fine-tooth saw or PVC cutter provides a straight edge; reciprocating saws require a slow, controlled stroke.
After cutting, the edge is deburred and the face lightly sanded to remove burrs and make certain full contact. Dry-fit pieces to verify alignment and length before final assembly.
Clean cuts reduce gaps, ease fitting, and prevent stress points that cause leaks.
- Mark and secure pipe
- Use appropriate cutting tool
- Deburr and test fit
Joining With Proper Solvent
Apply solvent cement promptly after dry-fitting to create a chemically welded joint that resists leaks and resists separation.
The installer lightens pipe and fitting contact areas with a compatible primer when required, then evenly applies solvent to both mating surfaces.
Parts are pushed together with a quarter-turn twist to spread cement and align sockets; excess is wiped away.
Hold joint for the manufacturer’s set time to prevent movement.
Allow full cure per temperature and solvent guidelines before testing.
For ABS use ABS-specific cement; for PVC use PVC cement and primer.
Proper ventilation and gloves protect health during application.
Glue Solvent‑Weld Pipe Joints Safely
Wear proper ventilation and eye protection, and work in a well-ventilated area, when preparing to solvent‑weld PVC drain fittings.
The installer cleans pipe and socket, marks insertion depth, applies primer where required, then coats both surfaces evenly with solvent cement.
Parts are joined quickly, rotated slightly to spread cement, and held for the manufacturer’s set time.
Excess cement is wiped away; joints are left undisturbed until cured.
Proper technique prevents leaks and brittle bonds.
Follow cement and primer instructions, observe temperature limits, and dispose of rags safely.
- Clean and measure insertion depth
- Apply primer and cement evenly
- Hold joint until set time
Solder or Thread Metal Drain Connections
The next section explains how to prepare metal drain fittings, including cleaning, fluxing, and cutting to length.
It compares soldered joints and threaded connections, outlining when each method is appropriate.
Practical tips for achieving leak‑free seals and avoiding common mistakes are provided.
Preparing Metal Connections
Prepare metal drain connections by cleaning, fitting, and protecting the joint surfaces to guarantee a watertight seal whether soldering or threading is used.
Surfaces are descaled and degreased; threads are inspected and chased; fittings are test-assembled to confirm alignment and gap.
Flux is applied sparingly for solder joints; thread sealant or PTFE tape is chosen for threaded joints.
Protective measures like heat shields or masking prevent damage to nearby fixtures and finishes.
Final cleaning removes residue before assembly.
Proper preparation reduces leaks and rework while ensuring safe, durable joints in metal bathtub drain installations.
- Clean and degrease contact surfaces
- Inspect and fit components for alignment
- Apply appropriate flux or thread sealant
Joining Methods And Tips
When joining metal bathtub drain components, soldering and threaded connections each demand distinct procedures, tools, and precautions to produce a reliable, leak-free seal.
For soldering, flux cleaning, proper fit, and heat control matter: use a flame or torch suited to plumbing fittings, apply solder evenly, avoid overheating nearby finishes or seals, and test for leaks after cooling.
For threaded joints, wrap male threads with PTFE tape or apply pipe dope, hand-tighten then wrench-turn to seat without crushing fittings.
In both methods, inspect alignment, deburr edges, and pressure-test with water.
Follow local codes and replace corroded parts.
Install the Overflow and Link It to the Drain
Following the tub manufacturer’s instructions, the installer positions the overflow assembly and secures it to the tub shell, then connects the overflow elbow to the drain tailpiece using the supplied linkage or a trap adapter.
The installer adjusts the linkage length and pivot points so the stopper operates smoothly, ensuring gaskets or O-rings seat evenly to prevent seepage.
Metal or plastic components are tightened to manufacturer torque recommendations without over-stressing threads.
Alignment of the overflow plate and trim is confirmed before final tightening.
Any excess sealant is wiped away and connections are inspected visually for proper mating.
- Align linkage and set stopper travel
- Seat gaskets evenly
- Tighten to spec, clean excess sealant
Test the Bathtub Drain for Leaks First
Before finishing, the installer fills the tub to the marked water level to pressurize the drain assembly.
Visible connections under the tub and at the overflow are then carefully inspected for any signs of seepage.
The installer monitors for slow drips over several minutes, noting any areas that require tightening or resealing.
Fill Tub To Mark
Fill the tub to the recommended water level to perform a leak test of the newly installed drain. The installer observes the water line for at least 15–30 minutes, noting any drop or stains below the fixture.
If water level holds, internal seals and tailpiece fitments are likely sound. If it falls, the source may be within the drain assembly or below the tub; further targeted checks follow.
Document observations and timing before proceeding. Avoid running hot water or using excessive agitation during this static test to prevent misleading results.
- Record water level and start time
- Look for visible seepage or dampness
- Recheck after 30 minutes
Inspect Visible Connections
Once the static water test has confirmed whether the waterline holds, the installer moves on to visually inspect all accessible drain connections for signs of leakage.
The inspector examines the overflow assembly, tailpiece, trap adapter, and slip-joint nuts for water beads, mineral deposits, or fresh dampness.
Seams, gasket faces, and threaded fittings receive close scrutiny under good light; any softened sealant or misaligned components are noted.
If staining or corrosion appears, loose fittings are gently tightened to specification or marked for replacement.
All observations are recorded, with photos and measurements, to guide corrective actions before resuming use.
Monitor For Slow Drips
Regularly, the installer watches the drain area for slow drips after reassembling the bathtub, because hairline leaks may not show during a static fill but will reveal themselves over time. He fills the tub, seals the overflow, notes water level, and returns after several hours to inspect for any fresh moisture or stains around the tailpiece, slip nut, and flange.
Observations guide further tightening, reseating of gaskets, or replacement of degraded seals. Persistent dampness prompts dye testing or paper-towel checks to pinpoint sources before cosmetic damage or mold develops.
- Check joints and fittings
- Use dye or paper towels
- Reassess seals and gaskets
Fix Common Leaks at the Flange, Tailpiece, and Trap
Identify and address leaks at the flange, tailpiece, and trap promptly to prevent water damage and odors.
Inspect the flange seal for cracked putty or loosened bolts; retighten screws and replace sealant or a rubber gasket as needed.
Check the tailpiece connection under the tub for loose slip nuts or worn washers; hand-tighten then secure with a wrench, replacing washers or nylon nuts if leaking persists.
Examine the P-trap for misalignment, corrosion, or stripped threads; realign piping, replace corroded sections, and install new washers or a compression fitting.
Test with water and observe for continued seepage, tightening incrementally.
Remove Stubborn or Corroded Drain Fittings
Often the metal parts around a bathtub drain become seized by corrosion or hardened debris, requiring deliberate force and the right tools to remove without causing further damage.
The technician applies penetrating oil, allows soak time, then uses a strap wrench or basin wrench to avoid marring finishes.
If threads are corroded, gentle tapping with a cold chisel can break rust bonds; excessive force is avoided to protect the flange and surrounding tile.
After removal, surfaces are cleaned and inspected for pitting or crack damage before installing replacements or seals.
- Use penetrating oil and soak time
- Employ strap or basin wrenches
- Tap gently to free corroded threads
Retrofit a Modern Pop‑Up or Trip‑Lever Bathtub Drain
When replacing an old plunger or lift-and-turn assembly with a modern pop-up or trip-lever drain, the technician first verifies compatibility with the tub’s tailpiece and overflow assembly, then gathers the specific pop-up kit, plumber’s putty or silicone, and appropriate wrenches. The old assembly is removed, sealing surfaces cleaned, and the new flange installed with putty or sealant. The pop-up linkage or trip lever is adjusted to make certain smooth closure and watertight seal. Finally, the system is tested for leaks and proper operation, making minor linkage or seal adjustments as needed.
| Item | Purpose |
|---|---|
| Pop-up kit | Drain and linkage |
| Sealant | Watertight flange |
| Wrenches | Tightening fittings |
| Cleaner | Remove old putty |
| Test run | Verify operation |
Replace the Trap: When and How
Replace the P‑trap when corrosion, persistent leaks, slow drainage despite clear traps, or incompatible fittings prevent reliable operation.
The homeowner assesses access, water shutoff, and compatible replacement trap material (PVC, ABS, or brass).
Removal requires a bucket, loosening slip nuts, and inspecting tailpiece and trap arm; replace damaged sections, seat new washers, align trap arm pitch, and hand‑tighten then slightly wrench for leak‑free joints.
Test by running water and checking for drips.
Dispose of corroded metal per local rules.
If fittings or layout conflict with code or reach, consult a plumber.
- Inspect condition and material
- Replace parts and seals
- Test and verify drainage
Access Panels, Drywall, and Tile: Tips for Access
Proper placement of an access panel can prevent excessive drywall or tile removal and simplify future maintenance.
When cutting drywall, measuring and marking stud locations first minimizes repair work and guarantees a clean opening.
For tile, score grout lines and use a small grinder or chisel to remove tiles around the access area to preserve surrounding finishes.
Access Panel Placement
For straightforward maintenance and to prevent costly wall or tile removal later, locate access panels so they provide direct, unobstructed reach to the bathtub drain trap, overflow assembly, and any shutoff valves.
Panels should align with framing bays, sit at a comfortable working height, and avoid interfering with plumbing or electrical runs.
Consider panel size that permits tool maneuvering and part replacement.
Choose durable, serviceable covers that match finishes where visible.
Mark panel location before finishing walls or tiling to guarantee neat integration.
Plan for future access needs and confirm local code or manufacturer requirements before final placement.
- Align with framing bays
- Allow tool clearance
- Match visible finish
Drywall Cutting Tips
After marking the access-panel location, cutting drywall cleanly and accurately guarantees the panel sits flush and provides the intended-for service clearance. A square or rectangle should be scribed with a straightedge; confirm stud and utility positions before cutting.
Use a utility knife to score paper, then snap and trim with a drywall saw for controlled edges. Sand or pare ragged edges so the access frame fits without forcing.
Protect adjacent tile and fixtures with tape. Remove dust. Label the panel if recessed.
The goal is a neat, safe opening that allows future drain or trap work without damaging surrounding surfaces.
Tile Removal Techniques
When preparing an access panel through tile, careful removal preserves surrounding finishes and reveals the substrate and fasteners needed for drain or trap work.
The technician scores grout, uses a carbide grout saw or oscillating tool to loosen tiles, and pries tiles gently to avoid cracking adjacent pieces.
Backing materials are exposed one layer at a time; cement board or drywall should be cut cleanly.
Debris is contained and adhesive residue removed to allow patching or panel installation.
Fastener locations are documented for reattachment and waterproofing details are noted before proceeding with plumbing access.
- Score grout, cut, and pry tiles
- Expose substrate gradually
- Contain debris and note fasteners
Finish Cleanup: Remove Putty, Recaulk, and Polish
Typically, the final cleanup focuses on removing excess plumber’s putty, replacing any worn caulk, and polishing fixtures to restore a neat, watertight finish.
After the drain assembly sets, scrape hardened putty carefully with a plastic scraper to avoid scratching the tub. Clean the area with a mild solvent recommended for the tub material, then dry thoroughly.
Remove old caulk with a utility tool and apply a continuous bead of bathroom-grade silicone, smoothing with a wet finger or tool for adhesion.
Wipe metal surfaces with a soft cloth and metal polish appropriate to the finish, ensuring seals remain intact and clean.
Quick Temporary Fixes for a Leaking Bathtub Drain
Once the permanent seal is inspected and polished, attention can turn to quick temporary fixes for a leaking bathtub drain that stop water loss until a proper repair is made.
Small gaps can be managed temporarily with plumber’s putty pressed into seams; tighten visible slip-nuts and test for reduced drip.
For weeping drains, wrap Teflon tape around threaded connections after drying.
A rubber drain stop or waterproof silicone band can reduce flow into a damaged flange.
- Use plumber’s putty to fill minor gaps
- Tighten and tape threaded connections
- Employ a rubber stop or silicone band to limit leakage
Typical DIY vs. Pro Costs and Time Estimates
Typical DIY bathtub drain replacements usually cost between $20 and $75 for parts and take an experienced homeowner one to three hours.
Hiring a plumber typically adds labor and service fees, bringing total costs into the $150–$400 range while the job is often completed within one hour by a pro.
These contrasts in material cost, labor expense, and time frame help inform whether to attempt the repair or call a professional.
Typical DIY Costs
For a homeowner weighing whether to tackle a bathtub drain replacement, the cost comparison between DIY and hiring a professional centers on parts, tools, and labor time. Typical DIY costs generally include the drain assembly ($10–$60), basic fittings and sealant ($5–$25), and rental or purchase of specialty tools if needed ($15–100).
Savings come from avoiding hourly labor charges, but unexpected parts or mistakes can raise expenses. Budgeting a small contingency (10–20%) is prudent. The DIY route suits those with modest plumbing experience and time; otherwise professional rates may justify the expense.
- Parts: drain kit, gaskets, sealant
- Tools: wrench, pliers, drain key
- Contingency: 10–20% for extras
Professional Time Estimates
Having compared parts, tools, and contingency for a DIY bathtub drain replacement, homeowners should next consider how time commitments differ between DIY and hiring a pro.
A competent plumber typically completes a straightforward drain replacement in one to three hours, including minor adjustments and cleanup; complex cases involving access panels, corroded fittings, or tub removal can extend to a half or full day.
DIYers often spend three to eight hours spread over planning, shopping, and installation, with potential delays for unexpected issues. Labor costs for professionals raise total expense but provide faster, warranty-backed results and reduced risk of prolonged downtime.
Local Code and Permit Points That Affect Drains
When installing a bathtub drain, local plumbing codes and permit requirements determine allowable materials, trap configurations, venting, slope, and connection methods; compliance prevents failed inspections and costly rework.
The installer should verify jurisdictional code editions, required permits for remodels, and approved fittings and pipe types.
Plans or permit applications may require diagrams showing vent locations, trap arm lengths, and grading.
Inspections often occur at rough‑in and final stages; failures must be corrected before concealment.
Recordkeeping of permit numbers and inspector notes aids resale and warranty claims.
- Confirm permitted materials and fittings
- Document vent/trap measurements per code
- Schedule required inspections and retain approvals
When to Call a Licensed Plumber Instead of DIY
After confirming code requirements and scheduling inspections, the homeowner should assess whether the bathtub drain project remains within their skill set or requires a licensed plumber. Complex issues—hidden leaks, cast iron corrosion, multiple fixture connections, or persistent backups—signal professional intervention. A plumber guarantees code-compliant repairs, durable seals, and reliable venting; they carry insurance and permits, reducing liability. Emergency water damage, structural concerns, or uncertainty about pipe materials mandates calling a pro. Costly mistakes outweigh DIY savings when access is limited or diagnostic tools are needed.
| Fear | Relief | Confidence |
|---|---|---|
| Leak | Repair | Trust |
| Unknown | Certainty | Safety |
Conclusion
The reader is guided to assess, prepare, and act: inspect the old drain, gather the right tools, follow safety steps, and choose proper parts; they are shown simple temporary fixes, given cost and time expectations, and alerted to code and permit issues. For routine repairs, a careful DIY approach suffices; for complex installations, persistent leaks, or code-sensitive work, hiring a licensed plumber is the safer, smarter choice.