How to Hook Up Grill to Gas Line Safely: Step-by-Step Guide for Homeowners
To safely connect your grill to a gas line, start by confirming the fuel type, checking local codes, and assessing your own skills. Use the appropriate fittings, a gas-rated shutoff valve, a regulator, and approved piping materials such as black iron, CSST, or flexible stainless steel. Shut off the main gas supply, install an accessible inline valve, and ensure all fittings are torqued according to specifications. Finally, test for leaks using a soap solution or a gas detector. If you’re unsure about any step or if the installation is complex, it’s best to hire a licensed professional. The following guide will detail the steps, tests, and troubleshooting methods involved.
How to Safely Hook Up a Grill to a Natural Gas Line: Quick Overview
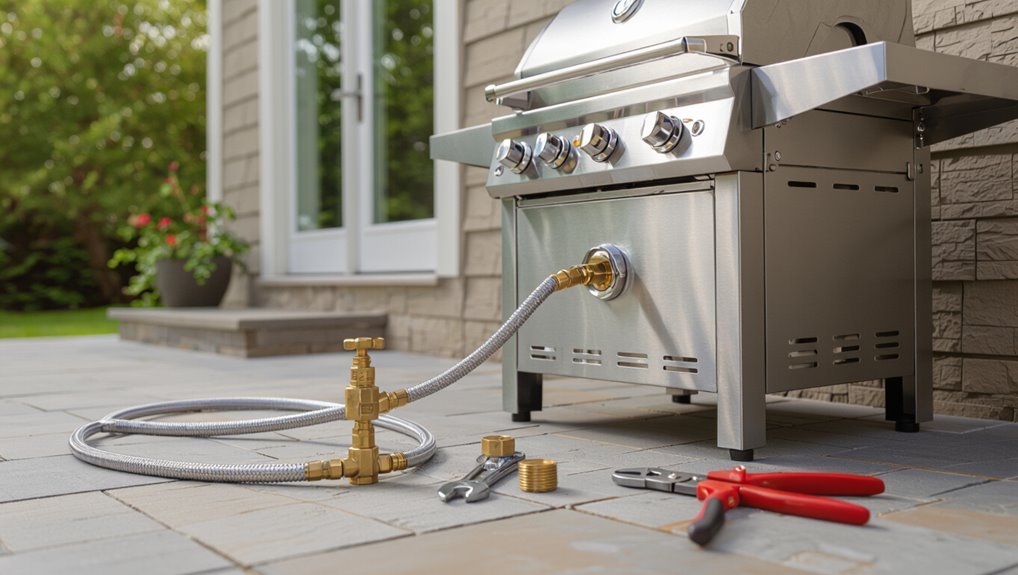
The opening overview clarifies who should tackle a natural gas grill hookup—experienced DIYers with plumbing and gas knowledge—and who should not, such as homeowners uncomfortable with gas work or those lacking proper tools.
It outlines typical time, tools, and materials needed for a straightforward install and stresses checking local codes and permits before starting.
It also explains common signs that a licensed professional or utility company inspection is required.
Who should and shouldn’t attempt this project
Who should tackle a gas-line grill hookup and who should not depends on skill, certification, and comfort with gas systems.
Homeowners experienced with plumbing, certified gas technicians, or DIYers familiar with codes may learn how to hook up a grill to a gas line safely.
Novices, anyone uncomfortable with gas, and those without permits or local code knowledge should hire a licensed professional to avoid hazards.
Typical time, tools, and materials required
After deciding whether to hire a pro or proceed as a capable DIYer, an accurate estimate of time, tools, and materials helps plan the job.
Typical DIY hookup takes 1–3 hours for trained homeowners: shutoff, fittings, leak testing.
Essential tools: adjustable wrenches, pipe thread sealant, tubing cutter, flexible gas connector, pipe dope, leak detector solution, pipe supports, safety gloves, and a gas-rated shutoff valve.
Local codes, permits, and when to hire a pro
Why check local codes before starting a gas hookup? Local codes dictate allowable pipe materials, shutoff locations, pressure limits, and required permits.
Homeowners must verify municipality rules and inspection requirements. If regulations demand licensed installation or if lines cross property boundaries, hire a licensed gas technician.
Complex installations, meter changes, or uncertainty about compliance always justify professional services to guarantee safety and legality.
Understanding Gas Types, Fittings, and Safety Basics
The distinction between natural gas and propane—notably their pressure differences, connector types, and performance implications—dictates equipment choices and installation methods.
Common outdoor fuel lines include black iron, CSST, flexible stainless, and brass fittings, each with specific uses and compatibility requirements with regulators, quick-disconnects, and shutoff valves.
Reading regulator and hose specifications (PSI and BTU capacity) guarantees the selected components safely match the grill’s demand and the supply type.
Natural gas vs. propane: pressure, fittings, and implications
Because natural gas and propane differ in pressure, chemical properties, and required fittings, they demand distinct hookup methods and safety considerations when connecting a grill to a gas line.
Natural gas runs at lower pressure than propane, affecting orifice size and regulator choice.
Propane is denser and more volatile; leaks pose greater ignition risk.
Always match grill components, regulators, and labeling to the fuel type.
Pipe types and connectors used for outdoor grills (black iron, CSST, flexible stainless, brass fittings)
Given the differing pressures and connectors required by natural gas versus propane, choosing the correct pipe material and fittings becomes a practical next step.
Outdoor grill installations commonly use black iron pipe for permanent runs, CSST for flexible routed lines, corrugated stainless steel for short connections, and brass fittings or adapters for threaded joints.
Compatibility, corrosion resistance, and approved connectors dictate selection.
Required safety devices: shutoff valves, regulators, quick-disconnects
Several essential safety devices protect outdoor grill gas systems from leaks, pressure issues, and accidental gas flow.
A manual shutoff valve near the appliance enables immediate isolation. A pressure regulator maintains appropriate downstream pressure. Quick-disconnect fittings allow safe, tool-free removal of hoses for maintenance.
Devices must be rated for the fuel type and installed per code to guarantee reliable operation and reduce hazard potential.
How to read regulator and hose specifications (PSI, BTU capacity)
After outlining the safety devices that control flow and pressure, attention turns to interpreting the markings on regulators and hoses to guarantee compatibility with a grill’s fuel requirements.
Inspect label PSI (propane commonly 10–11″WC ≈ 0.36 PSI; LP regs list inch‑WC), and maximum BTU or GPH ratings.
Confirm fuel type, inlet/outlet threads, and temperature limits to prevent underperformance or hazards.
Pre-Installation Preparations
Before beginning hookup work, the installer reviews the grill’s gas type, pressure requirements, and manufacturer instructions to confirm compatibility.
Next, they plan the gas line route and ideal grill placement while verifying the location of existing utilities and required clearances.
Finally, they assemble the recommended tools and safety gear—shutoff wrench, pipe sealant, leak detector, gloves, and eye protection—so the job proceeds safely and efficiently.
Inspecting your grill’s gas requirements and manufacturer instructions
A careful review of the grill’s gas requirements and the manufacturer’s instructions is essential for a safe installation.
The owner should confirm fuel type (natural gas or propane), required inlet pressure, connector size, and maximum BTU rating.
Verify included parts, clearance and ventilation specifications, and warranty conditions.
Note any required adapters, certified fittings, or professional-installation mandates before proceeding.
Locating the gas line route and optimal placement for the grill
Proper placement of the grill and a clear route for the gas line are critical to guarantee safety, accessibility, and compliance with codes.
Determine a stable, level location with adequate ventilation and clearance from structures.
Plan the shortest, most direct gas line path avoiding sharp bends.
Position regulators and shutoffs for easy access.
Consider appliance orientation, service access, and future maintenance when finalizing placement.
Checking for existing utility lines and obtaining clearances
With the grill location and gas-line route set, the next step is to identify any underground or nearby utilities and secure necessary clearances.
Contact local utility marking services (811) to locate buried lines, inspect for overhead wires, and verify property easements.
Obtain permits and written clearances from utility providers or municipal authorities before excavation or installation to prevent damage and guarantee compliance.
Recommended tools and safety gear checklist
Several essential tools and safety items are required before starting a gas-line hookup to guarantee efficiency and reduce risk.
The homeowner should assemble quality tools, inspection devices, and protective gear, ensuring compatibility with local code and gas type. Proper preparation prevents leaks and injury, and enables a smoother, code-compliant installation.
- Pipe wrench, adjustable wrench, thread sealant
- Gas leak detector or soapy water
- Pressure gauge/test kit
- Safety goggles, gloves, respirator
Step-by-Step Installation Guide
The installation guide proceeds through five essential steps to complete a safe grill hookup.
First, the technician confirms the gas supply is shut off and the work area is secure before fitting or verifying an inline shutoff valve.
Next, the correct regulator and adapter are selected, the chosen gas line (rigid or flexible) is run and secured, and—if applicable—a quick-disconnect for portable grills is installed.
Step 1 Turning off gas supply and ensuring the area is safe
Before any connections are made, shut off the gas at the main valve and ventilate the area to eliminate lingering fumes; verify the supply is off by using a gas detector or soapy-water test at accessible fittings.
Inspect surroundings for ignition sources, remove combustibles, and guarantee adequate lighting and clear egress.
Notify household members, keep children and pets away, and wear appropriate PPE before proceeding.
Step 2 Installing or verifying inline shutoff valve
Install or verify an accessible inline shutoff valve on the grill’s supply line to provide a quick, reliable means of isolating the appliance during use, maintenance, or emergencies.
Position the valve near the grill, confirm proper orientation and pipe thread type, guarantee a full open/close action, use approved fittings and joint sealant, test for leaks with soapy water, and label the valve for easy identification.
Step 3 Choosing and installing the correct regulator and adapter
With the inline shutoff confirmed and labeled, attention shifts to selecting and fitting a regulator and any required adapter to match the grill’s fuel type and inlet fitting.
The homeowner verifies regulator pressure (LP vs natural), thread type, and certification.
Install the regulator per manufacturer torque specs using approved fittings and thread sealant for gas.
Test for leaks at the regulator and adapter connections.
Step 4 Running the gas line (rigid vs. flexible) and securing connections
Begin planning the route and material choice for the gas line, deciding between rigid black iron/CSST or flexible stainless steel (corrugated) pipe based on local code, distance, and ease of installation.
Run lines avoiding heat sources and sharp edges, support at manufacturer spacing, use proper fittings and thread sealant or tape rated for gas.
Test with soap solution and pressure test per code.
Step 5 Installing a quick-disconnect for portable/movable grills
A quick-disconnect provides a safe, convenient way to connect and disconnect a portable or movable grill without tools; this step-by-step guide covers selection, placement, and proper attachment to guarantee a leak-free, code-compliant connection.
Select a CSA/ANSI-listed connector and matching male/female coupler.
Mount the fixed half near the gas stub with a shutoff valve accessible.
Use proper thread sealant, tighten to spec, and secure strain relief.
Step 6 Pressure testing the line and joint leak testing with soapy water
After securing the quick-disconnect and tightening all fittings, pressure testing confirms the integrity of the gas line before first use.
The installer pressurizes the system per local code using an approved gauge and regulator, isolates downstream appliances, and monitors for pressure drop.
All joints and connections are brushed with a soapy water solution; any bubbling indicates leaks requiring retightening or replacement until no bubbles appear.
Step 7 Lighting procedure and final combustion checks
Proceed to light the grill only after confirming no leaks and that all pressure tests passed. The operator should follow the manufacturer’s lighting sequence—open the gas supply, set burners to the specified pilot or low position, and use the built-in ignition or a certified lighter per instructions.
Observe flame characteristics: steady blue flames with minimal yellow tips, consistent burner ignition, and no odors. Shut off if irregularities appear.
Step 8 Securing hoses and protecting lines from heat and damage
With the grill confirmed leak-free and burners tested, attention shifts to securing hoses and shielding gas lines from heat and physical damage.
Install approved clamps and non-compressing straps to prevent sagging and movement. Route hoses away from hot surfaces, sharp edges, and foot traffic; maintain manufacturer’s clearance.
Add heat shields or insulation where needed, and inspect fittings regularly for wear, abrasion, and chafing.
Inspection, Testing, and Verification
A final inspection verifies the integrity of the new gas connection through pressure testing and defined acceptable leak thresholds.
Technicians employ gas detectors and step‑by‑step bubble tests to locate leaks, then document results and corrective actions.
Inspectors check fittings, shutoff accessibility, venting, and test records, which should be retained for future reference.
How to perform a pressure test and acceptable leak thresholds
Begin by isolating the grill and closing all downstream appliances and valves.
Then pressurize the gas line to the specified test pressure using a calibrated gauge and an approved gas test kit.
Monitor pressure for the required hold time; acceptable loss is typically negligible per local code (often ≤1 in. WC drop over the hold period).
Record results and remedy any failures before service.
Using gas detectors and bubble tests: stepwise method
After pressure testing confirms line integrity, attention shifts to localized leak detection using electronic gas detectors and soap bubble tests.
Technicians sweep joints, valves, and fittings with a detector, then apply a soap solution to suspect areas. Bubbles indicate leaks; mark and repair before retesting. Repeat until clear. Follow safe ventilation and ignition-control precautions.
- Sweep slowly along fittings
- Apply soap solution evenly
- Mark and isolate leaks
- Retest after repairs
What inspectors look for and documentation to retain
Inspectors examine fittings, flexible connectors, shutoff valves, pressure regulators, and appliance connectors for proper materials, correct sizing, secure supports, and absence of visible damage or corrosion.
They verify leak tests, regulator settings, and venting clearances, confirming compliance with codes.
Homeowners should retain permits, inspection reports, test results, appliance manuals, and component receipts for warranty, future inspections, and insurance documentation.
Common Problems and How to Fix Them
Common issues after connecting a grill to a gas line include low or uneven burner flames, audible hissing or evidence of persistent leaks, and signs of regulator or hose failure.
Each problem has identifiable causes—clogged ports, loose fittings, or damaged components—and specific remediation steps such as cleaning burner ports, performing soap-bubble leak tests, and replacing faulty regulators or hoses.
The following guidance explains how to detect these faults safely and perform appropriate repairs or replacements.
Low flame or uneven burners: causes and fixes
Low or uneven burners often indicate restricted gas flow, clogged ports, or improper air-to-gas mixture. Diagnosing the exact cause quickly restores performance and safety.
Inspect and clean burner ports, remove debris, and clear spider nests. Verify regulator orientation and supply pressure. Adjust air shutter for correct flame color and height.
Replace damaged burners or valves. Test operation after each repair.
Hissing or persistent leaks: detection and remediation
Detect a hissing sound or the smell of gas promptly, as these are clear signs of a leak that require immediate attention.
Turn off the gas supply, evacuate the area, and avoid sparks or flames.
Perform a soap-and-water test to locate the leak; mark affected fittings.
If leak persists at rigid connections, tighten or reseal with approved materials.
Call a licensed technician for stubborn or large leaks.
Regulator or hose failure signs and replacement steps
Inspect the regulator and hose regularly for cracking, brittleness, hissing, gouges, kinks, blistering, or loose fittings—symptoms that indicate imminent failure and unsafe operation.
If any appear, shut off gas, disconnect, and replace the hose and regulator with OEM or approved components.
Use proper wrenching, thread sealant rated for gas, torque to spec, perform a soap-bubble leak test, and retest before use.
Safety Tips and Maintenance for Long-Term Use
A routine inspection schedule and a seasonal startup checklist help guarantee the gas connection and burners remain safe and functional.
Regular cleaning, proper winterizing, and corrosion protection for fittings extend equipment life and prevent leaks.
Safe procedures for moving or replacing the grill minimize the risk of damage to the gas line and personal injury.
Regular inspection schedule and seasonal startup checklist
Routine vigilance keeps a gas-connected grill safe and reliable over time. Homeowners should follow a consistent inspection schedule and a brief seasonal startup checklist to detect leaks, wear, and regulator function before use.
Document findings and correct issues promptly. Recommended checks include:
- Visual hose and connection inspection for cracks or abrasions
- Leak test with soapy water at fittings
- Regulator and valve operation test
- Burner ignition and flame pattern check
Cleaning, winterizing, and protecting fittings from corrosion
Clean and winterize gas fittings to prevent corrosion, freezing, and leaks that can compromise safety and performance.
Inspect fittings, regulators, and hose connections for rust, cracks, or wear. Clean with a mild detergent and brush, rinse, and dry thoroughly.
Apply approved anti-corrosion compound or dielectric grease to threads and joints.
Drain or insulate exposed lines and store spare connectors indoors for winter.
Safe practices for moving or replacing the grill
When relocating or replacing a gas grill, the owner should first shut off the gas at the supply and disconnect the regulator and hose before moving the unit, ensuring all valves are fully closed and any residual pressure is bled per manufacturer instructions.
Inspect connections, cap or plug open fittings, and transport the grill upright.
Have a qualified technician reconnect and leak-test the system after placement.
When to Call a Licensed Professional
Certain tasks—such as installing new gas lines, repairing leaks, or modifying existing piping—warrant hiring a licensed plumber or gas contractor.
Readers should verify credentials, ask about insurance, references, experience with outdoor grill hookups, and request written estimates that specify permits and inspections.
The professional’s quote often includes permit handling and typical labor and material costs, which helps homeowners compare bids and avoid unexpected expenses.
Situations requiring a licensed plumber or gas contractor
If the installation involves modifying the home’s gas main, running new underground or concealed lines, or tying into a meter, a licensed plumber or gas contractor should be engaged.
Other situations warranting a pro include complex line rerouting, gas pressure adjustments, multi-appliance manifolds, suspected leaks, code compliance inspections, or any work requiring permits.
Safety and liability risks justify professional involvement.
How to vet contractors and questions to ask before hiring
Having established scenarios that require a licensed plumber or gas contractor, homeowners should next focus on vetting those professionals before hiring.
Verify license and insurance, check references and recent reviews, confirm gas-specific experience, ask about scope of work, timelines, safety protocols, and warranty on labor.
Request written estimates and clear communication expectations.
Prioritize responsive, transparent contractors with verifiable credentials.
Typical costs and permit handling by professionals
Many homeowners can expect a licensed professional to charge for both labor and materials when hooking a grill to a gas line, with typical total costs varying by job complexity, local rates, and permit requirements. Professionals handle permits, inspections, and compliance; estimates often include permit fees and corrective work. Hiring is advised for hard piping, regulator replacement, or multi-appliance setups.
| Item | Typical Cost Range | Notes |
|---|---|---|
| Basic hookup | $150–$400 | Flexible hose, short run |
| Hard pipe install | $400–$1,200 | More labor, permits |
| Permit fee | $50–$250 | Varies by jurisdiction |
| Inspection | $50–$150 | Required in many areas |
| Regulator or repair | $100–$500 | Safety-critical parts |
Additional Resources and Manufacturer References
Readers are directed to local building departments and permitting offices for applicable codes and inspection requirements.
Manufacturer manuals and model-specific hookup notes should be consulted for installation steps and warranty conditions.
Recommended fittings, regulators, and gas detectors from reputable brands can be referenced to guarantee compatible, code-compliant components.
Where to find local code information and permitting offices
Before starting any gas-line work, consult the local building department or fire marshal to confirm applicable codes, permit requirements, and inspection procedures. These offices provide the definitive rules that supersede generic guides and manufacturer instructions.
Additional contacts include municipal permitting offices, county code enforcement, and state plumbing or gas safety divisions. Online portals, phone hotlines, and local inspector directories offer permit applications, fee schedules, and inspection booking.
Helpful manufacturer manuals and model-specific hookup notes
Because grill models vary in connections, pressure requirements, and safety features, consulting the manufacturer’s installation manual and any model-specific hookup notes is essential for a correct and safe gas connection.
Manuals provide torque specs, regulator settings, and venting guidance. Model notes highlight unique fittings or adapter needs.
- Exact torque and sealant recommendations
- Approved hose/regulator types
- Pressure and BTU limits
- Warranty and service instructions
Recommended products and brands for fittings, regulators, and detectors
When selecting fittings, regulators, and gas detectors for a grill hookup, prioritize components that meet recognized safety standards, are compatible with the grill’s fuel type and pressure, and carry clear manufacturer support.
Certified brands and model-specific parts reduce installation errors and simplify service or warranty claims.
Recommended examples include quality-certified hose assemblies, LP/NG regulators, combination leak detectors, and inline shutoff valves.
- Anderson Metals hose assemblies
- Honeywell gas detectors
- Maxitrol and Fisher regulators
- Apollo and Brass Craft fittings
Conclusion
Warmth gathers as a new connection hums to life, the bright flame a careful promise against the night. With fittings snugged like practiced hands and tests completed, the grill stands ready — a small constellation of safety and skill. Routine inspections and steady maintenance keep that promise steady, while the wisdom to call a pro remains the steady anchor. In this way, backyard gatherings become both reliable ritual and quiet assurance, glowing under watchful care.