How to Flush a Rheem Water Heater: Step-by-Step Guide to Remove Sediment Safely
Flushing a Rheem water heater is essential for removing sediment buildup that can reduce efficiency and lifespan. To do this safely, start by turning off the power or gas and allowing the tank to cool. Next, attach a garden hose to the drain valve, directing the discharge to a safe location. Open the valve slowly and drain several gallons until the water runs clear. Briefly open the cold-water inlet to help dislodge any remaining particles, then close the valve, refill the tank, purge any trapped air, and restore power or gas. For more detailed steps, safety tips, and troubleshooting guidance, continue reading.
What It Means to Flush a Rheem Water Heater and Why It Matters
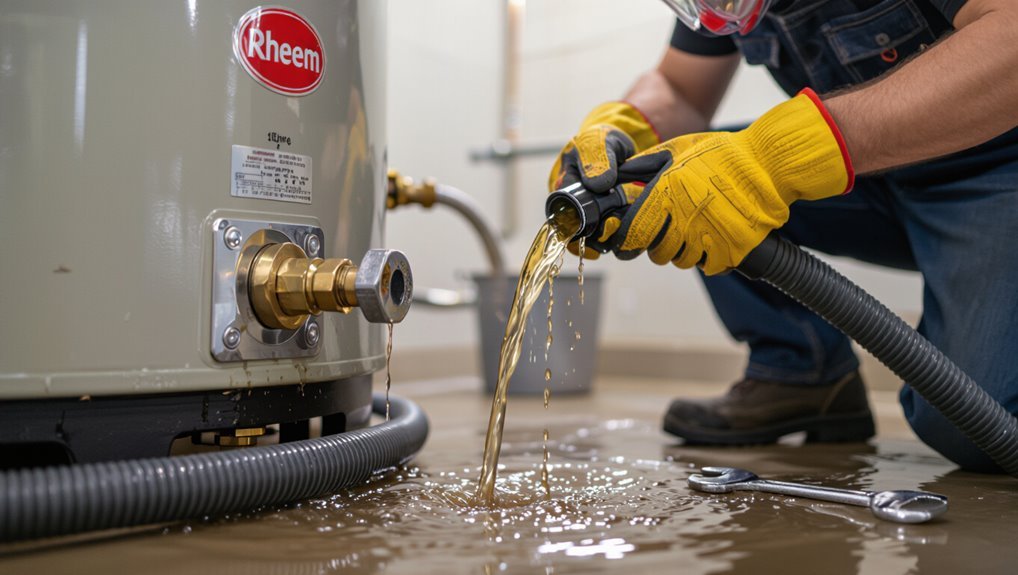
Flushing a Rheem tank-style water heater means removing accumulated sediment that settles at the bottom of the tank.
If left unaddressed, sediment reduces heating efficiency, causes banging or popping noises, and can lead to premature component or tank failure.
Regular flushing restores efficiency, reduces energy use, extends the heater’s service life, and improves hot water quality and availability.
How sediment builds up in tank-style Rheem water heaters
When hard water or mineral-rich supply enters a tank-style Rheem water heater, dissolved solids precipitate and settle to the bottom over time, forming layers of sediment that reduce heat transfer, trap corrosion-causing moisture, and shorten component life.
Sediment accumulates from minerals, sand, and scale, concentrating in low-flow zones. Regular maintenance, including how to flush Rheem water heater procedures, dislodges and removes buildup.
Risks of not flushing (efficiency loss, noise, premature failure)
Sediment left in a Rheem tank gradually compromises performance and lifespan: accumulated minerals insulate the burner or heating element, forcing longer run times and higher energy use, while abrasive particles create rumbling or popping noises as trapped water flashes to steam.
Over time, deposits corrode components, clog valves and dip tubes, reduce hot water capacity, and increase risk of premature thermostat or tank failure requiring costly repairs or replacement.
Benefits of regular flushing (energy savings, longer lifespan, better hot water)
Regularly flushing a Rheem water heater removes accumulated mineral and sediment buildup, restoring heat transfer efficiency and reducing energy consumption.
Routine maintenance prolongs tank and component life, preventing corrosion and element failure. It guarantees consistent hot water delivery, reduces recovery time, and minimizes noisy operation.
Homeowners save on utility bills and repair costs while maintaining system reliability and peak performance over years.
Safety Precautions Before You Begin
Before starting the flush, the reader should confirm they have the necessary tools and materials on hand and wear appropriate personal protective equipment.
Clear safety tips include shutting off power or gas and allowing the unit to cool before opening any valves.
If the heater shows signs of major corrosion, leaks, or complex plumbing, a qualified professional should be contacted rather than attempting a DIY repair.
Tools and materials needed
A few basic tools and safety items are required to flush a Rheem water heater safely and effectively.
Essential tools and materials include items for draining, disconnecting, and inspecting the tank.
Recommended list:
- Garden hose (to drain to a safe location)
- Bucket (for small spills)
- Adjustable wrench (for valves/fittings)
- Screwdriver and flashlight (for access and inspection)
Personal protective equipment and safety tips
Proper protective gear and careful procedures reduce the risk of burns, electrical shock, and slipping when flushing a Rheem water heater.
Wear heat-resistant gloves, safety goggles, long sleeves, and closed-toe footwear.
Verify power and gas are off, allow cooling, and ventilate the area.
Use a sturdy hose with secure connections, clear work space, and keep a fire extinguisher and first-aid kit nearby.
When to call a professional instead of DIY
When should a homeowner call a professional instead of attempting to flush a Rheem water heater themselves?
A professional is advised if the unit shows leaks, corroded connections, faulty pressure relief valve, gas or electrical issues, unclear shutoffs, or past repair history.
Also call if uncomfortable with plumbing tools, confined spaces, or unsure about local codes; a technician guarantees safe, code-compliant service.
How to Prepare the Rheem Water Heater for Flushing
Before flushing, the unit’s energy must be disabled—electrical models should be switched off at the breaker and gas models turned to the pilot position.
The cold-water supply should be shut off, the drain valve located, and the relief valve closed while a hose is attached to a suitable drain.
Finally, water temperature and pressure should be checked to verify they are within safe limits before proceeding.
Turn off power or gas supply (electric vs gas models)
Although shutting off power or gas may seem straightforward, identifying the correct supply and confirming it is fully disconnected are essential safety steps before flushing a Rheem water heater.
For electric units, switch off the dedicated breaker at the panel and verify with a non-contact voltage tester.
For gas models, turn the gas control knob to “off” and, if uncertain, shut the home’s gas supply and consult a professional.
Turn off cold-water supply and locate drain valve
Shut off the cold-water supply at the shutoff valve to stop incoming water and relieve pressure in the tank; on most Rheem heaters this valve is a lever or wheel located on the pipe entering the top of the unit.
Then identify the brass drain valve near the tank base, clear surrounding debris, and guarantee access for a garden hose to direct water to a safe drain location.
Shut off the relief valve and prepare a hose and drain location
With the cold-water inlet secured and the tank’s drain valve cleared, attention turns to the temperature-pressure (T&P) relief valve and arranging a hose and safe discharge point.
Close the T&P lever gently to prevent accidental release.
Attach a suitable, heat-rated hose to the drain spout, route it to a nearby floor drain or outside area clear of people and landscaping, and secure connections.
Confirm water temperature and pressure are safe
Before beginning the flush, verify that the tank’s water temperature and pressure are within safe limits to prevent scalding or a pressurized discharge.
Check the thermostat setting and let water cool if above 120°F.
Inspect the pressure gauge or house gauge; typical safe pressure is 40–60 psi.
Reduce pressure via the main shutoff if necessary and wait until temperatures stabilize before proceeding.
Step-by-Step Guide to Flush a Rheem Water Heater
The guide proceeds through five clear steps to flush the Rheem water heater: attach a hose and open the drain valve, drain a few gallons to remove loose sediment, then briefly open the cold-water supply to agitate remaining particles.
The process of repeating draining and flushing continues until the outflow runs clear.
Finally, the drain valve is closed, the tank refilled, and power or gas service is restored.
Step 1 Attach hose and open drain valve
A garden hose is connected to the water heater’s drain fitting and run to a safe discharge point such as a floor drain, driveway, or bucket outside.
Once secure, the drain valve is opened slowly to allow water and sediment to flow out without splashing.
The technician confirms the hose is tight, checks for leaks, and positions the end downhill or clear of footpaths before proceeding.
Step 2 Drain a few gallons to remove loose sediment
Open the drain valve enough to let several gallons flow out, allowing loosened sediment to exit while keeping the flow controlled.
Observe discharge for grit and discoloration; stop once water runs clearer.
Maintain a safe distance and avoid inhaling fumes.
Close valve partially if flow is too strong.
Record volume drained to estimate remaining sediment before proceeding to the next step.
Step 3 Open cold-water supply briefly to agitate sediment
After fresh water has cleared from the drain and sediment reduction is noted, briefly turning the cold-water supply creates a surge that agitates remaining deposits on the tank bottom.
The operator opens the cold inlet for 3–10 seconds, then closes it to let loosened particles settle toward the drain.
Repeat brief pulses as needed, avoiding continuous full flow.
Step 4 Repeat draining and flushing until water runs clear
Proceed to drain and flush repeatedly until the discharge runs clear, signaling that most loose sediment has been removed.
Continue cycles of opening the drain valve, briefly running the cold-water supply to stir remaining particles, then draining again.
Monitor clarity and temperature; repeat as needed.
Stop when outflow appears consistently clear, indicating effective sediment removal while avoiding overagitation or unnecessary water waste.
Step 5 Close drain valve, refill tank, and restore power or gas
With the drain valve closed and the hose removed, refill the tank by turning the cold-water supply back on and watching a nearby hot faucet until a steady stream of water (and no sputtering) confirms the tank is full and air has been purged.
Then restore electrical power at the breaker or relight the gas pilot following manufacturer instructions, allowing the heater to resume normal operation.
Step 6 Check for leaks and proper operation after restart
Inspect the heater and surrounding plumbing for any signs of leaking, corrosion, or loose fittings immediately after restoring power or relighting the pilot.
Confirm the pressure relief valve seats and does not drip. Monitor for stable water temperature and normal burner or element cycling.
Recheck connections after first hot-water draw. Address any leaks or abnormal sounds promptly to prevent damage and guarantee safe operation.
Detailed Steps for Electric vs Gas Rheem Models
The procedure for flushing a Rheem water heater varies between electric and gas models due to their different components and safety needs.
For electric units, the homeowner must first switch off the appropriate breakers and consider the upper and lower heating elements when draining and flushing.
For gas units, attention to the pilot light and proper gas valve shutoff and relighting procedures is required.
Additional steps for electric Rheem heaters (switching off breakers, upper/lower elements)
Before draining an electric Rheem water heater, power must be cut at the breaker and both thermostat-controlled heating elements treated separately: the upper element is de-energized when its breaker is off, but the lower element can remain hot if wiring uses staggered thermostats.
So each element’s breaker or disconnect should be identified and switched off to prevent burns and equipment damage during flushing.
After power off, confirm with a voltage tester, then proceed.
Additional steps for gas Rheem heaters (pilot light, gas valve procedures)
For gas Rheem water heaters, the shutdown procedure differs from electric models and requires attention to the pilot light and gas supply.
The technician should turn the gas control to “pilot,” extinguish the pilot if instructed, or shut the gas valve fully.
Wait for cooling, then proceed with draining.
Relight the pilot following manufacturer steps after flushing and refilling, checking for leaks.
Troubleshooting Common Problems During Flushing
When flushing a Rheem water heater, common issues include stubborn sediment that resists removal, leaking drain valves or loose fittings, lack of water flow from the drain, and new or persistent noises after the procedure.
The following section outlines quick checks and remedies for each symptom. Readers are encouraged to follow safety precautions and consult a professional if problems persist.
Stubborn sediment that won’t flush out
Persistent sediment that resists flushing can indicate compacted mineral buildup, corrosion products, or trapped debris lodged in the tank or dip tube passages.
The technician should try alternating hot and cold water to agitate deposits, use a garden hose with higher flow or a wet/dry vacuum at the drain, and consider gentle mechanical agitation through the anode access before repeating flushing cycles.
Leaking drain valve or fittings
Inspect the drain valve and nearby fittings immediately if water is observed leaking during a flush, since even small drips can worsen and lead to larger spills or rust.
Tighten loose fittings with appropriate tools, replace damaged washers or a corroded valve, and use thread sealant or plumber’s tape on threaded connections.
If leakage persists, shut off water and consult a qualified technician.
No water flow from drain valve
If the drain valve fails to deliver water during a flush, the issue typically stems from a closed supply, a clogged valve or hose, or trapped air in the line.
Verify the cold-water supply shutoff is open, open the pressure-relief briefly to release air, inspect and clear the hose and valve screen, and replace a faulty valve if flow remains obstructed.
Strange noises after flushing
Expect occasional popping, rumbling, or hissing after a flush; these noises usually indicate trapped air, sediment shifting, or rapid temperature changes inside the tank rather than immediate mechanical failure.
Allow the unit to stabilize, bleed air via a hot faucet, and recheck drain valve seating.
Persistent loud banging, metallic clanks, or steaming sounds warrant professional inspection to rule out element failure, excessive sediment, or pressure issues.
Maintenance Schedule and Best Practices
A clear maintenance schedule helps prevent sediment buildup and prolongs tank life, with flushing recommended annually for soft water and every three to six months where hardness or heavy use is present.
Homeowners should monitor signs of sediment such as reduced hot-water flow, rumbling noises, discolored water, or fluctuating temperatures.
Complementary tasks include inspecting the anode rod for corrosion and testing the TPR valve during routine service.
Recommended flushing frequency by water hardness and usage
Regularly adjusting flushing frequency according to water hardness and household usage helps preserve Rheem water heater efficiency and extend its lifespan.
Recommendations vary by conditions: hard water and high use require more frequent service; soft water and low use permit longer intervals.
Typical guidance follows:
- Hard water/high usage: every 3–6 months.
- Moderate conditions: every 6–12 months.
- Soft water/low usage: annually.
- Vacation homes: every 12–24 months.
How to monitor sediment buildup (signs to watch for)
When sediment begins to accumulate in a Rheem water heater, subtle changes in performance and sound offer the earliest clues; homeowners should watch for reduced hot-water flow, slower recovery times, and rumbling or popping noises from the tank.
Other indicators include fluctuating water temperature during use, discolored or gritty water at faucets, and higher energy bills—track these signs to schedule timely flushing.
Complementary maintenance tasks (anode rod inspection, TPR valve check)
Inspect complementary components like the anode rod and TPR (temperature-pressure-relief) valve at scheduled intervals to extend tank life and guarantee safe operation.
Check the anode rod for heavy corrosion or depletion; replace if more than 50% consumed.
Test the TPR valve by lifting the lever to confirm discharge and reseating.
Record inspections, perform replacements promptly, and follow manufacturer specifications.
When to Replace Parts or the Entire Rheem Water Heater
Signs such as a heavily corroded anode rod, a leaking or clogged drain valve, or persistent sediment buildup indicate individual parts may need replacement.
If regular flushing fails to restore heating efficiency or water quality, the tank’s overall condition should be evaluated for possible replacement.
Homeowners should weigh repair costs against the price and benefits of replacing or upgrading the Rheem unit to determine the most economical option.
Signs the anode rod or drain valve needs replacement
How can a homeowner tell if the anode rod or drain valve is failing?
Visible corrosion, a heavily pitted or shortened anode rod, rotten-egg odor, or accelerated tank rust indicate anode depletion.
A drain valve that leaks after closing, feels stiff, is clogged with sediment, or sprays while draining signals replacement.
Promptly replacing either reduces corrosion and guarantees effective flushing and drainage.
When flushing no longer improves performance
Recognize that persistent issues after repeated flushes indicate deeper problems beyond routine maintenance.
If water remains cloudy, heating is inconsistent, noises persist, or leaks recur, internal corrosion, a failed heating element, or tank breach may be present.
At that stage, replacement of components or the entire Rheem unit is warranted.
Consult a qualified technician to diagnose extent and recommend safe, compliant action.
Cost vs. benefit: repair, replace, or upgrade
Evaluate the economics of repair versus replacement by weighing repair costs, remaining service life, energy efficiency, and safety risks.
If repair expenses approach half the cost of a new unit or recurring issues persist, replacement is prudent.
Factor in improved efficiency, warranties, and potential rebates for newer Rheem models.
Replace immediately if corrosion, tank leaks, or compromised safety controls are evident.
Quick Reference Checklist for Flushing a Rheem Water Heater
A concise checklist summarizes the essential steps and safety checks for flushing a Rheem water heater, providing a quick-reference guide to save time and prevent common mistakes.
Follow these concise, safety-focused actions before, during, and after flushing:
- Turn off power/gas and cold-water supply.
- Attach hose and open drain valve to flush until clear.
- Close drain, refill, purge air, restore power/gas.
- Inspect for leaks and proper operation.
Comparison Table of DIY Flushing vs Professional Service
Many homeowners weigh the choice between DIY flushing and hiring a professional by comparing cost, time, skill level, equipment, and risk; a concise table highlights these factors side-by-side to clarify trade-offs and help decide which option best fits individual needs and circumstances.
| DIY | Professional |
|---|---|
| Lower cost, variable time | Higher cost, faster overall |
| Requires moderate skill, basic tools | Requires expertise, specialized tools |
| Moderate risk if inexperienced | Low risk, warranty/insurance |
Conclusion
Flushing a Rheem water heater removes damaging sediment, prolongs service life, and improves efficiency. After observing safety steps and following model-specific instructions, most owners can perform this maintenance themselves; however, complex issues or aging units may warrant professional attention. Who wants to risk reduced performance or premature failure when a regular flush can prevent both? Routine checks, timely part replacements, and adherence to best practices will keep the heater reliable and efficient.