Quick DIY Guide: How to Fix a Copper Pipe Leak Fast and Easy
Quick Fix for Copper Pipe Leaks: A Step-by-Step Guide
If you have a copper pipe leak, act quickly to minimize water damage. Here’s how to fix it fast and easy:
1. Stop the Flow: Immediately shut the nearest valve, open a faucet to relieve pressure, and remove any valuables from the area.
2. Identify the Leak: Determine whether the leak is a pinhole, seam, or joint issue. Also, check for nearby electrical hazards to ensure safety.
3. Choose a Temporary Fix:
- For small pinholes, use epoxy putty or a rubber patch secured with a hose clamp.
- For accessible sections, consider using push-fit couplers or a sweat replacement for a more permanent solution.
4. When to Call a Professional: If you are unsure about the repair or if there is extensive corrosion, it’s best to call a professional plumber for assistance.
By following these steps, you can effectively address a copper pipe leak and prevent further damage.
Stop the Leak Fast: Immediate Steps to Take First
At the first sign of a copper pipe leak, the quickest priorities are to stop the water source and limit damage: shut off the main water valve, open nearby faucets to relieve pressure, and move valuables and electronics away from the affected area.
The person assesses visible flow and collects towels or buckets to contain runoff.
They inspect surroundings for electrical hazards and avoid standing water near outlets.
Temporary measures include wrapping the leak with rubber and hose clamps or applying epoxy putty to small pinholes.
They document the damage with photos and call a qualified plumber if the leak persists or is sizable.
How to Shut Off Your Water Quickly and Safely
After stopping visible flow and containing runoff, the next immediate action is to turn off the water supply to prevent further damage. Locate the nearest shutoff valve: a local stop valve under sinks, a hose bib, or the house shutoff at the meter. Turn the valve clockwise until fully closed; use pliers gently if stiff.
For multi-unit systems, notify neighbors or building management before isolating mains. If valves leak or won’t move, stop and call a professional. After closing, open a nearby faucet to relieve pressure and verify flow has stopped before proceeding with repairs.
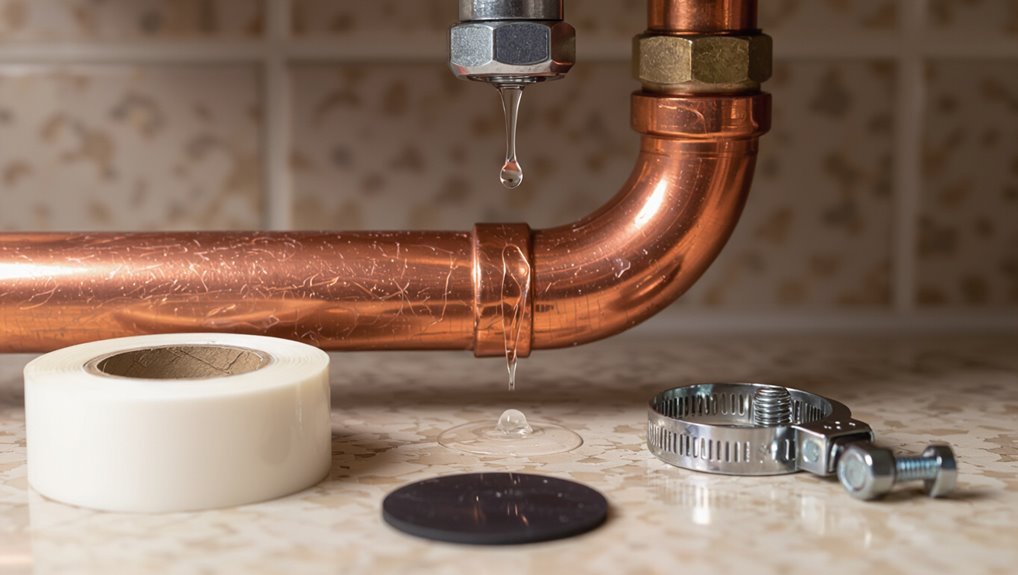
Assess the Leak: Type, Location, and Severity
With the water shut off and the area stabilized, inspect the pipe to determine leak type, exact location, and severity.
Note whether the leak is a pinhole, hairline crack, seam split, or joint failure.
Identify if corrosion, mechanical damage, or frozen burst caused it.
Trace wetness to the highest point of seepage to find the origin; dry surrounding areas and use a cloth to reveal slow weeps.
Assess flow rate—dripping, steady stream, or spray—and estimate pressure impact.
Check accessibility for repair tools or clamps, and evaluate nearby insulation, wiring, or finishes that could complicate work.
Should You DIY or Call a Plumber? Quick Decision Checklist
Decide quickly whether the leak falls within typical DIY scope by matching observed conditions against a short checklist: small pinhole leaks in accessible, non-pressurized sections, obvious corroded joints that only need replacement, or leaks that respond to a temporary clamp often suit a competent DIYer; large ruptures, leaks near electrical wiring, concealed pipes in walls or ceilings, signs of extensive corrosion, high-pressure sprays, or any uncertainty about shutoffs, fittings, or codes warrant calling a licensed plumber.
If checklist items favor DIY, confirm water and power shutoff, plan safe access, and proceed only with confident skill. Otherwise contact a professional promptly.
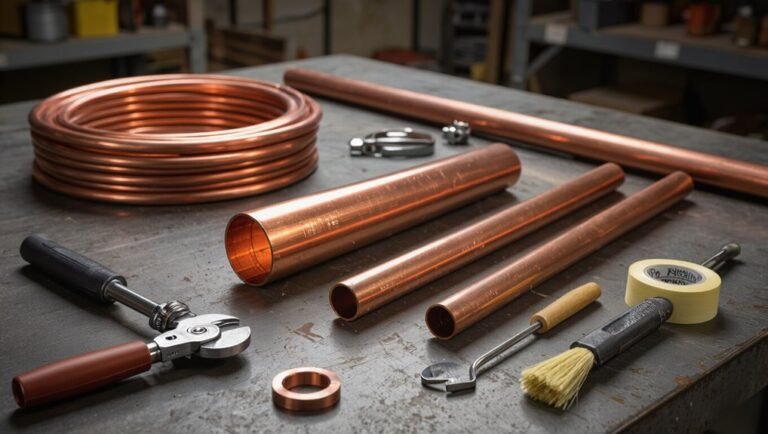
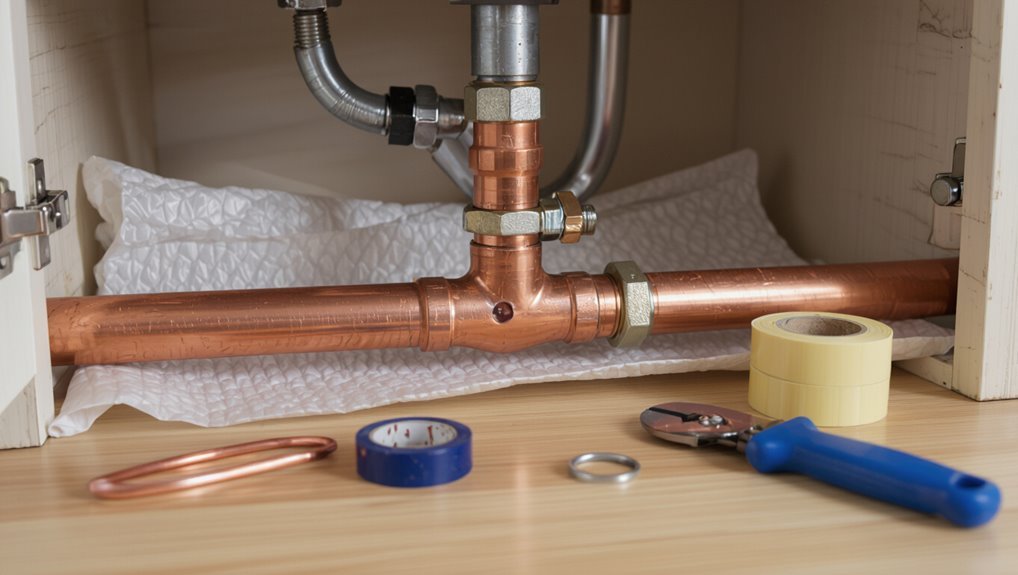
Tools for Copper‑Pipe Repairs (Emergency Kit)
For emergency copper‑pipe repairs, a compact kit should contain only the items needed to stop leaks temporarily and enable a safe, orderly permanent repair: adjustable wrench, slip‑joint pliers, tube cutter, emery cloth or sandpaper, flux and lead‑free solder (or a solderless repair coupling), a propane or butane torch with a snuffer, pipe repair clamps or rubber-lined saddle clamps, epoxy putty rated for potable water, PTFE tape, a torch‑safe fire blanket, work gloves, safety glasses, and a small flashlight.
Additional useful items include a hand towel, a small bucket, marker, measuring tape, replacement coupling or cap, and spare batteries for the flashlight.
How to Dry and Clean a Copper Pipe Before Repair
Before any repair work begins, the pipe should be thoroughly dried to remove surface moisture that prevents proper adhesion or soldering.
Once dry, the affected area is cleaned with an abrasive pad or sandpaper to remove oxidation and expose bright copper.
Proper drying and abrasive cleaning guarantee a sound surface for sealing or soldering.
Remove Surface Moisture
Once the water supply is shut off and the immediate leak addressed, the pipe surface must be completely dry and clean to guarantee any repair material will adhere properly.
A towel or absorbent cloth removes pooled water; cotton swabs reach seams. Compressed air or a hair dryer speeds evaporation; avoid heat that could damage fittings. Rubbing alcohol or acetone on a lint-free cloth removes oils and residue, then allow full evaporation. Inspect with a flashlight for remaining damp spots before applying patches or solder.
- Blot visible water with a clean towel
- Use cotton swabs for crevices
- Apply low heat or compressed air
- Wipe with alcohol
- Visually confirm dryness
Clean With Abrasive
After the pipe is dry and free of oil or debris, the next step is to abrade the copper to create a clean, roughened surface that promotes bonding.
Using fine-grit sandpaper, a Scotch-Brite pad, or emery cloth, the surface is scuffed evenly until the natural copper color appears.
Corrosion and green patina must be removed.
Abrasion should extend slightly beyond the repair area to guarantee adhesion.
After scuffing, dust and particles are brushed away and wiped with a lint-free cloth; a solvent like isopropyl alcohol can be used to remove residues.
Allow the metal to air completely before applying repair materials.
Fix Pinhole Leaks With Epoxy Putty
For small pinhole leaks in copper pipes, epoxy putty provides a quick, reliable temporary repair by forming a solid, watertight patch that bonds to clean metal.
The surface must be dry and free of corrosion; sandpaper or a wire brush removes scale.
Knead the putty until uniform, press firmly over the hole, and shape to overlap surrounding pipe.
Cure time varies—consult manufacturer instructions—and avoid pressurizing until fully set.
Epoxy is suitable for small defects and short-term fixes; plan for a permanent repair if corrosion continues.
- Clean and dry the area thoroughly
- Remove corrosion with abrasive
- Mix putty to consistent color
- Press and smooth firmly
- Allow full cure before testing
Use a Pipe Repair Clamp for Medium Leaks
For medium leaks, a pipe repair clamp provides a secure, mechanical seal and is available in various types and sizes to match pipe diameter and pressure rating.
Selection should consider clamp material, gasket type, and whether a single-band or split-clamp design is required.
Installation generally involves shutting off water, positioning the gasket over the leak, tightening the clamp evenly, and testing for leaks.
Clamp Types And Sizes
A variety of pipe repair clamps are available to address medium leaks, each designed for specific pipe diameters, materials, and pressure ratings. Selection depends on pipe outer diameter, wall thickness, and fluid pressure. Stainless steel bands suit corrosion-prone environments; rubber-saddled clamps cushion copper without scoring.
Single-bolt clamps offer quick fitting; two-bolt models provide higher seal reliability. Oversized clamps with interchangeable inserts accommodate irregular or slightly flattened sections. Compatibility charts and pressure ratings guide proper choice; choosing the correct size avoids slippage and secondary damage.
- Single-bolt stainless clamp
- Two-bolt heavy-duty clamp
- Rubber-saddled repair clamp
- Split-sleeve insert clamp
- Oversized adjustable clamp
Installation Step Overview
Before starting work, make sure the water supply is isolated and system pressure is relieved so the clamp can be installed safely and effectively.
The installer inspects the leak area, cleans and dries the pipe, and selects a clamp matching pipe diameter and leak severity.
Positioning centers the gasket over the hole; bolts align with clamp flanges.
Tighten evenly, alternating sides to compress the gasket uniformly, avoiding overtightening that could deform the pipe.
After installation, restore supply gradually and check for seepage.
Recheck torque after thermal cycling.
Document repair location and consider permanent replacement if corrosion or multiple leaks persist.
How to Solder a Copper Pipe Joint
When preparing to solder a copper pipe joint, the technician makes certain the surfaces are clean, properly fitted, and flux applied to guarantee a secure, leak-free connection.
Heat is applied evenly with a torch until flux sizzles; solder is fed to the joint, melting by the heated copper, not directly from the flame.
Once solder flows around the seam, the flame is removed and the joint cools undisturbed.
Excess flux is wiped away and the connection is inspected for gaps.
After cooling, the system is pressure-tested for leaks before restoring service.
- Clean pipe and fitting
- Proper fit and alignment
- Apply appropriate flux
- Heat evenly
- Feed solder until capillary flow
Cut Out and Replace a Damaged Copper Section
Having completed and tested soldered joints, the technician locates the damaged copper segment to be removed and replaced.
Water is shut off and remaining water drained; a towel and bucket catch drips.
Using a pipe cutter, straight cuts are made on either side of corrosion or the split, leaving enough length for fittings.
Burrs are deburred and edges cleaned with emery cloth.
A replacement piece of copper tubing is measured and cut to fit with minimal gap.
Flux is applied to mating surfaces, and either sweat fittings are soldered or compression fittings tightened to install the new section.
Test for leaks before finishing.
Use Push‑Fit (SharkBite) Fittings for Quick Replacements
For quick copper-pipe repairs, push-fit (SharkBite) fittings provide a reliable, solder-free alternative that slips onto clean pipe ends and seals instantly.
They simplify replacing short copper sections without tools beyond a cutter and deburring tool.
The user makes certain pipe is cut square, free of burrs, and fully inserted to the fitting’s depth mark.
Push-fit fittings suit temporary or permanent repairs, handle hot and cold water, and meet plumbing codes in many areas.
After installation, the system can be pressurized immediately.
Fitting removal requires the included release collar or removal tool for repositioning or replacement.
- Fast installation
- No soldering
- Reusable options
- Code-compliant often
- Handles hot/cold
Protect Insulation, Drywall & Flooring During Pipe Work
When repairing a copper pipe, care is taken to protect surrounding insulation from moisture and debris.
Workers also shield drywall with plastic sheeting or cardboard to prevent gouges and stains.
Flooring is covered with drop cloths or plywood to keep surfaces clean and undamaged during the job.
Protect Surrounding Insulation
Before cutting or soldering, the work area should be cleared and surfaces shielded to prevent heat, sparks, or water from damaging insulation, drywall, and flooring. The technician removes loose insulation, exposes only the pipe length needed, and keeps wet insulation away.
Heat shields and fireproof blankets cover nearby batts. Small openings are temporarily sealed to avoid dust and moisture migration. Any vapor barriers cut for access are patched after work.
After repairs, insulation is inspected and replaced where compressed or contaminated to restore thermal performance and prevent future moisture issues.
- Remove loose insulation
- Use heat shields
- Keep insulation dry
- Seal small openings
- Inspect and replace damaged insulation
Safeguard Drywall And Flooring
Alongside protecting insulation, drywall and flooring require careful shielding to prevent heat, debris, or water from causing cosmetic or structural damage during pipe work.
Work area is cleared; furniture and loose items are moved away. Floors are covered with layered rosin paper, cardboard, or waterproof drop cloths taped at seams. Drywall faces near the repair receive heat shields or fire‑retardant barriers; screw‑on access panels or removable sections preserve finishes. Plastic sheeting with zipper access contains dust and directs debris into a vacuum. Any water leaks are caught with trays and rags; affected drywall is dried promptly to prevent mold and warping.
Test Your Repair: Pressure, Leak Checks, and Timelines
After the repair is complete, the system should be tested under pressure to confirm the joint’s integrity.
The technician isolates the repaired section, restores water, then slowly reintroduces pressure while observing for leaks.
Allow time for seals or solder to settle; a short soak test followed by a monitored period gives confidence.
Document observations and note repair time and any residual dampness.
If leakage appears, depressurize before reworking.
- Gradually raise water pressure to full building pressure
- Inspect joints and surrounding areas for drips
- Perform a 30–60 minute soak test
- Recheck after 24 hours for slow leaks
- Record test results and timestamps
Prevent Copper‑Pipe Corrosion and Future Leaks
Reducing corrosion and preventing recurring leaks requires routine inspection, proper water chemistry, and correct installation practices. The homeowner should monitor for verdigris, pitting, or pinholes, flush systems periodically, and maintain pH and hardness within recommended ranges. Electrical grounding and bonding must be checked to prevent stray current corrosion. Use protective sleeves where dissimilar metals meet and apply appropriate pipe supports to avoid stress. Regularly replace sacrificial anodes in water heaters and address high-velocity conditions that accelerate erosion.
| Action | Benefit |
|---|---|
| Inspect quarterly | Early defect detection |
| Test water | Control corrosivity |
| Check grounding | Prevent electrolysis |
| Support pipes | Reduce stress |
| Sleeve joints | Avoid galvanic corrosion |
Choosing the Right Copper Pipe and Fittings
Selecting the correct copper pipe and fittings requires attention to pipe type and grade to assure suitable pressure and corrosion resistance.
The materials of fittings should match or be compatible with the pipe to prevent galvanic corrosion and leaks.
Proper sizing and consideration of soldered, threaded, or compression connections determine fit, ease of repair, and long‑term reliability.
Pipe Type And Grade
Choosing the correct copper pipe and fittings depends on planned use, water pressure, and local building codes. Types include Type K (thickest, mains), L (medium, general plumbing), and M (thinner, low-pressure interiors).
Soft vs. hard copper affects bending and joining methods. Temper designation (annealed vs. drawn) informs flexibility and soldering behavior.
Sizing follows nominal inches and wall thickness; higher pressure requires heavier grades. Inspect markings for ASTM or local approvals. Match pressure rating to system demands and consider corrosion resistance where water chemistry is aggressive.
- Type K for underground/mains
- Type L for residential supply
- Type M for light duty
- Soft for bending jobs
- Check ASTM markings
Matching Fitting Materials
After confirming the appropriate copper type and grade for a run, attention turns to matching fittings that will maintain pressure rating, corrosion resistance, and joint integrity.
Fittings should be of the same copper alloy (Type K, L, or M) or a compatible brass approved for potable water to prevent galvanic corrosion. Choose solder‑cup, brazed, or compression fittings compatible with the piping material and local code. Verify pressure and temperature ratings match the system. Use flux and solder designed for potable systems when sweat joints are required.
Avoid mixing dissimilar metals without dielectric unions or approved adaptor fittings.
Sizing And Compression Options
When determining pipe size and compression fittings, the installer evaluates flow requirements, pressure loss, and available space to match tubing diameter and fitting type to the system’s hydraulic and mechanical demands.
The choice balances nominal pipe size (1/2″, 3/4″), wall thickness (Type K, L, M), and expected pressure.
Compression fittings suit repairs and tight spaces; make certain proper ferrule seating and torque.
For longer runs, upsizing minimizes head loss.
Compatibility with valves and soldered sections prevents galvanic issues.
Proper measurement and testing after installation confirm leak-free service.
- Select correct nominal diameter
- Choose appropriate wall type
- Use quality ferrules
- Verify torque specs
- Pressure-test after install
Safe Soldering: Heat, Flame, and Fire‑Safety Rules
Preparing to solder a copper pipe requires strict attention to heat control, flame direction, and fire prevention to protect people and property.
The operator should clear combustible materials, use a fire-resistant pad, and keep a charged extinguisher nearby.
Use a properly sized torch tip and regulate flame to a focused, blue cone aimed away from fittings and insulation.
Heat evenly to avoid overheating flux or pipe damage.
Wear safety glasses, gloves, and avoid loose clothing.
Ventilate confined spaces and monitor for hot spots.
After soldering, inspect surroundings for smoldering, cool joints gradually, and store tools safely.
Fixing Leaks in Tight or Hard‑to‑Reach Spots
In confined spaces or behind fixtures, accessing a pinhole or joint requires compact tools, clear strategy, and patience.
The guide recommends choosing low-profile equipment — mini pipe cutter, stubby wrench, flexible tubing brush — and lighting with a headlamp.
Isolation of the section, draining, and confirming no pressure remain essential.
For repairs, consider epoxy putty, self-fusing silicone tape, or compression sleeves sized correctly.
When soldering is necessary, use a right-angle torch and heat shields.
If access prevents a lasting repair, plan for section replacement by a professional.
- Mini pipe cutter
- Stubby wrench
- Headlamp
- Self-fusing tape
- Epoxy putty
Estimate Cost and Time for Each Repair Method
Generally, estimates for copper pipe leak repairs break down into quick temporary fixes and more durable restorations, with cost and time varying by method, access, and materials on hand.
Temporary measures (epoxy putty, rubber patch with hose clamp) typically cost $5–$25 in materials and take 10–30 minutes to apply, holding until permanent repair.
Soldering or brazing a joint requires $10–$50 for solder, flux, and tip, plus 30–90 minutes depending on skill and prep.
Compression or push-fit fittings run $5–$30 and install in 10–30 minutes.
Section replacement with coupling or sweat repair may cost $15–$100 and take 30–120 minutes.
Common DIY Mistakes and How to Avoid Them
Common DIY errors when repairing copper pipes include overtightening fittings until the metal cracks, using incorrect soldering techniques that cause weak joints or overheating, and skipping essential prep like cleaning and fluxing the surfaces.
Each mistake increases the chance of leaks or costly rework. Recognizing these pitfalls early and following proper torque, soldering procedure, and preparation steps prevents most failures.
Overtightening And Cracking
Overtightening fittings or soldered joints often leads to hairline fractures in copper piping, turning a well-intended repair into a new leak.
A technician observing a cracked section will note stress concentrations where excess torque or force was applied.
Proper tightening follows manufacturer torque specs and uses appropriate tools to avoid deforming soft copper.
When compression rings or threaded couplings are snugged too hard, metal fatigues and micro-cracks propagate under pressure cycles.
Inspect for pinching marks and replace compromised sections.
Controlled, measured force and correct part selection prevent repeat failures and extend service life.
- Use calibrated wrenches
- Follow torque specs
- Avoid makeshift tools
- Replace damaged fittings
- Inspect after pressurizing
Wrong Soldering Technique
A technician who replaces an overtightened fitting may still encounter leaks if the soldering technique is poor; improper heat application, contaminated joints, or incorrect solder type produce weak bonds that fail under pressure.
The technician overheats or underheats, causing flux to burn away or solder not to flow, and joint cleanliness is neglected so oxidation prevents wetting.
Using leaded solder, plumbing-grade alloys, or skipping flux leads to unreliable seals.
Proper flame control, even heat distribution, and correct filler selection guarantee capillary action fills the joint.
Testing under modest pressure and inspecting for smooth, continuous fillets confirms a successful soldered connection.
Ignoring Proper Preparation
Before any torch is struck or fittings tightened, thorough surface preparation determines whether a repair will hold or fail. Ignoring cleaning, deburring, flux application, and proper fit leads to leaks, weak joints, and repeated work. A detached observer notes that shortcuts—skipping sandpaper, leaving oxidation, or neglecting alignment—create failures often blamed on materials rather than technique.
Proper prep saves time and materials: clean with emery cloth, remove burrs, degrease, apply correct flux evenly, and dry surfaces fully. Following steps prevents cold joints and future leaks, yielding durable soldered connections and fewer callbacks for emergency fixes.
- Clean with emery cloth
- Remove burrs and sharp edges
- Degrease and dry surfaces
- Apply correct flux evenly
- Make certain proper alignment before soldering
When to Schedule Professional Follow‑Up and What to Ask
Some situations warrant scheduling a professional follow‑up promptly: persistent dripping after a DIY repair, visible corrosion or cracking in the surrounding piping, recurring pressure changes, or evidence of water damage such as staining or mold.
A plumber can assess hidden damage, test system pressure, and determine whether soldered joints, replacement sections, or a reroute is needed.
When scheduling, request inspection of adjacent fittings, leak tracing, and a written estimate with materials, labor, and warranty details. Ask about permit requirements, expected timeline, and preventative recommendations.
Prioritize licensed contractors with liability insurance and clear references for copper plumbing work.
Conclusion
When a homeowner stops the water, evaluates the copper pipe’s location and leak type, and uses the right tools or a temporary clamp, immediate damage is minimized and repair options become clear. One striking statistic: plumbing leaks waste roughly 1 trillion gallons of water annually in the U.S., underscoring why quick, informed action matters. If uncertainty or high pressure persists, calling a licensed plumber guarantees a lasting fix and avoids costlier damage later.